Correction
Page 1
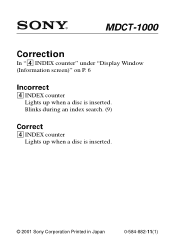
Blinks during an index search. (9) Correct 4 INDEX counter Lights up when a disc is inserted. © 2001 Sony Corporation Printed in Japan 0-584-882-11(1) MDC T -1000 Correction In "4 INDEX counter" under "Display Window (Information screen)" on P. 6 Incorrect 4 INDEX counter Lights up when a disc is inserted.
Blinks during an index search. (9) Correct 4 INDEX counter Lights up when a disc is inserted. © 2001 Sony Corporation Printed in Japan 0-584-882-11(1) MDC T -1000 Correction In "4 INDEX counter" under "Display Window (Information screen)" on P. 6 Incorrect 4 INDEX counter Lights up when a disc is inserted.
Operating Instructions
Page 1
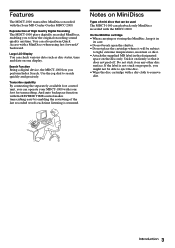
3-230-570-12(1) MD Confer-Transcriber Operating Instructions MDCT-1000 2001 Sony Corporation Introduction 1
3-230-570-12(1) MD Confer-Transcriber Operating Instructions MDCT-1000 2001 Sony Corporation Introduction 1
Operating Instructions
Page 2
... should be required to qualified personnel only. Refer servicing to correct the interference at his own expense. Owner's Record The model and serial numbers are located on MiniDiscs 3 Location and Function of Controls 4 Setting Up Connection 7 Operations Playback 8 Switching the Display 10 Transcribing 11 Additional Information Precautions 15 Maintenance 15 Troubleshooting Guide 16 Error and Caution messages 17 Specifications 18 2 Introduction Record the serial number in cabinet. To avoid electrical shock, do not...
... should be required to qualified personnel only. Refer servicing to correct the interference at his own expense. Owner's Record The model and serial numbers are located on MiniDiscs 3 Location and Function of Controls 4 Setting Up Connection 7 Operations Playback 8 Switching the Display 10 Transcribing 11 Additional Information Precautions 15 Maintenance 15 Troubleshooting Guide 16 Error and Caution messages 17 Specifications 18 2 Introduction Record the serial number in cabinet. To avoid electrical shock, do not...
Operating Instructions
Page 3
And auto backspace function with the REVERSE TIME control makes transcribing easy by enabling the reviewing of the last recorded words each time listening is not stuck on properly, you can also perform Quick Access with a MiniDiscs when using fast forward/ backward. If the label is resumed. You can operate your MDCT-1000 with a dry cloth to light, extreme temperatures, moisture or dust. • Attach the supplied MD label...
And auto backspace function with the REVERSE TIME control makes transcribing easy by enabling the reviewing of the last recorded words each time listening is not stuck on properly, you can also perform Quick Access with a MiniDiscs when using fast forward/ backward. If the label is resumed. You can operate your MDCT-1000 with a dry cloth to light, extreme temperatures, moisture or dust. • Attach the supplied MD label...

Operating Instructions
Page 4
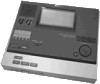
Location and Function of Controls For details, refer to the pages indicated in ( ). 1 LCD display 2 Built-in speaker 3 MONITOR VOL control 4 LCD CONTRAST control Adjusts the contrast of the display. 5 MONITOR select buttons (ALL/1/2/3/4) (8) 6 STANDBY switch 7 MD insertion slot 8 Z EJECT button 9 FUNCTION button q; DISP MODE button (10) qa Arrow buttons qs ENTER button qd Jog dial qf x STOP button qg m REW/BS button qh u PLAY/PAUSE button qj M FF/FS button 4 Introduction
Location and Function of Controls For details, refer to the pages indicated in ( ). 1 LCD display 2 Built-in speaker 3 MONITOR VOL control 4 LCD CONTRAST control Adjusts the contrast of the display. 5 MONITOR select buttons (ALL/1/2/3/4) (8) 6 STANDBY switch 7 MD insertion slot 8 Z EJECT button 9 FUNCTION button q; DISP MODE button (10) qa Arrow buttons qs ENTER button qd Jog dial qf x STOP button qg m REW/BS button qh u PLAY/PAUSE button qj M FF/FS button 4 Introduction
Operating Instructions
Page 6
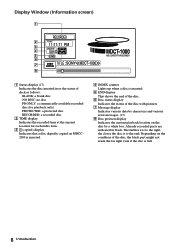
... it is to the end. Display Window (Information screen) 1 2 3 4 5 6 7 8 1 Status display (17) Indicates the disc inserted in black. Already recorded parts are indicated in or the status of deck as follows: BLANK: a blank disc NO DISC: no disc PB ONLY: a commercially available recorded disc (for playback only) PROTECTED: a protected disc RECORDED: a recorded disc 2 TIME display Indicates the recorded time at the current location for...
... it is to the end. Display Window (Information screen) 1 2 3 4 5 6 7 8 1 Status display (17) Indicates the disc inserted in black. Already recorded parts are indicated in or the status of deck as follows: BLANK: a blank disc NO DISC: no disc PB ONLY: a commercially available recorded disc (for playback only) PROTECTED: a protected disc RECORDED: a recorded disc 2 TIME display Indicates the recorded time at the current location for...

Operating Instructions
Page 7
Setting Up 7 Put the cord of the AC power adaptor in the groove on the AC power adaptor Use only the AC power adaptor supplied. Do not use any other AC power adaptor. 1 Plug in the AC power cord to a wall outlet. to a wall outlet AC power cord (supplied) Rear AC power adaptor (supplied) to DC IN 12 V Note on the bottom of the plug 2 Connect the AC power cord to the AC power adaptor firmly and plug in the supplied AC power adapter to the AC power adaptor firmly. Connection Connect the AC power cord to the DC IN 12V jack. Porarity of the unit.
Setting Up 7 Put the cord of the AC power adaptor in the groove on the AC power adaptor Use only the AC power adaptor supplied. Do not use any other AC power adaptor. 1 Plug in the AC power cord to a wall outlet. to a wall outlet AC power cord (supplied) Rear AC power adaptor (supplied) to DC IN 12 V Note on the bottom of the plug 2 Connect the AC power cord to the AC power adaptor firmly and plug in the supplied AC power adapter to the AC power adaptor firmly. Connection Connect the AC power cord to the DC IN 12V jack. Porarity of the unit.
Operating Instructions
Page 8
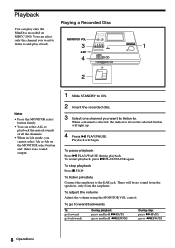
... STANDBY to ON. 2 Insert the recorded disc. 3 Select one channel you want to listen to. To go forward/backwards To: go forward go backwards During playback: press and hold MFF/FS press and hold mREW/BS During stop playback Press x STOP. To stop : press MFF/FS press mREW/BS 8 Operations To pause playback Press u PLAY/PAUSE during playback. To restart playback, press u PLAY/PAUSE again. You can select only...
... STANDBY to ON. 2 Insert the recorded disc. 3 Select one channel you want to listen to. To go forward/backwards To: go forward go backwards During playback: press and hold MFF/FS press and hold mREW/BS During stop playback Press x STOP. To stop : press MFF/FS press mREW/BS 8 Operations To pause playback Press u PLAY/PAUSE during playback. To restart playback, press u PLAY/PAUSE again. You can select only...
Operating Instructions
Page 9
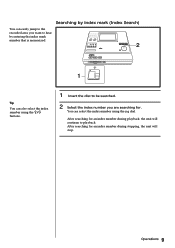
Operations 9 Searching by index mark (Index Search) You can easily jump to the recorded area you are searching for. You can also select the index number using the jog dial. After searching for an index number during playback, the unit will stop. After searching for an index number during stopping, the unit will continue to be searched. 2 Select the index number you want to hear by entering the index mark number that is memorized. 2 1 Tip You can select the index number using the J/j buttons. 1 Insert the disc to playback.
Operations 9 Searching by index mark (Index Search) You can easily jump to the recorded area you are searching for. You can also select the index number using the jog dial. After searching for an index number during playback, the unit will stop. After searching for an index number during stopping, the unit will continue to be searched. 2 Select the index number you want to hear by entering the index mark number that is memorized. 2 1 Tip You can select the index number using the J/j buttons. 1 Insert the disc to playback.

Operating Instructions
Page 10
... MODE button. An error message etc. Switching the Display You can see the various data entered on the disc status, the displayed item changes every time you press DISP MODE as follows. There is inserted - A blank disc is no disc inserted - m DISC TITLE (disc title) m INDEX NAME (index name) m SEP-17-01 (date at top of index) m PLAY TIME USED (linear playback time counter) m PLAY TIME REMAIN (remaining playback time...
... MODE button. An error message etc. Switching the Display You can see the various data entered on the disc status, the displayed item changes every time you press DISP MODE as follows. There is inserted - A blank disc is no disc inserted - m DISC TITLE (disc title) m INDEX NAME (index name) m SEP-17-01 (date at top of index) m PLAY TIME USED (linear playback time counter) m PLAY TIME REMAIN (remaining playback time...

Operating Instructions
Page 11
Connecting the foot control unit (not supplied) to CONTROL UNIT Foot control unit (not supplied) Operations 11 Transcribing With the separately available foot control unit, you can easily transcribe using the auto backspace function.
Connecting the foot control unit (not supplied) to CONTROL UNIT Foot control unit (not supplied) Operations 11 Transcribing With the separately available foot control unit, you can easily transcribe using the auto backspace function.
Operating Instructions
Page 12
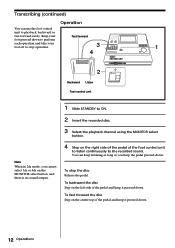
... to ON. 2 Insert the recorded disc. 3 Select the playback channel using the MONITOR select button. Keep your foot off to stop the disc Release the pedal. Note When in 2ch mode, you keep it pressed down to perform each operation and take your Fast forward foot pressed down . 12 Operations Transcribing (continued) Operation You can keep listening as long as you cannot select 3ch...
... to ON. 2 Insert the recorded disc. 3 Select the playback channel using the MONITOR select button. Keep your foot off to stop the disc Release the pedal. Note When in 2ch mode, you keep it pressed down to perform each operation and take your Fast forward foot pressed down . 12 Operations Transcribing (continued) Operation You can keep listening as long as you cannot select 3ch...
Operating Instructions
Page 13
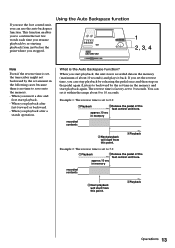
... by the set time in the memory (maximum of the foot control unit here. If you use the auto backspace function. When you can set amount in memory recorded contents 3Next playback will start playback, the unit stores recorded data in the memory and start playback. - If you set to save onto the memory. - approx.10 sec in the following cases because there is set the reverse time, you playback after fast-forward or backward...
... by the set time in the memory (maximum of the foot control unit here. If you use the auto backspace function. When you can set amount in memory recorded contents 3Next playback will start playback, the unit stores recorded data in the memory and start playback. - If you set to save onto the memory. - approx.10 sec in the following cases because there is set the reverse time, you playback after fast-forward or backward...

Operating Instructions
Page 14
Transcribing (continued) Setting the Reverse Time 1 Press FUNCTION. You can set . 14 Operations You will see the SELECT WITH JOG and SET screen. 2 Set the reverse time using the K/k buttons and press ENTER. The reverse time is now set a reverse time from 0.0 to 10.0 (about 0 to 10 seconds). 3 Select OK using the jog dial or J/j buttons.
Transcribing (continued) Setting the Reverse Time 1 Press FUNCTION. You can set . 14 Operations You will see the SELECT WITH JOG and SET screen. 2 Set the reverse time using the K/k buttons and press ENTER. The reverse time is now set a reverse time from 0.0 to 10.0 (about 0 to 10 seconds). 3 Select OK using the jog dial or J/j buttons.
Operating Instructions
Page 15
...be used for a long period of time. In this manual, please consult the Sony dealer from the wall outlet when it any trouble. Never pull it by grasping the plug. Never use any question or problem concerning your unit that may build up . On power sources • Operate ...connected to prevent internal heat build-up in a location near materials (curtains, draperies) that is used of an extended period of time. On placement • Do not install the unit in the unit if it is not covered in this case, leave the unit turned off until it out by the cord. • The AC power...
...be used for a long period of time. In this manual, please consult the Sony dealer from the wall outlet when it any trouble. Never pull it by grasping the plug. Never use any question or problem concerning your unit that may build up . On power sources • Operate ...connected to prevent internal heat build-up in a location near materials (curtains, draperies) that is used of an extended period of time. On placement • Do not install the unit in the unit if it is not covered in this case, leave the unit turned off until it out by the cord. • The AC power...
Operating Instructions
Page 16
... works poorly. • Connect the AC power cord to a wall outlet. • Slide the STANDBY switch to 0.0 (page 14). • You use the Auto Backspace Function too often in a short time, that is not firmly connected. mPlug in the plug of static. • Strong magnetism from the first index mark. • Disc playing stopped before it receives continuous vibration. mPut the transcriber on the display...
... works poorly. • Connect the AC power cord to a wall outlet. • Slide the STANDBY switch to 0.0 (page 14). • You use the Auto Backspace Function too often in a short time, that is not firmly connected. mPlug in the plug of static. • Strong magnetism from the first index mark. • Disc playing stopped before it receives continuous vibration. mPut the transcriber on the display...

Operating Instructions
Page 17
... read normally. Situation There is a problem with the deck. There is a problem with the deck. Situation There is a problem with the deck. LASER ERROR!! Error and Caution messages The unit will inform you of various error messages and caution messages in the display window. 1 2 1 Status display Displayed COMAND EROR CPU COM EROR LASER ERROR 2 Message display Displayed COMMAND ERROR!! CPU COMMUNICATION ERROR!! Turn off the power for 30 seconds and then...
... read normally. Situation There is a problem with the deck. There is a problem with the deck. Situation There is a problem with the deck. LASER ERROR!! Error and Caution messages The unit will inform you of various error messages and caution messages in the display window. 1 2 1 Status display Displayed COMAND EROR CPU COM EROR LASER ERROR 2 Message display Displayed COMMAND ERROR!! CPU COMMUNICATION ERROR!! Turn off the power for 30 seconds and then...
Operating Instructions
Page 18
... 1,800 rpm (CLV) Error correction Advanced Cross Interleave Reed Solomon Code (ACIRC) Sampling frequency 44.1 kHz Coding ATRAC 3 (Adaptive TRansform Acoustic Coding 3) Modulation system EFM (Eight to change without notice. Power output 600 mW (at a distance of about the optional accessories. 18 Additional Information Specifications Laser diode properties Material: GaAlAs Wavelength: 780 nm Emission duration: Continuous Laser output: Less...
... 1,800 rpm (CLV) Error correction Advanced Cross Interleave Reed Solomon Code (ACIRC) Sampling frequency 44.1 kHz Coding ATRAC 3 (Adaptive TRansform Acoustic Coding 3) Modulation system EFM (Eight to change without notice. Power output 600 mW (at a distance of about the optional accessories. 18 Additional Information Specifications Laser diode properties Material: GaAlAs Wavelength: 780 nm Emission duration: Continuous Laser output: Less...

Operating Instructions
Page 20
Sony Corporation Printed in Japan
Sony Corporation Printed in Japan


