
Limited Warranty (US Only)
Page 1
... THE DURATION OF THIS WARRANTY. PARTS: In addition, Sony will repair or replace the Product, at no charge, or pay the labor charges to any accessories) against defects in exchange for defective parts for a period of purchase in Japan 4-557-172-02 General Stereo/Hifi Components/Tape Decks ® CD Players/Mini Disc Players/Audio Systems Hifi Audio LIMITED WARRANTY Sony Electronics Inc. ("Sony") warrants this Product is valid...
... THE DURATION OF THIS WARRANTY. PARTS: In addition, Sony will repair or replace the Product, at no charge, or pay the labor charges to any accessories) against defects in exchange for defective parts for a period of purchase in Japan 4-557-172-02 General Stereo/Hifi Components/Tape Decks ® CD Players/Mini Disc Players/Audio Systems Hifi Audio LIMITED WARRANTY Sony Electronics Inc. ("Sony") warrants this Product is valid...
Operating Instructions
Page 3
... radio communications. Unit HCD-ZUX9 - Consult the dealer or an experienced radio/ TV technician for help. Note to CATV system installer: This reminder is connected. - Increase the separation between the equipment and receiver. - Speaker System • Front speakers SS-ZUX9 • Surround speakers SS-ZUX9 "WALKMAN" and "WALKMAN" logo are designed to which can radiate radio frequency energy and, if not installed and used in a particular installation. MPEG Layer-3 audio coding...
... radio communications. Unit HCD-ZUX9 - Consult the dealer or an experienced radio/ TV technician for help. Note to CATV system installer: This reminder is connected. - Increase the separation between the equipment and receiver. - Speaker System • Front speakers SS-ZUX9 • Surround speakers SS-ZUX9 "WALKMAN" and "WALKMAN" logo are designed to which can radiate radio frequency energy and, if not installed and used in a particular installation. MPEG Layer-3 audio coding...
Operating Instructions
Page 4
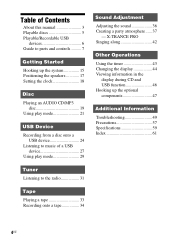
... AUDIO CD/MP3 disc 19 Using play mode 21 USB Device Recording from a disc onto a USB device 24 Listening to music of Contents About this manual 3 Playable discs 5 Playable/Recordable USB devices 6 Guide to the radio 31 Tape Playing a tape 33 Recording onto a tape 34 Sound Adjustment Adjusting the sound 36 Creating a party atmosphere ...... 37 - Table of a USB device 27 Using play mode 29 Tuner Listening to parts and controls.......... 7 Getting Started Hooking up the optional components...
... AUDIO CD/MP3 disc 19 Using play mode 21 USB Device Recording from a disc onto a USB device 24 Listening to music of Contents About this manual 3 Playable discs 5 Playable/Recordable USB devices 6 Guide to the radio 31 Tape Playing a tape 33 Recording onto a tape 34 Sound Adjustment Adjusting the sound 36 Creating a party atmosphere ...... 37 - Table of a USB device 27 Using play mode 29 Tuner Listening to parts and controls.......... 7 Getting Started Hooking up the optional components...
Operating Instructions
Page 8
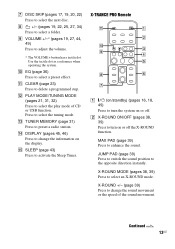
... to adjust the microphone volume. H DISPLAY (pages 45, 46) Press to reinforce the bass. Lights up when recording from the connected optional USB device (Digital music player or USB storage media). I GROOVE (page 36) Press to change the information on or off. N Power illuminator (page 44) O MIC (jack) (pages 42, 49, 59) Connect an optional microphone. B Function buttons: CD (pages 17, 19, 21, 24, 32, 34, 45) TUNER/BAND...
... to adjust the microphone volume. H DISPLAY (pages 45, 46) Press to reinforce the bass. Lights up when recording from the connected optional USB device (Digital music player or USB storage media). I GROOVE (page 36) Press to change the information on or off. N Power illuminator (page 44) O MIC (jack) (pages 42, 49, 59) Connect an optional microphone. B Function buttons: CD (pages 17, 19, 21, 24, 32, 34, 45) TUNER/BAND...
Operating Instructions
Page 9
... the connected optional USB device (Digital music player or USB storage media). X-ROUND ON/OFF (pages 38, 39) Press to the parent folder. Continued l 9US wj B PUSH Z OPEN/CLOSE (Deck B) (page 33) Press to the opposite direction instantly. JUMP PAD (page 39) Press to switch the sound position to insert or eject a tape. Z BEAM MODE (page 45) Press to change the power...
... the connected optional USB device (Digital music player or USB storage media). X-ROUND ON/OFF (pages 38, 39) Press to the parent folder. Continued l 9US wj B PUSH Z OPEN/CLOSE (Deck B) (page 33) Press to the opposite direction instantly. JUMP PAD (page 39) Press to switch the sound position to insert or eject a tape. Z BEAM MODE (page 45) Press to change the power...
Operating Instructions
Page 10
... record onto a tape. USB SYNC/REC 1 (page 24) Press to record a disc onto a tape. CD-TAPE SYNC (page 34) Press to record from a disc onto the connected optional USB device (Digital music player or USB storage media). ef BEAT ON/OFF (page 41) Press to add percussion sound. 10US PAD A/PAD B (page 40) Press to turn on or off the rhythms of the audio source.
... record onto a tape. USB SYNC/REC 1 (page 24) Press to record a disc onto a tape. CD-TAPE SYNC (page 34) Press to record from a disc onto the connected optional USB device (Digital music player or USB storage media). ef BEAT ON/OFF (page 41) Press to add percussion sound. 10US PAD A/PAD B (page 40) Press to turn on or off the rhythms of the audio source.
Operating Instructions
Page 13
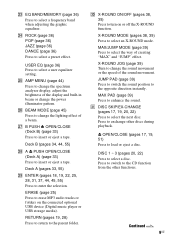
... tuning mode. J EQ (page 36) Press to preset a radio station. qd TUNER MEMORY (page 31) Press to select a preset effect. X-ROUND +/- (page 39) Press to turn on the display. X-ROUND MODE (pages 38, 39) Press to adjust the volume. * The VOLUME + button has a tactile dot. I VOLUME +/-* (pages 19, 27, 44, 49) Press to select an X-ROUND mode. qg SLEEP (page 43) Press to select the next disc. X-TRANCE PRO Remote qa 1 2 q; 3 9 4 5 8 6 7 1 "/1 (on/standby...
... tuning mode. J EQ (page 36) Press to preset a radio station. qd TUNER MEMORY (page 31) Press to select a preset effect. X-ROUND +/- (page 39) Press to turn on the display. X-ROUND MODE (pages 38, 39) Press to adjust the volume. * The VOLUME + button has a tactile dot. I VOLUME +/-* (pages 19, 27, 44, 49) Press to select an X-ROUND mode. qg SLEEP (page 43) Press to select the next disc. X-TRANCE PRO Remote qa 1 2 q; 3 9 4 5 8 6 7 1 "/1 (on/standby...
Operating Instructions
Page 27
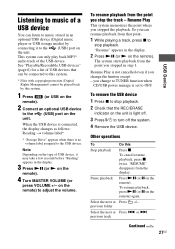
... is set to OFF. on the remote). Select the next or Press +/-. Listening to music of a USB device You can listen to music stored in an optional USB device (Digital music player or USB storage media) by this Stop playback Press x. The system starts playback from the point you change to TUNER function when CD/USB power manage is no volume label assigned to...
... is set to OFF. on the remote). Select the next or Press +/-. Listening to music of a USB device You can listen to music stored in an optional USB device (Digital music player or USB storage media) by this Stop playback Press x. The system starts playback from the point you change to TUNER function when CD/USB power manage is no volume label assigned to...
Operating Instructions
Page 28
... recognize up to select the by a device other types of the connected digital music player. • Be sure to turn on an USB device DIAL to - 999 folders. - 999 MP3 audio tracks. If there are many folders or tracks on the USB device, it may take a long time to finish reading the...on the previous operation you have the extension ".MP3" may vary depending on the remote during "RESUME", then you switch to the parent folder, press RETURN. The maximum number of MP3 audio tracks and folders may result in noise or malfunction. • The system can increase the time it at all ...
... recognize up to select the by a device other types of the connected digital music player. • Be sure to turn on an USB device DIAL to - 999 folders. - 999 MP3 audio tracks. If there are many folders or tracks on the USB device, it may take a long time to finish reading the...on the previous operation you have the extension ".MP3" may vary depending on the remote during "RESUME", then you switch to the parent folder, press RETURN. The maximum number of MP3 audio tracks and folders may result in noise or malfunction. • The system can increase the time it at all ...
Operating Instructions
Page 31
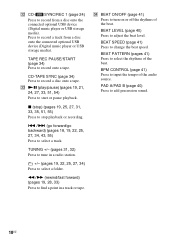
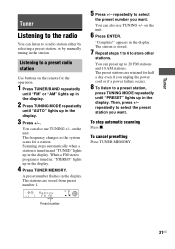
... the operation. 1 Press TUNER/BAND repeatedly until "FM" or "AM" lights up in the display. 2 Press TUNING MODE repeatedly until "PRESET" lights up in the display. 3 Press +/-. on the unit. You can also use TUNING +/- To stop automatic scanning Press x. You can listen to a radio station either by selecting a preset station, or by manually tuning in the display. The station is stored. 7 Repeat steps 1 to 6 to a preset radio station Use buttons on the remote for a station. Then...
... the operation. 1 Press TUNER/BAND repeatedly until "FM" or "AM" lights up in the display. 2 Press TUNING MODE repeatedly until "PRESET" lights up in the display. 3 Press +/-. on the unit. You can also use TUNING +/- To stop automatic scanning Press x. You can listen to a radio station either by selecting a preset station, or by manually tuning in the display. The station is stored. 7 Repeat steps 1 to 6 to a preset radio station Use buttons on the remote for a station. Then...
Operating Instructions
Page 32
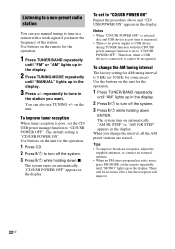
... selected, disc and USB device access time is increased. • There is no stereo effect, but the reception will be recognized. Use the buttons on the remote for the operation. 1 Press TUNER/BAND repeatedly until "FM" or "AM" lights up in the display. 2 Press TUNING MODE repeatedly until "MANUAL" lights up in the display. When you want. The default setting is "CD/USB POWER ON". Listening to a non-preset radio station You...
... selected, disc and USB device access time is increased. • There is no stereo effect, but the reception will be recognized. Use the buttons on the remote for the operation. 1 Press TUNER/BAND repeatedly until "FM" or "AM" lights up in the display. 2 Press TUNING MODE repeatedly until "MANUAL" lights up in the display. When you want. The default setting is "CD/USB POWER ON". Listening to a non-preset radio station You...
Operating Instructions
Page 36
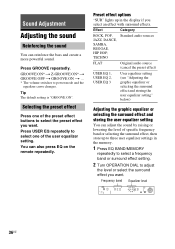
... the level of specific frequency band or selecting the surround effect, then store up in the memory. 1 Press EQ BAND/MEMORY repeatedly to select a frequency band or surround effect setting. 2 Turn OPERATION DIAL to select one of the user equalizer setting. You can reinforce the bass and create a more powerful sound. Preset effect options "SUR" lights up to power mode and the equalizer curve changes. Tip The default setting is "GROOVE ON". Sound Adjustment Adjusting the sound Reinforcing the sound You...
... the level of specific frequency band or selecting the surround effect, then store up in the memory. 1 Press EQ BAND/MEMORY repeatedly to select a frequency band or surround effect setting. 2 Turn OPERATION DIAL to select one of the user equalizer setting. You can reinforce the bass and create a more powerful sound. Preset effect options "SUR" lights up to power mode and the equalizer curve changes. Tip The default setting is "GROOVE ON". Sound Adjustment Adjusting the sound Reinforcing the sound You...
Operating Instructions
Page 44
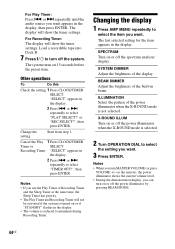
... select "PLAY SELECT?" SPECTRUM Turn on or off the spectrum analyzer display. X-ROUND ILLUM Turn on or off the power illuminator when the X-ROUND mode is not selected. on the remote), the power illuminator shows the current volume level. • During the demonstration display, you can turn on 15 seconds before the preset time. For Recording Timer: The display will show the timer settings. "SELECT" appears in the display. Changing the display 1 Press AMP MENU...
... select "PLAY SELECT?" SPECTRUM Turn on or off the spectrum analyzer display. X-ROUND ILLUM Turn on or off the power illuminator when the X-ROUND mode is not selected. on the remote), the power illuminator shows the current volume level. • During the demonstration display, you can turn on 15 seconds before the preset time. For Recording Timer: The display will show the timer settings. "SELECT" appears in the display. Changing the display 1 Press AMP MENU...
Operating Instructions
Page 47
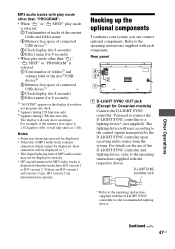
... control signals transmitted by the D-LIGHT SYNC controller upon receiving audio source from the system. MP3 audio tracks with play mode other than "PROGRAM": • When " " or " SHUF" play mode is selected 1 Total number of tracks of the current folder and folder name 2 Memory free space of connected USB device3) 3 Clock display (for 8 seconds) 4 Effect name (for 8 seconds) • When play mode other than " ", " SHUF" or "PROGRAM" is selected 1 Total number of folders2) and volume...
... control signals transmitted by the D-LIGHT SYNC controller upon receiving audio source from the system. MP3 audio tracks with play mode other than "PROGRAM": • When " " or " SHUF" play mode is selected 1 Total number of tracks of the current folder and folder name 2 Memory free space of connected USB device3) 3 Clock display (for 8 seconds) 4 Effect name (for 8 seconds) • When play mode other than " ", " SHUF" or "PROGRAM" is selected 1 Total number of folders2) and volume...
Operating Instructions
Page 49
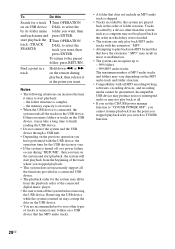
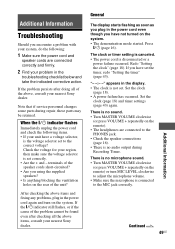
... system. • The demonstration mode started. There is no microphone sound. • Turn MASTER VOLUME clockwise (or press VOLUME + repeatedly on the remote) or turn on the remote). • The headphones are connected correctly and firmly. 2 Find your problem in the power cord again and turn MIC LEVEL clockwise to adjust the microphone volume. • Make sure the microphone is connected to the MIC jack correctly. There is disconnected or a power failure occurred. Continued l 49US...
... system. • The demonstration mode started. There is no microphone sound. • Turn MASTER VOLUME clockwise (or press VOLUME + repeatedly on the remote) or turn on the remote). • The headphones are connected correctly and firmly. 2 Find your problem in the power cord again and turn MIC LEVEL clockwise to adjust the microphone volume. • Make sure the microphone is connected to the MIC jack correctly. There is disconnected or a power failure occurred. Continued l 49US...
Operating Instructions
Page 51
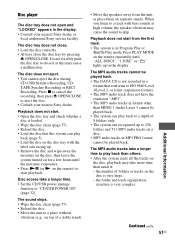
... time. • Set the CD/USB power manage function to eject the disc. • Consult your nearest Sony dealer or local authorized Sony service facility. The MP3 audio tracks cannot be played back. • The system can play back to a depth of a stable stand). • Move the speakers away from the first track. • The system is in Program Play or Shuffle Play mode. The MP3 audio...
... time. • Set the CD/USB power manage function to eject the disc. • Consult your nearest Sony dealer or local authorized Sony service facility. The MP3 audio tracks cannot be played back. • The system can play back to a depth of a stable stand). • Move the speakers away from the first track. • The system is in Program Play or Shuffle Play mode. The MP3 audio...

Operating Instructions
Page 54
... lead antenna receives signals along its entire length, so make sure you cannot obtain good reception, we recommend that are magnetized (see the operating instructions of these FAT. If you extend it fully. • Locate the antennas as far away from the speaker cords as possible. • Try turning off the surrounding electrical equipment. • Set the CD/USB power manage function to a preset radio station...
... lead antenna receives signals along its entire length, so make sure you cannot obtain good reception, we recommend that are magnetized (see the operating instructions of these FAT. If you extend it fully. • Locate the antennas as far away from the speaker cords as possible. • Try turning off the surrounding electrical equipment. • Set the CD/USB power manage function to a preset radio station...
Operating Instructions
Page 55
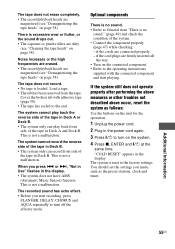
... display. This is no sound." (page 49) and check the condition of the tape in the power cord again. 3 Press "/1 to turn off the effector mode. Optional components There is no sound. • Refer to turn on the connected component. • Refer to the operating instructions supplied with adhesive tape (page 58). • The tape has reeled to the factory settings. When you made, such as follows: Use the buttons...
... display. This is no sound." (page 49) and check the condition of the tape in the power cord again. 3 Press "/1 to turn off the effector mode. Optional components There is no sound. • Refer to turn on the connected component. • Refer to the operating instructions supplied with adhesive tape (page 58). • The tape has reeled to the factory settings. When you made, such as follows: Use the buttons...
Marketing Specifications
Page 1
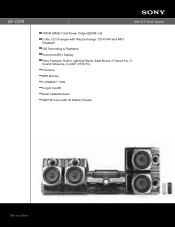
LBT-ZUX9 Mini Hi-Fi Shelf System 1000W (RMS) Total Power Output(250W x 4) 3-disc CD Changer with Play Exchange: CD-R/RW and MP3 Playback1 USB Recording & Playback Fluorescent(FL) Display Party Features: Built-in Lighting Effects, Beat Blend, X-Trance Pro, XRound Advance, D-LIGHT SYNC Pro Z-Groove MP3 Booster X-TRANCE™ PRO D-Light Sync® Dual Cassette Deck AM/FM Tuner with 30 Station Presets
LBT-ZUX9 Mini Hi-Fi Shelf System 1000W (RMS) Total Power Output(250W x 4) 3-disc CD Changer with Play Exchange: CD-R/RW and MP3 Playback1 USB Recording & Playback Fluorescent(FL) Display Party Features: Built-in Lighting Effects, Beat Blend, X-Trance Pro, XRound Advance, D-LIGHT SYNC Pro Z-Groove MP3 Booster X-TRANCE™ PRO D-Light Sync® Dual Cassette Deck AM/FM Tuner with 30 Station Presets
Marketing Specifications
Page 2
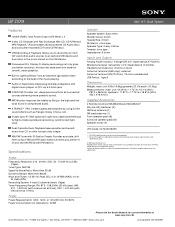
... Accessories 2 Remote Controls RM-AMU006 and RM-AMU007 R6 (size AA) batteries (4) AM loop antenna (1) FM lead antenna (1) Front speaker pads (8) Surround speaker pads (8) Speaker cords (4) UPC Code: 027242728035 1. All rights reserved. Works with digital music players or PC's via a 3.5mm jack. Non-metric weights and measures are trademarks of the music playing. Built-in Experience simple plug-and-play integration with D-Light Sync lighting from CD's and other sources onto a tape. Specifications Audio Frequency Response: 2 Hz...
... Accessories 2 Remote Controls RM-AMU006 and RM-AMU007 R6 (size AA) batteries (4) AM loop antenna (1) FM lead antenna (1) Front speaker pads (8) Surround speaker pads (8) Speaker cords (4) UPC Code: 027242728035 1. All rights reserved. Works with digital music players or PC's via a 3.5mm jack. Non-metric weights and measures are trademarks of the music playing. Built-in Experience simple plug-and-play integration with D-Light Sync lighting from CD's and other sources onto a tape. Specifications Audio Frequency Response: 2 Hz...


