
The Sony Guide to Home Theater
Page 15
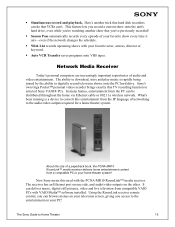
... About the size of your favorite show that VCRs can browse menus on your home theater system! Now Sony meets this need with VAIO Media™ software installed. The Sony Guide to your television screen, giving you can 't. Here's another show every time it airs...and live television from the IP language of audio and video entertainment. Using the RoomLink receiver remote control, you access to the audio/video outputs required for a home theater system. Sony's own Giga Pocket™ personal video recorder brings exactly this entertainment from compatible VAIO PCs...
... About the size of your favorite show that VCRs can browse menus on your home theater system! Now Sony meets this need with VAIO Media™ software installed. The Sony Guide to your television screen, giving you can 't. Here's another show every time it airs...and live television from the IP language of audio and video entertainment. Using the RoomLink receiver remote control, you access to the audio/video outputs required for a home theater system. Sony's own Giga Pocket™ personal video recorder brings exactly this entertainment from compatible VAIO PCs...
The Sony Guide to Home Theater
Page 16
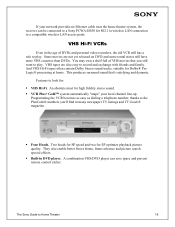
...Fi tapes often contain Dolby Stereo sound tracks, suitable for EP optimize playback picture quality. A combination VHS/DVD player can be connected to a Sony PCWA-DE50 for : ƒ VHS Hi-Fi.... Programming the VCR becomes as easy as dialing a telephone number, thanks to play . The Sony... stereo sound. ƒ VCR Plus+ Gold™ system automatically "maps" your network provides no Ethernet cable...
...Fi tapes often contain Dolby Stereo sound tracks, suitable for EP optimize playback picture quality. A combination VHS/DVD player can be connected to a Sony PCWA-DE50 for : ƒ VHS Hi-Fi.... Programming the VCR becomes as easy as dialing a telephone number, thanks to play . The Sony... stereo sound. ƒ VCR Plus+ Gold™ system automatically "maps" your network provides no Ethernet cable...

The Sony Guide to Home Theater
Page 39
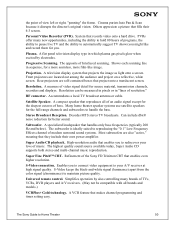
... can replace all your separate remotes-an especially good move if you to enjoy the system after others have gone to sleep. A television stand can solve many issues at night, after others in your house have gone to bed. ...provides shelves for home theater, two add-on purchases can simplify system operation. The Sony Guide to the correct height and it , too. Wireless headphones (right) enable you 've built your system much more enjoyable. A universal remote control (left) can make your system from individual components. It elevates the television to Home Theater ...
... can replace all your separate remotes-an especially good move if you to enjoy the system after others have gone to sleep. A television stand can solve many issues at night, after others in your house have gone to bed. ...provides shelves for home theater, two add-on purchases can simplify system operation. The Sony Guide to the correct height and it , too. Wireless headphones (right) enable you 've built your system much more enjoyable. A universal remote control (left) can make your system from individual components. It elevates the television to Home Theater ...
The Sony Guide to Home Theater
Page 50
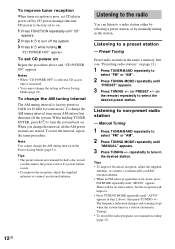
... . Refinement of bass. Many home theater speaker systems use satellite speakers for the deepest octaves of the Sony FD Trinitron CRT that projects the image as light onto a screen. Universal remote control. Personal Video Recorder (PVR). Rear projectors ...measure of modern surround sound systems. Most subwoofers are self-contained boxes that they include their 4:3 screen. Resolution can be compatible with all of music. RF connector. Satellite Speaker. A compact speaker that fills their own power amplifier. Stereo Broadcast Reception. Subwoofer. A...
... . Refinement of bass. Many home theater speaker systems use satellite speakers for the deepest octaves of the Sony FD Trinitron CRT that projects the image as light onto a screen. Universal remote control. Personal Video Recorder (PVR). Rear projectors ...measure of modern surround sound systems. Most subwoofers are self-contained boxes that they include their 4:3 screen. Resolution can be compatible with all of music. RF connector. Satellite Speaker. A compact speaker that fills their own power amplifier. Stereo Broadcast Reception. Subwoofer. A...

Operating Instructions
Page 3
registered mark. As an ENERGY STAR® partner, Sony Corporation has determined that this manual This manual mainly explains operations using the system, but the same operations can also be performed using the buttons on the remote having the same or similar names. 3GB How to use this product meets the ENERGY STAR® guidelines for energy efficiency. ENERGY STAR® ENERGY STAR® is a U.S.
registered mark. As an ENERGY STAR® partner, Sony Corporation has determined that this manual This manual mainly explains operations using the system, but the same operations can also be performed using the buttons on the remote having the same or similar names. 3GB How to use this product meets the ENERGY STAR® guidelines for energy efficiency. ENERGY STAR® ENERGY STAR® is a U.S.

Operating Instructions
Page 6
... selector, set VOLTAGE SELECTOR to the local power line voltage. VOLTAGE SELECTOR 120V 220V 230~240V Note If you press ?/1, the system turns on your system's VOLTAGE SELECTOR for models equipped with new ones. 6GB You can cancel the demonstration by pressing DISPLAY repeatedly (page 21). Refer ...to a wall outlet. Tip When the remote no longer operates the system, replace both batteries with an adaptor). The demonstration appears in the display. If the plug does not fit the wall socket...
... selector, set VOLTAGE SELECTOR to the local power line voltage. VOLTAGE SELECTOR 120V 220V 230~240V Note If you press ?/1, the system turns on your system's VOLTAGE SELECTOR for models equipped with new ones. 6GB You can cancel the demonstration by pressing DISPLAY repeatedly (page 21). Refer ...to a wall outlet. Tip When the remote no longer operates the system, replace both batteries with an adaptor). The demonstration appears in the display. If the plug does not fit the wall socket...

Operating Instructions
Page 7
...power failure occurs. • You cannot set the minute. 6 Press ENTER. Setting the clock 1 Press ?/1 to turn on the system. 2 Press c/CLOCK SET (or CLOCK/ TIMER SET on the remote). 2 Press M/m to select "CLOCK SET", then press ENTER. 3 Do the same procedures as step 3 to stabilize the speakers... and prevent them from the system. 2 Press FUNCTION repeatedly until "CD" appears. 3 Hold down EDIT and ?/1 until "LOCK" appears. 4 ...
...power failure occurs. • You cannot set the minute. 6 Press ENTER. Setting the clock 1 Press ?/1 to turn on the system. 2 Press c/CLOCK SET (or CLOCK/ TIMER SET on the remote). 2 Press M/m to select "CLOCK SET", then press ENTER. 3 Do the same procedures as step 3 to stabilize the speakers... and prevent them from the system. 2 Press FUNCTION repeatedly until "CD" appears. 3 Hold down EDIT and ?/1 until "LOCK" appears. 4 ...

Operating Instructions
Page 8
... 1 Press PUSH OPEN at left side of disc tray. The front cover opens. 2 Place a disc with tape, seals or paste on the remote). 8GB Normal Play/Shuffle Play This system lets you want them to rotate the disc tray. 3 Close the front cover. Total track number Total playing time 1 Press FUNCTION repeatedly...
... 1 Press PUSH OPEN at left side of disc tray. The front cover opens. 2 Place a disc with tape, seals or paste on the remote). 8GB Normal Play/Shuffle Play This system lets you want them to rotate the disc tray. 3 Close the front cover. Total track number Total playing time 1 Press FUNCTION repeatedly...

Operating Instructions
Page 9
... Other operations To Do this case, set "CD POWER ON" by pressing NX (or CD N on the remote). Note You cannot change the play mode during playback until "REPEAT" or "REPEAT1" appears. on the remote), a longer time may be required to resume play or pause, press . In this Stop play all the... tracks on the remote) (Automatic Source Selection). or > repeatedly. Tip When switching to the front. Find a point in a Keep pressing m or M during track playback and release it at the ...
... Other operations To Do this case, set "CD POWER ON" by pressing NX (or CD N on the remote). Note You cannot change the play mode during playback until "REPEAT" or "REPEAT1" appears. on the remote), a longer time may be required to resume play or pause, press . In this Stop play all the... tracks on the remote) (Automatic Source Selection). or > repeatedly. Tip When switching to the front. Find a point in a Keep pressing m or M during track playback and release it at the ...

Operating Instructions
Page 10
... 4 Press . To program Repeat steps Other tracks on the 4 and 5 same disc Other tracks on other discs 3 to 25 steps from Press CLEAR on the remote in the end stop mode. Add a track to the Perform step 3 to play the same program again, press NX (or CD N on the...when you want to 5. Using the display window 1 Press FUNCTION repeatedly until "PROGRAM" appears. 3 Press one of up to 5 7 Press NX (or CD N on the remote). Creating your own program - To play them. Program Play starts. Clear a track from all the discs in stop mode Tips • The program you made...
... 4 Press . To program Repeat steps Other tracks on the 4 and 5 same disc Other tracks on other discs 3 to 25 steps from Press CLEAR on the remote in the end stop mode. Add a track to the Perform step 3 to play the same program again, press NX (or CD N on the...when you want to 5. Using the display window 1 Press FUNCTION repeatedly until "PROGRAM" appears. 3 Press one of up to 5 7 Press NX (or CD N on the remote). Creating your own program - To play them. Program Play starts. Clear a track from all the discs in stop mode Tips • The program you made...
Operating Instructions
Page 12
... FM MODE repeatedly until "MANUAL" appears. 3 Press TUNING +/- There will be no stereo effect, but the reception will improve. • Press TUNING MODE repeatedly until "AUTO" appears in any AM station first, then turn off the system. 3 Press ?/1 while holding x. To set CD power on Repeat the procedure above ...some areas). on . 1 Press FUNCTION repeatedly until "PRESET" appears. 3 Press TUNING +/- (or PRESET +/- CD power is factory set to on the remote) repeatedly to tune in a station (Automatic Tuning). • To record the radio programs, use manual recording (page 15). 12GB
... FM MODE repeatedly until "MANUAL" appears. 3 Press TUNING +/- There will be no stereo effect, but the reception will improve. • Press TUNING MODE repeatedly until "AUTO" appears in any AM station first, then turn off the system. 3 Press ?/1 while holding x. To set CD power on Repeat the procedure above ...some areas). on . 1 Press FUNCTION repeatedly until "PRESET" appears. 3 Press TUNING +/- (or PRESET +/- CD power is factory set to on the remote) repeatedly to tune in a station (Automatic Tuning). • To record the radio programs, use manual recording (page 15). 12GB

Operating Instructions
Page 13
...press .m or M> (or press . Press again to play both sides. Fast-forward or rewind Press .m or M> (or press m or M on the remote) in succession. 3 Press H (or Y on the remote). With the side you want to play Press x. Remove the tape Press A EJECT Z (or Z B EJECT) in deck A or B. Tape - Select... j to play the reverse side. Play Tape - or > on the remote again) to skip forward (or backward). Play Loading a tape 1 Press A EJECT Z or Z B EJECT. 2 Load a tape in stop mode. Press h (or Y on the...
...press .m or M> (or press . Press again to play both sides. Fast-forward or rewind Press .m or M> (or press m or M on the remote) in succession. 3 Press H (or Y on the remote). With the side you want to play Press x. Remove the tape Press A EJECT Z (or Z B EJECT) in deck A or B. Tape - Select... j to play the reverse side. Play Tape - or > on the remote again) to skip forward (or backward). Play Loading a tape 1 Press A EJECT Z or Z B EJECT. 2 Load a tape in stop mode. Press h (or Y on the...

Operating Instructions
Page 16
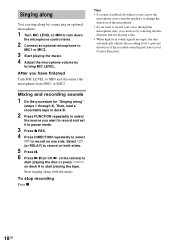
Before operating, first select the basic audio emphasis you can create a personal file of audio patterns (surround effect and graphic equalizer) and store them in the system's memory. Making a personal audio emphasis file - Personal File You can call up an audio pattern when playing a favorite tape, CD, or radio program. Later, you want for your sound. 1 Press
Before operating, first select the basic audio emphasis you can create a personal file of audio patterns (surround effect and graphic equalizer) and store them in the system's memory. Making a personal audio emphasis file - Personal File You can call up an audio pattern when playing a favorite tape, CD, or radio program. Later, you want for your sound. 1 Press
Operating Instructions
Page 18
... sounds 1 Do the procedure for "Singing along with the music. Select j (or RELAY) to record on both sides. 5 Press X. 6 Press NX (or CD N on the remote) to MIN and disconnect the microphone from the speakers or change the direction of the recorded sound signal (Auto Level Control Function). 18GB To stop...
... sounds 1 Do the procedure for "Singing along with the music. Select j (or RELAY) to record on both sides. 5 Press X. 6 Press NX (or CD N on the remote) to MIN and disconnect the microphone from the speakers or change the direction of the recorded sound signal (Auto Level Control Function). 18GB To stop...

Operating Instructions
Page 19
...source appears. Waking up to adjust the volume. 3 Press c/CLOCK SET (or CLOCK/ TIMER SET on the remote). Press M/m repeatedly to set the clock. continued 19GB Timer Sleep Timer You can set the system to turn , before the original display returns. 9 Press ?/1 to 100 minutes). Make sure you have not... set the minute, then press ENTER. 6 Set the time to stop time, and the sound source appear in turn off time you want . on the remote) to music - Each...
...source appears. Waking up to adjust the volume. 3 Press c/CLOCK SET (or CLOCK/ TIMER SET on the remote). Press M/m repeatedly to set the clock. continued 19GB Timer Sleep Timer You can set the system to turn , before the original display returns. 9 Press ?/1 to 100 minutes). Make sure you have not... set the minute, then press ENTER. 6 Set the time to stop time, and the sound source appear in turn off time you want . on the remote) to music - Each...

Operating Instructions
Page 20
...time. Timer recording radio programs You can record a preset radio station from step 1. 1 Press TIMER SELECT (or CLOCK/TIMER SELECT on the remote). 2 Press M/m repeatedly until "DAILY SELECT" appears, then press ENTER. The start recording. The minute indication flashes. Other operations To Check... Change the setting Cancel the timer Do this 1 Press TIMER SELECT (or CLOCK/TIMER SELECT on the remote). 2 Press M/m repeatedly until "TIMER OFF" appears, then press ENTER. Tip The system turns on 15 seconds before the original display returns. 6 Load a recordable tape into deck B. 7 ...
...time. Timer recording radio programs You can record a preset radio station from step 1. 1 Press TIMER SELECT (or CLOCK/TIMER SELECT on the remote). 2 Press M/m repeatedly until "DAILY SELECT" appears, then press ENTER. The start recording. The minute indication flashes. Other operations To Check... Change the setting Cancel the timer Do this 1 Press TIMER SELECT (or CLOCK/TIMER SELECT on the remote). 2 Press M/m repeatedly until "TIMER OFF" appears, then press ENTER. Tip The system turns on 15 seconds before the original display returns. 6 Load a recordable tape into deck B. 7 ...
Operating Instructions
Page 21
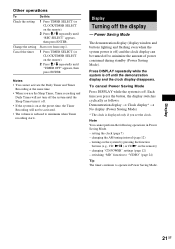
...Tip The timer continues to minimize the amount of power consumed during standby (Power Saving Mode). turning on the system by pressing the function buttons (e.g., CD: NX ( or CDN on the remote). 2 Press M/m repeatedly until "REC SELECT" appears, then press ENTER. Display Turning off . To cancel ... Mode. - setting the clock (page 7) - Press DISPLAY repeatedly while the system is reduced to minimum when Timer recording starts. Start over from step 1. 1 Press TIMER SELECT (or CLOCK/TIMER SELECT on the remote)) - Notes • You cannot activate the Daily Timer and Timer Recording at...
...Tip The timer continues to minimize the amount of power consumed during standby (Power Saving Mode). turning on the system by pressing the function buttons (e.g., CD: NX ( or CDN on the remote). 2 Press M/m repeatedly until "REC SELECT" appears, then press ENTER. Display Turning off . To cancel ... Mode. - setting the clock (page 7) - Press DISPLAY repeatedly while the system is reduced to minimum when Timer recording starts. Start over from step 1. 1 Press TIMER SELECT (or CLOCK/TIMER SELECT on the remote)) - Notes • You cannot activate the Daily Timer and Timer Recording at...
Operating Instructions
Page 26
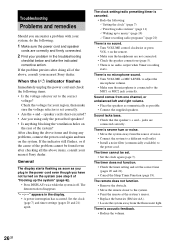
...Sony dealer. General The display starts flashing as soon as possible. • Connect the supplied speakers. The clock setting/radio presetting/timer is canceled. • Redo the following: -"Setting the clock" (page 7) -"Presetting radio stations" (page 11) -"Waking up the system" (page 6)). • Press DISPLAY twice while the system is off. The remote... does not function. • Remove the obstacle. • Move the remote closer to the system. • Point the remote at the system's sensor...
...Sony dealer. General The display starts flashing as soon as possible. • Connect the supplied speakers. The clock setting/radio presetting/timer is canceled. • Redo the following: -"Setting the clock" (page 7) -"Presetting radio stations" (page 11) -"Waking up the system" (page 6)). • Press DISPLAY twice while the system is off. The remote... does not function. • Remove the obstacle. • Move the remote closer to the system. • Point the remote at the system's sensor...
Operating Instructions
Page 27
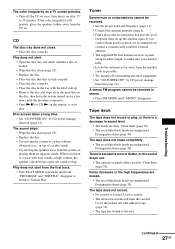
...the proper band and frequency (page 11). • Connect the antenna properly (page 6). • Find a place and an orientation that this system can play , or there is a decrease in stereo. • Press FM MODE until both "PROGRAM" and "SHUFFLE" disappear to return to start . • Open the disc tray and ...set up . • Remove the disc and wipe away the moisture on the disc, then leave the system turned on for a few hours until the moisture evaporates. • Press NX (or CD N on the remote) to Normal Play. Load a cassette. • The tab has been removed from the cassette. Tuner...
...the proper band and frequency (page 11). • Connect the antenna properly (page 6). • Find a place and an orientation that this system can play , or there is a decrease in stereo. • Press FM MODE until both "PROGRAM" and "SHUFFLE" disappear to return to start . • Open the disc tray and ...set up . • Remove the disc and wipe away the moisture on the disc, then leave the system turned on for a few hours until the moisture evaporates. • Press NX (or CD N on the remote) to Normal Play. Load a cassette. • The tab has been removed from the cassette. Tuner...

Operating Instructions
Page 32
... 6 ohms Approx. 305 × 615 × 435 mm Approx. 15.5 kg net per speaker Speaker SS-XGR66 for LBT-XGR66 Speaker system Speaker units Super Woofer/Woofer: Tweeter: Rated impedance Dimensions (w/h/d) Mass 3-way BUILT IN SW, bass-reflex type, magnetically shielded ...215; 425 × 451 mm Mass (Main Unit) LBT-XGR600: LBT-XGR88: LBT-XGR66: Approx. 13.0 kg Approx. 17.0 kg Approx. 15.1 kg Supplied accessories: AM loop antenna (1) FM lead antenna (1) Speaker cords (LBT-XGR88:4, LBT-XGR600/XGR66:2) Speaker pads (8) Remote Commander (1) Batteries (2) Design and specifications are subject to ...
... 6 ohms Approx. 305 × 615 × 435 mm Approx. 15.5 kg net per speaker Speaker SS-XGR66 for LBT-XGR66 Speaker system Speaker units Super Woofer/Woofer: Tweeter: Rated impedance Dimensions (w/h/d) Mass 3-way BUILT IN SW, bass-reflex type, magnetically shielded ...215; 425 × 451 mm Mass (Main Unit) LBT-XGR600: LBT-XGR88: LBT-XGR66: Approx. 13.0 kg Approx. 17.0 kg Approx. 15.1 kg Supplied accessories: AM loop antenna (1) FM lead antenna (1) Speaker cords (LBT-XGR88:4, LBT-XGR600/XGR66:2) Speaker pads (8) Remote Commander (1) Batteries (2) Design and specifications are subject to ...


