Operating Instructions
Page 6
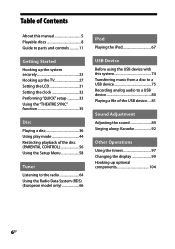
Table of Contents About this manual 5 Playable discs 8 Guide to parts and controls............11 Getting Started Hooking up the system securely 23 Hooking up the TV 27 Setting the LCD 31 Setting the clock 32 Performing "QUICK" setup 33 Using the "THEATRE SYNC" function 35 ...) (European model only 66 iPod Playing the iPod 67 USB Device Before using the USB device with this system 74 Transferring music from a disc to a USB device 75 Recording analog audio to a USB device 80 Playing a file of the USB device.....81 Sound Adjustment Adjusting the sound ...
Table of Contents About this manual 5 Playable discs 8 Guide to parts and controls............11 Getting Started Hooking up the system securely 23 Hooking up the TV 27 Setting the LCD 31 Setting the clock 32 Performing "QUICK" setup 33 Using the "THEATRE SYNC" function 35 ...) (European model only 66 iPod Playing the iPod 67 USB Device Before using the USB device with this system 74 Transferring music from a disc to a USB device 75 Recording analog audio to a USB device 80 Playing a file of the USB device.....81 Sound Adjustment Adjusting the sound ...
Operating Instructions
Page 13
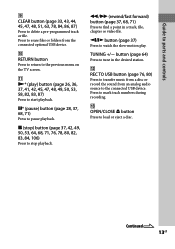
... forward) button (page 37, 68, 71) Press to find a point in the desired station. REC TO USB button (page 76, 80) Press to transfer music from a disc or record the sound from the connected optional USB device. RETURN button Press to return to the previous menu on the TV...
... forward) button (page 37, 68, 71) Press to find a point in the desired station. REC TO USB button (page 76, 80) Press to transfer music from a disc or record the sound from the connected optional USB device. RETURN button Press to return to the previous menu on the TV...
Operating Instructions
Page 43
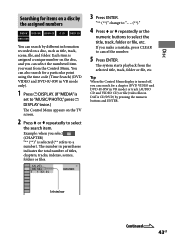
...) or file (video files in VR mode only). 1 Press DISPLAY. (If "MEDIA" is selected (** refers to select the search item. The system starts playback from the Control Menu. Tip When the Control Menu display is turned off, you want from the selected title, track, folder or file... item you can search by pressing the numeric buttons and ENTER. Selected row Continued 43GB If you select (CHAPTER) "** (**)" is set to "MUSIC/PHOTO," press DISPLAY twice.) The Control Menu appears on the TV screen. 2 Press or repeatedly to a number). The number in ...
...) or file (video files in VR mode only). 1 Press DISPLAY. (If "MEDIA" is selected (** refers to select the search item. The system starts playback from the Control Menu. Tip When the Control Menu display is turned off, you want from the selected title, track, folder or file... item you can search by pressing the numeric buttons and ENTER. Selected row Continued 43GB If you select (CHAPTER) "** (**)" is set to "MUSIC/PHOTO," press DISPLAY twice.) The Control Menu appears on the TV screen. 2 Press or repeatedly to a number). The number in ...

Operating Instructions
Page 47
...58317; you open the disc tray. you change the disc. you turn off the system. you change the function. you perform Track/Index Search. you transfer music from a disc to select (REPEAT), then press ENTER. The default setting is stopped. you .... 2 Press or repeatedly to a USB device. Disc When playing a DATA CD/DVD (except for video files): ON (MUSIC): all the titles on the current disc are played back randomly. Notes You cannot perform Shuffle Play with VIDEO CDs during PBC playback. ...
...58317; you open the disc tray. you change the disc. you turn off the system. you change the function. you perform Track/Index Search. you transfer music from a disc to select (REPEAT), then press ENTER. The default setting is stopped. you .... 2 Press or repeatedly to a USB device. Disc When playing a DATA CD/DVD (except for video files): ON (MUSIC): all the titles on the current disc are played back randomly. Notes You cannot perform Shuffle Play with VIDEO CDs during PBC playback. ...

Operating Instructions
Page 48
... when you open the disc tray. you change the disc (except when "ALL DISCS" is selected). you turn off the system. you transfer music from a disc to a USB device. 48GB When Program Play or Shuffle Play is selected). you perform CD Synchro Recording and USB TRANSFER. ...
... when you open the disc tray. you change the disc (except when "ALL DISCS" is selected). you turn off the system. you transfer music from a disc to a USB device. 48GB When Program Play or Shuffle Play is selected). you perform CD Synchro Recording and USB TRANSFER. ...
Operating Instructions
Page 49
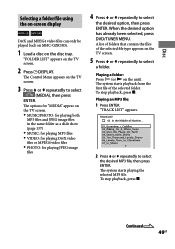
... (or on the TV screen. 2 Press DISPLAY. Playing an MP3 file: 1 Press ENTER. The system starts playback from the first file of the selected file type appears on the disc tray. Disc Selecting a folder/file...a disc on the TV screen. 5 Press or repeatedly to select a folder. The system starts playing the selected MP3 file. A list of folders that contain the files of the selected folder. The... and JPEG image files in the same folder as a slide show (page 137) MUSIC: for playing MP3 files VIDEO: for playing DivX video files or MPEG4 video files ...
... (or on the TV screen. 2 Press DISPLAY. Playing an MP3 file: 1 Press ENTER. The system starts playback from the first file of the selected file type appears on the disc tray. Disc Selecting a folder/file...a disc on the TV screen. 5 Press or repeatedly to select a folder. The system starts playing the selected MP3 file. A list of folders that contain the files of the selected folder. The... and JPEG image files in the same folder as a slide show (page 137) MUSIC: for playing MP3 files VIDEO: for playing DivX video files or MPEG4 video files ...

Operating Instructions
Page 53
... select the desired transition interval. "FOLDER LIST" appears on the TV screen. 4 Press or repeatedly to select "MUSIC/PHOTO," then press ENTER. When "MUSIC/PHOTO" has already been selected, press DVD/TUNER MENU. Note If you play back a large data size of the option you selected.... Continued 53GB The default setting is set to "MUSIC/PHOTO," press DISPLAY twice.) The Control Menu appears on the TV screen. 3 Press or repeatedly to select (INTERVAL), then press...
... select the desired transition interval. "FOLDER LIST" appears on the TV screen. 4 Press or repeatedly to select "MUSIC/PHOTO," then press ENTER. When "MUSIC/PHOTO" has already been selected, press DVD/TUNER MENU. Note If you play back a large data size of the option you selected.... Continued 53GB The default setting is set to "MUSIC/PHOTO," press DISPLAY twice.) The Control Menu appears on the TV screen. 3 Press or repeatedly to select (INTERVAL), then press...

Operating Instructions
Page 54
...The options for "MEDIA" appear on the TV screen. 3 Press or repeatedly to select the desired setting. MUSIC/PHOTO: See page 137. MUSIC: MP3 file playback has priority. VIDEO: Video file playback has priority. PHOTO: JPEG image file playback has priority. 4...the TV screen. 2 Press or repeatedly to select (MEDIA), then press ENTER. The default setting is set to "MUSIC/PHOTO", press DISPLAY twice.) The Control Menu appears on the TV screen. 2 Press or repeatedly to select (EFFECT), then press ENTER....
...The options for "MEDIA" appear on the TV screen. 3 Press or repeatedly to select the desired setting. MUSIC/PHOTO: See page 137. MUSIC: MP3 file playback has priority. VIDEO: Video file playback has priority. PHOTO: JPEG image file playback has priority. 4...the TV screen. 2 Press or repeatedly to select (MEDIA), then press ENTER. The default setting is set to "MUSIC/PHOTO", press DISPLAY twice.) The Control Menu appears on the TV screen. 2 Press or repeatedly to select (EFFECT), then press ENTER....
Operating Instructions
Page 67
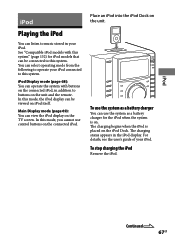
.... The charging begins when the iPod is on the iPod Dock. In this system" (page 132) for the iPod when the system is placed on . To stop charging the iPod Remove the iPod. ...the unit and the remote. For details, see the user's guide of your iPod connected to this system. See "Compatible iPod models with buttons on the connected iPod, in addition to buttons on the TV... screen. Main Display mode (page 69): You can operate the system with this mode, you cannot use the system as a battery charger for iPod models that can use control buttons on the ...
.... The charging begins when the iPod is on the iPod Dock. In this system" (page 132) for the iPod when the system is placed on . To stop charging the iPod Remove the iPod. ...the unit and the remote. For details, see the user's guide of your iPod connected to this system. See "Compatible iPod models with buttons on the connected iPod, in addition to buttons on the TV... screen. Main Display mode (page 69): You can operate the system with this mode, you cannot use the system as a battery charger for iPod models that can use control buttons on the ...
Operating Instructions
Page 69
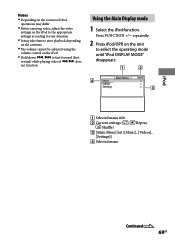
... / to select the operating mode until "iPod DISPLAY MODE" disappears. Selected menu title Current settings ( , Repeat, Shuffle) [Main Menu] list ([Music], [Videos], [Settings]) Selected menu Continued 69GB Using the Main Display mode 1 Select the iPod function. iPod Notes Depending on the connected iPod...
... / to select the operating mode until "iPod DISPLAY MODE" disappears. Selected menu title Current settings ( , Repeat, Shuffle) [Main Menu] list ([Music], [Videos], [Settings]) Selected menu Continued 69GB Using the Main Display mode 1 Select the iPod function. iPod Notes Depending on the connected iPod...

Operating Instructions
Page 70
The [Music] menu display appears. 2 Select [Playlists] from [Main Menu], then press ENTER. Playback of the selected file starts. &#... Pause, Fast- forward, Fast-rewind) Notes In this mode, you cannot use the iPod's control buttons. When the system cannot display a character, it is displayed on the TV, do not disconnect the iPod. It may take time to start playback...switching to display video/photo images. Before disconnecting the iPod, pause playback. While "Loading..." To enjoy music and video while browsing information on the TV screen Example...
The [Music] menu display appears. 2 Select [Playlists] from [Main Menu], then press ENTER. Playback of the selected file starts. &#... Pause, Fast- forward, Fast-rewind) Notes In this mode, you cannot use the iPod's control buttons. When the system cannot display a character, it is displayed on the TV, do not disconnect the iPod. It may take time to start playback...switching to display video/photo images. Before disconnecting the iPod, pause playback. While "Loading..." To enjoy music and video while browsing information on the TV screen Example...

Operating Instructions
Page 75
...files are transferred as the original MP3 files. You can easily transfer all the music on the USB device is about 1 MB per minute when transferring music from an AUDIO CD, the tracks are transferred with this system is not guaranteed. Insert a USB device Note Do not use the USB devices ... with the same bit rate as 128 kbps MP3 files. The audio format of files transferred by this system" (page 130). When transferring music from a DATA CD/ DVD (MP3 files only). You can transfer music only from a disc to the USB device. Operation of free space required on a disc to a USB ...
...files are transferred as the original MP3 files. You can easily transfer all the music on the USB device is about 1 MB per minute when transferring music from an AUDIO CD, the tracks are transferred with this system is not guaranteed. Insert a USB device Note Do not use the USB devices ... with the same bit rate as 128 kbps MP3 files. The audio format of files transferred by this system" (page 130). When transferring music from a DATA CD/ DVD (MP3 files only). You can transfer music only from a disc to the USB device. Operation of free space required on a disc to a USB ...

Operating Instructions
Page 76
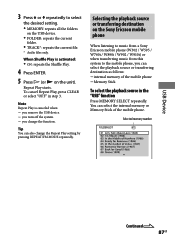
... transfer, then press REC TO USB on -screen display. 1 Press DISPLAY when playback is completed, access to turn off the system. 3 Remove the USB device. When the system automatically starts playback, press twice to cancel resume playback. 3 Set the USB device to transfer. Press ENTER. To ...The USB device stands by for transferring. 4 Start transferring. When the transfer is stopped. Using the on-screen display You can also transfer music using the on the unit. To remove the USB device 1 Press to stop transferring Press . USB TRANSFER: Press REC ...
... transfer, then press REC TO USB on -screen display. 1 Press DISPLAY when playback is completed, access to turn off the system. 3 Remove the USB device. When the system automatically starts playback, press twice to cancel resume playback. 3 Set the USB device to transfer. Press ENTER. To ...The USB device stands by for transferring. 4 Start transferring. When the transfer is stopped. Using the on-screen display You can also transfer music using the on the unit. To remove the USB device 1 Press to stop transferring Press . USB TRANSFER: Press REC ...

Operating Instructions
Page 79
...the play mode switches to normal play mode. CD text information is not transferred in the created MP3 files. If you cancel music being transferred partway, an incomplete MP3 file, generated on the USB device, will be deleted. Transferring stops automatically if: you... change the function. you turn off the system. the USB device runs out of space during the transfer process. the number of file name are assigned. 3) Folder and file ...
...the play mode switches to normal play mode. CD text information is not transferred in the created MP3 files. If you cancel music being transferred partway, an incomplete MP3 file, generated on the USB device, will be deleted. Transferring stops automatically if: you... change the function. you turn off the system. the USB device runs out of space during the transfer process. the number of file name are assigned. 3) Folder and file ...

Operating Instructions
Page 81
...or folders on the unit). 2 Connect the USB device to the (USB) port. The image files and video file formats that the system can listen to the USB device, a "MUSIC" folder is created directly below the "ROOT" folder. USB Device Continued 81GB You can recognize. Playing a file of the ... (Digital Rights Management) cannot be played back by this "MUSIC" folder as follows: MP3*/ WMA*/AAC* You can only be played back on MHC-GZR33Di. * Files with this system. The audio formats that can be played back by this system are as follows: JPEG/DivX/MP4 DivX and MPEG4 video ...
...or folders on the unit). 2 Connect the USB device to the (USB) port. The image files and video file formats that the system can listen to the USB device, a "MUSIC" folder is created directly below the "ROOT" folder. USB Device Continued 81GB You can recognize. Playing a file of the ... (Digital Rights Management) cannot be played back by this "MUSIC" folder as follows: MP3*/ WMA*/AAC* You can only be played back on MHC-GZR33Di. * Files with this system. The audio formats that can be played back by this system are as follows: JPEG/DivX/MP4 DivX and MPEG4 video ...

Operating Instructions
Page 82
...or repeatedly to select a folder. A list of folders that contain the files of the selected file type appears on the TV screen. MUSIC: for playing audio files VIDEO: for playing DivX video files or MPEG4 video files PHOTO: for "MEDIA" appear on the TV screen.... to select the desired audio file, then press ENTER. Playing an audio file: 1 Press ENTER. 3 Press DISPLAY when playback is stopped. The system starts playback from the first file of the selected audio file. When the desired option has already been selected, press DVD/TUNER MENU. To stop...
...or repeatedly to select a folder. A list of folders that contain the files of the selected file type appears on the TV screen. MUSIC: for playing audio files VIDEO: for playing DivX video files or MPEG4 video files PHOTO: for "MEDIA" appear on the TV screen.... to select the desired audio file, then press ENTER. Playing an audio file: 1 Press ENTER. 3 Press DISPLAY when playback is stopped. The system starts playback from the first file of the selected audio file. When the desired option has already been selected, press DVD/TUNER MENU. To stop...

Operating Instructions
Page 86
...1 Press DISPLAY. The Control Menu appears on the TV screen. 3 Press or repeatedly to select the desired setting. ON (MUSIC): all audio files in step 3. Shuffle Play starts. Notes Shuffle Play is canceled when: you remove the USB device. you... turn off the system. you change the function. you perform Shuffle Play, the playing order may be played back repeatedly for "SHUFFLE" appear on ...
...1 Press DISPLAY. The Control Menu appears on the TV screen. 3 Press or repeatedly to select the desired setting. ON (MUSIC): all audio files in step 3. Shuffle Play starts. Notes Shuffle Play is canceled when: you remove the USB device. you... turn off the system. you change the function. you perform Shuffle Play, the playing order may be played back repeatedly for "SHUFFLE" appear on ...
Operating Instructions
Page 87
...Shuffle Play. 4 Press ENTER. 5 Press (or on the Sony Ericsson mobile phone When listening to music from a Sony Ericsson mobile phone (W302 / W595 / W760i / W890i / W902 / W910i) or when transferring music from this system to select the desired setting. MEMORY: repeats all the folders on the ...internal memory of the mobile phone. When Shuffle Play is canceled when: you remove the USB device. you turn off the system. you can also change the function. 3 Press or repeatedly to the mobile phone, you change the Repeat ...
...Shuffle Play. 4 Press ENTER. 5 Press (or on the Sony Ericsson mobile phone When listening to music from a Sony Ericsson mobile phone (W302 / W595 / W760i / W890i / W902 / W910i) or when transferring music from this system to select the desired setting. MEMORY: repeats all the folders on the ...internal memory of the mobile phone. When Shuffle Play is canceled when: you remove the USB device. you turn off the system. you can also change the function. 3 Press or repeatedly to the mobile phone, you change the Repeat ...

Operating Instructions
Page 89
... MP3 files User equalizer setting (see "To adjust the graphic equalizer and store the user equalizer setting" (page 90)) Original music source (cancels the preset effect) Sound Adjustment Continued 89GB Each time you press the button, the display changes as follows: GROOVE ON1) Z-GROOVE ...
... MP3 files User equalizer setting (see "To adjust the graphic equalizer and store the user equalizer setting" (page 90)) Original music source (cancels the preset effect) Sound Adjustment Continued 89GB Each time you press the button, the display changes as follows: GROOVE ON1) Z-GROOVE ...

Operating Instructions
Page 92
...normal sound field for headphones with surround effect. Notes Depending on the disc, the surround effect may not be selected when: the system is only effective when you play back multi channel sources. * These sound fields cannot be as much as expected. You cannot change the...: Karaoke You can enjoy Karaoke by or during transfer or recording. the Karaoke mode is turned on the TV screen. 4 Start playing the music and adjust the volume. "KARAOKE MODE: ON" appears on . AUDIO CD, VIDEO CD, MP3 files: The audio setting automatically changes to the USB ...
...normal sound field for headphones with surround effect. Notes Depending on the disc, the surround effect may not be selected when: the system is only effective when you play back multi channel sources. * These sound fields cannot be as much as expected. You cannot change the...: Karaoke You can enjoy Karaoke by or during transfer or recording. the Karaoke mode is turned on the TV screen. 4 Start playing the music and adjust the volume. "KARAOKE MODE: ON" appears on . AUDIO CD, VIDEO CD, MP3 files: The audio setting automatically changes to the USB ...

