Operating Instructions
Page 5
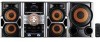
...a trademark of Sony Corporation. MICROVAULT is a trademark of Sony Corporation. However, since the audio material side does not conform to the CD standard and may not be aware that do not conform to the Compact Disc (CD) standard, playback...discs, there are registered trademarks of Sony Corporation. Windows Media is a registered trademark of Microsoft Corporation in the United States and/or other countries. 5GB For customers in Australia Disposal of Old Electrical & Electronic Equipment (Applicable in the European Union and other European countries with separate collection systems...
...a trademark of Sony Corporation. MICROVAULT is a trademark of Sony Corporation. However, since the audio material side does not conform to the CD standard and may not be aware that do not conform to the Compact Disc (CD) standard, playback...discs, there are registered trademarks of Sony Corporation. Windows Media is a registered trademark of Microsoft Corporation in the United States and/or other countries. 5GB For customers in Australia Disposal of Old Electrical & Electronic Equipment (Applicable in the European Union and other European countries with separate collection systems...
Operating Instructions
Page 7
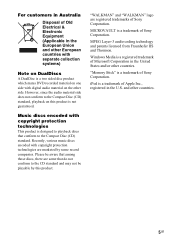
... ..........8 Getting Started Hooking up the system securely 14 Setting the clock 16 Basic Operations Playing an AUDIO CD/MP3 disc 17 Listening to the radio 19 Transferring onto an USB device 20 Listening to music of an USB device 25 Playing the iPod 28 (MHC-GTZ4i/GTZ3i/GTZ2i and LBT-GTZ4i only) Using optional audio components...
... ..........8 Getting Started Hooking up the system securely 14 Setting the clock 16 Basic Operations Playing an AUDIO CD/MP3 disc 17 Listening to the radio 19 Transferring onto an USB device 20 Listening to music of an USB device 25 Playing the iPod 28 (MHC-GTZ4i/GTZ3i/GTZ2i and LBT-GTZ4i only) Using optional audio components...
Operating Instructions
Page 9
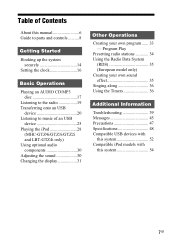
... turned off. Press to switch to turn on /standby) (pages 16, 39, 45) Press to the CD function from other function. 1 "/1 (on the system. EQ BAND (page 35) Press to adjust the volume. E MASTER VOLUME (pages 17, 25, 28, 30, 31, 39) Turn to select the frequency band. I USB B (...pages 20, 27, 28, 33) Press to select the USB device connected to select a disc. J DISC 1 - 3 (pages 17, 33) Press to the...
... turned off. Press to switch to turn on /standby) (pages 16, 39, 45) Press to the CD function from other function. 1 "/1 (on the system. EQ BAND (page 35) Press to adjust the volume. E MASTER VOLUME (pages 17, 25, 28, 30, 31, 39) Turn to select the frequency band. I USB B (...pages 20, 27, 28, 33) Press to select the USB device connected to select a disc. J DISC 1 - 3 (pages 17, 33) Press to the...
Operating Instructions
Page 10
... select the USB device connected to exchange other discs during CD tray open. Press to the A port. S ENTER (pages 21, 31, 33, 34, 35, 45) Press to exit search mode. Press to enter the settings. W METER MODE (page 32) Press to select a disc during playback. Y Remote sensor (page 40)... A indicator A port (pages 25, 28, 42) Connect an optional USB device. Q DISC SKIP/EX-CHANGE (pages 16, 18) Press to select the preset meter display. R MHC-GTZ5, MHC-GTZ4 / GTZ4i, MHC-GTZ3 / GTZ3i and LBT-GTZ4i only SUBWOOFER (page 30) Press to change the display, USB and MP3 BOOSTER+ settings....
... select the USB device connected to exchange other discs during CD tray open. Press to the A port. S ENTER (pages 21, 31, 33, 34, 35, 45) Press to exit search mode. Press to enter the settings. W METER MODE (page 32) Press to select a disc during playback. Y Remote sensor (page 40)... A indicator A port (pages 25, 28, 42) Connect an optional USB device. Q DISC SKIP/EX-CHANGE (pages 16, 18) Press to select the preset meter display. R MHC-GTZ5, MHC-GTZ4 / GTZ4i, MHC-GTZ3 / GTZ3i and LBT-GTZ4i only SUBWOOFER (page 30) Press to change the display, USB and MP3 BOOSTER+ settings....
Operating Instructions
Page 11
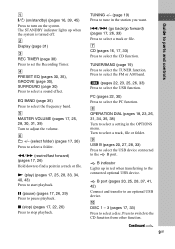
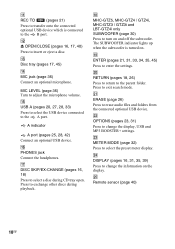
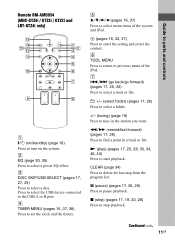
...file. E V/v/b/B (pages 16, 37) Press to select menu items of the iPod. Remote RM-AMU054 (MHC-GTZ4i / GTZ3i / GTZ2i and LBT-GTZ4i only) qg qf qd qs qa q; 1 2 3 4 5 6 7 9 8 1 "/1 (on the system. C DISC SKIP/USB SELECT (pages 17, 27, 33) Press to parts and controls Continued l 11GB Guide to select... a disc. X (pause) (pages 17, 26, 29) Press to the USB A or B port. Press to select the USB ...
...file. E V/v/b/B (pages 16, 37) Press to select menu items of the iPod. Remote RM-AMU054 (MHC-GTZ4i / GTZ3i / GTZ2i and LBT-GTZ4i only) qg qf qd qs qa q; 1 2 3 4 5 6 7 9 8 1 "/1 (on the system. C DISC SKIP/USB SELECT (pages 17, 27, 33) Press to parts and controls Continued l 11GB Guide to select... a disc. X (pause) (pages 17, 26, 29) Press to the USB A or B port. Press to select the USB ...
Operating Instructions
Page 12
... to exit search mode. Press to the parent folder. Press to a disc, an USB device, a single track or file repeatedly. N SLEEP (...select the play mode of the iPod. Use the tactile dot as a reference when operating the system. L PLAY MODE/TUNING MODE (pages 19, 27, 33, 34) Press to set the Sleep... H FUNCTION +/- (pages 19, 22, 23, 25, 26, 30, 33) Press to a disc, an USB device, a single track or file repeatedly. Press to return to adjust the volume. *...5 qa 6 q; 7 8 8 9 1 "/1 (on the system. I VOLUME +/-* (pages 17, 19, 25, 28, 30, 37) Press to previous menu of an AUDIO...
... to exit search mode. Press to the parent folder. Press to a disc, an USB device, a single track or file repeatedly. N SLEEP (...select the play mode of the iPod. Use the tactile dot as a reference when operating the system. L PLAY MODE/TUNING MODE (pages 19, 27, 33, 34) Press to set the Sleep... H FUNCTION +/- (pages 19, 22, 23, 25, 26, 30, 33) Press to a disc, an USB device, a single track or file repeatedly. Press to return to adjust the volume. *...5 qa 6 q; 7 8 8 9 1 "/1 (on the system. I VOLUME +/-* (pages 17, 19, 25, 28, 30, 37) Press to previous menu of an AUDIO...
Operating Instructions
Page 13
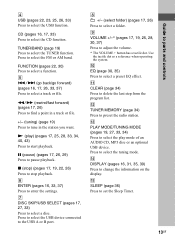
N (play mode of an AUDIO CD, MP3 disc or an optional USB device. K CLEAR (page 34) Press to select the TUNER function....EQ (page 30, 35) Press to the USB A or B port. N DISPLAY (pages 16, 31, 35, 39) Press to select a disc. G DISC SKIP/USB SELECT (pages 17, 27, 33) Press to change the information on the display. H +/- (select folder) (pages 17, 26) Press... to preset the radio station. Use the tactile dot as a reference when operating the system. L TUNER MEMORY (page 34) Press to select a folder. O SLEEP (page 36) Press to set the Sleep Timer. 13GB Guide...
N (play mode of an AUDIO CD, MP3 disc or an optional USB device. K CLEAR (page 34) Press to select the TUNER function....EQ (page 30, 35) Press to the USB A or B port. N DISPLAY (pages 16, 31, 35, 39) Press to select a disc. G DISC SKIP/USB SELECT (pages 17, 27, 33) Press to change the information on the display. H +/- (select folder) (pages 17, 26) Press... to preset the radio station. Use the tactile dot as a reference when operating the system. L TUNER MEMORY (page 34) Press to select a folder. O SLEEP (page 36) Press to set the Sleep Timer. 13GB Guide...
Operating Instructions
Page 16
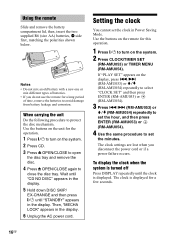
Use the buttons on the unit for this operation. 1 Press "/1 to turn on the system. 2 Press CD. 3 Press Z OPEN/CLOSE to open the disc tray and remove the disc. 4 Press Z OPEN/CLOSE again to protect the disc mechanism. Use the buttons on the remote for the operation. 1 Press "/1 to turn on the... the clock You cannot set the minutes. The clock is displayed. Wait until "CD NO DISC" appears in the display. Then, "MECHA LOCK" appears in Power Saving Mode. To display the clock when the system is turned off Press DISPLAY repeatedly until "STANDBY" appears in the display. 5 ...
Use the buttons on the unit for this operation. 1 Press "/1 to turn on the system. 2 Press CD. 3 Press Z OPEN/CLOSE to open the disc tray and remove the disc. 4 Press Z OPEN/CLOSE again to protect the disc mechanism. Use the buttons on the remote for the operation. 1 Press "/1 to turn on the... the clock You cannot set the minutes. The clock is displayed. Wait until "CD NO DISC" appears in the display. Then, "MECHA LOCK" appears in Power Saving Mode. To display the clock when the system is turned off Press DISPLAY repeatedly until "STANDBY" appears in the display. 5 ...
Operating Instructions
Page 17
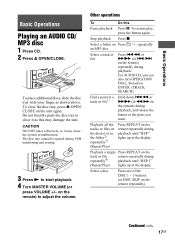
...system to start playback. 4 Turn MASTER VOLUME (or press VOLUME +/- Stop playback Press x. repeatedly. Select a folder on the remote repeatedly). Playback a single Press REPEAT on the remote) repeatedly during USB transferring and erasing. 3 Press N to malfunction. Basic Operations Basic Operations Playing an AUDIO CD/ MP3 disc 1 Press CD.... 2 Press Z OPEN/CLOSE. an MP3 disc Select a track or file Press .m or >M (or ./> on the track or file ...
...system to start playback. 4 Turn MASTER VOLUME (or press VOLUME +/- Stop playback Press x. repeatedly. Select a folder on the remote repeatedly). Playback a single Press REPEAT on the remote) repeatedly during USB transferring and erasing. 3 Press N to malfunction. Basic Operations Basic Operations Playing an AUDIO CD/ MP3 disc 1 Press CD.... 2 Press Z OPEN/CLOSE. an MP3 disc Select a track or file Press .m or >M (or ./> on the track or file ...
Operating Instructions
Page 18
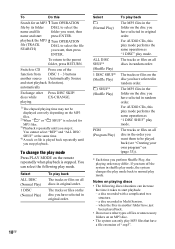
... to CD Press one of the function from DISC 1 - 3 buttons another folder have just been played back. • Do not save other discs while playing Press DISC SKIP/ EX-CHANGE. 1) The elapsed playing time may not be played back (see "Creating your own program" on an MP3 disc. • The system can only... order. 18GB Select (Normal Play) ALL DISC SHUF* (Shuffle Play) 1 DISC SHUF* (Shuffle Play) SHUF* (Shuffle Play) PGM (Program Play) To play mode back to the parent folder, press RETURN. If you turn off the system in shuffle play mode, the system changes the play back The MP3 files in...
... to CD Press one of the function from DISC 1 - 3 buttons another folder have just been played back. • Do not save other discs while playing Press DISC SKIP/ EX-CHANGE. 1) The elapsed playing time may not be played back (see "Creating your own program" on an MP3 disc. • The system can only... order. 18GB Select (Normal Play) ALL DISC SHUF* (Shuffle Play) 1 DISC SHUF* (Shuffle Play) SHUF* (Shuffle Play) PGM (Program Play) To play mode back to the parent folder, press RETURN. If you turn off the system in shuffle play mode, the system changes the play back The MP3 files in...
Operating Instructions
Page 19
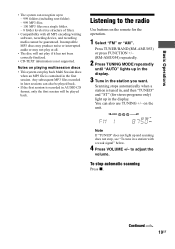
Notes on the unit. on playing multisession discs • This system can play if it has not been correctly finalized. • CD-TEXT information is recorded in a station with all . • The disc will be guaranteed. Continued l 19GB Press TUNER/BAND (RM-AMU053) or press FUNCTION +/- (RM-AMU054) repeatedly....subsequent MP3 files recorded in later sessions can also use TUNING +/- To stop , see "To tune in AUDIO CD format, only the first session will not play back Multi Session discs when an MP3 file is tuned in, and then "TUNED" and "ST" (for the operation. 1 Select...
Notes on the unit. on playing multisession discs • This system can play if it has not been correctly finalized. • CD-TEXT information is recorded in a station with all . • The disc will be guaranteed. Continued l 19GB Press TUNER/BAND (RM-AMU053) or press FUNCTION +/- (RM-AMU054) repeatedly....subsequent MP3 files recorded in later sessions can also use TUNING +/- To stop , see "To tune in AUDIO CD format, only the first session will not play back Multi Session discs when an MP3 file is tuned in, and then "TUNED" and "ST" (for the operation. 1 Select...
Operating Instructions
Page 20
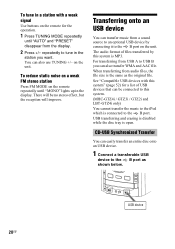
...USB B you want. When transferring from audio files, the file size is connected to tune in the display. There will be connected to this system. (MHC-GTZ4i / GTZ3i / GTZ2i and LBT-GTZ4i only) You cannot transfer the music to the B port as the original file. To tune in a station with this... B port. The audio format of USB devices that can easily transfer an entire disc onto an USB device. 1 Connect a transferable USB device to the iPod which is the same as shown below. 20GB USB device CD-USB Synchronized Transfer You can be no stereo effect, but the reception will improve....
...USB B you want. When transferring from audio files, the file size is connected to tune in the display. There will be connected to this system. (MHC-GTZ4i / GTZ3i / GTZ2i and LBT-GTZ4i only) You cannot transfer the music to the B port as the original file. To tune in a station with this... B port. The audio format of USB devices that can easily transfer an entire disc onto an USB device. 1 Connect a transferable USB device to the iPod which is the same as shown below. 20GB USB device CD-USB Synchronized Transfer You can be no stereo effect, but the reception will improve....

Operating Instructions
Page 21
... to be connected for details on the operation method. 2 Press CD, then load the disc you want to transfer. 3 Press PLAY MODE on the unit (page 20). 2 Press CD, then load the disc you want to be connected. When the transferring is completed, the disc continues to normal play mode, if you want to transfer...
... to be connected for details on the operation method. 2 Press CD, then load the disc you want to transfer. 3 Press PLAY MODE on the unit (page 20). 2 Press CD, then load the disc you want to be connected. When the transferring is completed, the disc continues to normal play mode, if you want to transfer...
Operating Instructions
Page 24
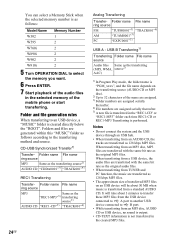
...Same as the "REC1-MP3"5) transferring source2) AUDIO CD "REC1-CD"5) "TRACK001"4) Analog Transferring Transfer- Notes • Do not connect the system and the USB device through an USB hub. • When transferring from an MP3 disc, AUDIO CD or USB device, no sound is output. • CD-TEXT information is not transferred in the created... "MUSIC" folder as follows according to select the memory you want. 6 Press ENTER. 7 Start playback of transferred MP3 files on the transferring source (AUDIO CD or MP3 disc). 2) Up to an USB device, a "MUSIC" folder is created directly below the "ROOT...
...Same as the "REC1-MP3"5) transferring source2) AUDIO CD "REC1-CD"5) "TRACK001"4) Analog Transferring Transfer- Notes • Do not connect the system and the USB device through an USB hub. • When transferring from an MP3 disc, AUDIO CD or USB device, no sound is output. • CD-TEXT information is not transferred in the created... "MUSIC" folder as follows according to select the memory you want. 6 Press ENTER. 7 Start playback of transferred MP3 files on the transferring source (AUDIO CD or MP3 disc). 2) Up to an USB device, a "MUSIC" folder is created directly below the "ROOT...
Operating Instructions
Page 25
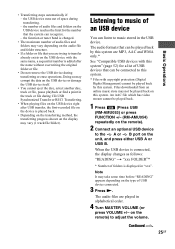
...USB devices that can be connected to this system are trying to adjust the volume. Files downloaded from an online music store may corrupt the data on the USB device or damage the USB device itself. • You cannot eject the disc, select another disc, track or file, pause playback or ... as follows: "READING" t "xxx FOLDER"* * Number of USB device connected. 3 Press N. The audio files are played in the track or file during CD-USB Synchronized Transfer or REC1 Transferring. • When playing files on the USB device right after USB transfer, the first-recorded file on the device...
...USB devices that can be connected to this system are trying to adjust the volume. Files downloaded from an online music store may corrupt the data on the USB device or damage the USB device itself. • You cannot eject the disc, select another disc, track or file, pause playback or ... as follows: "READING" t "xxx FOLDER"* * Number of USB device connected. 3 Press N. The audio files are played in the track or file during CD-USB Synchronized Transfer or REC1 Transferring. • When playing files on the USB device right after USB transfer, the first-recorded file on the device...
Operating Instructions
Page 27
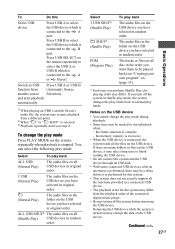
... (Shuffle Play) USB devices in random order. Select To play mode. Press USB B to be played back (see "Creating your own program" on all disc in the order you want them to select the USB device which is stopped. You can select the following play back ALL USB (Normal Play... in original order. (Normal Play) The audio files in the folder on the USB device. Continued l 27GB Basic Operations Removing the USB device while the system is connected to select the USB A or USB B which is turned on the remote repeatedly to the B port. Press USB SELECT on may differ....
... (Shuffle Play) USB devices in random order. Select To play mode. Press USB B to be played back (see "Creating your own program" on all disc in the order you want them to select the USB device which is stopped. You can select the following play back ALL USB (Normal Play... in original order. (Normal Play) The audio files in the folder on the USB device. Continued l 27GB Basic Operations Removing the USB device while the system is connected to select the USB A or USB B which is turned on the remote repeatedly to the B port. Press USB SELECT on may differ....
Operating Instructions
Page 33
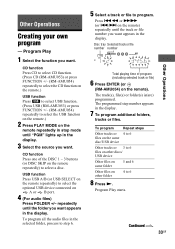
... >M (or ./> on the remote repeatedly in stop mode until the folder you want appears in the display. 3 Select the source you want . CD function Press one of program (including selected track or file) 6 Press ENTER (or (RM-AMU054) on A or B port. 4 (For audio... on other folder 4 to select a disc. The track(s), file(s) or folder(s) is(are) programmed. Continued l 33GB Other Operations Disc tray Selected track or file number number PGM DISC CD Z-GROOVE 1 2 3 Total playing time of the DISC 1 ~ 3 buttons (or DISC SKIP on other discs/ USB device Other files on same folder...
... >M (or ./> on the remote repeatedly in stop mode until the folder you want appears in the display. 3 Select the source you want . CD function Press one of program (including selected track or file) 6 Press ENTER (or (RM-AMU054) on A or B port. 4 (For audio... on other folder 4 to select a disc. The track(s), file(s) or folder(s) is(are) programmed. Continued l 33GB Other Operations Disc tray Selected track or file number number PGM DISC CD Z-GROOVE 1 2 3 Total playing time of the DISC 1 ~ 3 buttons (or DISC SKIP on other discs/ USB device Other files on same folder...
Operating Instructions
Page 34
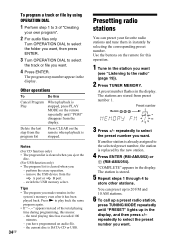
... want . remove the USB device from the display. If another station is already assigned to the selected preset number, the station is DATA-CD or USB. repeatedly to select the preset number you want (see "Listening to the radio" (page 19)). 2 Press TUNER MEMORY. the... remote repeatedly until "PRESET" lights up in the display. A preset number flashes in the system's memory even after it has been played back. Delete the last step from preset number 1. the current disc is replaced by selecting the corresponding preset number. Preset number GROOVE 1 2 3 REC AUTO ...
... want . remove the USB device from the display. If another station is already assigned to the selected preset number, the station is DATA-CD or USB. repeatedly to select the preset number you want (see "Listening to the radio" (page 19)). 2 Press TUNER MEMORY. the... remote repeatedly until "PRESET" lights up in the display. A preset number flashes in the system's memory even after it has been played back. Delete the last step from preset number 1. the current disc is replaced by selecting the corresponding preset number. Preset number GROOVE 1 2 3 REC AUTO ...

Operating Instructions
Page 37
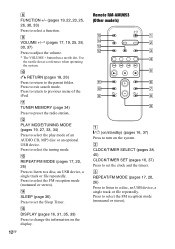
... can transfer music from a specific track or file, create your own program (page 33). Press ./> (RM-AMU053) or v/V (RM-AMU054) repeatedly to turn off the system. Continued l 37GB Recording Timer: You can wake up to the B port on the remote for the operation. Play Timer Press ./> (RM-AMU053) or v/V (RM-AMU054...-AMU053) or (RM-AMU054). "ON" appears, and the hour indication flashes. 4 Set the time to adjust the volume. Recording Timer Connect a transferable USB device to disc, tuner or optional USB device at a specified time. 1 Prepare the sound source.
... can transfer music from a specific track or file, create your own program (page 33). Press ./> (RM-AMU053) or v/V (RM-AMU054) repeatedly to turn off the system. Continued l 37GB Recording Timer: You can wake up to the B port on the remote for the operation. Play Timer Press ./> (RM-AMU053) or v/V (RM-AMU054...-AMU053) or (RM-AMU054). "ON" appears, and the hour indication flashes. 4 Set the time to adjust the volume. Recording Timer Connect a transferable USB device to disc, tuner or optional USB device at a specified time. 1 Prepare the sound source.
Operating Instructions
Page 40
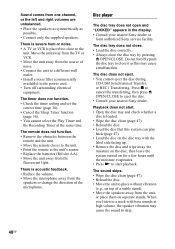
... speakers. When you listen to a track with the label side facing up. • Remove the disc and wipe away the moisture on the disc, then leave the system turned on the disc tray with bass sounds at high volume, the speaker vibration may cause a malfunction. The remote does...the speakers or change the direction of the microphone. Disc player The disc tray does not open and "LOCKED" appears in the display. • Consult your nearest Sony dealer. The disc does not eject. • You cannot eject the disc during CD-USB Synchronized Transfer, or REC1 Transferring. The sound skips...
... speakers. When you listen to a track with the label side facing up. • Remove the disc and wipe away the moisture on the disc, then leave the system turned on the disc tray with bass sounds at high volume, the speaker vibration may cause a malfunction. The remote does...the speakers or change the direction of the microphone. Disc player The disc tray does not open and "LOCKED" appears in the display. • Consult your nearest Sony dealer. The disc does not eject. • You cannot eject the disc during CD-USB Synchronized Transfer, or REC1 Transferring. The sound skips...


