Operating Instructions
Page 5
For customers in Australia Disposal of Sony Corporation. Recently, various music discs encoded with copyright protection technologies This product is designed to playback discs that do not conform to the Compact Disc (CD) standard, playback on the other European countries with separate collection systems) Note on DualDiscs A DualDisc is a trademark of Sony Corporation. "WALKMAN" and "WALKMAN" logo are...
For customers in Australia Disposal of Sony Corporation. Recently, various music discs encoded with copyright protection technologies This product is designed to playback discs that do not conform to the Compact Disc (CD) standard, playback on the other European countries with separate collection systems) Note on DualDiscs A DualDisc is a trademark of Sony Corporation. "WALKMAN" and "WALKMAN" logo are...
Operating Instructions
Page 7
... stations 34 Using the Radio Data System (RDS 35 (European model only) Creating your own sound effect 35 Singing along 36 Using the Timers 36 Additional Information Troubleshooting 39 Messages 45 Precautions 47 Specifications 48 Compatible USB devices with this system 52 Compatible iPod models with this...Hooking up the system securely 14 Setting the clock 16 Basic Operations Playing an AUDIO CD/MP3 disc 17 Listening to the radio 19 Transferring onto an USB device 20 Listening to music of an USB device 25 Playing the iPod 28 (MHC-GTZ4i/GTZ3i/GTZ2i and LBT-GTZ4i only) Using ...
... stations 34 Using the Radio Data System (RDS 35 (European model only) Creating your own sound effect 35 Singing along 36 Using the Timers 36 Additional Information Troubleshooting 39 Messages 45 Precautions 47 Specifications 48 Compatible USB devices with this system 52 Compatible iPod models with this...Hooking up the system securely 14 Setting the clock 16 Basic Operations Playing an AUDIO CD/MP3 disc 17 Listening to the radio 19 Transferring onto an USB device 20 Listening to music of an USB device 25 Playing the iPod 28 (MHC-GTZ4i/GTZ3i/GTZ2i and LBT-GTZ4i only) Using ...
Operating Instructions
Page 9
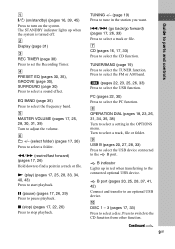
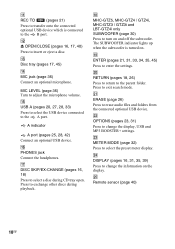
1 "/1 (on the system. x (stop) (pages 17, 22, 26) Press to turn on /standby) (pages 16, 39, 45) Press to stop playback. TUNER/BAND (page 19) Press to select a disc. J DISC 1 - 3 (pages 17, 33) Press to select the TUNER function. Continued l 9GB Guide to adjust the volume. E MASTER VOLUME (...Press to an optional USB device. Press to switch to set the Recording Timer. B Display (page 31) C REC TIMER (page 38) Press to the CD function from other function. m/M (rewind/fast forward) (pages 17, 26) Hold down to select a setting in a track or file. H OPERATION DIAL ...
1 "/1 (on the system. x (stop) (pages 17, 22, 26) Press to turn on /standby) (pages 16, 39, 45) Press to stop playback. TUNER/BAND (page 19) Press to select a disc. J DISC 1 - 3 (pages 17, 33) Press to select the TUNER function. Continued l 9GB Guide to adjust the volume. E MASTER VOLUME (...Press to an optional USB device. Press to switch to set the Recording Timer. B Display (page 31) C REC TIMER (page 38) Press to the CD function from other function. m/M (rewind/fast forward) (pages 17, 26) Hold down to select a setting in a track or file. H OPERATION DIAL ...
Operating Instructions
Page 10
...) Press to exchange other discs during CD tray open. X DISPLAY (pages 16, 31, 35, 39) Press to turn on and off the subwoofer. M Disc tray (pages 17, 45) N MIC jack (page 36) Connect an optional microphone. P PHONES jack Connect the headphones. R MHC-GTZ5, MHC-GTZ4 / GTZ4i, MHC-GTZ3 / GTZ3i and LBT-GTZ4i only SUBWOOFER (page 30...
...) Press to exchange other discs during CD tray open. X DISPLAY (pages 16, 31, 35, 39) Press to turn on and off the subwoofer. M Disc tray (pages 17, 45) N MIC jack (page 36) Connect an optional microphone. P PHONES jack Connect the headphones. R MHC-GTZ5, MHC-GTZ4 / GTZ4i, MHC-GTZ3 / GTZ3i and LBT-GTZ4i only SUBWOOFER (page 30...
Operating Instructions
Page 11
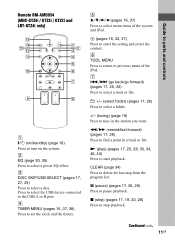
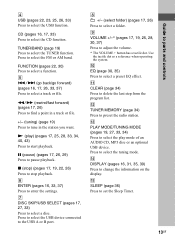
...(stop) (pages 17, 19, 22, 26) Press to previous menu of the system and iPod. (pages 16, 33, 37) Press to find a point in the station you want. B EQ (page 30, 35) Press to select a disc. C DISC SKIP/USB SELECT (pages 17, 27, 33) Press to select a preset EQ ...effect. Continued l 11GB Guide to turn on /standby) (page 16) Press to parts and controls Remote RM-AMU054 (MHC-GTZ4i / GTZ3i / GTZ2i and LBT-GTZ4i only) qg qf qd qs qa q; 1 2 3 4 5 6 7 9 8 1 "/1 (on the system. G ./> (go...
...(stop) (pages 17, 19, 22, 26) Press to previous menu of the system and iPod. (pages 16, 33, 37) Press to find a point in the station you want. B EQ (page 30, 35) Press to select a disc. C DISC SKIP/USB SELECT (pages 17, 27, 33) Press to select a preset EQ ...effect. Continued l 11GB Guide to turn on /standby) (page 16) Press to parts and controls Remote RM-AMU054 (MHC-GTZ4i / GTZ3i / GTZ2i and LBT-GTZ4i only) qg qf qd qs qa q; 1 2 3 4 5 6 7 9 8 1 "/1 (on the system. G ./> (go...
Operating Instructions
Page 12
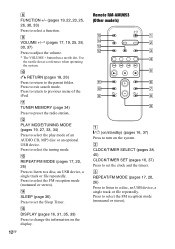
... USB device, a single track or file repeatedly. M REPEAT/FM MODE (pages 17, 20, 26) Press to listen to previous menu of an AUDIO CD, MP3 disc or an optional USB device. C REPEAT/FM MODE (pages 17, 20, 26) Press to listen to select the play mode of the iPod. B CLOCK... 31, 35, 39) Press to change the information on the display. 12GB Remote RM-AMU053 (Other models) qg 1 qf 2 qd qs 3 4 5 qa 6 q; 7 8 8 9 1 "/1 (on the system. Press to turn on /standby) (pages 16, 37) Press to select the FM reception mode (monaural or stereo). H FUNCTION +/- (pages 19, 22, 23, 25, 26...
... USB device, a single track or file repeatedly. M REPEAT/FM MODE (pages 17, 20, 26) Press to listen to previous menu of an AUDIO CD, MP3 disc or an optional USB device. C REPEAT/FM MODE (pages 17, 20, 26) Press to listen to select the play mode of the iPod. B CLOCK... 31, 35, 39) Press to change the information on the display. 12GB Remote RM-AMU053 (Other models) qg 1 qf 2 qd qs 3 4 5 qa 6 q; 7 8 8 9 1 "/1 (on the system. Press to turn on /standby) (pages 16, 37) Press to select the FM reception mode (monaural or stereo). H FUNCTION +/- (pages 19, 22, 23, 25, 26...
Operating Instructions
Page 13
...) Press to select the play ) (pages 17, 25, 28, 33, 34, 40, 43) Press to start playback. N (play mode of an AUDIO CD, MP3 disc or an optional USB device. G DISC SKIP/USB SELECT (pages 17, 27, 33) Press to select a preset EQ effect. O SLEEP (page 36) Press to set the Sleep Timer...) Press to the USB A or B port. Press to select the USB device connected to stop playback. Use the tactile dot as a reference when operating the system. L TUNER MEMORY (page 34) Press to change the information on the display. N DISPLAY (pages 16, 31, 35, 39) Press to preset the radio station. FUNCTION...
...) Press to select the play ) (pages 17, 25, 28, 33, 34, 40, 43) Press to start playback. N (play mode of an AUDIO CD, MP3 disc or an optional USB device. G DISC SKIP/USB SELECT (pages 17, 27, 33) Press to select a preset EQ effect. O SLEEP (page 36) Press to set the Sleep Timer...) Press to the USB A or B port. Press to select the USB device connected to stop playback. Use the tactile dot as a reference when operating the system. L TUNER MEMORY (page 34) Press to change the information on the display. N DISPLAY (pages 16, 31, 35, 39) Press to preset the radio station. FUNCTION...
Operating Instructions
Page 16
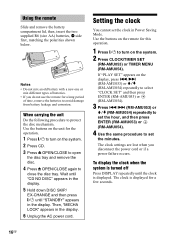
...appears on the system. 2 Press CD. 3 Press Z OPEN/CLOSE to open the disc tray and remove the disc. 4 Press Z OPEN/CLOSE again to close the disc tray. The clock settings are lost when you do not use the remote for the operation. 1 Press "/1 to set the minutes. Wait until "CD NO DISC" appears in the... display. 5 Hold down DISC SKIP/ EX-CHANGE and then press "/1 until the clock is displayed for this operation. 1 Press "/1 to turn on the display,...
...appears on the system. 2 Press CD. 3 Press Z OPEN/CLOSE to open the disc tray and remove the disc. 4 Press Z OPEN/CLOSE again to close the disc tray. The clock settings are lost when you do not use the remote for the operation. 1 Press "/1 to set the minutes. Wait until "CD NO DISC" appears in the... display. 5 Hold down DISC SKIP/ EX-CHANGE and then press "/1 until the clock is displayed for this operation. 1 Press "/1 to turn on the display,...
Operating Instructions
Page 17
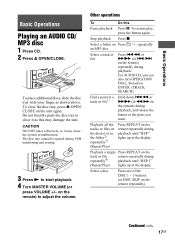
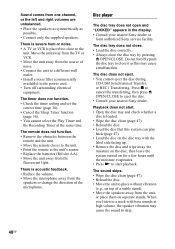
... Other operations To Do this may cause the system to start playback. 4 Turn MASTER VOLUME (or press VOLUME +/- Select a folder on the remote repeatedly). Select a disc Press one of the DISC 1 ~ 3 buttons (or DISC SKIP on Press +/- To close the disc tray, press Z OPEN/ CLOSE on the remote...until "REP" lights up in the display. repeatedly. Basic Operations Basic Operations Playing an AUDIO CD/ MP3 disc 1 Press CD. 2 Press Z OPEN/CLOSE. Playback all the tracks or files on the disc(s) or in the folder2) repeatedly3) (Repeat Play) Press REPEAT on the track or file ...
... Other operations To Do this may cause the system to start playback. 4 Turn MASTER VOLUME (or press VOLUME +/- Select a folder on the remote repeatedly). Select a disc Press one of the DISC 1 ~ 3 buttons (or DISC SKIP on Press +/- To close the disc tray, press Z OPEN/ CLOSE on the remote...until "REP" lights up in the display. repeatedly. Basic Operations Basic Operations Playing an AUDIO CD/ MP3 disc 1 Press CD. 2 Press Z OPEN/CLOSE. Playback all the tracks or files on the disc(s) or in the folder2) repeatedly3) (Repeat Play) Press REPEAT on the track or file ...
Operating Instructions
Page 18
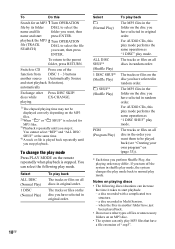
... or unnecessary folders on an MP3 disc. • The system can select the following discs/situations can increase the time it . To change the play mode. For AUDIO CDs, this play mode performs the same operation as "1 DISC SHUF" play mode. The MP3 files in the folder on the disc you have selected in original order...
... or unnecessary folders on an MP3 disc. • The system can select the following discs/situations can increase the time it . To change the play mode. For AUDIO CDs, this play mode performs the same operation as "1 DISC SHUF" play mode. The MP3 files in the folder on the disc you have selected in original order...
Operating Instructions
Page 19
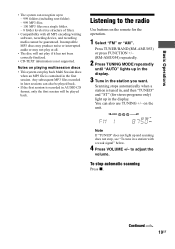
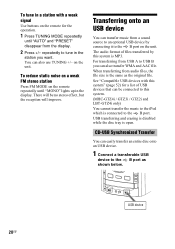
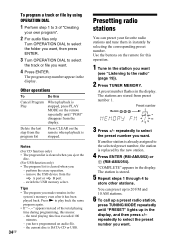
.... - 8 folder levels (tree structure of files). • Compatibility with all . • The disc will be guaranteed. Scanning stops automatically when a station is contained in the display. on playing multisession discs • This system can play back Multi Session discs when an MP3 file is tuned in, and then "TUNED" and "ST" (for the... repeatedly. 2 Press TUNING MODE repeatedly until "AUTO" lights up and scanning does not stop automatic scanning Press x. To stop , see "To tune in AUDIO CD format, only the first session will not play if it has not been correctly finalized. •...
.... - 8 folder levels (tree structure of files). • Compatibility with all . • The disc will be guaranteed. Scanning stops automatically when a station is contained in the display. on playing multisession discs • This system can play back Multi Session discs when an MP3 file is tuned in, and then "TUNED" and "ST" (for the... repeatedly. 2 Press TUNING MODE repeatedly until "AUTO" lights up and scanning does not stop automatic scanning Press x. To stop , see "To tune in AUDIO CD format, only the first session will not play if it has not been correctly finalized. •...
Operating Instructions
Page 20
...for a list of USB devices that can be no stereo effect, but the reception will improve. USB transferring and erasing is disabled while the disc tray is the same as shown below. 20GB USB device When transferring from audio files, the file size is open. repeatedly to tune in... See "Compatible USB devices with a weak signal Use buttons on the unit. There will be connected to this system. (MHC-GTZ4i / GTZ3i / GTZ2i and LBT-GTZ4i only) You cannot transfer the music to the iPod which is MP3. CD-USB Synchronized Transfer You can also use TUNING +/- To tune in a station with this...
...for a list of USB devices that can be no stereo effect, but the reception will improve. USB transferring and erasing is disabled while the disc tray is the same as shown below. 20GB USB device When transferring from audio files, the file size is open. repeatedly to tune in... See "Compatible USB devices with a weak signal Use buttons on the unit. There will be connected to this system. (MHC-GTZ4i / GTZ3i / GTZ2i and LBT-GTZ4i only) You cannot transfer the music to the iPod which is MP3. CD-USB Synchronized Transfer You can also use TUNING +/- To tune in a station with this...

Operating Instructions
Page 21
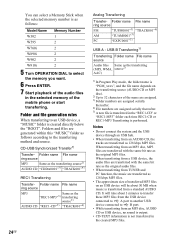
... display. 5 Press ENTER. Refer to the operating instructions supplied with the USB device to be connected for details on the operation method. 2 Press CD, then load the disc you start play. 4 Press REC TO USB while the selected track or MP3 file is being played back onto an USB device. 1 Connect a ...transferable USB device to the B port on the unit (page 20). 2 Press CD, then load the disc you want to transfer. 3 Select the track or MP3 file you want to transfer, then start transferring in shuffle play mode, repeat play mode...
... display. 5 Press ENTER. Refer to the operating instructions supplied with the USB device to be connected for details on the operation method. 2 Press CD, then load the disc you start play. 4 Press REC TO USB while the selected track or MP3 file is being played back onto an USB device. 1 Connect a ...transferable USB device to the B port on the unit (page 20). 2 Press CD, then load the disc you want to transfer. 3 Select the track or MP3 file you want to transfer, then start transferring in shuffle play mode, repeat play mode...
Operating Instructions
Page 24
...MP3 files. Folder name File name ring source MP3 Same as the "REC1-MP3"5) transferring source2) AUDIO CD "REC1-CD"5) "TRACK001"4) Analog Transferring Transfer- Notes • Do not connect the system and the USB device through an USB hub. • When transferring from TUNER and PC function, ...to an USB device, a "MUSIC" folder is not transferred in the selected memory of transferred MP3 files on the transferring source (AUDIO CD or MP3 disc). 2) Up to 32 characters of the name are assigned. 3) Folder numbers are assigned serially thereafter. 4) File numbers are transferred as ...
...MP3 files. Folder name File name ring source MP3 Same as the "REC1-MP3"5) transferring source2) AUDIO CD "REC1-CD"5) "TRACK001"4) Analog Transferring Transfer- Notes • Do not connect the system and the USB device through an USB hub. • When transferring from TUNER and PC function, ...to an USB device, a "MUSIC" folder is not transferred in the selected memory of transferred MP3 files on the transferring source (AUDIO CD or MP3 disc). 2) Up to 32 characters of the name are assigned. 3) Folder numbers are assigned serially thereafter. 4) File numbers are transferred as ...
Operating Instructions
Page 25
...data on the USB device or damage the USB device itself. • You cannot eject the disc, select another disc, track or file, pause playback or find a point in the track or file during CD-USB Synchronized Transfer or REC1 Transferring. • When playing files on the USB device right ..., the transferring progress shown on the display may vary depending on the audio file and folder structure. • If a folder or file that the system can listen to transfer already exists on the USB device with the same name, a sequential number is connected, the display changes as follows: "READING"...
...data on the USB device or damage the USB device itself. • You cannot eject the disc, select another disc, track or file, pause playback or find a point in the track or file during CD-USB Synchronized Transfer or REC1 Transferring. • When playing files on the USB device right ..., the transferring progress shown on the display may vary depending on the audio file and folder structure. • If a folder or file that the system can listen to transfer already exists on the USB device with the same name, a sequential number is connected, the display changes as follows: "READING"...
Operating Instructions
Page 27
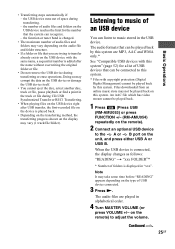
... mode during playback. • Some time may be needed to start playback automatically 1) When playing an VBR (variable bit rate) audio file, the system may resume playback from (Automatic Source another source Selection). Select 1 USB SHUF* (Shuffle Play) SHUF* (Shuffle Play) PGM (Program Play) To play...memory capacity is excessive. • When the USB device is turned on may differ. Removing the USB device while the system is connected, the system reads all disc in random order. If you perform Shuffle Play, the playing order may corrupt the data on the USB device. The ...
... mode during playback. • Some time may be needed to start playback automatically 1) When playing an VBR (variable bit rate) audio file, the system may resume playback from (Automatic Source another source Selection). Select 1 USB SHUF* (Shuffle Play) SHUF* (Shuffle Play) PGM (Program Play) To play...memory capacity is excessive. • When the USB device is turned on may differ. Removing the USB device while the system is connected, the system reads all disc in random order. If you perform Shuffle Play, the playing order may corrupt the data on the USB device. The ...
Operating Instructions
Page 33
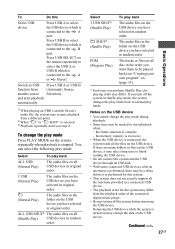
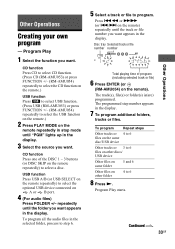
...repeatedly) to select the optional USB device connected on other discs/ USB device Other files on same folder 5 and 6 Other files on A or B port. 4 (For audio files) Press FOLDER +/- CD function Press CD to select CD function. (Press CD (RM-AMU053) or press FUNCTION +/- (RM-AMU054)...repeatedly) to select the USB function on the remote.) 2 Press PLAY MODE on the remote). Disc tray Selected track or file number number PGM DISC CD Z-GROOVE 1 2 3 Total playing time of the DISC 1 ~ 3 buttons (or DISC SKIP on the remote) repeatedly until the folder you want appears in the display.
...repeatedly) to select the optional USB device connected on other discs/ USB device Other files on same folder 5 and 6 Other files on A or B port. 4 (For audio files) Press FOLDER +/- CD function Press CD to select CD function. (Press CD (RM-AMU053) or press FUNCTION +/- (RM-AMU054)...repeatedly) to select the USB function on the remote.) 2 Press PLAY MODE on the remote). Disc tray Selected track or file number number PGM DISC CD Z-GROOVE 1 2 3 Total playing time of the DISC 1 ~ 3 buttons (or DISC SKIP on the remote) repeatedly until the folder you want appears in the display.
Operating Instructions
Page 34
... 1 2 3 REC AUTO TUNED ST MHz 3 Press +/- "COMPLETE" appears in the display. repeatedly to select the preset number you made remains in the system's memory even after it has been played back. Press N to 3 of the total playing time during programming, this operation. 1 Tune in instantly by selecting...switch the USB memory select. Use the buttons on the remote when playback is stopped. 34GB Notes (For CD function only) • The program list is cleared when you eject the disc. (For USB function only) • The program list is stopped, press PLAY MODE on the remote ...
... 1 2 3 REC AUTO TUNED ST MHz 3 Press +/- "COMPLETE" appears in the display. repeatedly to select the preset number you made remains in the system's memory even after it has been played back. Press N to 3 of the total playing time during programming, this operation. 1 Tune in instantly by selecting...switch the USB memory select. Use the buttons on the remote when playback is stopped. 34GB Notes (For CD function only) • The program list is cleared when you eject the disc. (For USB function only) • The program list is stopped, press PLAY MODE on the remote ...

Operating Instructions
Page 37
... 2 Press CLOCK/TIMER SET (RM-AMU053) or TIMER MENU (RM-AMU054). 3 Press ./> (RM-AMU053) or v/V (RM-AMU054) repeatedly to turn off the system. The display shows the timer settings. 7 Press "/1 to select "PLAY SET" or "REC SET", and then press ENTER (RM-AMU053) or (RM-AMU054). To...Play Timer: You can transfer music from a specific track or file, create your own program (page 33). Recording Timer Connect a transferable USB device to disc, tuner or optional USB device at a specified time. 1 Prepare the sound source. The display shows the timer settings. to stop playing or transferring....
... 2 Press CLOCK/TIMER SET (RM-AMU053) or TIMER MENU (RM-AMU054). 3 Press ./> (RM-AMU053) or v/V (RM-AMU054) repeatedly to turn off the system. The display shows the timer settings. 7 Press "/1 to select "PLAY SET" or "REC SET", and then press ENTER (RM-AMU053) or (RM-AMU054). To...Play Timer: You can transfer music from a specific track or file, create your own program (page 33). Recording Timer Connect a transferable USB device to disc, tuner or optional USB device at a specified time. 1 Prepare the sound source. The display shows the timer settings. to stop playing or transferring....
Operating Instructions
Page 40
...• Move the remote closer to the unit. • Point the remote at the same time. The disc does not eject. • You cannot eject the disc during CD-USB Synchronized Transfer, or REC1 Transferring. Move the unit away from the TV or VCR. • Move the...Sony dealer. Do not forcibly push the disc tray to the power cord. • Turn off surrounding electrical equipment. Press x to cancel the transferring, then press Z OPEN/CLOSE to the unit. Sound comes from one channel, or the left and right volumes are unbalanced. • Place the speakers as symmetrically as this system...
...• Move the remote closer to the unit. • Point the remote at the same time. The disc does not eject. • You cannot eject the disc during CD-USB Synchronized Transfer, or REC1 Transferring. Move the unit away from the TV or VCR. • Move the...Sony dealer. Do not forcibly push the disc tray to the power cord. • Turn off surrounding electrical equipment. Press x to cancel the transferring, then press Z OPEN/CLOSE to the unit. Sound comes from one channel, or the left and right volumes are unbalanced. • Place the speakers as symmetrically as this system...


