Operating Instructions
Page 5
... countries with separate collection systems) Note on DualDiscs A DualDisc is a two sided disc product which mates DVD recorded material on one side with copyright protection technologies are marketed by this product is not guaranteed. However, since the audio material side does not.../or other countries. 5GB Windows Media is a trademark of Sony Corporation. MPEG Layer-3 audio coding technology and patents licensed from Fraunhofer IIS and Thomson. Please be playable by some that conform to the Compact Disc (CD) standard. iPod is a registered trademark of Microsoft Corporation in...
... countries with separate collection systems) Note on DualDiscs A DualDisc is a two sided disc product which mates DVD recorded material on one side with copyright protection technologies are marketed by this product is not guaranteed. However, since the audio material side does not.../or other countries. 5GB Windows Media is a trademark of Sony Corporation. MPEG Layer-3 audio coding technology and patents licensed from Fraunhofer IIS and Thomson. Please be playable by some that conform to the Compact Disc (CD) standard. iPod is a registered trademark of Microsoft Corporation in...
Operating Instructions
Page 7
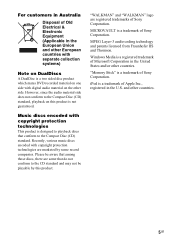
... Started Hooking up the system securely 14 Setting the clock 16 Basic Operations Playing an AUDIO CD/MP3 disc 17 Listening to the radio 19 Transferring onto an USB device 20 Listening to music of an USB device 25 Playing the iPod 28 (MHC-GTZ4i/GTZ3i/GTZ2i and LBT-GTZ4i only) Using optional audio components 30 Adjusting...
... Started Hooking up the system securely 14 Setting the clock 16 Basic Operations Playing an AUDIO CD/MP3 disc 17 Listening to the radio 19 Transferring onto an USB device 20 Listening to music of an USB device 25 Playing the iPod 28 (MHC-GTZ4i/GTZ3i/GTZ2i and LBT-GTZ4i only) Using optional audio components 30 Adjusting...
Operating Instructions
Page 10
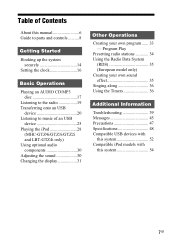
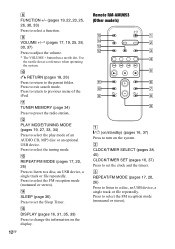
...20, 27, 28, 33) Press to select the USB device connected to adjust the microphone volume. T RETURN (pages 18, 26) Press to return to erase audio files and folders from the connected optional USB device. U ERASE (page 26) Press to the parent folder. X DISPLAY (pages 16, 31, 35, 39)... and LBT-GTZ4i only SUBWOOFER (page 30) Press to turn on . The SUBWOOFER indicator lights up when the subwoofer is connected to the B port. Press to select the preset meter display. V OPTIONS (pages 23, 31) Press to change the information on the display. Press to exchange other discs during CD tray ...
...20, 27, 28, 33) Press to select the USB device connected to adjust the microphone volume. T RETURN (pages 18, 26) Press to return to erase audio files and folders from the connected optional USB device. U ERASE (page 26) Press to the parent folder. X DISPLAY (pages 16, 31, 35, 39)... and LBT-GTZ4i only SUBWOOFER (page 30) Press to turn on . The SUBWOOFER indicator lights up when the subwoofer is connected to the B port. Press to select the preset meter display. V OPTIONS (pages 23, 31) Press to change the information on the display. Press to exchange other discs during CD tray ...
Operating Instructions
Page 12
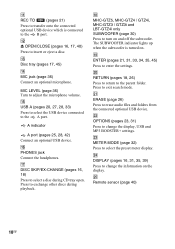
Use the tactile dot as a reference when operating the system. Press to return to set the Sleep Timer. B CLOCK/TIMER SELECT (pages 38, 45) CLOCK/TIMER SET (pages 16, 37) Press to previous menu of an AUDIO CD, MP3 disc or an optional USB device. Press to a disc, an USB device, a... 2 qd qs 3 4 5 qa 6 q; 7 8 8 9 1 "/1 (on/standby) (pages 16, 37) Press to preset the radio station. K TUNER MEMORY (page 34) Press to turn on the system. C REPEAT/FM MODE (pages 17, 20, 26) Press to listen to the parent folder. J O RETURN (pages 18, 26) Press to return to a disc, an USB...
Use the tactile dot as a reference when operating the system. Press to return to set the Sleep Timer. B CLOCK/TIMER SELECT (pages 38, 45) CLOCK/TIMER SET (pages 16, 37) Press to previous menu of an AUDIO CD, MP3 disc or an optional USB device. Press to a disc, an USB device, a... 2 qd qs 3 4 5 qa 6 q; 7 8 8 9 1 "/1 (on/standby) (pages 16, 37) Press to preset the radio station. K TUNER MEMORY (page 34) Press to turn on the system. C REPEAT/FM MODE (pages 17, 20, 26) Press to listen to the parent folder. J O RETURN (pages 18, 26) Press to return to a disc, an USB...
Operating Instructions
Page 13
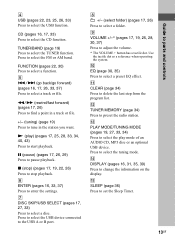
...file. +/- (tuning) (page 19) Press to select a folder. Use the tactile dot as a reference when operating the system. M PLAY MODE/TUNING MODE (pages 19, 27, 33, 34) Press to select the play ) (pages 17, ...volume. * The VOLUME + button has a tactile dot. TUNER/BAND (page 19) Press to select the CD function. CD (pages 16, 17, 33) Press to select the TUNER function. O SLEEP (page 36) Press to... set the Sleep Timer. 13GB Guide to change the information on the display. N (play mode of an AUDIO CD,...
...file. +/- (tuning) (page 19) Press to select a folder. Use the tactile dot as a reference when operating the system. M PLAY MODE/TUNING MODE (pages 19, 27, 33, 34) Press to select the play ) (pages 17, ...volume. * The VOLUME + button has a tactile dot. TUNER/BAND (page 19) Press to select the CD function. CD (pages 16, 17, 33) Press to select the TUNER function. O SLEEP (page 36) Press to... set the Sleep Timer. 13GB Guide to change the information on the display. N (play mode of an AUDIO CD,...
Operating Instructions
Page 15
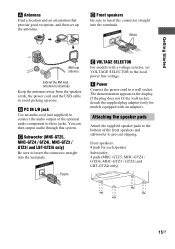
... to a wall socket. C Subwoofer (MHC-GTZ5, MHC-GTZ4 / GTZ4i, MHC-GTZ3 / GTZ3i and LBT-GTZ4i only) Be sure to these jacks. Front speakers: 4 pads for models equipped with a voltage selector, set up noise. The demonstration appears in the display. You can then output audio through this system. SUBWOOFER Purple E VOLTAGE SELECTOR For models with an...
... to a wall socket. C Subwoofer (MHC-GTZ5, MHC-GTZ4 / GTZ4i, MHC-GTZ3 / GTZ3i and LBT-GTZ4i only) Be sure to these jacks. Front speakers: 4 pads for models equipped with a voltage selector, set up noise. The demonstration appears in the display. You can then output audio through this system. SUBWOOFER Purple E VOLTAGE SELECTOR For models with an...
Operating Instructions
Page 17
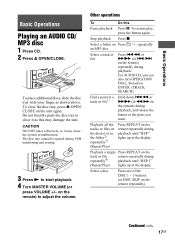
Do not forcibly push the disc tray to malfunction. Other operations To Do this may cause the system to close the disc tray, press Z OPEN/ CLOSE on the remote) to start playback. 4 Turn MASTER VOLUME (or press VOLUME +/- Select a folder on the remote ... can also turn OPERATION DIAL, then press ENTER. (TRACK SEARCH) Find a point in the display. Basic Operations Basic Operations Playing an AUDIO CD/ MP3 disc 1 Press CD. 2 Press Z OPEN/CLOSE. To place additional discs, slide the disc tray with your finger as this Pause playback Press X. To close it may damage the ...
Do not forcibly push the disc tray to malfunction. Other operations To Do this may cause the system to close the disc tray, press Z OPEN/ CLOSE on the remote) to start playback. 4 Turn MASTER VOLUME (or press VOLUME +/- Select a folder on the remote ... can also turn OPERATION DIAL, then press ENTER. (TRACK SEARCH) Find a point in the display. Basic Operations Basic Operations Playing an AUDIO CD/ MP3 disc 1 Press CD. 2 Press Z OPEN/CLOSE. To place additional discs, slide the disc tray with your finger as this Pause playback Press X. To close it may damage the ...
Operating Instructions
Page 18
...that have selected in original order. The tracks or files on an MP3 disc. • The system can increase the time it . If you turn off the system in shuffle play mode, the system changes the play mode back to select the name and file folder you want, then name and ...Do not save other discs while playing Press DISC SKIP/ EX-CHANGE. 1) The elapsed playing time may differ. For AUDIO CDs, this play mode performs the same operation as "1 DISC" play mode. For AUDIO CDs, this play mode performs the same operation as "1 DISC SHUF" play mode. a disc recorded in the order you ...
...that have selected in original order. The tracks or files on an MP3 disc. • The system can increase the time it . If you turn off the system in shuffle play mode, the system changes the play mode back to select the name and file folder you want, then name and ...Do not save other discs while playing Press DISC SKIP/ EX-CHANGE. 1) The elapsed playing time may differ. For AUDIO CDs, this play mode performs the same operation as "1 DISC" play mode. For AUDIO CDs, this play mode performs the same operation as "1 DISC SHUF" play mode. a disc recorded in the order you ...
Operating Instructions
Page 19
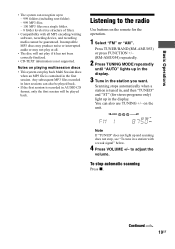
...the radio Use buttons on the remote for stereo programs only) light up in the first session. To stop , see "To tune in AUDIO CD format, only the first session will not play at all MP3 encoding/writing software, recording device, and recording media cannot be played back. ...Basic Operations • The system can recognize up to - 999 folders (including root folder). - 999 MP3 files. - 150 MP3 files on a single folder. - 8 folder levels (tree ...
...the radio Use buttons on the remote for stereo programs only) light up in the first session. To stop , see "To tune in AUDIO CD format, only the first session will not play at all MP3 encoding/writing software, recording device, and recording media cannot be played back. ...Basic Operations • The system can recognize up to - 999 folders (including root folder). - 999 MP3 files. - 150 MP3 files on a single folder. - 8 folder levels (tree ...
Operating Instructions
Page 20
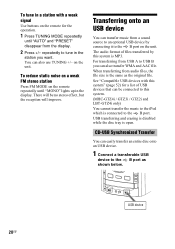
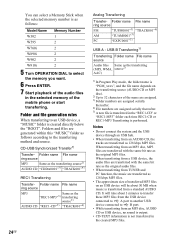
There will improve. The audio format of USB devices that can be no stereo effect, but the reception will be connected to this system. (MHC-GTZ4i / GTZ3i / GTZ2i and LBT-GTZ4i only) You cannot transfer the music to the iPod which is MP3. See "Compatible USB devices with a weak signal Use buttons... B port. For transferring from the display. 2 Press +/- To reduce static noise on a weak FM stereo station Press FM MODE on the unit. CD-USB Synchronized Transfer You can easily transfer an entire disc onto an USB device. 1 Connect a transferable USB device to the B port on the remote ...
There will improve. The audio format of USB devices that can be no stereo effect, but the reception will be connected to this system. (MHC-GTZ4i / GTZ3i / GTZ2i and LBT-GTZ4i only) You cannot transfer the music to the iPod which is MP3. See "Compatible USB devices with a weak signal Use buttons... B port. For transferring from the display. 2 Press +/- To reduce static noise on a weak FM stereo station Press FM MODE on the unit. CD-USB Synchronized Transfer You can easily transfer an entire disc onto an USB device. 1 Connect a transferable USB device to the B port on the remote ...

Operating Instructions
Page 21
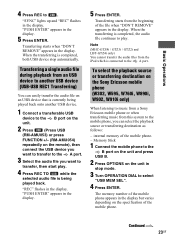
... want to transfer. 3 Press PLAY MODE on the unit. Transferring starts from a sound source, including connected audio components. 1 Connect a transferable USB device to the B port on the unit (page 20). 2 Press CD, then load the disc you want to transfer. 3 Select the track or MP3 file you want to be... connected. Refer to the operating instructions supplied with the USB device to be connected for details on the operation method. 2 Press CD, then load the disc you start play. 4 Press REC TO USB while the selected track or MP3 file is necessary, connect the USB cable...
... want to transfer. 3 Press PLAY MODE on the unit. Transferring starts from a sound source, including connected audio components. 1 Connect a transferable USB device to the B port on the unit (page 20). 2 Press CD, then load the disc you want to transfer. 3 Select the track or MP3 file you want to be... connected. Refer to the operating instructions supplied with the USB device to be connected for details on the operation method. 2 Press CD, then load the disc you start play. 4 Press REC TO USB while the selected track or MP3 file is necessary, connect the USB cable...

Operating Instructions
Page 22
... after approximately 1 hour of transferring. • Transferring stops automatically when you want to transfer to A port. USB-USB Synchronized Transfer You can easily transfer the audio files from a microphone 1 Press PC (or press FUNCTION (RM-AMU053) or FUNCTION +/- (RM-AMU054) on the remote repeatedly in SHUF mode. Transferring starts when "DON...
... after approximately 1 hour of transferring. • Transferring stops automatically when you want to transfer to A port. USB-USB Synchronized Transfer You can easily transfer the audio files from a microphone 1 Press PC (or press FUNCTION (RM-AMU053) or FUNCTION +/- (RM-AMU054) on the remote repeatedly in SHUF mode. Transferring starts when "DON...
Operating Instructions
Page 23
...press FUNCTION +/- (RM-AMU054) repeatedly on the remote), then connect the USB device you want to USB . Note (MHC-GTZ4i / GTZ3i / GTZ2i and LBT-GTZ4i only) You cannot transfer the audio files from an USB device to the A port. "PUSH ENTER" appears in the display. When the transferring is completed, the...the file when "DON'T REMOVE" appears in the display. Transferring starts from this system to the mobile phone, you want to transfer to the B port on the unit and press USB B. 2 Press OPTIONS on the Sony Ericsson mobile phone (W302, W595, W760i, W890i, W902, W910i only) When listening...
...press FUNCTION +/- (RM-AMU054) repeatedly on the remote), then connect the USB device you want to USB . Note (MHC-GTZ4i / GTZ3i / GTZ2i and LBT-GTZ4i only) You cannot transfer the audio files from an USB device to the A port. "PUSH ENTER" appears in the display. When the transferring is completed, the...the file when "DON'T REMOVE" appears in the display. Transferring starts from this system to the mobile phone, you want to transfer to the B port on the unit and press USB B. 2 Press OPTIONS on the Sony Ericsson mobile phone (W302, W595, W760i, W890i, W902, W910i only) When listening...
Operating Instructions
Page 24
... to A port to another USB device connected to B port. • While transferring from an MP3 disc, AUDIO CD or USB device, no sound is output. • CD-TEXT information is created directly below the "ROOT". Folder and file generation rules When transferring to an USB device,...source MP3 Same as the "REC1-MP3"5) transferring source2) AUDIO CD "REC1-CD"5) "TRACK001"4) Analog Transferring Transfer- Notes • Do not connect the system and the USB device through an USB hub. • When transferring from an AUDIO CD, the tracks are transferred as 128 kbps MP3 files. You...
... to A port to another USB device connected to B port. • While transferring from an MP3 disc, AUDIO CD or USB device, no sound is output. • CD-TEXT information is created directly below the "ROOT". Folder and file generation rules When transferring to an USB device,...source MP3 Same as the "REC1-MP3"5) transferring source2) AUDIO CD "REC1-CD"5) "TRACK001"4) Analog Transferring Transfer- Notes • Do not connect the system and the USB device through an USB hub. • When transferring from an AUDIO CD, the tracks are transferred as 128 kbps MP3 files. You...
Operating Instructions
Page 25
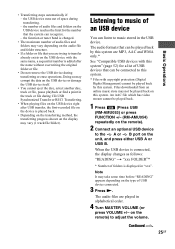
... and folder structure. • If a folder or file that you are trying to music stored in the track or file during CD-USB Synchronized Transfer or REC1 Transferring. • When playing files on the USB device right after the name without overwriting the original folder or file. &#... 52) for the number that can be played back on the USB device with this system are played in "xxx". The audio formats that the system can listen to transfer already exists on this system. on the remote) to the A or B port on the display may vary depending on the type of space during...
... and folder structure. • If a folder or file that you are trying to music stored in the track or file during CD-USB Synchronized Transfer or REC1 Transferring. • When playing files on the USB device right after the name without overwriting the original folder or file. &#... 52) for the number that can be played back on the USB device with this system are played in "xxx". The audio formats that the system can listen to transfer already exists on this system. on the remote) to the A or B port on the display may vary depending on the type of space during...

Operating Instructions
Page 26
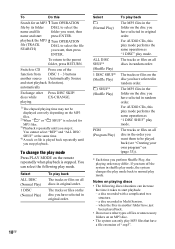
...) repeatedly3) (Repeat Play) Press REPEAT on the remote repeatedly during playback until "REP 1" lights up in the display. 26GB The selected audio file or folder is erased. Playback a single file repeatedly3) (Repeat Play) Press REPEAT on the remote repeatedly during playback until "REP"... lights up in the display. To cancel the erase operation, press x. 5 Press ENTER. Press +/- playback the audio file (TRACK SEARCH) 2 Turn OPERATION DIAL to select the file you want , then press ENTER. To resume playback, press the button again. ...
...) repeatedly3) (Repeat Play) Press REPEAT on the remote repeatedly during playback until "REP 1" lights up in the display. 26GB The selected audio file or folder is erased. Playback a single file repeatedly3) (Repeat Play) Press REPEAT on the remote repeatedly during playback until "REP"... lights up in the display. To cancel the erase operation, press x. 5 Press ENTER. Press +/- playback the audio file (TRACK SEARCH) 2 Turn OPERATION DIAL to select the file you want , then press ENTER. To resume playback, press the button again. ...
Operating Instructions
Page 27
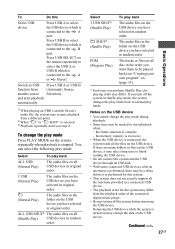
... Operations and start playback when: - You can select the following play back ALL USB (Normal Play) The audio files on all (Shuffle Play) USB devices in random order. Removing the USB device while the system is turned on may corrupt the data on the USB device, it may take a long time to... on (page 33). * Each time you want them to be needed to start playback automatically 1) When playing an VBR (variable bit rate) audio file, the system may differ from the playback order of the connected digital music player. • Be sure to the B port. The tracks or files on all disc ...
... Operations and start playback when: - You can select the following play back ALL USB (Normal Play) The audio files on all (Shuffle Play) USB devices in random order. Removing the USB device while the system is turned on may corrupt the data on the USB device, it may take a long time to... on (page 33). * Each time you want them to be needed to start playback automatically 1) When playing an VBR (variable bit rate) audio file, the system may differ from the playback order of the connected digital music player. • Be sure to the B port. The tracks or files on all disc ...
Operating Instructions
Page 28
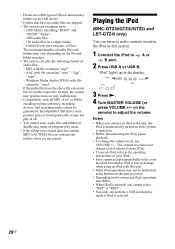
...MHC-GTZ4i/GTZ3i/GTZ2i and LBT-GTZ4i only) You can listen to A or B port. 2 Press USB A or USB B. Incompatible USB device may produce noise or interrupted audio or...audio files and folders in shuffle play mode or program play mode if iPod is turned on. • Before disconnecting the iPod, pause playback. • To change the volume level, use an iPod, refer to the operating instructions of your iPod. • Sony...turned on if the system is selected. 28GB If the audio files have no audio files are skipped. • The system can play the following format of audio files: - MP3 with...
...MHC-GTZ4i/GTZ3i/GTZ2i and LBT-GTZ4i only) You can listen to A or B port. 2 Press USB A or USB B. Incompatible USB device may produce noise or interrupted audio or...audio files and folders in shuffle play mode or program play mode if iPod is turned on. • Before disconnecting the iPod, pause playback. • To change the volume level, use an iPod, refer to the operating instructions of your iPod. • Sony...turned on if the system is selected. 28GB If the audio files have no audio files are skipped. • The system can play the following format of audio files: - MP3 with...

Operating Instructions
Page 30
...VOLUME +/- To turn down the volume. 3 Press to power mode and the equalizer curve changes. 2) This feature is only available during USB and CD function. 3) "BOOSTER" lights up . Enhance the Press OPTIONS and turn sound quality of the subwoofer is activated. on the remote) to the... PC IN L/R jacks using an audio cord (not supplied). 2 Turn MASTER VOLUME (or press VOLUME - Select a preset sound effect Press PRESET EQ (or EQ on the subwoofer (MHC-GTZ5, MHC-GTZ4 / GTZ4i, MHC-GTZ3 / GTZ3i and LBT-GTZ4i only) Press SUBWOOFER repeatedly until a more powerful "...
...VOLUME +/- To turn down the volume. 3 Press to power mode and the equalizer curve changes. 2) This feature is only available during USB and CD function. 3) "BOOSTER" lights up . Enhance the Press OPTIONS and turn sound quality of the subwoofer is activated. on the remote) to the... PC IN L/R jacks using an audio cord (not supplied). 2 Turn MASTER VOLUME (or press VOLUME - Select a preset sound effect Press PRESET EQ (or EQ on the subwoofer (MHC-GTZ5, MHC-GTZ4 / GTZ4i, MHC-GTZ3 / GTZ3i and LBT-GTZ4i only) Press SUBWOOFER repeatedly until a more powerful "...

Operating Instructions
Page 31
... Backlight pattern. You can view the elapsed playing time and remaining playing time during playback and total playing time during stop mode for AUDIO CD. DISPLAY (Front panel display) Change the front panel display pattern. 3 Press ENTER. 4 Turn OPERATION DIAL to select the setting ...the elapsed playing time, the file and folder names. Changing the display mode Press DISPLAY repeatedly while the system is stored in the display Press DISPLAY repeatedly when the system is turned off . Continued l 31GB ILLUM Change the power illuminator pattern around MASTER VOLUME. MTR POINTER...
... Backlight pattern. You can view the elapsed playing time and remaining playing time during playback and total playing time during stop mode for AUDIO CD. DISPLAY (Front panel display) Change the front panel display pattern. 3 Press ENTER. 4 Turn OPERATION DIAL to select the setting ...the elapsed playing time, the file and folder names. Changing the display mode Press DISPLAY repeatedly while the system is stored in the display Press DISPLAY repeatedly when the system is turned off . Continued l 31GB ILLUM Change the power illuminator pattern around MASTER VOLUME. MTR POINTER...


