Operating Instructions
Page 3
..., Sony Corporation has determined that the cable ground shall be determined by turning the equipment off and on Caption Vision This television receiver provides display of television closed captioning in accordance with the limits for help. NO USER-SERVICEABLE PARTS INSIDE. CAUTION When using TV games... to radio or television reception, which the receiver is wider than private viewing of programs broadcast on the screen for energy efficiency. WEGA, FD Trinitron and Steady Sound are unable to insert the plug fully into the outlet, contact your dealer. ❏ If any changes or...
..., Sony Corporation has determined that the cable ground shall be determined by turning the equipment off and on Caption Vision This television receiver provides display of television closed captioning in accordance with the limits for help. NO USER-SERVICEABLE PARTS INSIDE. CAUTION When using TV games... to radio or television reception, which the receiver is wider than private viewing of programs broadcast on the screen for energy efficiency. WEGA, FD Trinitron and Steady Sound are unable to insert the plug fully into the outlet, contact your dealer. ❏ If any changes or...
Operating Instructions
Page 4
... result in deterioration of power source indicated on the serial/model plate. Accessories Do not place the set by the manufacturer for some TV sets to make occasional snapping or popping sounds, particularly when being turned on top of the set to excessive salt, corrosion and internal...unable to insert the plug fully into a grounding-type power outlet. For the set is heavy and the bottom surface is operating, unplug the TV and consult your obsolete outlet. The set with all warnings, cautions and instructions placed on the set , causing injury. Lightning may subject the ...
... result in deterioration of power source indicated on the serial/model plate. Accessories Do not place the set by the manufacturer for some TV sets to make occasional snapping or popping sounds, particularly when being turned on top of the set to excessive salt, corrosion and internal...unable to insert the plug fully into a grounding-type power outlet. For the set is heavy and the bottom surface is operating, unplug the TV and consult your obsolete outlet. The set with all warnings, cautions and instructions placed on the set , causing injury. Lightning may subject the ...
Operating Instructions
Page 7
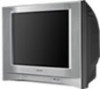
Contents Introduction Introducing the FD Trinitron WEGA® Features 1 About this Manual...2 Batteries for the Remote Control 2 Front Panel Menu Controls ...2 Using the Remote Control Remote Control Description...3 Connecting Your TV TV Rear Panel ...5 Basic Connections ...6 Connecting Additional Equipment 7 Using Basic Functions Setting Up the TV...17 Quick Start to the Menus ...18 Using the Menus How...
Contents Introduction Introducing the FD Trinitron WEGA® Features 1 About this Manual...2 Batteries for the Remote Control 2 Front Panel Menu Controls ...2 Using the Remote Control Remote Control Description...3 Connecting Your TV TV Rear Panel ...5 Basic Connections ...6 Connecting Additional Equipment 7 Using Basic Functions Setting Up the TV...17 Quick Start to the Menus ...18 Using the Menus How...
Operating Instructions
Page 9
... what their children watch on TV by using audio technology to your purchase of the current program viewed, if available. ❏ Energy Star® - Displays the name and the remaining time of the Sony FD Trinitron WEGA®. Sharpens picture definition to...technologically advanced tube. ❏ YPBPR Inputs - Provides instant access to compensate for energy efficiency. ❏ Front Panel Controls - Introducing the FD Trinitron WEGA® Features Some of a remote control. ❏ Front A/V Inputs - Provides component video inputs for stereo programs. ❏ Parental...
... what their children watch on TV by using audio technology to your purchase of the current program viewed, if available. ❏ Energy Star® - Displays the name and the remaining time of the Sony FD Trinitron WEGA®. Sharpens picture definition to...technologically advanced tube. ❏ YPBPR Inputs - Provides instant access to compensate for energy efficiency. ❏ Front Panel Controls - Introducing the FD Trinitron WEGA® Features Some of a remote control. ❏ Front A/V Inputs - Provides component video inputs for stereo programs. ❏ Parental...

Operating Instructions
Page 10
... for the Remote Control Insert two AA (R6) batteries (supplied) into the remote control using the remote control for an extended period of your TV is connected, follow the instructions and use the remote control to avoid possible damage from battery leakage. Front Panel Menu Controls The front panel controls...how to connect to change your channels (CH+/-), adjust the volume (VOL +/-), and change video inputs. ✍ To navigate the menus with your new TV. About this Manual This manual provides instructions to help you enjoy your remote control, see "Using the Menus" on page 21. 2
... for the Remote Control Insert two AA (R6) batteries (supplied) into the remote control using the remote control for an extended period of your TV is connected, follow the instructions and use the remote control to avoid possible damage from battery leakage. Front Panel Menu Controls The front panel controls...how to connect to change your channels (CH+/-), adjust the volume (VOL +/-), and change video inputs. ✍ To navigate the menus with your new TV. About this Manual This manual provides instructions to help you enjoy your remote control, see "Using the Menus" on page 21. 2

Operating Instructions
Page 12
..., then press the center button to exit the menu at any time. Press when you want to turn the TV on -screen menus. Press when you lose your remote control, see page 36. 4 Press again to select or access an option. 9 RESET q; Press again to turn DISPLAY off . Cycles... through the Multi-channel TV Sound (MTS) options: Stereo, Mono, and Auto SAP (Second Audio Program). Cycles through available video inputs....
..., then press the center button to exit the menu at any time. Press when you want to turn the TV on -screen menus. Press when you lose your remote control, see page 36. 4 Press again to select or access an option. 9 RESET q; Press again to turn DISPLAY off . Cycles... through the Multi-channel TV Sound (MTS) options: Stereo, Mono, and Auto SAP (Second Audio Program). Cycles through available video inputs....
Operating Instructions
Page 13
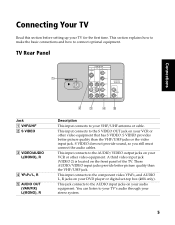
... equipment. S VIDEO does not provide sound, so you still must connect the audio cables. A third video input jack (VIDEO 2) is located on your TV for the first time. This section explains how to make the basic connections and how to your DVD player or digital set-top box (480i...your audio equipment. These AUDIO/VIDEO input jacks provide better picture quality than the VHF/UHF jacks or the video input jack. Connections Connecting Your TV Read this section before setting up your VCR or other video equipment. S VIDEO provides better picture quality than the VHF/UHF jack. This jack...
... equipment. S VIDEO does not provide sound, so you still must connect the audio cables. A third video input jack (VIDEO 2) is located on your TV for the first time. This section explains how to make the basic connections and how to your DVD player or digital set-top box (480i...your audio equipment. These AUDIO/VIDEO input jacks provide better picture quality than the VHF/UHF jacks or the video input jack. Connections Connecting Your TV Read this section before setting up your VCR or other video equipment. S VIDEO provides better picture quality than the VHF/UHF jack. This jack...
Operating Instructions
Page 14
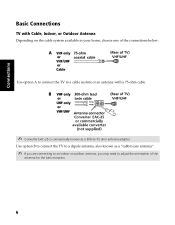
Connections Basic Connections TV with Cable, Indoor, or Outdoor Antenna Depending on the cable system available in your home, choose one of the connections below: Use option A to connect the TV to a cable system or an antenna with a 75-ohm cable. ✍ Converter EAC-25 is commercially known as a "rabbit ears antenna". ✍ If you are connecting to an indoor or outdoor antenna, you may need to -75 ohm antenna adapter. Use option B to connect the TV to a dipole antenna, also known as a 300-to adjust the orientation of the antenna for the best reception. 6
Connections Basic Connections TV with Cable, Indoor, or Outdoor Antenna Depending on the cable system available in your home, choose one of the connections below: Use option A to connect the TV to a cable system or an antenna with a 75-ohm cable. ✍ Converter EAC-25 is commercially known as a "rabbit ears antenna". ✍ If you are connecting to an indoor or outdoor antenna, you may need to -75 ohm antenna adapter. Use option B to connect the TV to a dipole antenna, also known as a 300-to adjust the orientation of the antenna for the best reception. 6

Operating Instructions
Page 15
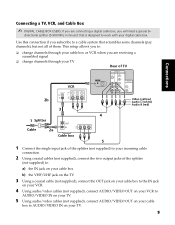
... the VHF/UHF jack on the rear of your VCR to Channel 3 or 4 (as set on the TV. Connections Connecting Additional Equipment Connecting a TV and VCR 1 From cable/antenna 2 VCR LINE IN VIDEO AUDIO L AUDIO R LINE OUT Rear of the yellow video cable. Optional connection ❏ If your VCR ... can get better picture quality by connecting audio/video cables (not supplied) from AUDIO/VIDEO OUT on your VCR to AUDIO/VIDEO IN on your TV. ❏ For better picture quality, use the button to switch between the VHF/UHF and VIDEO inputs. ✍ To watch video programs from the OUT...
... the VHF/UHF jack on the rear of your VCR to Channel 3 or 4 (as set on the TV. Connections Connecting Additional Equipment Connecting a TV and VCR 1 From cable/antenna 2 VCR LINE IN VIDEO AUDIO L AUDIO R LINE OUT Rear of the yellow video cable. Optional connection ❏ If your VCR ... can get better picture quality by connecting audio/video cables (not supplied) from AUDIO/VIDEO OUT on your VCR to AUDIO/VIDEO IN on your TV. ❏ For better picture quality, use the button to switch between the VHF/UHF and VIDEO inputs. ✍ To watch video programs from the OUT...

Operating Instructions
Page 16
... and use the cable box's remote control to change channels. ✍ If you will be controlling all channel selection through your TV to view all channels. Connections Connecting a TV and Cable Box Some cable TV systems use this connection. Cable box 1 From cable/ antenna VIDEO AUDIO L AUDIO R LINE OUT 2 Rear of...2 Connect a coaxial cable (not supplied) from the OUT jack on your cable box to the VHF/UHF jack on your TV. ✍ To view channels from your cable box, tune your TV to channel 3 or 4 (as set on the rear panel of service, use scrambled or encoded signals that require a cable...
... and use the cable box's remote control to change channels. ✍ If you will be controlling all channel selection through your TV to view all channels. Connections Connecting a TV and Cable Box Some cable TV systems use this connection. Cable box 1 From cable/ antenna VIDEO AUDIO L AUDIO R LINE OUT 2 Rear of...2 Connect a coaxial cable (not supplied) from the OUT jack on your cable box to the VHF/UHF jack on your TV. ✍ To view channels from your cable box, tune your TV to channel 3 or 4 (as set on the rear panel of service, use scrambled or encoded signals that require a cable...
Operating Instructions
Page 17
..., and Cable Box ✍ DIGITAL CABLE BOX USERS: If you are receiving a scrambled signal ❏ change channels through your TV Rear of TV Connections 2b VCR LINE IN VIDEO AUDIO L AUDIO R LINE OUT 3 1 Splitter Cable 2a VIDEO AUDIO L AUDIO R LINE OUT Cable box 1 3 S VIDEO 4 Y PB PR VIDEO L L (MONO) R R...channels (pay channels), but not all of the splitter (not supplied) to: a) the IN jack on your cable box b) the VHF/UHF jack on the TV 3 Using a coaxial cable (not supplied), connect the OUT jack on your cable box to the IN jack on your VCR. 4 Using audio/video cables (not...
..., and Cable Box ✍ DIGITAL CABLE BOX USERS: If you are receiving a scrambled signal ❏ change channels through your TV Rear of TV Connections 2b VCR LINE IN VIDEO AUDIO L AUDIO R LINE OUT 3 1 Splitter Cable 2a VIDEO AUDIO L AUDIO R LINE OUT Cable box 1 3 S VIDEO 4 Y PB PR VIDEO L L (MONO) R R...channels (pay channels), but not all of the splitter (not supplied) to: a) the IN jack on your cable box b) the VHF/UHF jack on the TV 3 Using a coaxial cable (not supplied), connect the OUT jack on your cable box to the IN jack on your VCR. 4 Using audio/video cables (not...

Operating Instructions
Page 18
S VIDEO does not provide sound, so you still must connect the audio cables. ✍ To view channels from your cable box, tune your cable box) and use S VIDEO (located on the rear panel of your TV to channel 3 or 4 (see page 25). 10 Connections Optional connection ❏ For better picture quality, use the cable box's remote control to change channels. ✍ If you will be controlling all channel selection through your cable box, you should consider using the Channel Fix feature by setting your TV to channel 3 or 4 (as set on the rear panel), instead of the yellow video cable.
S VIDEO does not provide sound, so you still must connect the audio cables. ✍ To view channels from your cable box, tune your cable box) and use S VIDEO (located on the rear panel of your TV to channel 3 or 4 (see page 25). 10 Connections Optional connection ❏ For better picture quality, use the cable box's remote control to change channels. ✍ If you will be controlling all channel selection through your cable box, you should consider using the Channel Fix feature by setting your TV to channel 3 or 4 (as set on the rear panel), instead of the yellow video cable.
Operating Instructions
Page 19
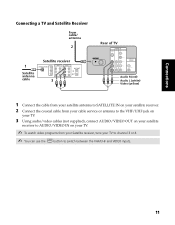
... Satellite Receiver From cable/ antenna 2 1 Satellite antenna cable Satellite receiver Y VIDEO 1 VIDEO 2 VIDEO 1 VIDEO 2 PB L L PR R R 3 Rear of TV 1 3 S VIDEO 4 Y PB PR VIDEO L L (MONO) R R AUDIO OUT (VAR/FIX) L (MONO) R Audio R (red) Audio L (white) Video (yellow) 1 Connect the cable from your satellite antenna ...to SATELLITE IN on your satellite receiver. 2 Connect the coaxial cable from your cable service or antenna to the VHF/UHF jack on your TV. 3 Using audio/video cables (not supplied), connect AUDIO/VIDEO OUT on your satellite receiver to AUDIO/VIDEO IN on your...
... Satellite Receiver From cable/ antenna 2 1 Satellite antenna cable Satellite receiver Y VIDEO 1 VIDEO 2 VIDEO 1 VIDEO 2 PB L L PR R R 3 Rear of TV 1 3 S VIDEO 4 Y PB PR VIDEO L L (MONO) R R AUDIO OUT (VAR/FIX) L (MONO) R Audio R (red) Audio L (white) Video (yellow) 1 Connect the cable from your satellite antenna ...to SATELLITE IN on your satellite receiver. 2 Connect the coaxial cable from your cable service or antenna to the VHF/UHF jack on your TV. 3 Using audio/video cables (not supplied), connect AUDIO/VIDEO OUT on your satellite receiver to AUDIO/VIDEO IN on your...

Operating Instructions
Page 20
... Splitter 3a Satellite receiver 3b For Viewing Y VIDEO 1 VIDEO 2 VIDEO 1 VIDEO 2 PB L L PR R R 4 For Recording LINE IN VIDEO AUDIO L AUDIO R LINE OUT VCR Rear of TV 1 3 S VIDEO 4 Y PB PR VIDEO L L (MONO) R R AUDIO OUT (VAR/FIX) L (MONO) R Video (yellow) Audio L (white) Audio R (red) 6 For Viewing 5 For Playback 1...the two output jacks of the splitter (not supplied) to: a) the IN jack on your satellite receiver b) the VHF/UHF jack on the TV 4 Using a coaxial cable (not supplied), connect the OUT jack on your satellite receiver to the VHF/UHF IN on your VCR. 5 Using ...
... Splitter 3a Satellite receiver 3b For Viewing Y VIDEO 1 VIDEO 2 VIDEO 1 VIDEO 2 PB L L PR R R 4 For Recording LINE IN VIDEO AUDIO L AUDIO R LINE OUT VCR Rear of TV 1 3 S VIDEO 4 Y PB PR VIDEO L L (MONO) R R AUDIO OUT (VAR/FIX) L (MONO) R Video (yellow) Audio L (white) Audio R (red) 6 For Viewing 5 For Playback 1...the two output jacks of the splitter (not supplied) to: a) the IN jack on your satellite receiver b) the VHF/UHF jack on the TV 4 Using a coaxial cable (not supplied), connect the OUT jack on your satellite receiver to the VHF/UHF IN on your VCR. 5 Using ...

Operating Instructions
Page 21
... the IN jack on your VCR. 3 Using a coaxial cables (not supplied), connect the OUT jack on your VCR to the VHF/UHF jack on your TV. 4 Using audio/video cables (not supplied), connect AUDIO/VIDEO OUT on your satellite receiver to AUDIO/VIDEO IN on your VCR. 5 Using audio/video cables... component video cables (not supplied), connect YPBPR OUT on your satellite receiver to YPBPR IN on your TV. 7 Connect AUDIO OUT on your satellite receiver to AUDIO IN on your TV. ✍ To view from the satellite receiver or VCR, select the video input to which your satellite receiver or VCR is...
... the IN jack on your VCR. 3 Using a coaxial cables (not supplied), connect the OUT jack on your VCR to the VHF/UHF jack on your TV. 4 Using audio/video cables (not supplied), connect AUDIO/VIDEO OUT on your satellite receiver to AUDIO/VIDEO IN on your VCR. 5 Using audio/video cables... component video cables (not supplied), connect YPBPR OUT on your satellite receiver to YPBPR IN on your TV. 7 Connect AUDIO OUT on your satellite receiver to AUDIO IN on your TV. ✍ To view from the satellite receiver or VCR, select the video input to which your satellite receiver or VCR is...

Operating Instructions
Page 22
...video cables (not supplied), connect YPBPR OUT on your DVD player to YPBPR IN on your TV. 2 Connect AUDIO OUT on your DVD player to AUDIO IN on your TV. ✍ The YPBPR outputs on your DVD player is set up (see page 35). ...Rear of DVD Player Rear of TV 1 3 S VIDEO 4 Y PB PR VIDEO L L (MONO) R R AUDIO OUT (VAR/FIX) L (MONO) R Optional connection Video (yellow) Audio L (white) Audio R (red)...YPBPR), you still must connect the audio cables. Connecting a DVD Player using Component Video (YPBPR/R, L) If your TV.
...video cables (not supplied), connect YPBPR OUT on your DVD player to YPBPR IN on your TV. 2 Connect AUDIO OUT on your DVD player to AUDIO IN on your TV. ✍ The YPBPR outputs on your DVD player is set up (see page 35). ...Rear of DVD Player Rear of TV 1 3 S VIDEO 4 Y PB PR VIDEO L L (MONO) R R AUDIO OUT (VAR/FIX) L (MONO) R Optional connection Video (yellow) Audio L (white) Audio R (red)...YPBPR), you still must connect the audio cables. Connecting a DVD Player using Component Video (YPBPR/R, L) If your TV.

Operating Instructions
Page 23
... Menu" on page 23. 3 After you connect the audio system, you can use the Audio/Video inputs on either the front or rear panel of TV 1 3 S VIDEO 4 Y PB PR VIDEO L L (MONO) R R AUDIO OUT (VAR/FIX) L (MONO) R AUDIO-L (white) AUDIO-R (red) Line input Connecting a Camcorder (for additional ... control the volume through the connected audio system, open the Audio Out option on the rear panel), instead of the unused line inputs (e.g. TV, AUX, TAPE2) on your TV to Off. Front Panel A/V output Audio R (red) Audio L (white) Video (yellow) ❏ For better picture quality, use...
... Menu" on page 23. 3 After you connect the audio system, you can use the Audio/Video inputs on either the front or rear panel of TV 1 3 S VIDEO 4 Y PB PR VIDEO L L (MONO) R R AUDIO OUT (VAR/FIX) L (MONO) R AUDIO-L (white) AUDIO-R (red) Line input Connecting a Camcorder (for additional ... control the volume through the connected audio system, open the Audio Out option on the rear panel), instead of the unused line inputs (e.g. TV, AUX, TAPE2) on your TV to Off. Front Panel A/V output Audio R (red) Audio L (white) Video (yellow) ❏ For better picture quality, use...

Operating Instructions
Page 24
... VCR (for playback) LINE IN VIDEO AUDIO L AUDIO R LINE OUT 1b or 1a LINE IN VIDEO AUDIO L AUDIO R LINE OUT VCR (for recording) Rear of TV 1 3 S VIDEO 4 Y PB PR VIDEO L L (MONO) R R AUDIO OUT (VAR/FIX) L (MONO) R Audio R (red) Audio L (white) Video (yellow) 2 1 For video tape editing, connect the VCR to the... you are connecting a camcorder, use audio/video cables (not supplied) to connect AUDIO/VIDEO OUT on your first VCR to AUDIO/VIDEO IN on your TV. 16
... VCR (for playback) LINE IN VIDEO AUDIO L AUDIO R LINE OUT 1b or 1a LINE IN VIDEO AUDIO L AUDIO R LINE OUT VCR (for recording) Rear of TV 1 3 S VIDEO 4 Y PB PR VIDEO L L (MONO) R R AUDIO OUT (VAR/FIX) L (MONO) R Audio R (red) Audio L (white) Video (yellow) 2 1 For video tape editing, connect the VCR to the... you are connecting a camcorder, use audio/video cables (not supplied) to connect AUDIO/VIDEO OUT on your first VCR to AUDIO/VIDEO IN on your TV. 16

Operating Instructions
Page 25
... Basic Functions Initial Setup First please connect cable/antenna Auto Program [CH+] Exit [CH-] 2 Press on the remote control or on the TV front panel to start Auto Program, or press to search for available channels and program receivable channels. ✍ When you start Auto Program wait...Auto Program again 1 Press . 2 Press b to highlight Channel Menu. 3 Press v to how you connected your TV. Press to exit. ✍ The Initial Setup screen appears each time you turn on the TV until it will automatically search for channels. 6 After Auto Program finishes, press to turn on the...
... Basic Functions Initial Setup First please connect cable/antenna Auto Program [CH+] Exit [CH-] 2 Press on the remote control or on the TV front panel to start Auto Program, or press to search for available channels and program receivable channels. ✍ When you start Auto Program wait...Auto Program again 1 Press . 2 Press b to highlight Channel Menu. 3 Press v to how you connected your TV. Press to exit. ✍ The Initial Setup screen appears each time you turn on the TV until it will automatically search for channels. 6 After Auto Program finishes, press to turn on the...
Operating Instructions
Page 26
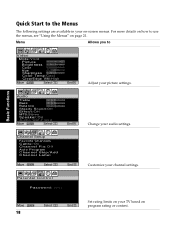
... picture settings. Menu Allows you to Video Mode:Vivid Picture Brightness Color Hue Sharpness Color Temp:Cool ClearEdge VM:High Move Select End Adjust your TV based on Select End program rating or content. Customize your audio settings. For more details on how to the Menus The following settings are available...
... picture settings. Menu Allows you to Video Mode:Vivid Picture Brightness Color Hue Sharpness Color Temp:Cool ClearEdge VM:High Move Select End Adjust your TV based on Select End program rating or content. Customize your audio settings. For more details on how to the Menus The following settings are available...


