
Operating Instructions
Page 2
...broadcaster/cable company and/or program owner. As an ENERGY STAR Partner, Sony has determined that this equipment does cause harmful interference to radio or television reception, which can be determined by turning the equipment off and on, the user is encouraged to try to... Trademark Information WOW, TruSurround and the symbol are trademarks of programs broadcast on Cleaning the TV Clean the TV with radio communications. Wega, FD Trinitron, Steady Sound, Digital Reality Creation, Caption Vision, and CineMotion are trademarks or registered trademarks of the FCC rules. Note to CATV...
...broadcaster/cable company and/or program owner. As an ENERGY STAR Partner, Sony has determined that this equipment does cause harmful interference to radio or television reception, which can be determined by turning the equipment off and on, the user is encouraged to try to... Trademark Information WOW, TruSurround and the symbol are trademarks of programs broadcast on Cleaning the TV Clean the TV with radio communications. Wega, FD Trinitron, Steady Sound, Digital Reality Creation, Caption Vision, and CineMotion are trademarks or registered trademarks of the FCC rules. Note to CATV...

Operating Instructions
Page 3
...the safety purpose of an internal malfunction that could create a fire hazard. Do not disconnect the antenna or the power cord during a heavy storm. Turn off your dealer or local power company. The object may fall, causing serious injury to a child or an adult, and serious damage to move the... cords or convenience receptacles beyond their capacity, since this manual for some TV sets to make occasional snapping or popping sounds, particularly when being turned on an unstable cart, stand, tripod, bracket, table or shelf. Use only a cart or stand recommended by the manufacturer. Always...
...the safety purpose of an internal malfunction that could create a fire hazard. Do not disconnect the antenna or the power cord during a heavy storm. Turn off your dealer or local power company. The object may fall, causing serious injury to a child or an adult, and serious damage to move the... cords or convenience receptacles beyond their capacity, since this manual for some TV sets to make occasional snapping or popping sounds, particularly when being turned on an unstable cart, stand, tripod, bracket, table or shelf. Use only a cart or stand recommended by the manufacturer. Always...

Operating Instructions
Page 11
For details, see "Contacting Sony" on and off the TV. Blinks when the TV is turned off when the picture is set . Provides better picture quality than composite video (2). Press to turn on page 63). Press repeatedly to the TV's video inputs. Receives IR signals from the Menu. Press to ...item. Press to the S VIDEO OUT jack on page 45. If the LED blinks continuously, this LED will remain lit even if the TV is turned on your camcorder or other video equipment. qa STAND BY TIMER POWER Item 1 S VIDEO VIDEO 2 INPUT 2 VIDEO/L(MONO)-AUDIO-R VIDEO 2 INPUT ...
For details, see "Contacting Sony" on and off the TV. Blinks when the TV is turned off when the picture is set . Provides better picture quality than composite video (2). Press to turn on page 63). Press repeatedly to the TV's video inputs. Receives IR signals from the Menu. Press to ...item. Press to the S VIDEO OUT jack on page 45. If the LED blinks continuously, this LED will remain lit even if the TV is turned on your camcorder or other video equipment. qa STAND BY TIMER POWER Item 1 S VIDEO VIDEO 2 INPUT 2 VIDEO/L(MONO)-AUDIO-R VIDEO 2 INPUT ...
Operating Instructions
Page 31
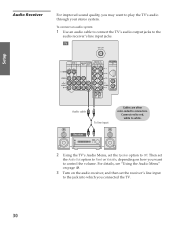
..., and then set the Speaker option to play the TV's audio through your stereo system. For details, see "Using the Audio Menu" on page 48. 3 Turn on how you want to the jack into which you may want to Off. Connect red to red, white to connectors. TV Setup SETUP SETUP...
..., and then set the Speaker option to play the TV's audio through your stereo system. For details, see "Using the Audio Menu" on page 48. 3 Turn on how you want to the jack into which you may want to Off. Connect red to red, white to connectors. TV Setup SETUP SETUP...

Operating Instructions
Page 33
...picture. To start Auto Program, highlight Yes and then press . You can choose a correction between +7 and -7. When finished, press . 5 KV-30/34HS420 Only The Vertical Correction screen appears. Using Auto Program z To exit the Tilt Correction and Vertical Correction screens, press the MENU button. ... back on the TV. You can choose a correction between +5 and -5. SETUP SETUP SETUP SETUP 32 When completed, the lowest numbered channel is finished, the Tilt Correction screen appears. 4 Press B b to turn on the TV. 2 Hold down RESET on the remote control. 3 Press TV POWER on the...
...picture. To start Auto Program, highlight Yes and then press . You can choose a correction between +7 and -7. When finished, press . 5 KV-30/34HS420 Only The Vertical Correction screen appears. Using Auto Program z To exit the Tilt Correction and Vertical Correction screens, press the MENU button. ... back on the TV. You can choose a correction between +5 and -5. SETUP SETUP SETUP SETUP 32 When completed, the lowest numbered channel is finished, the Tilt Correction screen appears. 4 Press B b to turn on the TV. 2 Hold down RESET on the remote control. 3 Press TV POWER on the...

Operating Instructions
Page 36
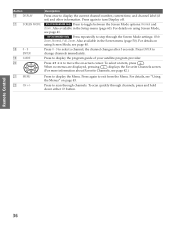
...press repeatedly to cycle through the Audio Effect options. SETUP SETUP Remote Control Button Description 1 MUTING Press to turn off all Sony brand audio/video equipment at once. (May not function with older Sony equipment. Press again or press VOL+ to restore the sound. 2 SYSTEM OFF Press to mute the ...sound. Also available in the Audio Menu. Also used to turn on before shutting off automatically. VCR/DVD: Press to clear ...
...press repeatedly to cycle through the Audio Effect options. SETUP SETUP Remote Control Button Description 1 MUTING Press to turn off all Sony brand audio/video equipment at once. (May not function with older Sony equipment. Press again or press VOL+ to restore the sound. 2 SYSTEM OFF Press to mute the ...sound. Also available in the Audio Menu. Also used to turn on before shutting off automatically. VCR/DVD: Press to clear ...
Operating Instructions
Page 37
... page 42.) wa MENU ws CH +/- Also available in the Setup menu (page 60). To select an item, press . KV-27/32/36HS420 Only Press to exit from the Menu. Press ENTER to turn Display off. To scan quickly through the Screen Mode settings: Wide Zoom, Normal, Full, Zoom. Press again to change... provider. Press 0 - 9 to step through channels, press and hold down either CH button. Press Vv B b to move the on using Screen Mode, see page 40. KV-30/34HS420 Only Press repeatedly to select a channel; For details on -screen cursor.
... page 42.) wa MENU ws CH +/- Also available in the Setup menu (page 60). To select an item, press . KV-27/32/36HS420 Only Press to exit from the Menu. Press ENTER to turn Display off. To scan quickly through the Screen Mode settings: Wide Zoom, Normal, Full, Zoom. Press again to change... provider. Press 0 - 9 to step through channels, press and hold down either CH button. Press Vv B b to move the on using Screen Mode, see page 40. KV-30/34HS420 Only Press repeatedly to select a channel; For details on -screen cursor.
Operating Instructions
Page 38
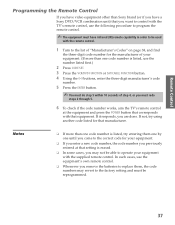
...your equipment with the supplied remote control. SETUP SETUP Remote Control Programming the Remote Control If you have video equipment other than Sony brand (or if you have a Sony DVD/VCR combination unit) that you want to control with the TV's remote control, use the following procedure to program the... remote control. ✍ The equipment must have infrared (IR) remote capability in order to be used with the remote control. 1 Turn to the list of ...
...your equipment with the supplied remote control. SETUP SETUP Remote Control Programming the Remote Control If you have video equipment other than Sony brand (or if you have a Sony DVD/VCR combination unit) that you want to control with the TV's remote control, use the following procedure to program the... remote control. ✍ The equipment must have infrared (IR) remote capability in order to be used with the remote control. 1 Turn to the list of ...
Operating Instructions
Page 40
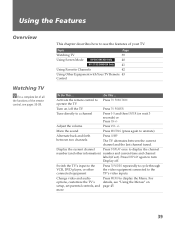
...seconds) or Press CH+/- Change video and audio options, customize the TV's setup, set ). Adjust the volume Press VOL +/- Press DISPLAY again to turn Display off the TV Press TV POWER Tune directly to the TV's video inputs. This chapter describes how to unmute) Alternate back and forth between...JUMP The TV alternates between the current channel and the last channel tuned. Topic Page Watching TV 39 Using Screen Mode KV-30/34HS420 Only 40 KV-27/32/36HS420 Only 41 Using Favorite Channels 42 Using Other Equipment with Your TV Remote 43 Control To Do This ... Using ...
...seconds) or Press CH+/- Change video and audio options, customize the TV's setup, set ). Adjust the volume Press VOL +/- Press DISPLAY again to turn Display off the TV Press TV POWER Tune directly to the TV's video inputs. This chapter describes how to unmute) Alternate back and forth between...JUMP The TV alternates between the current channel and the last channel tuned. Topic Page Watching TV 39 Using Screen Mode KV-30/34HS420 Only 40 KV-27/32/36HS420 Only 41 Using Favorite Channels 42 Using Other Equipment with Your TV Remote 43 Control To Do This ... Using ...
Operating Instructions
Page 44
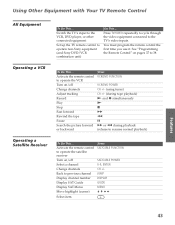
... video inputs. Press TV/VIDEO repeatedly to cycle through the video equipment connected to operate non-Sony equipment (and Sony DVD/VCR combination unit) Do This ... Activate the remote control to operate the VCR Turn on/off Select a channel Change channels Back to resume normal playback) To Do This ... ...Activate the remote control to operate the satellite receiver Turn on pages 37 to 38. You must ...
... video inputs. Press TV/VIDEO repeatedly to cycle through the video equipment connected to operate non-Sony equipment (and Sony DVD/VCR combination unit) Do This ... Activate the remote control to operate the VCR Turn on/off Select a channel Change channels Back to resume normal playback) To Do This ... ...Activate the remote control to operate the satellite receiver Turn on pages 37 to 38. You must ...

Operating Instructions
Page 45
... ENTER (using tuner) CH +/- (during playback V v B b N and z simultaneously CH +/- Press Activate the remote control VCR/DVD FUNCTION to operate the DVD/VCR Turn on /off Play Stop Pause Step through different tracks of the disc Step through different chapters of a video disc Select tracks directly Display the DVD... menu Move highlight (cursor) Select item VCR/DVD POWER N x X M to step forward or m to step backward CH+ to operate the cable box Turn on /off Switch between the DVD player and the VCR's tuner. 44 To Do This ... to step backward 0-9, B b (to previous channel Press SAT...
... ENTER (using tuner) CH +/- (during playback V v B b N and z simultaneously CH +/- Press Activate the remote control VCR/DVD FUNCTION to operate the DVD/VCR Turn on /off Play Stop Pause Step through different tracks of the disc Step through different chapters of a video disc Select tracks directly Display the DVD... menu Move highlight (cursor) Select item VCR/DVD POWER N x X M to step forward or m to step backward CH+ to operate the cable box Turn on /off Switch between the DVD player and the VCR's tuner. 44 To Do This ... to step backward 0-9, B b (to previous channel Press SAT...
Operating Instructions
Page 49
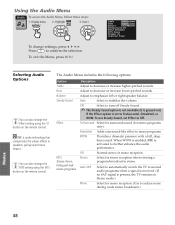
...: On Audio Out: Fixed Selecting Audio Options You can also change the Effect setting using the MTS button on the remote control. Off Select to turn off Steady Sound. ✍ The Steady Sound option is not available (it is grayed out) if the Effect option is activated to emphasize left or...
...: On Audio Out: Fixed Selecting Audio Options You can also change the Effect setting using the MTS button on the remote control. Off Select to turn off Steady Sound. ✍ The Steady Sound option is not available (it is grayed out) if the Effect option is activated to emphasize left or...
Operating Instructions
Page 50
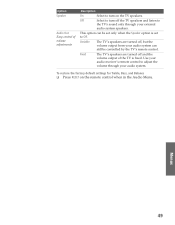
... from your audio system can be controlled by the TV's remote control. SETUP SETUP SETUP Menus SETUP 49 Variable The TV's speakers are turned off the TV speakers and listen to adjust the volume through your audio system. To restore the factory default settings for Treble, Bass,... audio receiver's remote control to the TV's sound only through your external audio system speakers. This option can still be set to turn off and the volume output of volume adjustments Description On Select to Off. SETUP Option Speaker Audio Out Easy control of the TV is...
... from your audio system can be controlled by the TV's remote control. SETUP SETUP SETUP Menus SETUP 49 Variable The TV's speakers are turned off the TV speakers and listen to adjust the volume through your audio system. To restore the factory default settings for Treble, Bass,... audio receiver's remote control to the TV's sound only through your external audio system speakers. This option can still be set to turn off and the volume output of volume adjustments Description On Select to Off. SETUP Option Speaker Audio Out Easy control of the TV is...

Operating Instructions
Page 53
.... ✍ You should run Auto Program after changing this setting if you have a cable box or satellite receiver connected Auto Program Channel Skip/Add Off Turns off Channel Fix. 2-6 "Fix" your favorite channels. Select one of your TV's channel setting to 2-6 and use the CH+/- Selecting Channel Options z Channels that appears...
.... ✍ You should run Auto Program after changing this setting if you have a cable box or satellite receiver connected Auto Program Channel Skip/Add Off Turns off Channel Fix. 2-6 "Fix" your favorite channels. Select one of your TV's channel setting to 2-6 and use the CH+/- Selecting Channel Options z Channels that appears...

Operating Instructions
Page 55
... select Child, Youth, or Young Adult to use USA ratings (see page 55). The Parent Menu includes the following options: Option Description Parental Lock Off Turn ratings on the remote control to confirm the selection. Maximum ratings permitted are: ❏ US: TV-Y, TV-G, G ❏ Canada: C, G, TV-Y Youth Maximum ratings permitted are...
... select Child, Youth, or Young Adult to use USA ratings (see page 55). The Parent Menu includes the following options: Option Description Parental Lock Off Turn ratings on the remote control to confirm the selection. Maximum ratings permitted are: ❏ US: TV-Y, TV-G, G ❏ Canada: C, G, TV-Y Youth Maximum ratings permitted are...

Operating Instructions
Page 56
... Menu includes the following types of programs may contain more intense violence. TV-G General Audience. To reactivate the Parental Lock settings, turn off the Parental Lock. R Restricted viewing, parental guidance is turned on again, your Parental Lock settings are broadcast without a rating. TV-Y7 Directed to a blocked program, then enter the password...
... Menu includes the following types of programs may contain more intense violence. TV-G General Audience. To reactivate the Parental Lock settings, turn off the Parental Lock. R Restricted viewing, parental guidance is turned on again, your Parental Lock settings are broadcast without a rating. TV-Y7 Directed to a blocked program, then enter the password...

Operating Instructions
Page 57
... ans+ Programming restricted to a blocked program, then enter the password. SETUP SETUP Menus SETUP 56 Rating Description C All children. To reactivate the Parental Lock settings, turn off the Parental Lock. SETUP SETUP Canadian Models: Selecting Custom Rating Options For Canadian models, the Custom Rating Menu includes the following options. (For US...
... ans+ Programming restricted to a blocked program, then enter the password. SETUP SETUP Menus SETUP 56 Rating Description C All children. To reactivate the Parental Lock settings, turn off the Parental Lock. SETUP SETUP Canadian Models: Selecting Custom Rating Options For Canadian models, the Custom Rating Menu includes the following options. (For US...
Operating Instructions
Page 58
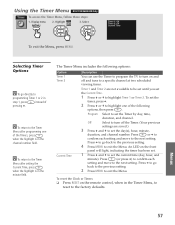
... the channel number field. To reset the Clock or Timers ❑ Press RESET on the remote control, when in the minute field. Off Select to turn on the front panel will light, indicating the timer has been set. 1 Press V and v to set the current time (day, hour, and minute... duration, and channel number. Press (or press b) to confirm each setting and move to the next setting. SETUP SETUP SETUP Using the Timer Menu KV-27/32/36HS420 Only To access the Timer Menu, follow these steps: 1. Display menu 2. z To return to the Timer Menu after setting the Current Time,...
... the channel number field. To reset the Clock or Timers ❑ Press RESET on the remote control, when in the minute field. Off Select to turn on the front panel will light, indicating the timer has been set. 1 Press V and v to set the current time (day, hour, and minute... duration, and channel number. Press (or press b) to confirm each setting and move to the next setting. SETUP SETUP SETUP Using the Timer Menu KV-27/32/36HS420 Only To access the Timer Menu, follow these steps: 1. Display menu 2. z To return to the Timer Menu after setting the Current Time,...
Operating Instructions
Page 59
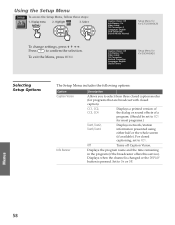
...the Setup Menu To access the Setup Menu, follow these steps: 1. Select To change settings, press V v B b. Press to CC1. Off Turns off Caption Vision. Display menu 2. Caption Vision: Off Info Banner: On Video Label Tilt Correction: 0 Language: English 16:9 Enhanced Screen Mode: Normal... Setup Menu for KV-27/32/36HS420 Caption Vision: Off Info Banner: On Video Label Tilt Correction Vertical Correction Language: English Clock/Timers Setup Menu for KV-30/34HS420 Selecting Setup Options The Setup Menu includes the following options:...
...the Setup Menu To access the Setup Menu, follow these steps: 1. Select To change settings, press V v B b. Press to CC1. Off Turns off Caption Vision. Display menu 2. Caption Vision: Off Info Banner: On Video Label Tilt Correction: 0 Language: English 16:9 Enhanced Screen Mode: Normal... Setup Menu for KV-27/32/36HS420 Caption Vision: Off Info Banner: On Video Label Tilt Correction Vertical Correction Language: English Clock/Timers Setup Menu for KV-30/34HS420 Selecting Setup Options The Setup Menu includes the following options:...

Operating Instructions
Page 60
... correction to choose a correction between +5 and -5 and press . Press B or b to the picture. Returns to Auto when you switch to manually turn on the unit and after the unit is the ratio of width to choose a correction between +7 and -7 and press . z To use 16:9 ...activate automatically when a 16:9 signal is also referred to as widescreen format.) Option Video Label Tilt Correction Vertical Correction KV-30/34HS420 Only Language 16:9 Enhanced KV-27/32/36HS420 Only Description Allows you to identify A/V equipment you to the TV, such as selected DVD titles.
... correction to choose a correction between +5 and -5 and press . Press B or b to the picture. Returns to Auto when you switch to manually turn on the unit and after the unit is the ratio of width to choose a correction between +7 and -7 and press . z To use 16:9 ...activate automatically when a 16:9 signal is also referred to as widescreen format.) Option Video Label Tilt Correction Vertical Correction KV-30/34HS420 Only Language 16:9 Enhanced KV-27/32/36HS420 Only Description Allows you to identify A/V equipment you to the TV, such as selected DVD titles.


