

Child Safety: It Makes A Difference Where Your TV Stands
Page 1
...CES® and is a growing trend, and larger televisions are popular purchases and are improperly secured or inappropriately situated on the proper TV stands. The Industry Cares! The industry is large enough to support the weight of your television (and other electronic components). 2 Use ...Use the appropriate furniture that is committed to advocate children's safety and educate customers and their families about television safety. As a result, TV sets may fall over and may pique the children's curiosity. 6 Remember that children can become excited while watching a program and can ...
...CES® and is a growing trend, and larger televisions are popular purchases and are improperly secured or inappropriately situated on the proper TV stands. The Industry Cares! The industry is large enough to support the weight of your television (and other electronic components). 2 Use ...Use the appropriate furniture that is committed to advocate children's safety and educate customers and their families about television safety. As a result, TV sets may fall over and may pique the children's curiosity. 6 Remember that children can become excited while watching a program and can ...
Warranty Card
Page 1
... LIMITED IN DURATION TO THE DURATION OF THIS WARRANTY. 4-557-166-02 ® Color TV Color Video TV LIMITED WARRANTY Sony Electronics Inc. ("Sony") warrants this Product is determined to be presented to obtain warranty service. PARTS: In addition, Sony will repair or replace the Product, at no charge, new or rebuilt replacements in the...
... LIMITED IN DURATION TO THE DURATION OF THIS WARRANTY. 4-557-166-02 ® Color TV Color Video TV LIMITED WARRANTY Sony Electronics Inc. ("Sony") warrants this Product is determined to be presented to obtain warranty service. PARTS: In addition, Sony will repair or replace the Product, at no charge, new or rebuilt replacements in the...
Primary User Manual
Page 2
... and at the rear of your warranty because they are not covered by qualified personnel before operating it checked by your TV. As an ENERGY STAR® Partner, Sony has determined that provides guidelines for energy efficiency. "WOW, TruSurround, and the ( )® symbol are trademarks of ... Reorient or relocate the receiving antennas. ❏ Increase the separation between the equipment and receiver. ❏ Connect the equipment into the TV, unplug it and have it further. These limits are cautioned that interference will fit into the power outlet only one or more of ...
... and at the rear of your warranty because they are not covered by qualified personnel before operating it checked by your TV. As an ENERGY STAR® Partner, Sony has determined that provides guidelines for energy efficiency. "WOW, TruSurround, and the ( )® symbol are trademarks of ... Reorient or relocate the receiving antennas. ❏ Increase the separation between the equipment and receiver. ❏ Connect the equipment into the TV, unplug it and have it further. These limits are cautioned that interference will fit into the power outlet only one or more of ...
Primary User Manual
Page 3
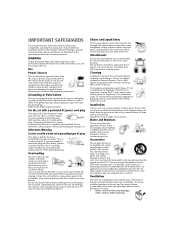
... unsteady handling. Installation Always use , and servicing of the set . Always turn the set is continuous or frequent while the TV is operating, unplug the TV and consult your protection, please read these slots and openings must never be blocked or covered. • Never cover the slots... outlet. Carefully observe and comply with a three-wire grounding type plug (a plug having one way. WARNING To guard against the possibility of TV. Grounding or Polarization This set is not to move the set with care. If you are holding the cable or cord, causing serious injury...
... unsteady handling. Installation Always use , and servicing of the set . Always turn the set is continuous or frequent while the TV is operating, unplug the TV and consult your protection, please read these slots and openings must never be blocked or covered. • Never cover the slots... outlet. Carefully observe and comply with a three-wire grounding type plug (a plug having one way. WARNING To guard against the possibility of TV. Grounding or Polarization This set is not to move the set with care. If you are holding the cable or cord, causing serious injury...
Primary User Manual
Page 6
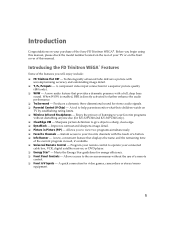
Contents Introduction Introducing the FD Trinitron WEGA® Features 1 About this Manual...2 Batteries for the Remote Control 2 Front Panel Menu Controls ...2 Using the Remote Controls ...3 Connecting Your TV TV Rear Panel ...8 Basic Connections ...10 Cable Box Connections ...11 Connecting Additional Equipment 13 Using Basic Functions Setting Up the TV Automatically 21 Quick Start to the Menus ...22...
Contents Introduction Introducing the FD Trinitron WEGA® Features 1 About this Manual...2 Batteries for the Remote Control 2 Front Panel Menu Controls ...2 Using the Remote Controls ...3 Connecting Your TV TV Rear Panel ...8 Basic Connections ...10 Cable Box Connections ...11 Connecting Additional Equipment 13 Using Basic Functions Setting Up the TV Automatically 21 Quick Start to the Menus ...22...
Primary User Manual
Page 8
... simultaneously. ❏ Favorite Channels - Sharpens picture definition to the on-screen menus without disturbing anyone else (for KV-32FV300 and KV-36FV300 only). ❏ ClearEdge VM - A new, convenient feature that provides a dramatic presence with uncompromising accuracy ...TV or on the front cover of this manual. A component video input connection for video games, camcorders or stereo/mono equipment. 1 Improves contrast and sharpens image detail. ❏ Picture in Picture (PIP) - A new audio feature that displays the name and the remaining time of the Sony FD Trinitron WEGA...
... simultaneously. ❏ Favorite Channels - Sharpens picture definition to the on-screen menus without disturbing anyone else (for KV-32FV300 and KV-36FV300 only). ❏ ClearEdge VM - A new, convenient feature that provides a dramatic presence with uncompromising accuracy ...TV or on the front cover of this manual. A component video input connection for video games, camcorders or stereo/mono equipment. 1 Improves contrast and sharpens image detail. ❏ Picture in Picture (PIP) - A new audio feature that displays the name and the remaining time of the Sony FD Trinitron WEGA...
Primary User Manual
Page 9
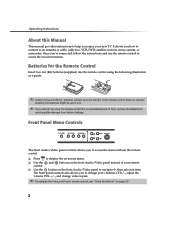
It shows you enjoy your new TV. Once you to access the menu without the remote control. ❏ Press to display the on-screen menu. ❏ Use the and buttons on the ... the following illustration as a guide. ✍ Under normal conditions, batteries will not be worn out. ✍ If you to six months. Front Panel Menu Controls TV/VIDEO - The front panel controls also allows you will last up to change your channels CH+/-, adjust the volume VOL +/-, and change video inputs. ✍...
It shows you enjoy your new TV. Once you to access the menu without the remote control. ❏ Press to display the on-screen menu. ❏ Use the and buttons on the ... the following illustration as a guide. ✍ Under normal conditions, batteries will not be worn out. ✍ If you to six months. Front Panel Menu Controls TV/VIDEO - The front panel controls also allows you will last up to change your channels CH+/-, adjust the volume VOL +/-, and change video inputs. ✍...
Primary User Manual
Page 10
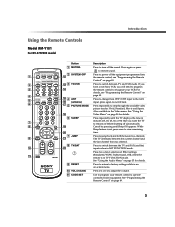
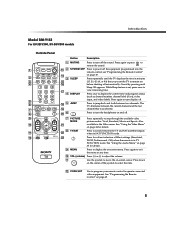
Introduction Using the Remote Controls Model RM-Y181 For KV-27FV300 model A B C D E F G H / I J K Button 1 MUTING 2 SYSTEM OFF L M 3 TV/VCR N O 4 ANT P (antenna) Q 5 PICTURE MODE R 6 SLEEP S T 7 JUMP U 8 TV/SAT V 9 RESET q; VOL (volume) qa CODE SET Description Press to turn off the equipment programmed into the remote ...See "Programming the Remote Control" on page 49. If you have a non-Sony VCR, you want the TV to view remaining time. Press repeatedly to switch back. Cancel by pressing until the TV displays the time in SAT FUNCTION mode. Use to operate connected video equipment....
Introduction Using the Remote Controls Model RM-Y181 For KV-27FV300 model A B C D E F G H / I J K Button 1 MUTING 2 SYSTEM OFF L M 3 TV/VCR N O 4 ANT P (antenna) Q 5 PICTURE MODE R 6 SLEEP S T 7 JUMP U 8 TV/SAT V 9 RESET q; VOL (volume) qa CODE SET Description Press to turn off the equipment programmed into the remote ...See "Programming the Remote Control" on page 49. If you have a non-Sony VCR, you want the TV to view remaining time. Press repeatedly to switch back. Cancel by pressing until the TV displays the time in SAT FUNCTION mode. Use to operate connected video equipment....
Primary User Manual
Page 11
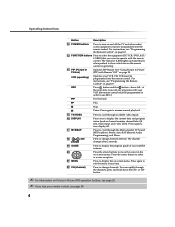
... display the on page 49. To scan rapidly through available video inputs. Operating Instructions Button Description qs POWER buttons Press to turn display off the TV and other audio/ video equipment you lose your VCR (the remote control must be programmed in order to record any time. The indicator (LED)...page 49. Press again to exit the menu at the same time to use REC.) M Fast-forward. qd FUNCTION buttons Press to select the equipment (TV, VCR/DVD, SAT/ CABLE) that you want to operate with your remote control, see page 25. ✍ If you have programmed into the remote...
... display the on page 49. To scan rapidly through available video inputs. Operating Instructions Button Description qs POWER buttons Press to turn display off the TV and other audio/ video equipment you lose your VCR (the remote control must be programmed in order to record any time. The indicator (LED)...page 49. Press again to exit the menu at the same time to use REC.) M Fast-forward. qd FUNCTION buttons Press to select the equipment (TV, VCR/DVD, SAT/ CABLE) that you want to operate with your remote control, see page 25. ✍ If you have programmed into the remote...
Primary User Manual
Page 12
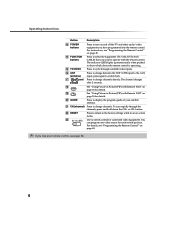
... move the on and off. 7 PICTURE MODE wa Press repeatedly to switch between the TV and SAT (satellite) inputs when in TV FUNCTION mode. See "Programming the Remote Control" on -screen menu. Introduction Model RM-Y182 For KV-32FV300, KV-36FV300 models Outside Panel 1 2 3 4 5 6 7 8 9 0 qa qs Button Description ... . See "Using the Video Menu" on qh before shutting off the sound. Press again to exit the menu at any time. The TV alternates between two channels. Press down on the center of Effect settings (Simulated, WOW, TruSurround, Off), when the remote is set ), ...
... move the on and off. 7 PICTURE MODE wa Press repeatedly to switch between the TV and SAT (satellite) inputs when in TV FUNCTION mode. See "Programming the Remote Control" on -screen menu. Introduction Model RM-Y182 For KV-32FV300, KV-36FV300 models Outside Panel 1 2 3 4 5 6 7 8 9 0 qa qs Button Description ... . See "Using the Video Menu" on qh before shutting off the sound. Press again to exit the menu at any time. The TV alternates between two channels. Press down on the center of Effect settings (Simulated, WOW, TruSurround, Off), when the remote is set ), ...
Primary User Manual
Page 13
qg TV/VIDEO Press to cycle through the channels, press and hold down the CH+ or CH- wa CH (...) with the remote control. You can program one video source for details. qf FUNCTION buttons Press to select the equipment (TV, VCR/DVD, SAT/ CABLE) that you have programmed into the remote control. w; button. qk See "Using Picture in an on... and off the TV and other audio/video equipment you want to operate with Remote Y182" on page 49. Operating Instructions Button Description qd POWER ...
qg TV/VIDEO Press to cycle through the channels, press and hold down the CH+ or CH- wa CH (...) with the remote control. You can program one video source for details. qf FUNCTION buttons Press to select the equipment (TV, VCR/DVD, SAT/ CABLE) that you have programmed into the remote control. w; button. qk See "Using Picture in an on... and off the TV and other audio/video equipment you want to operate with Remote Y182" on page 49. Operating Instructions Button Description qd POWER ...
Primary User Manual
Page 14
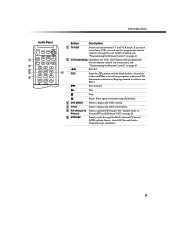
...) Operates your VCR. m Rewind. 6 REC Press the button and the blank button - X Pause. Introduction Inside Panel 1 2 3 4 5 Button Description 1 TV/VCR Press to cycle through the Multi-channel TV Sound (MTS) options: Stereo, Auto SAP (Second Audio Programming), and Mono. 7 above, left - Press to switch between... TV and VCR mode. If you have a non-Sony VCR, you will need to program the remote control to operate PIP feature. See "Using Picture in Picture) 6...
...) Operates your VCR. m Rewind. 6 REC Press the button and the blank button - X Pause. Introduction Inside Panel 1 2 3 4 5 Button Description 1 TV/VCR Press to cycle through the Multi-channel TV Sound (MTS) options: Stereo, Auto SAP (Second Audio Programming), and Mono. 7 above, left - Press to switch between... TV and VCR mode. If you have a non-Sony VCR, you will need to program the remote control to operate PIP feature. See "Using Picture in Picture) 6...
Primary User Manual
Page 15
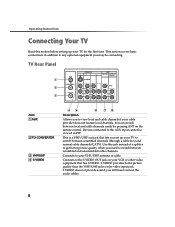
... VCR or other video equipment that lets you still must connect the audio cables. 8 S VIDEO does not provide sound; Operating Instructions Connecting Your TV Read this jack instead of a splitter to get better picture quality when you need to switch between scrambled and unscrambled cable channels...4 S VIDEO 45 6 78 Description Allows you may be viewed in addition to any optional equipment you to view local and cable channels if your TV to your TV for the first time. This is a VHF/UHF out jack that has S VIDEO. S VIDEO provides better picture quality than the VHF/UHF jacks...
... VCR or other video equipment that lets you still must connect the audio cables. 8 S VIDEO does not provide sound; Operating Instructions Connecting Your TV Read this jack instead of a splitter to get better picture quality when you need to switch between scrambled and unscrambled cable channels...4 S VIDEO 45 6 78 Description Allows you may be viewed in addition to any optional equipment you to view local and cable channels if your TV to your TV for the first time. This is a VHF/UHF out jack that has S VIDEO. S VIDEO provides better picture quality than the VHF/UHF jacks...
Primary User Manual
Page 16
... or video equipment. You can use your stereo system. 9 Connects to the AUDIO L and R input jacks on your VCR or other video equipment. Connecting Your TV Jack 5 AUDIO (L/R)/VIDEO 6 Y, PB, PR/ L, R 7MONITOR OUT 8 AUDIO OUT (VAR/FIX) L(MONO)/R Description Connects to the AUDIO and VIDEO output jacks on ...the front panel of the TV. Lets you record the program you can listen to your TV's audio through your TV as a monitor for tape-to a VCR. A third video input jack (VIDEO 2) is located on your DVD...
... or video equipment. You can use your stereo system. 9 Connects to the AUDIO L and R input jacks on your VCR or other video equipment. Connecting Your TV Jack 5 AUDIO (L/R)/VIDEO 6 Y, PB, PR/ L, R 7MONITOR OUT 8 AUDIO OUT (VAR/FIX) L(MONO)/R Description Connects to the AUDIO and VIDEO output jacks on ...the front panel of the TV. Lets you record the program you can listen to your TV's audio through your TV as a monitor for tape-to a VCR. A third video input jack (VIDEO 2) is located on your DVD...
Primary User Manual
Page 17
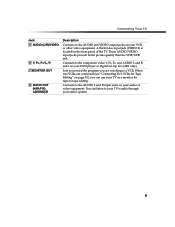
Operating Instructions Basic Connections TV with Indoor or Outdoor Antenna, or CATV Cable Depending on the cable available in your home, choose one of the connections below: (not supplied) ✍ If you are connecting to an indoor or outdoor antenna, you may need to adjust the orientation of the antenna for best reception. 10
Operating Instructions Basic Connections TV with Indoor or Outdoor Antenna, or CATV Cable Depending on the cable available in your home, choose one of the connections below: (not supplied) ✍ If you are connecting to an indoor or outdoor antenna, you may need to adjust the orientation of the antenna for best reception. 10
Primary User Manual
Page 18
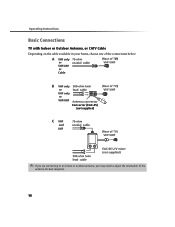
...cable box to channel 3 or 4 (see page 37). 11 Connecting Your TV Cable Box Connections Some cable TV systems use this connection. Cable Box and TV Cable Box 1 Rear of cable service, use scrambled or encoded signals that kind of TV From Cable/ Antenna 2 1 Connect the coaxial cable from your cable service ...VHF/UHF jack on your channels are scrambled, consider using the Channel Fix feature to set your TV to view all channel selection through the cable box cannot be viewed in to the TV through your cable box, you should consider using the Cable Box and Cable connection. If you...
...cable box to channel 3 or 4 (see page 37). 11 Connecting Your TV Cable Box Connections Some cable TV systems use this connection. Cable Box and TV Cable Box 1 Rear of cable service, use scrambled or encoded signals that kind of TV From Cable/ Antenna 2 1 Connect the coaxial cable from your cable service ...VHF/UHF jack on your channels are scrambled, consider using the Channel Fix feature to set your TV to view all channel selection through the cable box cannot be viewed in to the TV through your cable box, you should consider using the Cable Box and Cable connection. If you...
Primary User Manual
Page 19
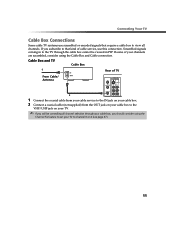
...to use the remote control to: ❏ change channels through your cable box when you are receiving a scrambled signal ❏ change your channels, set your TV to channel 3 or 4. Decodificador Parte posterior del televisor 3 Cable coaxial 2 Cable coaxial de 75 ohm 1 Cable CATV (canales no codificados) 1 Connect ... page 24 or 26. For more information on the remote control to switch between the cable box and direct cable inputs. ✍ Your Sony remote control can be programmed to operate your cable box (see page 50). ✍ To use the PIP feature when you are viewing ...
...to use the remote control to: ❏ change channels through your cable box when you are receiving a scrambled signal ❏ change your channels, set your TV to channel 3 or 4. Decodificador Parte posterior del televisor 3 Cable coaxial 2 Cable coaxial de 75 ohm 1 Cable CATV (canales no codificados) 1 Connect ... page 24 or 26. For more information on the remote control to switch between the cable box and direct cable inputs. ✍ Your Sony remote control can be programmed to operate your cable box (see page 50). ✍ To use the PIP feature when you are viewing ...
Primary User Manual
Page 20
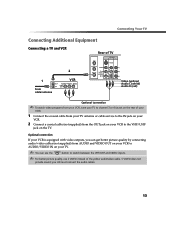
...) Audio L (white) Audio R (red) Optional connection ✍ To watch video programs from your VCR, tune your TV to channel 3 or 4 (as set on the rear of the yellow audio/video cable. Optional connection If your TV. ✍ You can use the button to the VHF/UHF jack on your VCR is equipped... switch between the VHF/UHF and VIDEO inputs. ✍ For better picture quality, use S VIDEO instead of your VCR). 1 Connect the coaxial cable from your TV antenna or cable service to the IN jack on your VCR. 2 Connect a coaxial cable (not supplied) from AUDIO and VIDEO OUT on your VCR to...
...) Audio L (white) Audio R (red) Optional connection ✍ To watch video programs from your VCR, tune your TV to channel 3 or 4 (as set on the rear of the yellow audio/video cable. Optional connection If your TV. ✍ You can use the button to the VHF/UHF jack on your VCR is equipped... switch between the VHF/UHF and VIDEO inputs. ✍ For better picture quality, use S VIDEO instead of your VCR). 1 Connect the coaxial cable from your TV antenna or cable service to the IN jack on your VCR. 2 Connect a coaxial cable (not supplied) from AUDIO and VIDEO OUT on your VCR to...
Primary User Manual
Page 21
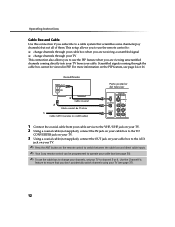
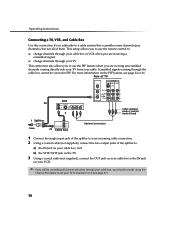
... (not supplied), connect the two output jacks of them. For more information on your VCR. ✍ If you will be viewed in PIP. Rear of TV 1 3 4 VCR 2b 3 1 Splitter Cable 2a Cable Box Optional connection Video (yellow) Audio L (white) Audio R (red) 1 Connect the single input ...jack of the splitter to : ❏ change channels through your cable. Scrambled signals coming directly into your TV from your cable box or VCR when you are receiving a scrambled signal ❏ change channels through the cable box cannot be controlling all of the...
... (not supplied), connect the two output jacks of them. For more information on your VCR. ✍ If you will be viewed in PIP. Rear of TV 1 3 4 VCR 2b 3 1 Splitter Cable 2a Cable Box Optional connection Video (yellow) Audio L (white) Audio R (red) 1 Connect the single input ...jack of the splitter to : ❏ change channels through your cable. Scrambled signals coming directly into your TV from your cable box or VCR when you are receiving a scrambled signal ❏ change channels through the cable box cannot be controlling all of the...
Primary User Manual
Page 22
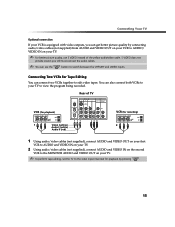
... quality by connecting audio/video cables (not supplied) from AUDIO and VIDEO OUT on your VCR to AUDIO/ VIDEO IN on your TV. ✍ To perform tape editing, set the TV to the video input intended for recording) 1 Video (yellow) 2 Audio L (white) Audio R (red) 1 Using audio/video cables (not supplied), connect... AUDIO and VIDEO OUT on your first VCR to AUDIO and VIDEO IN on your TV. 2 Using audio/video cables (not supplied), connect AUDIO and VIDEO IN on the second VCR to the MONITOR AUDIO and VIDEO OUT on your...
... quality by connecting audio/video cables (not supplied) from AUDIO and VIDEO OUT on your VCR to AUDIO/ VIDEO IN on your TV. ✍ To perform tape editing, set the TV to the video input intended for recording) 1 Video (yellow) 2 Audio L (white) Audio R (red) 1 Using audio/video cables (not supplied), connect... AUDIO and VIDEO OUT on your first VCR to AUDIO and VIDEO IN on your TV. 2 Using audio/video cables (not supplied), connect AUDIO and VIDEO IN on the second VCR to the MONITOR AUDIO and VIDEO OUT on your...


