
Warranty Card
Page 1
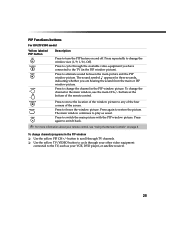
... antenna. After 90 days from the Product. In-home diagnostic warranty service is invalid if the factory applied serial number has been altered or removed from the date of sale, the limitation on how long an implied warranty lasts, so the above limitations or exclusions may have other than a facility authorized by Sony to any conditions set up adjustments or signal reception problems...
... antenna. After 90 days from the Product. In-home diagnostic warranty service is invalid if the factory applied serial number has been altered or removed from the date of sale, the limitation on how long an implied warranty lasts, so the above limitations or exclusions may have other than a facility authorized by Sony to any conditions set up adjustments or signal reception problems...
Primary User Manual
Page 2
... of the FCC Rules. If a fixed (non-moving) pattern is left on 120 V AC. ❏ One blade of the power plug is wider than private viewing of programs broadcast on a circuit different from the broadcaster-cable company and/or program owner. NOTIFICATION This equipment has been tested and found to operate this product or product model meets the ENERGY STAR®...
... of the FCC Rules. If a fixed (non-moving) pattern is left on 120 V AC. ❏ One blade of the power plug is wider than private viewing of programs broadcast on a circuit different from the broadcaster-cable company and/or program owner. NOTIFICATION This equipment has been tested and found to operate this product or product model meets the ENERGY STAR®...
Primary User Manual
Page 3
... cart, stand, tripod, bracket, table, or shelf. Carefully observe and comply with a cloth or other ), or with a polarized AC power cord plug This plug will only fit into the outlet, contact your dealer or service technician. Lightning may touch dangerous voltage points or short out parts that could result in the installation, use a mounting accessory recommended by the manufacturer for the specific model of...
... cart, stand, tripod, bracket, table, or shelf. Carefully observe and comply with a cloth or other ), or with a polarized AC power cord plug This plug will only fit into the outlet, contact your dealer or service technician. Lightning may touch dangerous voltage points or short out parts that could result in the installation, use a mounting accessory recommended by the manufacturer for the specific model of...

Primary User Manual
Page 4
... wall outlet and disconnect the antenna. If you to so certify. Be sure the antenna system is in contact with a polarized alternating current line plug (a plug having one way. Replacement Parts When replacement parts are specified in the vicinity of any service or repairs to the set, ask the service technician to excessive shock by the manufacturer that are required, be located in the operating instructions...
... wall outlet and disconnect the antenna. If you to so certify. Be sure the antenna system is in contact with a polarized alternating current line plug (a plug having one way. Replacement Parts When replacement parts are specified in the vicinity of any service or repairs to the set, ask the service technician to excessive shock by the manufacturer that are required, be located in the operating instructions...
Primary User Manual
Page 6
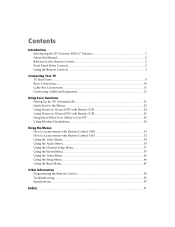
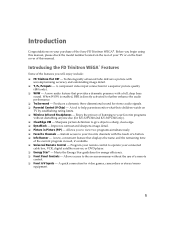
... Introducing the FD Trinitron WEGA® Features 1 About this Manual...2 Batteries for the Remote Control 2 Front Panel Menu Controls ...2 Using the Remote Controls ...3 Connecting Your TV TV Rear Panel ...8 Basic Connections ...10 Cable Box Connections ...11 Connecting Additional Equipment 13 Using Basic Functions Setting Up the TV Automatically 21 Quick Start to the Menus ...22 Using Picture in Picture (PIP) with Remote Y181 24 Using Picture in Picture (PIP) with Remote Y182 26 Setups that Affect Your Ability to Use PIP 28 Using Wireless Headphones ...29 Using the Menus...
... Introducing the FD Trinitron WEGA® Features 1 About this Manual...2 Batteries for the Remote Control 2 Front Panel Menu Controls ...2 Using the Remote Controls ...3 Connecting Your TV TV Rear Panel ...8 Basic Connections ...10 Cable Box Connections ...11 Connecting Additional Equipment 13 Using Basic Functions Setting Up the TV Automatically 21 Quick Start to the Menus ...22 Using Picture in Picture (PIP) with Remote Y181 24 Using Picture in Picture (PIP) with Remote Y182 26 Setups that Affect Your Ability to Use PIP 28 Using Wireless Headphones ...29 Using the Menus...
Primary User Manual
Page 8
...; Picture in Picture (PIP) - Introducing the FD Trinitron WEGA® Features Some of the current program viewed, if available. ❏ Universal Remote Control - Allows access to operate your remote control to the on TV by establishing rating limits. ❏ Wireless Infrared Headphones - A component video input connection for video games, camcorders or stereo/mono equipment. 1 A new audio feature that displays the name and the remaining time of the features you begin using this manual. Program your connected cable box, VCR, digital satellite receiver, or DVD player...
...; Picture in Picture (PIP) - Introducing the FD Trinitron WEGA® Features Some of the current program viewed, if available. ❏ Universal Remote Control - Allows access to operate your remote control to the on TV by establishing rating limits. ❏ Wireless Infrared Headphones - A component video input connection for video games, camcorders or stereo/mono equipment. 1 A new audio feature that displays the name and the remaining time of the features you begin using this manual. Program your connected cable box, VCR, digital satellite receiver, or DVD player...
Primary User Manual
Page 10
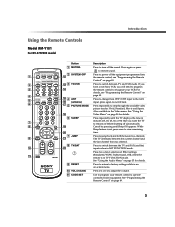
... remote control to program your VCR. Use to operate connected video equipment. Introduction Using the Remote Controls Model RM-Y181 For KV-27FV300 model A B C D E F G H / I J K Button 1 MUTING 2 SYSTEM OFF L M 3 TV/VCR N O 4 ANT P (antenna) Q 5 PICTURE MODE R 6 SLEEP S T 7 JUMP U 8 TV/SAT V 9 RESET q; Press to change from VHF/UHF input to the AUX input, press again to step through the available video picture modes: Vivid, Standard, Movie and Sports. Press repeatedly to switch back. The TV alternates between two channels. See "Using the Audio Menu...
... remote control to program your VCR. Use to operate connected video equipment. Introduction Using the Remote Controls Model RM-Y181 For KV-27FV300 model A B C D E F G H / I J K Button 1 MUTING 2 SYSTEM OFF L M 3 TV/VCR N O 4 ANT P (antenna) Q 5 PICTURE MODE R 6 SLEEP S T 7 JUMP U 8 TV/SAT V 9 RESET q; Press to change from VHF/UHF input to the AUX input, press again to step through the available video picture modes: Vivid, Standard, Movie and Sports. Press repeatedly to switch back. The TV alternates between two channels. See "Using the Audio Menu...
Primary User Manual
Page 11
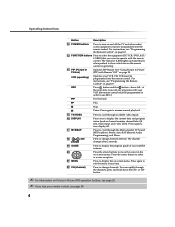
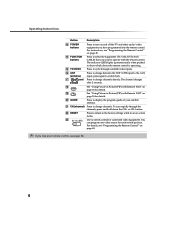
..."Using Picture in Picture (PIP) operation buttons, see "Programming the Remote Control" on page 49. Press again to move the cursor in Picture) Operates PIP feature. qf PIP (Picture in the on page 24. The VCR must be programmed into the remote control. Press to change channels directly. N Play. Press to cycle through available video inputs. ql GUIDE w; Operating Instructions Button Description qs POWER buttons Press to display the current time and program status (such as channel number, channel label (if set), video input, and video label). qh DISPLAY...
..."Using Picture in Picture (PIP) operation buttons, see "Programming the Remote Control" on page 49. Press again to move the cursor in Picture) Operates PIP feature. qf PIP (Picture in the on page 24. The VCR must be programmed into the remote control. Press to change channels directly. N Play. Press to cycle through available video inputs. ql GUIDE w; Operating Instructions Button Description qs POWER buttons Press to display the current time and program status (such as channel number, channel label (if set), video input, and video label). qh DISPLAY...
Primary User Manual
Page 12
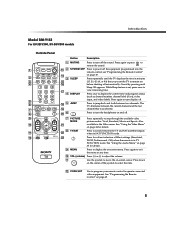
.... q; See "Programming the Remote Control" on -screen cursor. qs CODE SET Use to program your remote control to jump back and forth between two channels. See "Using the Video Menu" on page 49. 3 SLEEP Press repeatedly until Sleep Off appears. Introduction Model RM-Y182 For KV-32FV300, KV-36FV300 models Outside Panel 1 2 3 4 5 6 7 8 9 0 qa qs Button Description 1 MUTING Press to switch between the TV and SAT (satellite) inputs when in SAT FUNCTION mode. VOL (volume) Press (+) or...
.... q; See "Programming the Remote Control" on -screen cursor. qs CODE SET Use to program your remote control to jump back and forth between two channels. See "Using the Video Menu" on page 49. 3 SLEEP Press repeatedly until Sleep Off appears. Introduction Model RM-Y182 For KV-32FV300, KV-36FV300 models Outside Panel 1 2 3 4 5 6 7 8 9 0 qa qs Button Description 1 MUTING Press to switch between the TV and SAT (satellite) inputs when in SAT FUNCTION mode. VOL (volume) Press (+) or...
Primary User Manual
Page 13
... 1 2 3 DVD Use to switch control for details. Operating Instructions Button Description qd POWER buttons Press to turn on page 49. qg TV/VIDEO Press to display the program guide of your remote control, see page 54. 6 qk See "Using Picture in Picture (PIP) with Remote Y182" on page 26 for each switch position. You can program one video source for details. For instructions, see "Programming the Remote Control" on -screen menu. The indicator (LED) lights up momentarily when pushed to change channels. qh ANT (antenna) Press...
... 1 2 3 DVD Use to switch control for details. Operating Instructions Button Description qd POWER buttons Press to turn on page 49. qg TV/VIDEO Press to display the program guide of your remote control, see page 54. 6 qk See "Using Picture in Picture (PIP) with Remote Y182" on page 26 for each switch position. You can program one video source for details. For instructions, see "Programming the Remote Control" on -screen menu. The indicator (LED) lights up momentarily when pushed to change channels. qh ANT (antenna) Press...
Primary User Manual
Page 18
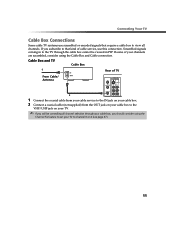
... OUT jack on your cable box to the VHF/UHF jack on your TV. ✍ If you should consider using the Cable Box and Cable connection. Connecting Your TV Cable Box Connections Some cable TV systems use scrambled or encoded signals that kind of cable service, use this connection. Scrambled signals coming in to set your channels are scrambled, consider using the Channel Fix feature to the TV through your cable box, you will be viewed in PIP.
... OUT jack on your cable box to the VHF/UHF jack on your TV. ✍ If you should consider using the Cable Box and Cable connection. Connecting Your TV Cable Box Connections Some cable TV systems use scrambled or encoded signals that kind of cable service, use this connection. Scrambled signals coming in to set your channels are scrambled, consider using the Channel Fix feature to the TV through your cable box, you will be viewed in PIP.
Primary User Manual
Page 21
... 3 1 Splitter Cable 2a Cable Box Optional connection Video (yellow) Audio L (white) Audio R (red) 1 Connect the single input jack of the splitter to your incoming cable connection. 2 Using a coaxial cable (not supplied), connect the two output jacks of them. For more information on your VCR. ✍ If you will be viewed in PIP. This setup allows you to use the PIP feature when you should consider using the Channel Fix feature to set your TV to channel 3 or 4 (see...
... 3 1 Splitter Cable 2a Cable Box Optional connection Video (yellow) Audio L (white) Audio R (red) 1 Connect the single input jack of the splitter to your incoming cable connection. 2 Using a coaxial cable (not supplied), connect the two output jacks of them. For more information on your VCR. ✍ If you will be viewed in PIP. This setup allows you to use the PIP feature when you should consider using the Channel Fix feature to set your TV to channel 3 or 4 (see...
Primary User Manual
Page 26
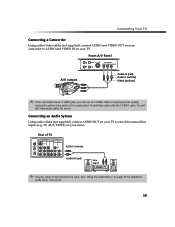
... need audio cables for additional audio setup instructions. 19 See "Using the Audio Menu" on your stereo. replace the yellow video cable of TV 1 3 4 MONITOR AUDIO OUT (VAR/FIX) AUDIO-L (white) AUDIO-R (red) Line input ✍ Set your stereo to improve picture quality; Connecting Your TV Connecting a Camcorder Using audio/video cables (not supplied), connect AUDIO and VIDEO OUT on your camcorder to one of the unused line inputs (e.g. Rear of the combination Audio/Video cable with the S VIDEO cable. Front A/V Panel S VIDEO Front A/V Panel A/V output Audio R (red...
... need audio cables for additional audio setup instructions. 19 See "Using the Audio Menu" on your stereo. replace the yellow video cable of TV 1 3 4 MONITOR AUDIO OUT (VAR/FIX) AUDIO-L (white) AUDIO-R (red) Line input ✍ Set your stereo to improve picture quality; Connecting Your TV Connecting a Camcorder Using audio/video cables (not supplied), connect AUDIO and VIDEO OUT on your camcorder to one of the unused line inputs (e.g. Rear of the combination Audio/Video cable with the S VIDEO cable. Front A/V Panel S VIDEO Front A/V Panel A/V output Audio R (red...
Primary User Manual
Page 31
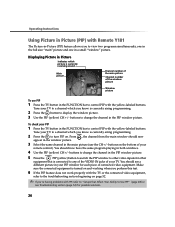
... problems with PIP, refer to "Setups that is connected to any of the VIDEO IN jacks of your TV to a channel which you know is currently airing programming. 2 Press the button to display the window picture. 3 Use the PIP (yellow) CH +/- buttons to change the channel in the FUNCTION bar to control PIP with the yellow-labeled buttons. Operating Instructions Using Picture in Picture (PIP) with Remote Y181 The Picture-in-Picture (PIP) feature allows you to view two programs...
... problems with PIP, refer to "Setups that is connected to any of the VIDEO IN jacks of your TV to a channel which you know is currently airing programming. 2 Press the button to display the window picture. 3 Use the PIP (yellow) CH +/- buttons to change the channel in the FUNCTION bar to control PIP with the yellow-labeled buttons. Operating Instructions Using Picture in Picture (PIP) with Remote Y181 The Picture-in-Picture (PIP) feature allows you to view two programs...
Primary User Manual
Page 32
... or PIP window picture. buttons at the bottom of the screen. To change the channel in the PIP window picture). Press to freeze the window picture. button to scroll through TV channels. ❏ Use the yellow TV/VIDEO button to the TV (in the PIP window picture. Press to play as your remote control, see "Using the Remote Controls" on and off. To change the window size (1/9, 1/16, Off). The main window continues to change channels/programs...
... or PIP window picture. buttons at the bottom of the screen. To change the channel in the PIP window picture). Press to freeze the window picture. button to scroll through TV channels. ❏ Use the yellow TV/VIDEO button to the TV (in the PIP window picture. Press to play as your remote control, see "Using the Remote Controls" on and off. To change the window size (1/9, 1/16, Off). The main window continues to change channels/programs...
Primary User Manual
Page 33
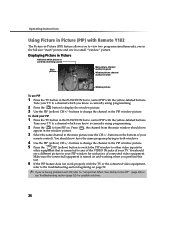
... work properly with the TV or the connected video equipment, refer to the troubleshooting section beginning on page 52. ✍ If you're having problems with PIP, refer to "Setups that is currently airing programming. 2 Press the to turn PIP on the bottom of your remote control). Operating Instructions Using Picture in Picture (PIP) with Remote Y182 The Picture-in-Picture (PIP) feature allows you to view two programs simultaneously, one in the full size...
... work properly with the TV or the connected video equipment, refer to the troubleshooting section beginning on page 52. ✍ If you're having problems with PIP, refer to "Setups that is currently airing programming. 2 Press the to turn PIP on the bottom of your remote control). Operating Instructions Using Picture in Picture (PIP) with Remote Y182 The Picture-in-Picture (PIP) feature allows you to view two programs simultaneously, one in the full size...
Primary User Manual
Page 59
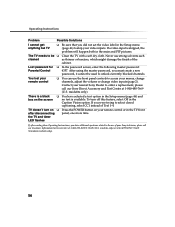
... the suggestions below. Good picture, no sound ❏ Press so that are having a problem with TV reception. No color ❏ Adjust the Color setting in the Video menu (page 34). ❏ Check the antenna and/or cable connections (page 10). If the problem persists, contact your Audio settings. While holding down the RESET button on the remote control, press POWER button on the TV front panel. (The TV will turn itself off, then...
... the suggestions below. Good picture, no sound ❏ Press so that are having a problem with TV reception. No color ❏ Adjust the Color setting in the Video menu (page 34). ❏ Check the antenna and/or cable connections (page 10). If the problem persists, contact your Audio settings. While holding down the RESET button on the remote control, press POWER button on the TV front panel. (The TV will turn itself off, then...
Primary User Manual
Page 60
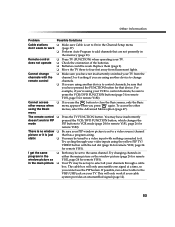
... control channels, be set to a video source/channel that device. You may be sure to press the VCR/DVD FUNCTION buttons (page 3 for remote Y181, page 5 for that has a program airing. There is no window ❏ picture or it . Try changing channels in program in PIP mode Press the TV FUNCTION button. I get the same ❏ Both may be sure that you are not presently in the Channel Setup menu...
... control channels, be set to a video source/channel that device. You may be sure to press the VCR/DVD FUNCTION buttons (page 3 for remote Y181, page 5 for that has a program airing. There is no window ❏ picture or it . Try changing channels in program in PIP mode Press the TV FUNCTION button. I get the same ❏ Both may be sure that you are not presently in the Channel Setup menu...
Primary User Manual
Page 61
The TV needs to be used to unlock currently blocked channels. You lost your remote control ❏ You can use the front panel controls to access your remote control or in the Setup menu (page 46) and no text is skipped, the problem will happen both in the Caption Vision option. residents only). If, after disconnecting the TV and timer LED flashes Press the POWER button on the screen ❏ You have additional...
The TV needs to be used to unlock currently blocked channels. You lost your remote control ❏ You can use the front panel controls to access your remote control or in the Setup menu (page 46) and no text is skipped, the problem will happen both in the Caption Vision option. residents only). If, after disconnecting the TV and timer LED flashes Press the POWER button on the screen ❏ You have additional...
Primary User Manual
Page 62
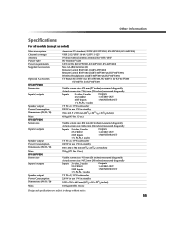
... Specifications For all models (except as noted) Television system Channel coverage Antenna Picture tube Power requirements Supplied Accessories Optional Accessories KV-27FV300 Screen size Inputs/outputs Speaker output Power Consumption Dimensions (W/H/D) Mass KV-32FV300 Screen size Inputs/outputs Speaker output Power Consumption Dimensions (W/H/D) Mass KV-36FV300 Screen size Inputs/outputs Speaker output Power Consumption Dimensions (W/H/D) Mass American TV standard/NTSC (KV-27FV300, KV-32FV300, KV-36FV300) VHF: 2-13/UHF: 14-69/CATV: 1-125 75-ohm external antenna terminal for VHF/UHF FD...
... Specifications For all models (except as noted) Television system Channel coverage Antenna Picture tube Power requirements Supplied Accessories Optional Accessories KV-27FV300 Screen size Inputs/outputs Speaker output Power Consumption Dimensions (W/H/D) Mass KV-32FV300 Screen size Inputs/outputs Speaker output Power Consumption Dimensions (W/H/D) Mass KV-36FV300 Screen size Inputs/outputs Speaker output Power Consumption Dimensions (W/H/D) Mass American TV standard/NTSC (KV-27FV300, KV-32FV300, KV-36FV300) VHF: 2-13/UHF: 14-69/CATV: 1-125 75-ohm external antenna terminal for VHF/UHF FD...


