
Operating Instructions
Page 1
3-866-565-13(1) Color Rear Video Projector Operating Instructions KP-43T70 KP-46C70 KP-48S70 KP-48S72 KP-53S70 KP-53N74 KP-61S70 © 1999 by Sony Corporation
3-866-565-13(1) Color Rear Video Projector Operating Instructions KP-43T70 KP-46C70 KP-48S70 KP-48S72 KP-53S70 KP-53N74 KP-61S70 © 1999 by Sony Corporation

Operating Instructions
Page 2
... grounding and, in a particular installation. If a fixed (nonmoving) pattern such as close to persons. Note on the screen for the remote control RM-Y906 MODELS: KP-43T70, KP-46C70, KP-48S70, KP-48S72, KP-53S70, KP-53N74, KP-61S70 Please keep the brightness and contrast functions at a high brightness or contrast setting, the image can radiate radio frequency energy and, if not installed and used in accordance with the instructions, may cause harmful interference with...
... grounding and, in a particular installation. If a fixed (nonmoving) pattern such as close to persons. Note on the screen for the remote control RM-Y906 MODELS: KP-43T70, KP-46C70, KP-48S70, KP-48S72, KP-53S70, KP-53N74, KP-61S70 Please keep the brightness and contrast functions at a high brightness or contrast setting, the image can radiate radio frequency energy and, if not installed and used in accordance with the instructions, may cause harmful interference with...
Operating Instructions
Page 4
... (SAT) .. 7 Connecting a satellite receiver (SAT) and a VCR 8 Connecting a DTV (digital television) receiver 9 Connecting a camcorder 9 Connecting two VCRs for tape editing 10 Connecting a DVD Player 11 Connecting a DVD Player with component video output connectors 11 Connecting an audio system 12 Connecting a Sony SAVA series speaker system 13 Basic Set Up 14 Using the Remote Control 14 Setting Up the Projection TV Automatically 14 Adjusting the Convergence Automatically (FLASH FOCUS 15 Using Your New Projection TV .... 16 Watching the TV 16 Watching Two Programs at One Time -
... (SAT) .. 7 Connecting a satellite receiver (SAT) and a VCR 8 Connecting a DTV (digital television) receiver 9 Connecting a camcorder 9 Connecting two VCRs for tape editing 10 Connecting a DVD Player 11 Connecting a DVD Player with component video output connectors 11 Connecting an audio system 12 Connecting a Sony SAVA series speaker system 13 Basic Set Up 14 Using the Remote Control 14 Setting Up the Projection TV Automatically 14 Adjusting the Convergence Automatically (FLASH FOCUS 15 Using Your New Projection TV .... 16 Watching the TV 16 Watching Two Programs at One Time -

Operating Instructions
Page 5
... skills needed to view and choose from eight of the projection TV, below . Using This Manual Operating Video Equipment 43 Setting the Manufacturer's Code 43 Operating a Cable Box or Satellite Receiver (SAT 45 Setting the Manufacturer's Code 45 Troubleshooting 46 Specifications 48 Index 49 Owner's Record The model and serial numbers are written for illustration purposes. Refer to them whenever you call upon your Sony dealer regarding this manual are located at the rear of...
... skills needed to view and choose from eight of the projection TV, below . Using This Manual Operating Video Equipment 43 Setting the Manufacturer's Code 43 Operating a Cable Box or Satellite Receiver (SAT 45 Setting the Manufacturer's Code 45 Troubleshooting 46 Specifications 48 Index 49 Owner's Record The model and serial numbers are written for illustration purposes. Refer to them whenever you call upon your Sony dealer regarding this manual are located at the rear of...

Operating Instructions
Page 9
... to receive using an antenna. (Rear of projection TV) Coaxial cable AUX (No connection "TO CONVERTER" in this set up if your remote control. Notes: • You may find it convenient to use scrambled or encoded signals that you can only be viewed in the Channel Set Up menu (page 27). Coaxial cable (Rear of projection TV) VHF/UHF Cable and antenna You may be able to program your Sony remote control to operate your cable box. (see "Operating a Cable Box or Satellite Receiver (SAT...
... to receive using an antenna. (Rear of projection TV) Coaxial cable AUX (No connection "TO CONVERTER" in this set up if your remote control. Notes: • You may find it convenient to use scrambled or encoded signals that you can only be viewed in the Channel Set Up menu (page 27). Coaxial cable (Rear of projection TV) VHF/UHF Cable and antenna You may be able to program your Sony remote control to operate your cable box. (see "Operating a Cable Box or Satellite Receiver (SAT...
Operating Instructions
Page 13
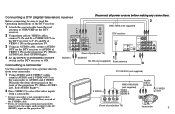
... (Rear of projection TV) AUDIO-L AUDIO-R VMC-10HG (not supplied) DTV receiver VHF/UHF (DTV) S VIDEO IN OUT DOLBY DIGITAL AUDIO OUT (OPTICAL) DOWN CONVERTER ON/OFF CONTROL S VIDEO 1 2 L (MONO) R 1 2 AUDIO OUT 1 4 RK-74A (not supplied) Roof antenna 3 Y R PB G HD 3 PR 4 B VD VIDEO OUT Use this connection to view a picture directly from your camcorder. 1 Using AUDIO and S VIDEO* cables, connect AUDIO and S VIDEO OUT on the camcorder to AUDIO and S VIDEO IN inside the drop-down panel on the front of the projection TV (White-AUDIO Left, Red-AUDIO...
... (Rear of projection TV) AUDIO-L AUDIO-R VMC-10HG (not supplied) DTV receiver VHF/UHF (DTV) S VIDEO IN OUT DOLBY DIGITAL AUDIO OUT (OPTICAL) DOWN CONVERTER ON/OFF CONTROL S VIDEO 1 2 L (MONO) R 1 2 AUDIO OUT 1 4 RK-74A (not supplied) Roof antenna 3 Y R PB G HD 3 PR 4 B VD VIDEO OUT Use this connection to view a picture directly from your camcorder. 1 Using AUDIO and S VIDEO* cables, connect AUDIO and S VIDEO OUT on the camcorder to AUDIO and S VIDEO IN inside the drop-down panel on the front of the projection TV (White-AUDIO Left, Red-AUDIO...

Operating Instructions
Page 14
... cause program interference and other viewing problems. VCR (for playback) AUDIO R AUDIO L VIDEO LINE OUT OUT IN VIDEO AUDIO-L AUDIO-R 1 VMC-810S/820S (not supplied) IN VIDEO 1 VIDEO 3 S VIDEO OUT MONITOR AUDIO (VAR/FIX) VHF/UHF VIDEO L (MONO) AUDIO R Y PB PR COMPONENT VIDEO L (MONO) AUDIO R VCR (for recording to the VCR LINE INPUT (see right). Installing and Connecting the Projection TV (continued) Connecting two VCRs for tape Disconnect all power sources before making any connections. Notes: • Do not change the input signal...
... cause program interference and other viewing problems. VCR (for playback) AUDIO R AUDIO L VIDEO LINE OUT OUT IN VIDEO AUDIO-L AUDIO-R 1 VMC-810S/820S (not supplied) IN VIDEO 1 VIDEO 3 S VIDEO OUT MONITOR AUDIO (VAR/FIX) VHF/UHF VIDEO L (MONO) AUDIO R Y PB PR COMPONENT VIDEO L (MONO) AUDIO R VCR (for recording to the VCR LINE INPUT (see right). Installing and Connecting the Projection TV (continued) Connecting two VCRs for tape Disconnect all power sources before making any connections. Notes: • Do not change the input signal...
Operating Instructions
Page 15
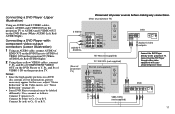
...Rear of projection TV) AUX S VIDEO IN VIDEO 1 VIDEO 3 S VIDEO OUT MONITOR AUDIO (VAR/FIX) VIDEO Y VIDEO L (MONO) AUDIO R AUDIO-R AUDIO-L PB PR COMPONENT L (MONO) AUDIO R TO CONVERTER VHF/UHF RK-74A (not supplied) (Rear of information, picture noise may be labeled differently. Connecting a DVD Player (Upper illustration) Using an AUDIO and S VIDEO cables, connect AUDIO and S VIDEO IN on the projection TV to AUDIO and S VIDEO OUT on the projection TV. Connecting a DVD Player with component video output connectors (Lower illustration) 1 Using an AUDIO cable, connect AUDIO of LINE...
...Rear of projection TV) AUX S VIDEO IN VIDEO 1 VIDEO 3 S VIDEO OUT MONITOR AUDIO (VAR/FIX) VIDEO Y VIDEO L (MONO) AUDIO R AUDIO-R AUDIO-L PB PR COMPONENT L (MONO) AUDIO R TO CONVERTER VHF/UHF RK-74A (not supplied) (Rear of information, picture noise may be labeled differently. Connecting a DVD Player (Upper illustration) Using an AUDIO and S VIDEO cables, connect AUDIO and S VIDEO IN on the projection TV to AUDIO and S VIDEO OUT on the projection TV. Connecting a DVD Player with component video output connectors (Lower illustration) 1 Using an AUDIO cable, connect AUDIO of LINE...

Operating Instructions
Page 16
...Line input and use the Audio menu to set the audio output and switch the TV's speakers off. (see "Audio Out" and "Speaker" on page 24) Note: CONTROL S OUT IN VIDEO 1 VIDEO 3 S VIDEO OUT MONITOR AUDIO (VAR/FIX) VIDEO Y VIDEO L (MONO) AUDIO R L PB (MONO) AUDIO PR R COMPONENT AUDIO-L (white) AUDIO-R (red) HRD Line inputs RK-74A (not supplied) • You can be adjusted only when "Audio Out" is set to "Variable" in the Audio menu. (see "Audio Out" on the projection TV to the projection TV. (Rear of the unused Line inputs (e.g. Installing and Connecting the Projection TV...
...Line input and use the Audio menu to set the audio output and switch the TV's speakers off. (see "Audio Out" and "Speaker" on page 24) Note: CONTROL S OUT IN VIDEO 1 VIDEO 3 S VIDEO OUT MONITOR AUDIO (VAR/FIX) VIDEO Y VIDEO L (MONO) AUDIO R L PB (MONO) AUDIO PR R COMPONENT AUDIO-L (white) AUDIO-R (red) HRD Line inputs RK-74A (not supplied) • You can be adjusted only when "Audio Out" is set to "Variable" in the Audio menu. (see "Audio Out" on the projection TV to the projection TV. (Rear of the unused Line inputs (e.g. Installing and Connecting the Projection TV...

Operating Instructions
Page 17
...) AUDIO R OUT MONITOR AUDIO (VAR/FIX) Y VIDEO L PB (MONO) AUDIO PR R COMPONENT AUDIO-L (white) 1 1 IN L 1 IN R CONTROL S AUDIO-R (red) Audio cord supplied OUT RK-G34, etc. (not supplied) with the speaker to AUDIO (VAR/FIX) OUT on the projection TV. 2 Using the CONTROL S cable, connect CONTROL S IN on the speaker to control the speaker's Dolby* Pro Logic surround system and super woofer mode with the remote control. (see "SAVA SP Control" on page 24) 1 Using the AUDIO cable supplied with the speakers 2 CONTROL S IN * Manufactured under Canadian patent number...
...) AUDIO R OUT MONITOR AUDIO (VAR/FIX) Y VIDEO L PB (MONO) AUDIO PR R COMPONENT AUDIO-L (white) 1 1 IN L 1 IN R CONTROL S AUDIO-R (red) Audio cord supplied OUT RK-G34, etc. (not supplied) with the speaker to AUDIO (VAR/FIX) OUT on the projection TV. 2 Using the CONTROL S cable, connect CONTROL S IN on the speaker to control the speaker's Dolby* Pro Logic surround system and super woofer mode with the remote control. (see "SAVA SP Control" on page 24) 1 Using the AUDIO cable supplied with the speakers 2 CONTROL S IN * Manufactured under Canadian patent number...

Operating Instructions
Page 18
... the diagram inside the drop-down panel. CHANNEL + POWER TIMER/STAND BY Inside the drop-down panel on the front panel and inside the drop-down panel: SET UP MENU FLASH FOCUS TV/VIDEO Notes: • Remove the batteries to avoid damage from ANT (not AUX) is selected by matching the + and - The AUTO SET UP feature does not apply for installations that use a cable box for an extended period. • Handle the remote control with the antenna...
... the diagram inside the drop-down panel. CHANNEL + POWER TIMER/STAND BY Inside the drop-down panel on the front panel and inside the drop-down panel: SET UP MENU FLASH FOCUS TV/VIDEO Notes: • Remove the batteries to avoid damage from ANT (not AUX) is selected by matching the + and - The AUTO SET UP feature does not apply for installations that use a cable box for an extended period. • Handle the remote control with the antenna...

Operating Instructions
Page 19
... Español or VOLUME + to reflect your projection TV, be displayed on the screen in three layers (red, green and blue). The screen will be sure to work. While scanning, the received channel will change to select Français. Adjusting the Convergence Automatically (FLASH FOCUS) The projection tube image appears on the sub screen. Before you use your choice. - The cross pattern appears and FLASH FOCUS begins to adjust the convergence. CHANNEL + English : Español...
... Español or VOLUME + to reflect your projection TV, be displayed on the screen in three layers (red, green and blue). The screen will be sure to work. While scanning, the received channel will change to select Français. Adjusting the Convergence Automatically (FLASH FOCUS) The projection tube image appears on the sub screen. Before you use your choice. - The cross pattern appears and FLASH FOCUS begins to adjust the convergence. CHANNEL + English : Español...

Operating Instructions
Page 20
... "Picture Adjustment" (such as "Brightness," "Color," etc.) to scan through the remote control. Personal 1, Personal 2: Select to customize the "Picture Adjustment" of some buttons found on your personal preference. For details, see "Mode" on the screen, press TV/VIDEO until a channel number appears. The following chart will change the channel number rapidly. 2 Release to your remote control. The channel will explain the function of the Video menu according to display the desired channel. Using Your New Projection TV (continued...
... "Picture Adjustment" (such as "Brightness," "Color," etc.) to scan through the remote control. Personal 1, Personal 2: Select to customize the "Picture Adjustment" of some buttons found on your personal preference. For details, see "Mode" on the screen, press TV/VIDEO until a channel number appears. The following chart will change the channel number rapidly. 2 Release to your remote control. The channel will explain the function of the Video menu according to display the desired channel. Using Your New Projection TV (continued...
Operating Instructions
Page 21
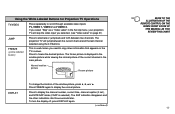
... picture DISPLAY To change the location of the current channel in the Set Up menu, your projection TV will jump between two channels. To turn the display off, press DISPLAY again. (continued) REFER TO THE ILLUSTRATION OF THE REMOTE CONTROL ON THE INSIDE FRONT COVER OF THIS MANUAL AS YOU REVIEW THIS CHART 17 The SAP indication disappears and the other indications dim three seconds later. This is useful when...
... picture DISPLAY To change the location of the current channel in the Set Up menu, your projection TV will jump between two channels. To turn the display off, press DISPLAY again. (continued) REFER TO THE ILLUSTRATION OF THE REMOTE CONTROL ON THE INSIDE FRONT COVER OF THIS MANUAL AS YOU REVIEW THIS CHART 17 The SAP indication disappears and the other indications dim three seconds later. This is useful when...
Operating Instructions
Page 26
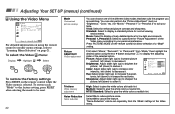
... increase the green Move Select Exit MENU tones; High: Select to increase color intensity; To select the Video menu: Display / Highlight / Select MENU To restore the factory settings Press RESET on page 21. Personal 1, Personal 2: Select to customize the "Picture Adjustment" of the Video menu. Picture Brightness Color Hue ch Sharpness Color: Adjust slider right (up ) to be set separately from "Mode," then highlight the desired option using the remote control to modify menu settings, refer to...
... increase the green Move Select Exit MENU tones; High: Select to increase color intensity; To select the Video menu: Display / Highlight / Select MENU To restore the factory settings Press RESET on page 21. Personal 1, Personal 2: Select to customize the "Picture Adjustment" of the Video menu. Picture Brightness Color Hue ch Sharpness Color: Adjust slider right (up ) to be set separately from "Mode," then highlight the desired option using the remote control to modify menu settings, refer to...

Operating Instructions
Page 49
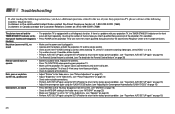
... remote control unit. • Whenever you may revert to operate a cable box or satellite receiver. Operating a Cable Box or Satellite Receiver (SAT) Setting the Manufacturer's Code You can be used only with a satellite receiver. Press CODE SET, SAT/CABLE (FUNCTION), and the 0-9 buttons to control the projection TV. The GUIDE and INDEX (blue-labeled) buttons can program the supplied remote control to the factory setting and must be able to operate a Sony satellite receiver: FUNCTION CODE SET SAT/CABLE ENTER 8 0 1 Manufacturer code numbers (cable box) Manufacturer Code...
... remote control unit. • Whenever you may revert to operate a cable box or satellite receiver. Operating a Cable Box or Satellite Receiver (SAT) Setting the Manufacturer's Code You can be used only with a satellite receiver. Press CODE SET, SAT/CABLE (FUNCTION), and the 0-9 buttons to control the projection TV. The GUIDE and INDEX (blue-labeled) buttons can program the supplied remote control to the factory setting and must be able to operate a Sony satellite receiver: FUNCTION CODE SET SAT/CABLE ENTER 8 0 1 Manufacturer code numbers (cable box) Manufacturer Code...
Operating Instructions
Page 50
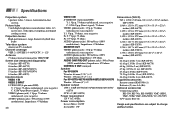
... fluorescent lights. • Check the polarity of flashes. Dark, poor or no picture (screen lit), good sound • Adjust "Picture" in the Video menu. (see "Picture Adjustment" on page 22) • Adjust "Brightness" in the Video menu. (see "Picture Adjustment" on the panel will flash repeatedly. Replace the batteries. • Press TV (FUNCTION) when operating your projection TV, the TIMER/STAND BY indicator on the front TIMER/STAND BY indicator on page 22) • Check antenna/cable connections. • Perform AUTO SET UP again using the SET UP button...
... fluorescent lights. • Check the polarity of flashes. Dark, poor or no picture (screen lit), good sound • Adjust "Picture" in the Video menu. (see "Picture Adjustment" on page 22) • Adjust "Brightness" in the Video menu. (see "Picture Adjustment" on the panel will flash repeatedly. Replace the batteries. • Press TV (FUNCTION) when operating your projection TV, the TIMER/STAND BY indicator on the front TIMER/STAND BY indicator on page 22) • Check antenna/cable connections. • Perform AUTO SET UP again using the SET UP button...

Operating Instructions
Page 51
... and noise appear on the screen • Check the "Cable" setting in the Channel Set Up menu. (see "Cable" on page 27) • Check the antenna/cable connections. • Make sure the channel is broadcasting programs. • Press ANT to change the input mode. (see the instruction manual supplied with the video game software. 47 For details, see "ANT" on page 18) Dotted lines or stripes • Adjust the antenna. • Keep the projection TV away from the other program.
... and noise appear on the screen • Check the "Cable" setting in the Channel Set Up menu. (see "Cable" on page 27) • Check the antenna/cable connections. • Make sure the channel is broadcasting programs. • Press ANT to change the input mode. (see the instruction manual supplied with the video game software. 47 For details, see "ANT" on page 18) Dotted lines or stripes • Adjust the antenna. • Keep the projection TV away from the other program.
Operating Instructions
Page 52
... Projection system 3 picture tubes, 3 lenses, horizontal in-line system Picture tube 7-inch high-brightness monochrome tubes (6.3 raster size), with optical coupling and liquid cooling system Projection lenses High performance, large diameter hybrid lens F1.05 Television system American TV standard Channel coverage VHF: 2-13/UHF: 14 -69/CATV: 1 - 125 Antenna 75 ohm external terminal for VHF/UHF Screen size (measured diagonally) 43 inches (KP-43T70) 46 inches (KP-46C70) 48 inches (KP-48S70/48S72) 53 inches (KP-53S70/53N74) 61 inches (KP-61S70) Inputs/outputs VIDEO 1 IN VIDEO 2 INPUT S VIDEO...
... Projection system 3 picture tubes, 3 lenses, horizontal in-line system Picture tube 7-inch high-brightness monochrome tubes (6.3 raster size), with optical coupling and liquid cooling system Projection lenses High performance, large diameter hybrid lens F1.05 Television system American TV standard Channel coverage VHF: 2-13/UHF: 14 -69/CATV: 1 - 125 Antenna 75 ohm external terminal for VHF/UHF Screen size (measured diagonally) 43 inches (KP-43T70) 46 inches (KP-46C70) 48 inches (KP-48S70/48S72) 53 inches (KP-53S70/53N74) 61 inches (KP-61S70) Inputs/outputs VIDEO 1 IN VIDEO 2 INPUT S VIDEO...

Operating Instructions
Page 53
... Connecting Projection TV to antenna 4 audio system 12 cable 4 cable box 5 cable box and VCR 6 camcorder 9 DTV receiver 9 DVD Player 11 satellite receiver (SAT 7 satellite receiver (SAT) and VCR 8 Sony SAVA series speaker system 13 two VCRs 10 VCR 6 CONTROL S OUT jack 4 Convergence 15 Current Time 25 D Daylight Savings 25 DISPLAY button 17 DVD connection 11 operation 44 DVD/VTR (FUNCTION 44 E Editing using MONITOR OUT ....... 10 Effect 23 (BBE/Surround/Simulated/Off ) F, G Factory settings 22, 23 Favorite Channel Selecting 29 Setting 28 FLASH FOCUS...
... Connecting Projection TV to antenna 4 audio system 12 cable 4 cable box 5 cable box and VCR 6 camcorder 9 DTV receiver 9 DVD Player 11 satellite receiver (SAT 7 satellite receiver (SAT) and VCR 8 Sony SAVA series speaker system 13 two VCRs 10 VCR 6 CONTROL S OUT jack 4 Convergence 15 Current Time 25 D Daylight Savings 25 DISPLAY button 17 DVD connection 11 operation 44 DVD/VTR (FUNCTION 44 E Editing using MONITOR OUT ....... 10 Effect 23 (BBE/Surround/Simulated/Off ) F, G Factory settings 22, 23 Favorite Channel Selecting 29 Setting 28 FLASH FOCUS...


