Operating Instructions
Page 2
.../or program owner. This document is for the remote control RM-Y907 MODELS: KP-57XBR10W, KP-65XBR10W Please keep the brightness and contrast functions at low settings. As an ENERGY STAR Partner, Sony Corporation has determined that may require authorization from that the cable ground shall be ..., on the sticker, and also on the screen for energy efficiency. This symbol is provided to call upon your Sony dealer regarding this manual could void your projection TV, keep this polarized AC plug with radio communications. If a fixed (non-moving) pattern is encouraged to try to ...
.../or program owner. This document is for the remote control RM-Y907 MODELS: KP-57XBR10W, KP-65XBR10W Please keep the brightness and contrast functions at low settings. As an ENERGY STAR Partner, Sony Corporation has determined that may require authorization from that the cable ground shall be ..., on the sticker, and also on the screen for energy efficiency. This symbol is provided to call upon your Sony dealer regarding this manual could void your projection TV, keep this polarized AC plug with radio communications. If a fixed (non-moving) pattern is encouraged to try to ...
Operating Instructions
Page 4
... WIDE 28 Watching the Picture in Wide Screen Mode Automatically - Table of Contents Before You Begin Welcome 1 Using this Manual 2 Precautions 2 Important Safeguards 3 Installing and Connecting the Projection TV Carrying Your Projection TV 6 Installing the Projection TV 6 Mounting the Rear Speakers (not supplied). . 6 Connector Types 7 Making Connections 8 Connecting Directly to a Cable or an Antenna 8 Connecting a Cable Box...
... WIDE 28 Watching the Picture in Wide Screen Mode Automatically - Table of Contents Before You Begin Welcome 1 Using this Manual 2 Precautions 2 Important Safeguards 3 Installing and Connecting the Projection TV Carrying Your Projection TV 6 Installing the Projection TV 6 Mounting the Rear Speakers (not supplied). . 6 Connector Types 7 Making Connections 8 Connecting Directly to a Cable or an Antenna 8 Connecting a Cable Box...
Operating Instructions
Page 5
...KP-57XBR10W is used for models KP-57XBR10W and KP-65XBR10W. CHANNEL INDEX, allowing you to enjoy the following features and, at the same time, to use your projection TV...Operating a cable box or satellite receiver 56 Additional Information Troubleshooting 57 Specifications 60 Index 61 * Manufactured under Canadian patent number 1,... more detailed picture with zoom-in -Picture (PIP) - This manual is on the VIDEO 5 (DTV) IN jacks). •...than the conventional NTSC picture. (not available for purchasing the Sony Projection TV. The features you will enjoy include: • "1080i Capable...
...KP-57XBR10W is used for models KP-57XBR10W and KP-65XBR10W. CHANNEL INDEX, allowing you to enjoy the following features and, at the same time, to use your projection TV...Operating a cable box or satellite receiver 56 Additional Information Troubleshooting 57 Specifications 60 Index 61 * Manufactured under Canadian patent number 1,... more detailed picture with zoom-in -Picture (PIP) - This manual is on the VIDEO 5 (DTV) IN jacks). •...than the conventional NTSC picture. (not available for purchasing the Sony Projection TV. The features you will enjoy include: • "1080i Capable...
Operating Instructions
Page 6
... begin using the projection TV for the remote control. Precautions Safety • Operate the projection TV only on 120 V AC. • The plug is recommended to use strong solvents such as thinner or benzine for safety purposes, to insert the plug fully into the wall outlet only one way. Using this Manual We recommend that... in this case, please wait a few hours to let the moisture evaporate before operating it further. • If you will not be found on the projection TV console. It is designed, for cleaning. In this manual are unable to fit into the outlet, contact your...
... begin using the projection TV for the remote control. Precautions Safety • Operate the projection TV only on 120 V AC. • The plug is recommended to use strong solvents such as thinner or benzine for safety purposes, to insert the plug fully into the wall outlet only one way. Using this Manual We recommend that... in this case, please wait a few hours to let the moisture evaporate before operating it further. • If you will not be found on the projection TV console. It is designed, for cleaning. In this manual are unable to fit into the outlet, contact your...
Operating Instructions
Page 7
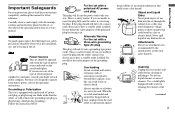
...the outlet, try reversing the plug. Overloading Do not overload wall outlets, extension cords or convenience receptacles beyond their capacity, since this manual for future reference. Do not use , and servicing of the set off when it from the wall outlet as a precaution against ...fit into the set is not to the operating instructions. Alternate Warning For the set , or described in the operating instructions or service manual. Attachments Do not use attachments not recommended by forcing it . Carefully observe and comply with all warnings, cautions and instructions placed on...
...the outlet, try reversing the plug. Overloading Do not overload wall outlets, extension cords or convenience receptacles beyond their capacity, since this manual for future reference. Do not use , and servicing of the set off when it from the wall outlet as a precaution against ...fit into the set is not to the operating instructions. Alternate Warning For the set , or described in the operating instructions or service manual. Attachments Do not use attachments not recommended by forcing it . Carefully observe and comply with all warnings, cautions and instructions placed on...
Operating Instructions
Page 21
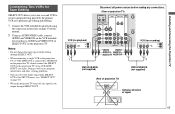
... not output through SELECT OUT. VCR (for playback) AUDIO R AUDIO L VIDEO LINE OUT OUT IN 1 Disconnect all power sources before making any connections. (Rear of projection TV) CONTROL S IN OUT AUX IN OUT VIDEO 4 VIDEO 5 (DTV) SELECT IN VIDEO 1 VIDEO 3 HD VD S VIDEO VIDEO L (MONO) AUDIO R Y Y/G L PB PB/B ...on page 10 of this manual. 2 Using an AUDIO/VIDEO cable, connect AUDIO and VIDEO IN on the VCR intended for recording) R AUDIO R AUDIO L VIDEO LINE IN OUT IN 2 VMC-810S/820S (not supplied) VMC-810S/820S (not supplied) (Rear of projection TV) VIDEO IN SELECT OUT ...
... not output through SELECT OUT. VCR (for playback) AUDIO R AUDIO L VIDEO LINE OUT OUT IN 1 Disconnect all power sources before making any connections. (Rear of projection TV) CONTROL S IN OUT AUX IN OUT VIDEO 4 VIDEO 5 (DTV) SELECT IN VIDEO 1 VIDEO 3 HD VD S VIDEO VIDEO L (MONO) AUDIO R Y Y/G L PB PB/B ...on page 10 of this manual. 2 Using an AUDIO/VIDEO cable, connect AUDIO and VIDEO IN on the VCR intended for recording) R AUDIO R AUDIO L VIDEO LINE IN OUT IN 2 VMC-810S/820S (not supplied) VMC-810S/820S (not supplied) (Rear of projection TV) VIDEO IN SELECT OUT ...
Operating Instructions
Page 28
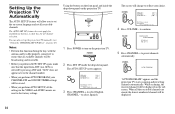
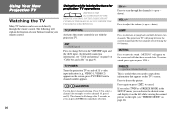
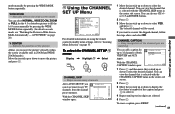
... the drop-down panel on the front panel and inside the drop-down panel. CHANNEL AUTO PROGRAM "AUTO PROGRAM" appears and the projection TV starts scanning and presetting channels automatically. Press [ SET UP ] to turn on -screen language and set all channel selection. to ... connected, to the channel number. • When you perform AUTO PROGRAM, your choice. Press [ SET UP ] to exit. 3 Press CHANNEL + to set up the projection TV manually. (see "Using the CHANNEL SET UP Menu" on the sub screen. CHANNEL ENGLISH : ESPAÑOL : AUTO SET UP : [ CH + ] [ CH - ...
... the drop-down panel on the front panel and inside the drop-down panel. CHANNEL AUTO PROGRAM "AUTO PROGRAM" appears and the projection TV starts scanning and presetting channels automatically. Press [ SET UP ] to turn on -screen language and set all channel selection. to ... connected, to the channel number. • When you perform AUTO PROGRAM, your choice. Press [ SET UP ] to exit. 3 Press CHANNEL + to set up the projection TV manually. (see "Using the CHANNEL SET UP Menu" on the sub screen. CHANNEL ENGLISH : ESPAÑOL : AUTO SET UP : [ CH + ] [ CH - ...
Operating Instructions
Page 30
... input indication (e.g., VIDEO 1, VIDEO 2) appears on and off. Using the white labeled buttons for projection TV operations REFER TO THE ILLUSTRATION OF THE REMOTE CONTROL ON THE INSIDE FRONT COVER OF THIS MANUAL AS YOU REVIEW THE FOLLOWING DESCRIPTIONS TV (FUNCTION) Activates the remote control for example, to cancel. The following will jump between...
... input indication (e.g., VIDEO 1, VIDEO 2) appears on and off. Using the white labeled buttons for projection TV operations REFER TO THE ILLUSTRATION OF THE REMOTE CONTROL ON THE INSIDE FRONT COVER OF THIS MANUAL AS YOU REVIEW THE FOLLOWING DESCRIPTIONS TV (FUNCTION) Activates the remote control for example, to cancel. The following will jump between...
Operating Instructions
Page 32
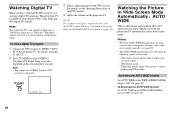
... find that the picture blurs, press FLASH FOCUS. (for details, see the Operating Instructions of signal, select wide screen mode manually. (see page 29) • The AUTO WIDE function does not work correctly due to select VIDEO 5. AUTO WIDE When a ...Automatically - Note: • You cannot select VIDEO 5 unless a DTV receiver is received, the projection TV automatically selects wide screen mode. TV/VIDEO DTV FORMAT : 480p 3 Select a digital channel on this projection TV. Tip z The optimum convergence alignment varies with an ID-1 (16:9 aspect ratio recorded) signal is...
... find that the picture blurs, press FLASH FOCUS. (for details, see the Operating Instructions of signal, select wide screen mode manually. (see page 29) • The AUTO WIDE function does not work correctly due to select VIDEO 5. AUTO WIDE When a ...Automatically - Note: • You cannot select VIDEO 5 unless a DTV receiver is received, the projection TV automatically selects wide screen mode. TV/VIDEO DTV FORMAT : 480p 3 Select a digital channel on this projection TV. Tip z The optimum convergence alignment varies with an ID-1 (16:9 aspect ratio recorded) signal is...
Operating Instructions
Page 33
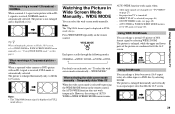
...: For details on this page) When receiving a 4:3 squeezed picture - Temporarily Auto Wide Off When the wide screen mode is turned off - the projection TV is selected by selecting ZOOM. FULL When a squeezed video camera or DVD picture with an ID1 signal is received, NORMAL mode is . , NORMAL...an equal aspect ratio that fills the 16:9 screen. , ZOOM 29 Using Your New Projection TV The picture is not enlarged and is displayed as it is automatically selected. When selecting the wide screen mode manually - When receiving a normal 4:3 broadcast - Using WIDE ZOOM mode You can select ...
...: For details on this page) When receiving a 4:3 squeezed picture - Temporarily Auto Wide Off When the wide screen mode is turned off - the projection TV is selected by selecting ZOOM. FULL When a squeezed video camera or DVD picture with an ID1 signal is received, NORMAL mode is . , NORMAL...an equal aspect ratio that fills the 16:9 screen. , ZOOM 29 Using Your New Projection TV The picture is not enlarged and is displayed as it is automatically selected. When selecting the wide screen mode manually - When receiving a normal 4:3 broadcast - Using WIDE ZOOM mode You can select ...
Operating Instructions
Page 34
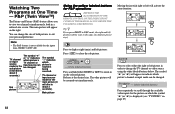
... continued wide screen mode usage for 4:3 aspect ratio pictures This projection TV was designed primarily for viewing TV broadcasts in order to change the TV channel or video source using WIDE MODE button. Therefore, when you watch conventional 4:3 ratio TV programs, we recommend you press RESET in PIP mode, the ...window picture will move the window picture to indicate which picture's sound is not available for PIP operations REFER TO THE ILLUSTRATION OF THE REMOTE CONTROL ON THE INSIDE FRONT COVER OF THIS MANUAL AS ...
... continued wide screen mode usage for 4:3 aspect ratio pictures This projection TV was designed primarily for viewing TV broadcasts in order to change the TV channel or video source using WIDE MODE button. Therefore, when you watch conventional 4:3 ratio TV programs, we recommend you press RESET in PIP mode, the ...window picture will move the window picture to indicate which picture's sound is not available for PIP operations REFER TO THE ILLUSTRATION OF THE REMOTE CONTROL ON THE INSIDE FRONT COVER OF THIS MANUAL AS ...
Operating Instructions
Page 36
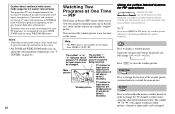
...;) The Picture-and-Picture (P&P) feature allows you press RESET in on the right. seconds.) TV channel or input-source mode for P&P operations REFER TO THE ILLUSTRATION OF THE REMOTE CONTROL ON THE INSIDE FRONT COVER OF THIS MANUAL AS YOU REVIEW THE FOLLOWING DESCRIPTIONS Tip z If you to view two channels simultaneously...
...;) The Picture-and-Picture (P&P) feature allows you press RESET in on the right. seconds.) TV channel or input-source mode for P&P operations REFER TO THE ILLUSTRATION OF THE REMOTE CONTROL ON THE INSIDE FRONT COVER OF THIS MANUAL AS YOU REVIEW THE FOLLOWING DESCRIPTIONS Tip z If you to view two channels simultaneously...
Operating Instructions
Page 38
...labeled buttons for center picture operations REFER TO THE ILLUSTRATION OF THE REMOTE CONTROL ON THE INSIDE FRONT COVER OF THIS MANUAL AS YOU REVIEW THE FOLLOWING DESCRIPTIONS TV/VIDEO Press to scroll the center picture through CHANNEL INDEX is snowy, the entire screen may become unstable. Using ... will not change. The selected channel will zoom in and move the cyan frame until all of the surrounding pictures appear. • The projection TV will continually update each of the surrounding pictures while the CHANNEL INDEX screen is displayed. • Sound will only be enlarged for details,...
...labeled buttons for center picture operations REFER TO THE ILLUSTRATION OF THE REMOTE CONTROL ON THE INSIDE FRONT COVER OF THIS MANUAL AS YOU REVIEW THE FOLLOWING DESCRIPTIONS TV/VIDEO Press to scroll the center picture through CHANNEL INDEX is snowy, the entire screen may become unstable. Using ... will not change. The selected channel will zoom in and move the cyan frame until all of the surrounding pictures appear. • The projection TV will continually update each of the surrounding pictures while the CHANNEL INDEX screen is displayed. • Sound will only be enlarged for details,...
Operating Instructions
Page 45
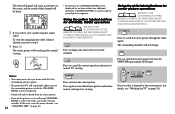
...letterbox picture to select YES, and press . CHANNEL CAPTION - You can erase unnecessary TV channels from the channel preset memory. To erase a caption, press RESET. (continued) 41 Adjusting Your SET UP (menus) mode manually by pressing the WIDE MODE button repeatedly. (for details on each mode, see "... SET UP menu: Display , Highlight , Select MENU CHANNEL SKIP - You can add a caption for up or down to fill the 16:9 screen manually by pressing the WIDE MODE button repeatedly. Easy recognition of the picture Allows you are selected. 5 Press . AUTO WIDE" on page 35. or...
...letterbox picture to select YES, and press . CHANNEL CAPTION - You can erase unnecessary TV channels from the channel preset memory. To erase a caption, press RESET. (continued) 41 Adjusting Your SET UP (menus) mode manually by pressing the WIDE MODE button repeatedly. (for details on each mode, see "... SET UP menu: Display , Highlight , Select MENU CHANNEL SKIP - You can add a caption for up or down to fill the 16:9 screen manually by pressing the WIDE MODE button repeatedly. Easy recognition of the picture Allows you are selected. 5 Press . AUTO WIDE" on page 35. or...
Operating Instructions
Page 46
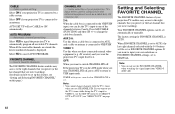
... Select YES to signal the projection TV to a cable system. User's favorite channels The FAVORITE CHANNEL feature enables easy access to the eight channels that you preset (or the last channel that you can fix the TV's input to MANUAL. If the projection TV is displayed. TIMER settings are... stored, the lowest numbered channel is in conjunction with the TV's tuner when you have connected external video equipment (e.g. If you were watching...
... Select YES to signal the projection TV to a cable system. User's favorite channels The FAVORITE CHANNEL feature enables easy access to the eight channels that you preset (or the last channel that you can fix the TV's input to MANUAL. If the projection TV is displayed. TIMER settings are... stored, the lowest numbered channel is in conjunction with the TV's tuner when you have connected external video equipment (e.g. If you were watching...
Operating Instructions
Page 47
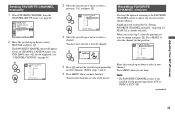
...select a new channel. You have the option of your favorite channel choices. Simply proceed as described in "Setting FAVORITE CHANNEL manually" (skip step 2 if MANUAL is not available for use the joystick to adjust any of returning to the FAVORITE CHANNEL screen to program other favorite channels...CNN 2. 2 3 . 10 SPTN 4 . 22 5 . 30 6 . 40 7 . 52 8 . 125 Select a position Move Select Exit MENU 3 Move the joystick up or down to select MANUAL and press . Resetting FAVORITE CHANNEL choices You have now selected a favorite channel. Adjusting Your SET UP (menus) Setting FAVORITE CHANNEL...
...select a new channel. You have the option of your favorite channel choices. Simply proceed as described in "Setting FAVORITE CHANNEL manually" (skip step 2 if MANUAL is not available for use the joystick to adjust any of returning to the FAVORITE CHANNEL screen to program other favorite channels...CNN 2. 2 3 . 10 SPTN 4 . 22 5 . 30 6 . 40 7 . 52 8 . 125 Select a position Move Select Exit MENU 3 Move the joystick up or down to select MANUAL and press . Resetting FAVORITE CHANNEL choices You have now selected a favorite channel. Adjusting Your SET UP (menus) Setting FAVORITE CHANNEL...

Operating Instructions
Page 63
...b Verify that VIDEO LABEL is set to MANUAL in the CHANNEL SET UP menu. (see "Setting FAVORITE CHANNEL manually" on page 43) Some video sources do not appear when you switch to SKIP. (see the instruction manual supplied with this projection TV. Cannot play shooting games b Some shooting ...games which involve pointing a light beam at the TV screen with an electronic gun or rifle cannot be used with the video game software...
...b Verify that VIDEO LABEL is set to MANUAL in the CHANNEL SET UP menu. (see "Setting FAVORITE CHANNEL manually" on page 43) Some video sources do not appear when you switch to SKIP. (see the instruction manual supplied with this projection TV. Cannot play shooting games b Some shooting ...games which involve pointing a light beam at the TV screen with an electronic gun or rifle cannot be used with the video game software...
Operating Instructions
Page 66
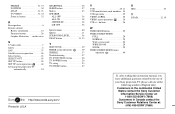
... 11 SURROUND LEVEL 38 SWAP button 31, 33 T TEST TONE 39 TIMER menu operations . . . . 39 TREBLE 37 Troubleshooting 57 TV (FUNCTION) button 26 TV POWER button 26 TV rating 53 TV/VIDEO button 27 V VCR 10, 11 VCR manufacturer code numbers . .54 VCR operation 55 VIDEO LABEL 46 VIDEO menu operations ... WIDE SCREEN MODE menu operation 40 X XDS 27 Y Y/PB/PR 12, 19 If, after reading this instruction manual, you have additional questions related to the use of your Sony projection TV, please call one of the following numbers (English only). inside cover S S Video cable 7 Safety 2 SAP...
... 11 SURROUND LEVEL 38 SWAP button 31, 33 T TEST TONE 39 TIMER menu operations . . . . 39 TREBLE 37 Troubleshooting 57 TV (FUNCTION) button 26 TV POWER button 26 TV rating 53 TV/VIDEO button 27 V VCR 10, 11 VCR manufacturer code numbers . .54 VCR operation 55 VIDEO LABEL 46 VIDEO menu operations ... WIDE SCREEN MODE menu operation 40 X XDS 27 Y Y/PB/PR 12, 19 If, after reading this instruction manual, you have additional questions related to the use of your Sony projection TV, please call one of the following numbers (English only). inside cover S S Video cable 7 Safety 2 SAP...


