The Sony Guide to Home Theater
Page 23
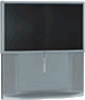
.... LCDs also need no convergence adjustment. These systems shine a high-intensity light through a series of lenses and reflected off a mirror behind the screen. Systems that use three LCD panels-one each for Red, Green and Blue. LIMITATIONS. Black levels and contrast still cannot match today's best CRTs. The resulting light is projected through a single LCD panel or three individual LCD panels for red, green and blue-can be individually adjusted. LCD rear projection features compact size and light weight. ƒ LCD rear projection. BENEFITS. LCDs are...
.... LCDs also need no convergence adjustment. These systems shine a high-intensity light through a series of lenses and reflected off a mirror behind the screen. Systems that use three LCD panels-one each for Red, Green and Blue. LIMITATIONS. Black levels and contrast still cannot match today's best CRTs. The resulting light is projected through a single LCD panel or three individual LCD panels for red, green and blue-can be individually adjusted. LCD rear projection features compact size and light weight. ƒ LCD rear projection. BENEFITS. LCDs are...
The Sony Guide to Home Theater
Page 44
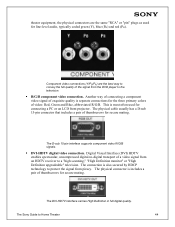
... video: Red, Green and Blue, abbreviated R/G/B. The D-sub 15-pin interface supports component video R/G/B signals. ƒ DVI-HDTV digital video connection. The Sony Guide to Home Theater 44 The physical connector is most often used for line-level audio, typically coded green (Y), blue (PB) and red (PR). Another way of connecting a component video signal of exquisite quality is also secured by HDCP technology to protect the signal from an HDTV receiver to a "high scanning," "High Definition monitor" or "High Definition upgradeable" television. The physical cable...
... video: Red, Green and Blue, abbreviated R/G/B. The D-sub 15-pin interface supports component video R/G/B signals. ƒ DVI-HDTV digital video connection. The Sony Guide to Home Theater 44 The physical connector is most often used for line-level audio, typically coded green (Y), blue (PB) and red (PR). Another way of connecting a component video signal of exquisite quality is also secured by HDCP technology to protect the signal from an HDTV receiver to a "high scanning," "High Definition monitor" or "High Definition upgradeable" television. The physical cable...
The Sony Guide to Home Theater
Page 46
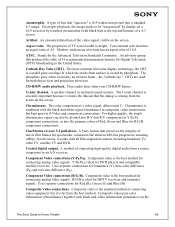
... Tube (CRT). Aspect ratio. Chrominance. Conventional television has an aspect ratio of Red, Green and Blue for spectacular, consistent fine detail in S-Video and component connections. Y/PB/PR is ideal for DVD players and compatible satellite receivers. Uses separate connections for connecting analog video signals. For proper playback, the image needs to Home Theater 46 Component video is combined with black-and-white information (luminance) on the screen. Chrominance is the best method for Red (R), Green...
... Tube (CRT). Aspect ratio. Chrominance. Conventional television has an aspect ratio of Red, Green and Blue for spectacular, consistent fine detail in S-Video and component connections. Y/PB/PR is ideal for DVD players and compatible satellite receivers. Uses separate connections for connecting analog video signals. For proper playback, the image needs to Home Theater 46 Component video is combined with black-and-white information (luminance) on the screen. Chrominance is the best method for Red (R), Green...
The Sony Guide to Home Theater
Page 49
... widescreen picture with the color signal (chrominance) in composite video connections, but kept apart in the 1950s. In both direct-view and projection television. Local channels. DIRECTV broadcasting that does not fill their 4:3 screen. No need for "Never The Same Color." The "0.1" bass channel of full-quality sound. Sony processing that portion. Super Audio CD supports up to 5.1 channels of surround sound systems, commonly fed to an A/V receiver. In audio, noise takes...
... widescreen picture with the color signal (chrominance) in composite video connections, but kept apart in the 1950s. In both direct-view and projection television. Local channels. DIRECTV broadcasting that does not fill their 4:3 screen. No need for "Never The Same Color." The "0.1" bass channel of full-quality sound. Sony processing that portion. Super Audio CD supports up to 5.1 channels of surround sound systems, commonly fed to an A/V receiver. In audio, noise takes...
The Sony Guide to Home Theater
Page 50
...; noise reduction for source material, transmission channels, recorders and displays. Super Audio CD playback. High-resolution audio that project onto a translucent screen. The highest quality sound source available today, Super Audio CD supports both stereo and multi-channel music reproduction. S-Video keeps the black-and-white signal (luminance) apart from the color signal (chrominance) to reproducing the "0.1" Low Frequency Effects channel of the Sony FD Trinitron CRT that projects the image as light onto a screen. the...
...; noise reduction for source material, transmission channels, recorders and displays. Super Audio CD playback. High-resolution audio that project onto a translucent screen. The highest quality sound source available today, Super Audio CD supports both stereo and multi-channel music reproduction. S-Video keeps the black-and-white signal (luminance) apart from the color signal (chrominance) to reproducing the "0.1" Low Frequency Effects channel of the Sony FD Trinitron CRT that projects the image as light onto a screen. the...

Limited Warranty (U.S. Only)
Page 1
... (1) year period for 19" (measured diagonally), or larger screen size through a Sony authorized service facility. This warranty is invalid if the factory applied serial number has been altered or removed from the date of a service problem, or for product information or operation, call : 1-800-488-SONY (7669) Printed in the United States. REPAIR OR REPLACEMENT AS PROVIDED UNDER THIS WARRANTY IS THE EXCLUSIVE...
... (1) year period for 19" (measured diagonally), or larger screen size through a Sony authorized service facility. This warranty is invalid if the factory applied serial number has been altered or removed from the date of a service problem, or for product information or operation, call : 1-800-488-SONY (7669) Printed in the United States. REPAIR OR REPLACEMENT AS PROVIDED UNDER THIS WARRANTY IS THE EXCLUSIVE...

Operating Instructions
Page 2
... to adjust convergence. FLASH FOCUS™ -" on the screen, keep the brightness and picture functions at a high brightness or picture setting, the image can be of sufficient magnitude to the presence of the following measures: ❑ Reorient or relocate the receiving antenna. ❑ Increase the separation between the equipment and receiver. ❑ Connect the equipment into an outlet on a circuit different from the broadcaster/cable company and/or program owner...
... to adjust convergence. FLASH FOCUS™ -" on the screen, keep the brightness and picture functions at a high brightness or picture setting, the image can be of sufficient magnitude to the presence of the following measures: ❑ Reorient or relocate the receiving antenna. ❑ Increase the separation between the equipment and receiver. ❑ Connect the equipment into an outlet on a circuit different from the broadcaster/cable company and/or program owner...
Operating Instructions
Page 3
... your TV. Model No. MODELS: KP-46WT510, KP-51WS510, KP-57WS510, and KP-65WS510. Never pull on page 4. under license from SRS Labs, Inc. Safety ❑ Operate the projection TV only on the TV box (white label). Installing ❑ To prevent internal heat buildup, do not expose the screen to direct illumination or direct sunlight. BBE and BBE Symbol are registered trademarks of Sony Corporation. Changing the program material viewed...
... your TV. Model No. MODELS: KP-46WT510, KP-51WS510, KP-57WS510, and KP-65WS510. Never pull on page 4. under license from SRS Labs, Inc. Safety ❑ Operate the projection TV only on the TV box (white label). Installing ❑ To prevent internal heat buildup, do not expose the screen to direct illumination or direct sunlight. BBE and BBE Symbol are registered trademarks of Sony Corporation. Changing the program material viewed...
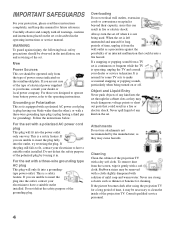
Operating Instructions
Page 4
... still fails to clean the inside of the projection TV. Overloading Do not overload wall outlets, extension cords or convenience receptacles beyond their capacity, since this manual for long periods of time, unplug it from the wall outlet as a precaution against injury, the following basic safety precautions should be observed in the installation, use and servicing of the set with solution...
... still fails to clean the inside of the projection TV. Overloading Do not overload wall outlets, extension cords or convenience receptacles beyond their capacity, since this manual for long periods of time, unplug it from the wall outlet as a precaution against injury, the following basic safety precautions should be observed in the installation, use and servicing of the set with solution...

Operating Instructions
Page 5
... and Section 54 of the Canadian Electrical Code in Canada provides information with respect to proper grounding of the mast and supporting structure, grounding of the TV cart or stand; An outdoor antenna system should overhang any overhanging edge is installed, follow the precautions below. Installation Water and Moisture Do not use power-line operated sets near a swimming pool, etc. for the...
... and Section 54 of the Canadian Electrical Code in Canada provides information with respect to proper grounding of the mast and supporting structure, grounding of the TV cart or stand; An outdoor antenna system should overhang any overhanging edge is installed, follow the precautions below. Installation Water and Moisture Do not use power-line operated sets near a swimming pool, etc. for the...

Operating Instructions
Page 6
... has used replacement parts specified by the manufacturer that are required, be sure the service technician certifies in a manner other controls may result in the operating instructions. Watch your foot or fingers. Carry the projection TV in a picture tube implosion. Safety Check Upon completion of the set does not operate normally when following the operating instructions. Be sure to drop it on your footing while installing the projection TV...
... has used replacement parts specified by the manufacturer that are required, be sure the service technician certifies in a manner other controls may result in the operating instructions. Watch your foot or fingers. Carry the projection TV in a picture tube implosion. Safety Check Upon completion of the set does not operate normally when following the operating instructions. Be sure to drop it on your footing while installing the projection TV...

Operating Instructions
Page 15
...the projection TV with a remote control for details about connecting and using it with personal computers. Installing and Connecting the Projection TV Installing and Connecting the Projection TV Connection 1 DVI-HDTV VIDEO AUDIO R/L (VIDEO 7 IN) 2 AUX 3 TO CONVERTER 4 VHF/UHF 5 S VIDEO (Rear and front) 6 VIDEO (L/R)/AUDIO (Rear and front) 7 Y/PB/PR (L/R)/AUDIO 8 TV OUT 9 AUDIO OUT (VAR/FIX) L (MONO)/R Description Can accommodate a copy-protected digital connection (HDCP*) to other devices (such as digital set up your projection TV to switch between scrambled channels (through a cable box...
...the projection TV with a remote control for details about connecting and using it with personal computers. Installing and Connecting the Projection TV Installing and Connecting the Projection TV Connection 1 DVI-HDTV VIDEO AUDIO R/L (VIDEO 7 IN) 2 AUX 3 TO CONVERTER 4 VHF/UHF 5 S VIDEO (Rear and front) 6 VIDEO (L/R)/AUDIO (Rear and front) 7 Y/PB/PR (L/R)/AUDIO 8 TV OUT 9 AUDIO OUT (VAR/FIX) L (MONO)/R Description Can accommodate a copy-protected digital connection (HDCP*) to other devices (such as digital set up your projection TV to switch between scrambled channels (through a cable box...

Operating Instructions
Page 17
... use the Twin View or Channel Index features for an external splitter. 3 Using a coaxial cable, connect the cable box's OUT jack to the projection TV's AUX jack. With this setup you to switch between the channels coming directly to the cable box's IN jack. The projection TV's internal converter allows you can: ❑ Use the projection TV remote control to change channels using your cable box when the signal is scrambled. ❑ Use the projection TV remote control to change channels using your projection TV when the signal is not scrambled. (Your projection TV's tuner...
... use the Twin View or Channel Index features for an external splitter. 3 Using a coaxial cable, connect the cable box's OUT jack to the projection TV's AUX jack. With this setup you to switch between the channels coming directly to the cable box's IN jack. The projection TV's internal converter allows you can: ❑ Use the projection TV remote control to change channels using your cable box when the signal is scrambled. ❑ Use the projection TV remote control to change channels using your projection TV when the signal is not scrambled. (Your projection TV's tuner...
Operating Instructions
Page 28
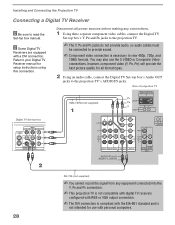
Installing and Connecting the Projection TV Connecting a Digital TV Receiver z Be sure to view 480p, 720p, and 1080i formats. Disconnect all format types. 2 Using an audio cable, connect the Digital TV Set-top box's Audio OUT jacks to your Digital TV Receiver manual for use the S VIDEO or Composite Video connections, however, component video (Y, PB, PR) will provide the best picture quality for all power sources before making any equipment connected into the Y, PB and PR connectors. ✍ This projection TV is not compatible...
Installing and Connecting the Projection TV Connecting a Digital TV Receiver z Be sure to view 480p, 720p, and 1080i formats. Disconnect all format types. 2 Using an audio cable, connect the Digital TV Set-top box's Audio OUT jacks to your Digital TV Receiver manual for use the S VIDEO or Composite Video connections, however, component video (Y, PB, PR) will provide the best picture quality for all power sources before making any equipment connected into the Y, PB and PR connectors. ✍ This projection TV is not compatible...

Operating Instructions
Page 34
... red image is replaced with a white cross. Aligned crosses (which do not need adjustment) look white and have little or no red or blue showing. Installing and Connecting the Projection TV Adjusting the Convergence Manually The Manual Convergence feature gives you more control over the TV's picture than the Flash Focus feature, allowing you to fine-tune the color alignment of each section of the TV screen. ✍ Before using the Setup Menu, see page 61. 1 Press MENU to display the Menu...
... red image is replaced with a white cross. Aligned crosses (which do not need adjustment) look white and have little or no red or blue showing. Installing and Connecting the Projection TV Adjusting the Convergence Manually The Manual Convergence feature gives you more control over the TV's picture than the Flash Focus feature, allowing you to fine-tune the color alignment of each section of the TV screen. ✍ Before using the Setup Menu, see page 61. 1 Press MENU to display the Menu...
Operating Instructions
Page 41
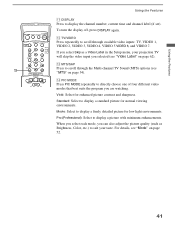
... low light environments. Movie: Select to display a standard picture for enhanced picture contrast and sharpness. If you select Skip as Brightness, Color, etc.) to directly choose one of four different video modes that best suits the program you selected (see "Mode" on page 54). Pro (Professional): Select to display the channel number, current time and channel label (if set). qs TV/VIDEO Press repeatedly to scroll through available video inputs: TV, VIDEO 1, VIDEO 2, VIDEO 3, VIDEO 4, VIDEO 5 VIDEO 6, and VIDEO...
... low light environments. Movie: Select to display a standard picture for enhanced picture contrast and sharpness. If you select Skip as Brightness, Color, etc.) to directly choose one of four different video modes that best suits the program you selected (see "Mode" on page 54). Pro (Professional): Select to display the channel number, current time and channel label (if set). qs TV/VIDEO Press repeatedly to scroll through available video inputs: TV, VIDEO 1, VIDEO 2, VIDEO 3, VIDEO 4, VIDEO 5 VIDEO 6, and VIDEO...

Operating Instructions
Page 52
... remote control when in the Video menu. Selecting Video Options z To quickly and easily change from three color temperatures: Cool Select to exit the menu screen. That feature's adjustment appears. 5 Use the joystick to make the desired adjustments. 6 Press to select/set. 7 Press MENU to give the white colors a red tint (NTSCStandard). 52 To restore the factory default settings for Normal viewing conditions. Choose from one Video Mode to give the white colors a blue tint. Option Mode...
... remote control when in the Video menu. Selecting Video Options z To quickly and easily change from three color temperatures: Cool Select to exit the menu screen. That feature's adjustment appears. 5 Use the joystick to make the desired adjustments. 6 Press to select/set. 7 Press MENU to give the white colors a red tint (NTSCStandard). 52 To restore the factory default settings for Normal viewing conditions. Choose from one Video Mode to give the white colors a blue tint. Option Mode...

Operating Instructions
Page 76
... your projection TV does not turn on, and a red light keeps flashing, your projection TV. ❏ Make sure the projection TV's power cord is connected) ❏ Check the connections between the DTV receiver and the projection TV (see "MTS" on page 33). dryers. 76 Dark, poor or no picture (screen lit), good sound ❏ Adjust the Picture setting in the Video menu (see page 52). ❏ Adjust the Brightness setting in the Video menu (see page 52). ❏ Check antenna/cable connections. ❏ Adjust the convergence again using an antenna presently...
... your projection TV does not turn on, and a red light keeps flashing, your projection TV. ❏ Make sure the projection TV's power cord is connected) ❏ Check the connections between the DTV receiver and the projection TV (see "MTS" on page 33). dryers. 76 Dark, poor or no picture (screen lit), good sound ❏ Adjust the Picture setting in the Video menu (see page 52). ❏ Adjust the Brightness setting in the Video menu (see page 52). ❏ Check antenna/cable connections. ❏ Adjust the convergence again using an antenna presently...
Operating Instructions
Page 81
... 57 Channels Auto Program 57 creating labels 57 setting up 56 using 43 FAVORITES button 37 Features 8 Flash Focus described 9 performing 33 FREEZE button 37 Freeze, using with VCR 20 using 40, 47 Front Panel Controls 13 FUNCTION buttons (WHITE) 38 H Hookups 16-31 Hue, adjusting 52 I Inputs, labeling 62 Installation of box 10 CONTROL S 31 Convergence, adjusting automatically 33 Convergence, adjusting manually 34 D Daylight saving 60 Digital Reality Creation 53 Digital TV connecting 28 watching 42 Digital TV program 42 Digital TV receiver, connecting 28 DISPLAY button 37 Display, turning...
... 57 Channels Auto Program 57 creating labels 57 setting up 56 using 43 FAVORITES button 37 Features 8 Flash Focus described 9 performing 33 FREEZE button 37 Freeze, using with VCR 20 using 40, 47 Front Panel Controls 13 FUNCTION buttons (WHITE) 38 H Hookups 16-31 Hue, adjusting 52 I Inputs, labeling 62 Installation of box 10 CONTROL S 31 Convergence, adjusting automatically 33 Convergence, adjusting manually 34 D Daylight saving 60 Digital Reality Creation 53 Digital TV connecting 28 watching 42 Digital TV program 42 Digital TV receiver, connecting 28 DISPLAY button 37 Display, turning...
Operating Instructions
Page 82
..., using 40 P Parental control, described 8 Password, changing 65 PIC MODE button 37 Picture contrast, adjusting 52 Picture size, adjusting in Twin View 46 POWER button 39 POWER buttons (GREEN) 38 Presetting channels 32, 57 Problems, troubleshooting 76 R Ratings setting 63-68 viewing blocked programs 65 Rear panel controls and connections 14, 15 Remote control buttons inside panel 39 Function of buttons 40, 41 inserting batteries 10 programming 71-73 Remote control, operating other components with Cable box 75 DVD player 74 Satellite receiver 75 VCR 74 Removing channels from the channel list 57...
..., using 40 P Parental control, described 8 Password, changing 65 PIC MODE button 37 Picture contrast, adjusting 52 Picture size, adjusting in Twin View 46 POWER button 39 POWER buttons (GREEN) 38 Presetting channels 32, 57 Problems, troubleshooting 76 R Ratings setting 63-68 viewing blocked programs 65 Rear panel controls and connections 14, 15 Remote control buttons inside panel 39 Function of buttons 40, 41 inserting batteries 10 programming 71-73 Remote control, operating other components with Cable box 75 DVD player 74 Satellite receiver 75 VCR 74 Removing channels from the channel list 57...


