Operating Instructions
Page 3
...Inc. ClearEdge VM, and HD Detailer are trademarks of Sony Corporation. For Safety Be careful when moving the projection TV When you place the projection TV in accordance with the limits for safety purposes, to ...there is connected. ❑ Consult the dealer or an experienced radio/TV technician for several days, disconnect the power by turning the equipment off and on, the user is desirable to... heat buildup, do not expose the screen to a warm location, or if the room temperature changes suddenly, the picture may be using the projection TV for help. Use of the FCC Rules...
...Inc. ClearEdge VM, and HD Detailer are trademarks of Sony Corporation. For Safety Be careful when moving the projection TV When you place the projection TV in accordance with the limits for safety purposes, to ...there is connected. ❑ Consult the dealer or an experienced radio/TV technician for several days, disconnect the power by turning the equipment off and on, the user is desirable to... heat buildup, do not expose the screen to a warm location, or if the room temperature changes suddenly, the picture may be using the projection TV for help. Use of the FCC Rules...
Operating Instructions
Page 4
...solution of mild soap and warm water. Additional Cleaning Instructions Clean the cabinet of the projection TV with the apparatus. The wide blade or the third prong are provided for your safety. Important Safety Instructions 1 Read... time. 14 Refer all servicing to clean your TV screen. When a cart is damaged, liquid has been spilled or objects have fallen into your projection TV, please use only a clean, soft cloth lightly...not operate normally, or has been dropped. Install in any way, such as power-supply cord or plug is used, use caution when moving the cart/apparatus ...
...solution of mild soap and warm water. Additional Cleaning Instructions Clean the cabinet of the projection TV with the apparatus. The wide blade or the third prong are provided for your safety. Important Safety Instructions 1 Read... time. 14 Refer all servicing to clean your TV screen. When a cart is damaged, liquid has been spilled or objects have fallen into your projection TV, please use only a clean, soft cloth lightly...not operate normally, or has been dropped. Install in any way, such as power-supply cord or plug is used, use caution when moving the cart/apparatus ...
Operating Instructions
Page 11
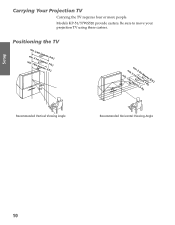
...˚ 20˚ 60 ˚ PRO STD/DUO FLASH FOCUS TV/VIDEO - f.7t8.f)tf.t).) PRO STD/DUO FLASH FOCUS TV/VIDEO - VOLUME + - Models KP-51/57WS520 provide casters. VOLUME + - Be sure to move your projection TV using these casters. CHANNEL + TIMER STAND BY POWER min. 60˚ 1m.84imn6."(2a.mp1mpi5nr1.o("a2xp..4p6mrfot5(x.a)7.p"7pfrto.)x. 8 ft.) Recommended...
...˚ 20˚ 60 ˚ PRO STD/DUO FLASH FOCUS TV/VIDEO - f.7t8.f)tf.t).) PRO STD/DUO FLASH FOCUS TV/VIDEO - VOLUME + - Models KP-51/57WS520 provide casters. VOLUME + - Be sure to move your projection TV using these casters. CHANNEL + TIMER STAND BY POWER min. 60˚ 1m.84imn6."(2a.mp1mpi5nr1.o("a2xp..4p6mrfot5(x.a)7.p"7pfrto.)x. 8 ft.) Recommended...
Operating Instructions
Page 12
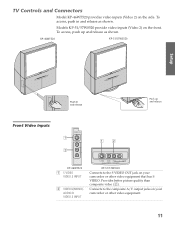
KP-46WT520 KP-51/57WS520 PRO STD/DUO FLASH FOCUS TV/VIDEO - CHANNEL + TIMER STAND BY POWER PRO STD/DUO FLASH FOCUS TV/VIDEO - VOLUME + - SETUP TV Controls and Connectors Model KP-46WT520 provides video inputs (Video 2) on the front. Connects to the S VIDEO OUT jack on your camcorder or other video equipment. 11 SETUP VOLUME + - To access, ...
KP-46WT520 KP-51/57WS520 PRO STD/DUO FLASH FOCUS TV/VIDEO - CHANNEL + TIMER STAND BY POWER PRO STD/DUO FLASH FOCUS TV/VIDEO - VOLUME + - SETUP TV Controls and Connectors Model KP-46WT520 provides video inputs (Video 2) on the front. Connects to the S VIDEO OUT jack on your camcorder or other video equipment. 11 SETUP VOLUME + - To access, ...
Operating Instructions
Page 13
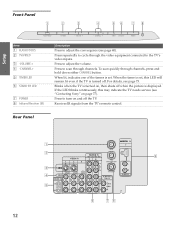
...the video equipment connected to turn on , then shuts off . For details, see "Contacting Sony" on page 77). Press to adjust the convergence (see page 40). Receives IR signals from the TV's remote control. VOLUME + - To scan quickly through channels, press and hold down either...the LED blinks continuously, this LED will remain lit even if the TV is turned off when the picture is set . CHANNEL + TIMER STAND BY POWER Item 1 FLASH FOCUS 2 TV/VIDEO 3 -VOLUME + 4 -CHANNEL+ 5 TIMER LED 6 STAND BY LED 7 POWER 8 Infrared Receiver (IR) Description Press to adjust the volume. ...
...the video equipment connected to turn on , then shuts off . For details, see "Contacting Sony" on page 77). Press to adjust the convergence (see page 40). Receives IR signals from the TV's remote control. VOLUME + - To scan quickly through channels, press and hold down either...the LED blinks continuously, this LED will remain lit even if the TV is turned off when the picture is set . CHANNEL + TIMER STAND BY POWER Item 1 FLASH FOCUS 2 TV/VIDEO 3 -VOLUME + 4 -CHANNEL+ 5 TIMER LED 6 STAND BY LED 7 POWER 8 Infrared Receiver (IR) Description Press to adjust the volume. ...
Operating Instructions
Page 40
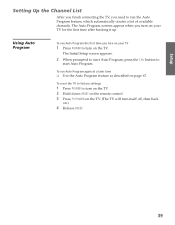
...time after hooking it up. The Auto Program screens appear when you need to turn on .) 4 Release RESET. Using Auto Program To run Auto Program again at a later time ❑ Use the Auto Program feature as described on your TV 1 Press POWER to run the Auto Program feature, which ...button to turn on the TV. 2 Hold down RESET on the remote control. 3 Press TV POWER on the TV. (The TV will turn on page 67. SETUP Setup Setting Up the Channel List After you finish connecting the TV, you turn itself off, then back on the TV. The Initial Setup screen appears. 2 When prompted ...
...time after hooking it up. The Auto Program screens appear when you need to turn on .) 4 Release RESET. Using Auto Program To run Auto Program again at a later time ❑ Use the Auto Program feature as described on your TV 1 Press POWER to run the Auto Program feature, which ...button to turn on the TV. 2 Hold down RESET on the remote control. 3 Press TV POWER on the TV. (The TV will turn on page 67. SETUP Setup Setting Up the Channel List After you finish connecting the TV, you turn itself off, then back on the TV. The Initial Setup screen appears. 2 When prompted ...

Operating Instructions
Page 45
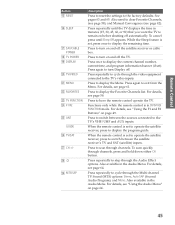
...to freeze the window picture. SETUP SETUP Remote Control Button Descriptions 1 qj Button DVD/ SAT/ POWER MUTING VCR CABLE 2 qk 1 DVD/VCR 3 MODE TV/ PICTURE WIDE DISPLAY VIDEO ql POWER w; 2 MUTING 4 Description Press to turn on and off the DVD player or VCR. qf...X Pause z Record (press together with Sony DVD Dream™ Systems SETUP SETUP SETUP 44 Press again to mute the sound. The TV alternates between two channels. To select an item, press . For details, see "Selecting Video Options" on -screen cursor. Press to restore the picture....
...to freeze the window picture. SETUP SETUP Remote Control Button Descriptions 1 qj Button DVD/ SAT/ POWER MUTING VCR CABLE 2 qk 1 DVD/VCR 3 MODE TV/ PICTURE WIDE DISPLAY VIDEO ql POWER w; 2 MUTING 4 Description Press to turn on and off the DVD player or VCR. qf...X Pause z Record (press together with Sony DVD Dream™ Systems SETUP SETUP SETUP 44 Press again to mute the sound. The TV alternates between two channels. To select an item, press . For details, see "Selecting Video Options" on -screen cursor. Press to restore the picture....
Operating Instructions
Page 46
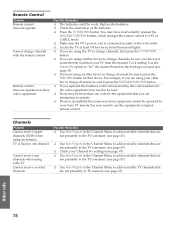
... repeatedly to display the Favorite Channels list. For details, see page 42). SETUP SETUP Remote Control Button qg RESET qh SLEEP qj SAT/CABLE POWER qk TV POWER ql DISPLAY w; While the Sleep feature is set to operate the satellite receiver, press to switch between the sources connected to switch between the satellite...
... repeatedly to display the Favorite Channels list. For details, see page 42). SETUP SETUP Remote Control Button qg RESET qh SLEEP qj SAT/CABLE POWER qk TV POWER ql DISPLAY w; While the Sleep feature is set to operate the satellite receiver, press to switch between the sources connected to switch between the satellite...
Operating Instructions
Page 47
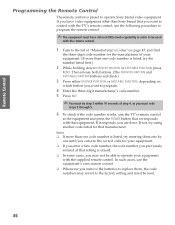
...a new code number, the code number you previously entered at the equipment and press the POWER button that corresponds with that equipment. In such cases, use the following procedure to program the... code listed for that setting is preset to operate Sony brand video equipment. If it responds, you are done. Notes ❑ If more than Sony brand that you want to program. 4 Enter the... for the manufacturer of "Manufacturer's Codes" on which button you want to control with the TV's remote control, use the equipment's own remote control. ❑ Whenever you must redo steps 3...
...a new code number, the code number you previously entered at the equipment and press the POWER button that corresponds with that equipment. In such cases, use the following procedure to program the... code listed for that setting is preset to operate Sony brand video equipment. If it responds, you are done. Notes ❑ If more than Sony brand that you want to program. 4 Enter the... for the manufacturer of "Manufacturer's Codes" on which button you want to control with the TV's remote control, use the equipment's own remote control. ❑ Whenever you must redo steps 3...
Operating Instructions
Page 49
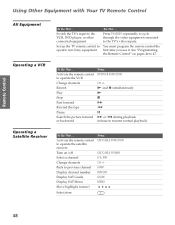
...to cycle through the video equipment connected to previous channel Display channel number Display SAT Guide Display SAT Menu Press SAT/CABLE FUNCTION SAT/CABLE POWER 0-9, ENT CH +/JUMP DISPLAY GUIDE MENU Move highlight (cursor) V v B b Select item SETUP SETUP SETUP 48 Activate the remote control... Remote Control" on /off Select a channel Change channels Back to the TV's video inputs. Switch the TV's input to the VCR, DVD player, or other connected equipment Set up the TV remote control to operate non-Sony equipment Do This ... To Do This ... SETUP SETUP Remote Control Using ...
...to cycle through the video equipment connected to previous channel Display channel number Display SAT Guide Display SAT Menu Press SAT/CABLE FUNCTION SAT/CABLE POWER 0-9, ENT CH +/JUMP DISPLAY GUIDE MENU Move highlight (cursor) V v B b Select item SETUP SETUP SETUP 48 Activate the remote control... Remote Control" on /off Select a channel Change channels Back to the TV's video inputs. Switch the TV's input to the VCR, DVD player, or other connected equipment Set up the TV remote control to operate non-Sony equipment Do This ... To Do This ... SETUP SETUP Remote Control Using ...
Operating Instructions
Page 50
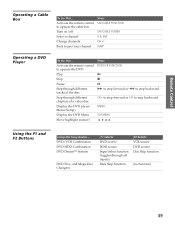
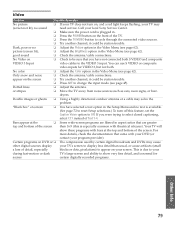
... DVD/VCR FUNCTION N x X M to step forward or m to step backward CH+ to step backward MENU TOP MENU V v B b Using the F1 and F2 Buttons Using this Sony Device ... Activate the remote control to operate the DVD Play Stop Pause Step through different tracks of the disc Step through all inputs) Disk Skip... the remote control to operate the cable box Turn on/off Select a channel Change channels Back to previous channel Press SAT/CABLE FUNCTION SAT/CABLE POWER 0-9, ENT CH +/JUMP Operating a DVD Player To Do This ...
... DVD/VCR FUNCTION N x X M to step forward or m to step backward CH+ to step backward MENU TOP MENU V v B b Using the F1 and F2 Buttons Using this Sony Device ... Activate the remote control to operate the DVD Play Stop Pause Step through different tracks of the disc Step through all inputs) Disk Skip... the remote control to operate the cable box Turn on/off Select a channel Change channels Back to previous channel Press SAT/CABLE FUNCTION SAT/CABLE POWER 0-9, ENT CH +/JUMP Operating a DVD Player To Do This ...

Operating Instructions
Page 53
...current channel Press DISPLAY once to the TV's video inputs. Change video and audio options, customize the TV's setup, set ). Press DISPLAY again to turn Display off the TV Press TV POWER Tune directly to a channel To tune to Press TV FUNCTION operate the TV Turn on page 61. To Do ...This ... SETUP Features SETUP SETUP 52 SETUP SETUP Watching TV z For a complete list of all the functions of ...
...current channel Press DISPLAY once to the TV's video inputs. Change video and audio options, customize the TV's setup, set ). Press DISPLAY again to turn Display off the TV Press TV POWER Tune directly to a channel To tune to Press TV FUNCTION operate the TV Turn on page 61. To Do ...This ... SETUP Features SETUP SETUP 52 SETUP SETUP Watching TV z For a complete list of all the functions of ...
Operating Instructions
Page 78
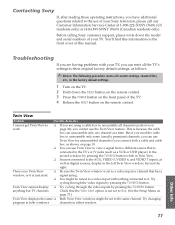
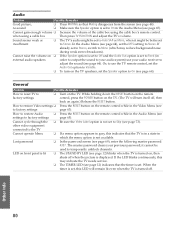
...the right. Try cycling through the video inputs by pressing the TV/VIDEO button. Before calling Sony customer support, please write down the RESET button on the remote control. 3 Press the POWER button on the front panel of the TV. 4 Release the RESET button on the front cover of this.... 77 SETUP Other Info Twin View cannot display ❏ Try cycling through the video inputs by pressing the TV/VIDEO button. This is set to the same channel. Welcome Contacting Sony If, after reading these operating instructions, you have additional questions related to the use of your...
...the right. Try cycling through the video inputs by pressing the TV/VIDEO button. Before calling Sony customer support, please write down the RESET button on the remote control. 3 Press the POWER button on the front panel of the TV. 4 Release the RESET button on the front cover of this.... 77 SETUP Other Info Twin View cannot display ❏ Try cycling through the video inputs by pressing the TV/VIDEO button. This is set to the same channel. Welcome Contacting Sony If, after reading these operating instructions, you have additional questions related to the use of your...
Operating Instructions
Page 79
... have inadvertently pressed the SAT/CABLE FUNCTION button, which changes the remote control to SAT or CABLE mode. ❏ Make sure the TV's power cord is fixed to one channel Cannot receive any channels when using another device to change channels with the remote control Remote control does ... the Channel Menu to add receivable channels that are attempting to operate. ❏ There is a possibility that some non-Sony equipment cannot be operated by your Sony TV remote.You may have not inadvertently switched your Channel Fix settings (see page 67). ❏ Use Auto Program in the...
... have inadvertently pressed the SAT/CABLE FUNCTION button, which changes the remote control to SAT or CABLE mode. ❏ Make sure the TV's power cord is fixed to one channel Cannot receive any channels when using another device to change channels with the remote control Remote control does ... the Channel Menu to add receivable channels that are attempting to operate. ❏ There is a possibility that some non-Sony equipment cannot be operated by your Sony TV remote.You may have not inadvertently switched your Channel Fix settings (see page 67). ❏ Use Auto Program in the...
Operating Instructions
Page 80
... details, check the documentation that came with bars at the ❏ Some wide-screen programs are filmed in aspect ratios that you were trying to select closed captioning, select CC1 instead of the TV. ❏ Press the TV/VIDEO button to the VIDEO 3 input. Call your program provider). Dark, ...the front of Text 1-4. This is due to your during fast-motion or dark TV's large screen and ability to show these programs with your DVD (or contact your local Sony Service Center. ❏ Make sure the power cord is normal for VIDEO 3, but not both S VIDEO and composite VIDEO 3...
... details, check the documentation that came with bars at the ❏ Some wide-screen programs are filmed in aspect ratios that you were trying to select closed captioning, select CC1 instead of the TV. ❏ Press the TV/VIDEO button to the VIDEO 3 input. Call your program provider). Dark, ...the front of Text 1-4. This is due to your during fast-motion or dark TV's large screen and ability to show these programs with your DVD (or contact your local Sony Service Center. ❏ Make sure the power cord is normal for VIDEO 3, but not both S VIDEO and composite VIDEO 3...
Operating Instructions
Page 81
...to Skip (see page 44). While holding down the RESET button on the remote factory settings control, press the POWER button on the TV. (The TV will remain lit even when the TV is turned off. If the LED blinks continuously, this may reduce background noise during weak stereo broadcasts). Or, to... to Stereo, switch to Mono (which the menu option is not available. it might be set . Lost password ❏ In the password screen (see page 12) blinks when the TV is turned on, then shuts off , then back on the remote control while in which may indicate the...
...to Skip (see page 44). While holding down the RESET button on the remote factory settings control, press the POWER button on the TV. (The TV will remain lit even when the TV is turned off. If the LED blinks continuously, this may reduce background noise during weak stereo broadcasts). Or, to... to Stereo, switch to Mono (which the menu option is not available. it might be set . Lost password ❏ In the password screen (see page 12) blinks when the TV is turned on, then shuts off , then back on the remote control while in which may indicate the...

Operating Instructions
Page 82
...VHF/UHF NTSC American TV Standard VHF 2-13... SETUP Specifications Projection System Picture Tube Projection Lenses Antenna Television System Channel Coverage Power Requirements Inputs/Outputs...Screen Size (measured diagonally) Speaker Output Dimensions (W x H x D) Mass Power Consumption 3 picture tubes, 3 lenses, horizontal in-line system 7-inch high-brightness monochrome tubes (6.3 raster size), with optical coupling and liquid cooling system High performance, large diameter hybrid lens F1.1 75 ohm external terminal for remote control KP-46WT520 46 inches KP-51WS520 51 inches KP...
...VHF/UHF NTSC American TV Standard VHF 2-13... SETUP Specifications Projection System Picture Tube Projection Lenses Antenna Television System Channel Coverage Power Requirements Inputs/Outputs...Screen Size (measured diagonally) Speaker Output Dimensions (W x H x D) Mass Power Consumption 3 picture tubes, 3 lenses, horizontal in-line system 7-inch high-brightness monochrome tubes (6.3 raster size), with optical coupling and liquid cooling system High performance, large diameter hybrid lens F1.1 75 ohm external terminal for remote control KP-46WT520 46 inches KP-51WS520 51 inches KP...
Operating Instructions
Page 84
... connecting 15 with VCR, connecting 24 cable box connecting with VCR 26 Twin View issues 55 using with TV remote control 49 DVD/VCR Combination 49 DVD/VCR FUNCTION button 44 DVD/VCR POWER button 44 DVI (Digital Video Interface) 36 E Effect button 45 ENTER button 44, 52, 56 F F1/F2 buttons... features 7 Fixed audio setting 65 Flash Focus 40, 74 FLASH FOCUS button 12 FREEZE button 44, 59 Freeze, using with TV remote control 49 Cable setting 67 Caption Vision 72 carrying the TV 10 CATV. DVD Dream™ System 49 DVD Five- Index 0-9 buttons 44, 52, 56 4:3 Default settings 66 A Advanced ...
... connecting 15 with VCR, connecting 24 cable box connecting with VCR 26 Twin View issues 55 using with TV remote control 49 DVD/VCR Combination 49 DVD/VCR FUNCTION button 44 DVD/VCR POWER button 44 DVI (Digital Video Interface) 36 E Effect button 45 ENTER button 44, 52, 56 F F1/F2 buttons... features 7 Fixed audio setting 65 Flash Focus 40, 74 FLASH FOCUS button 12 FREEZE button 44, 59 Freeze, using with TV remote control 49 Cable setting 67 Caption Vision 72 carrying the TV 10 CATV. DVD Dream™ System 49 DVD Five- Index 0-9 buttons 44, 52, 56 4:3 Default settings 66 A Advanced ...
Operating Instructions
Page 85
...button 45 MUTING button 44, 52 N Neutral, Color Temperature 62 Noise Reduction 63 Normal 53 O off, turning off the TV 12 TV FUNCTION button 45, 52 TV POWER button 45, 52 TV/SAT button 45 TV/VIDEO button 12, 45, 52 Twin View button 44 described 7 using 55-57 V Variable audio setting 65 VCR using ...modes, selecting 62 Vivid mode 62 VOL buttons 12, 44, 52 W Warm, Color Temperature 62 Wide Mode 53, 66 WIDE MODE button 44, 53 Wide Zoom 53, 54 Z Zoom 53, 54 zoom feature, with TV remote control 48 Screen Menu 61 Setup Menu 61, 72 sharpness, adjusting 62 Simulated, Effect 64 sizing, picture in Twin...
...button 45 MUTING button 44, 52 N Neutral, Color Temperature 62 Noise Reduction 63 Normal 53 O off, turning off the TV 12 TV FUNCTION button 45, 52 TV POWER button 45, 52 TV/SAT button 45 TV/VIDEO button 12, 45, 52 Twin View button 44 described 7 using 55-57 V Variable audio setting 65 VCR using ...modes, selecting 62 Vivid mode 62 VOL buttons 12, 44, 52 W Warm, Color Temperature 62 Wide Mode 53, 66 WIDE MODE button 44, 53 Wide Zoom 53, 54 Z Zoom 53, 54 zoom feature, with TV remote control 48 Screen Menu 61 Setup Menu 61, 72 sharpness, adjusting 62 Simulated, Effect 64 sizing, picture in Twin...

Marketing Specifications
Page 2
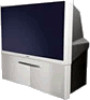
...; SRS® Audio • 2 Speaker System (20W X 2) Specifications General • Power Requirements AC 120V 60Hz • Power Consumption In Operation: 260W In Standby: All rights reserved. All trademarks referenced herein are subject ...KP-46WT520 Projection TV Features Video • Auto Channel Program • Trinitone® Color Temperature • Caption Vision (CC) • Channel Label • Channel Skip/Add • Clock/Timer Two Event • Energy Star® Compliant • Favorite Channel With Preview • Picture Freeze • Picture Jump • On Screen...
...; SRS® Audio • 2 Speaker System (20W X 2) Specifications General • Power Requirements AC 120V 60Hz • Power Consumption In Operation: 260W In Standby: All rights reserved. All trademarks referenced herein are subject ...KP-46WT520 Projection TV Features Video • Auto Channel Program • Trinitone® Color Temperature • Caption Vision (CC) • Channel Label • Channel Skip/Add • Clock/Timer Two Event • Energy Star® Compliant • Favorite Channel With Preview • Picture Freeze • Picture Jump • On Screen...


