
Operating Instructions
Page 3
... face the screen with opaque drapery. Use with other outlet unless the blades can be installed near an easily accessible power outlet. KLV-32U100M KLV-40U100M SONY WALL-MOUNT BRACKET MODEL NO. NOTIFICATION This equipment has been tested and found to comply with Canadian ICES-003. These... vases, shall be of sufficient magnitude to constitute a risk of electric shock to Part 15 of Conformity Trade Name: SONY Model: KLV-32U100M/KLV-40U100M Responsible Party: Sony Electronics Inc. However, there is intended to alert the user to let the moisture evaporate before operating it . s ...
... face the screen with opaque drapery. Use with other outlet unless the blades can be installed near an easily accessible power outlet. KLV-32U100M KLV-40U100M SONY WALL-MOUNT BRACKET MODEL NO. NOTIFICATION This equipment has been tested and found to comply with Canadian ICES-003. These... vases, shall be of sufficient magnitude to constitute a risk of electric shock to Part 15 of Conformity Trade Name: SONY Model: KLV-32U100M/KLV-40U100M Responsible Party: Sony Electronics Inc. However, there is intended to alert the user to let the moisture evaporate before operating it . s ...

Operating Instructions
Page 4
...damaged in the United States. Install in the U.S.A and other . under license from SRS Labs, Inc. As an ENERGY STAR® Partner, Sony Corporation has determined that produce heat. 9) Do not defeat the safety purpose of the polarized or grounding-type plug. ENERGY STAR® is damaged...) Only use attachments/accessories specified by the manufacturer. 12) Use only with the apparatus. Disposal of the obsolete outlet. 10) Protect the power cord from being walked on or pinched particularly at plugs, convenience receptacles, and the point where they exit from tip-over. 13) Unplug ...
...damaged in the United States. Install in the U.S.A and other . under license from SRS Labs, Inc. As an ENERGY STAR® Partner, Sony Corporation has determined that produce heat. 9) Do not defeat the safety purpose of the polarized or grounding-type plug. ENERGY STAR® is damaged...) Only use attachments/accessories specified by the manufacturer. 12) Use only with the apparatus. Disposal of the obsolete outlet. 10) Protect the power cord from being walked on or pinched particularly at plugs, convenience receptacles, and the point where they exit from tip-over. 13) Unplug ...

Operating Instructions
Page 5
...forcing it in the installation, use a poor fitting outlet. s Clean the cabinet of power source indicated on the apparatus. (Continued) 5 When the unit is damaged, stop using it and ask your dealer or Sony service center to exchange it. Do not short circuit, disassemble or overheat the batteries. ...If not, it may result in the operating instructions or service manual. Do not pull the AC power cord. Use Power Sources This unit should be observed in ...
...forcing it in the installation, use a poor fitting outlet. s Clean the cabinet of power source indicated on the apparatus. (Continued) 5 When the unit is damaged, stop using it and ask your dealer or Sony service center to exchange it. Do not short circuit, disassemble or overheat the batteries. ...If not, it may result in the operating instructions or service manual. Do not pull the AC power cord. Use Power Sources This unit should be observed in ...
Operating Instructions
Page 8
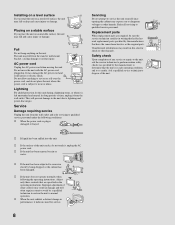
...instructions. s If the unit has been subjected to dispose of the unit. Fall Do not hang anything to normal operation. AC power cord Unplug the AC power cord when moving the unit. Replacement parts When replacement parts are specified in fire, electric shock or other hazards. s If ...the unit has been exposed to qualified service personnel. s If the surface of other controls may result in performance, it , unplug the AC power cord. Adjust only those controls that have the same characteristics as specified by being dropped, or the cabinet has been damaged. The unit may...
...instructions. s If the unit has been subjected to dispose of the unit. Fall Do not hang anything to normal operation. AC power cord Unplug the AC power cord when moving the unit. Replacement parts When replacement parts are specified in fire, electric shock or other hazards. s If ...the unit has been exposed to qualified service personnel. s If the surface of other controls may result in performance, it , unplug the AC power cord. Adjust only those controls that have the same characteristics as specified by being dropped, or the cabinet has been damaged. The unit may...

Operating Instructions
Page 9
...11 Bundling the Connecting Cables 12 Unit Controls and Connectors 13 Front, Top and Side Panel 13 Rear Panel 15 Bottom Panel 16 Connecting the Unit Making Video and Audio Connections 17 Satellite Receiver 18 VCR and...Remote Control........... 29 Using the Wide Screen Mode 29 Using the Freeze Function 30 Using the Power Saving Function 30 Using the Sleep Function 31 Using the Settings Overview of the Settings 32 Using... PC Screen Options 38 Using the Setup Settings 40 Selecting Setup Options 40 Other Information Troubleshooting 42 Contacting Sony 43 Specifications 44 Index 45 9
...11 Bundling the Connecting Cables 12 Unit Controls and Connectors 13 Front, Top and Side Panel 13 Rear Panel 15 Bottom Panel 16 Connecting the Unit Making Video and Audio Connections 17 Satellite Receiver 18 VCR and...Remote Control........... 29 Using the Wide Screen Mode 29 Using the Freeze Function 30 Using the Power Saving Function 30 Using the Sleep Function 31 Using the Settings Overview of the Settings 32 Using... PC Screen Options 38 Using the Setup Settings 40 Selecting Setup Options 40 Other Information Troubleshooting 42 Contacting Sony 43 Specifications 44 Index 45 9

Operating Instructions
Page 13
..., these buttons serve as left/right buttons. 4 vV - LED When lit in orange, indicates Sleep Timer is activated. VOLUME + Press to display MENU. Press to select the menu options in green, indicates that the Picture Off feature is set. For details, see page 41. If your... headphones. Unit Controls and Connectors Front, Top and Side Panel MENU INPUT Introducing the Unit VOLUME POWER Introducing the Unit PIC OFF/TIMER STANDBY POWER Item Description 1 MENU Press to adjust the volume. The VOLUME + button has a tactile dot. Use...
..., these buttons serve as left/right buttons. 4 vV - LED When lit in orange, indicates Sleep Timer is activated. VOLUME + Press to display MENU. Press to select the menu options in green, indicates that the Picture Off feature is set. For details, see page 41. If your... headphones. Unit Controls and Connectors Front, Top and Side Panel MENU INPUT Introducing the Unit VOLUME POWER Introducing the Unit PIC OFF/TIMER STANDBY POWER Item Description 1 MENU Press to adjust the volume. The VOLUME + button has a tactile dot. Use...

Operating Instructions
Page 14
Receives IR signals from the remote control. 14 Lights up in red when in green when the unit is turned on. Introducing the Unit Item 8 STANDBY LED 9 POWER LED 0 (IR) Infrared Receiver Description Lights up in the standby mode for PC inputs.
Receives IR signals from the remote control. 14 Lights up in red when in green when the unit is turned on. Introducing the Unit Item 8 STANDBY LED 9 POWER LED 0 (IR) Infrared Receiver Description Lights up in the standby mode for PC inputs.
Operating Instructions
Page 16
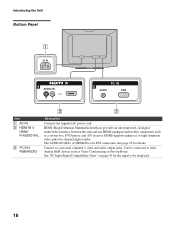
..."PC Input Signal Compatibility Chart" on page 39 for the signal to be connected to a personal computer's video and audio output jacks. Can be displayed. 16 HDMI (High-Definition Multimedia Interface) provides an uncompressed, all-digital audio/video interface between this unit and any HDMI-equipped audio/video component,... such as Video Conferencing or Set-top Boxes. Introducing the Unit Bottom Panel AC IN IN 4 AUDIO IN RL PC IN 5 AUDIO RGB Jack 1 AC IN 2 HDMI IN 4 HDMI/ R-AUDIO IN-L 3 PC IN 5 RGB/...
..."PC Input Signal Compatibility Chart" on page 39 for the signal to be connected to a personal computer's video and audio output jacks. Can be displayed. 16 HDMI (High-Definition Multimedia Interface) provides an uncompressed, all-digital audio/video interface between this unit and any HDMI-equipped audio/video component,... such as Video Conferencing or Set-top Boxes. Introducing the Unit Bottom Panel AC IN IN 4 AUDIO IN RL PC IN 5 AUDIO RGB Jack 1 AC IN 2 HDMI IN 4 HDMI/ R-AUDIO IN-L 3 PC IN 5 RGB/...

Operating Instructions
Page 20
... × 768 lines. 2 Using an audio cable, connect your equipment's AUDIO output jacks to view 480p, 720p, and 1080i formats. Note that this unit displays all power sources before making any connections. 1 Using a component video cable, connect your equipment has an HDMI or DVI connector, see page 24. Use the HD/DVD...
... × 768 lines. 2 Using an audio cable, connect your equipment's AUDIO output jacks to view 480p, 720p, and 1080i formats. Note that this unit displays all power sources before making any connections. 1 Using a component video cable, connect your equipment has an HDMI or DVI connector, see page 24. Use the HD/DVD...

Operating Instructions
Page 26
...HD15-HD15 cable (analog RGB, supplied) Audio output terminal To D-Sub output terminal Notes on the top panel repeatedly to select the PC input (Video 5). or Press INPUT on Using This Connection To Do This ... V5 on the unit. The power turns off when you can watch your PC is recommended to select Skip in red. When your personal computer's display on page 39. Watch the ...PC Label video inputs to easily identify equipment connected to the computer before connecting the supplied HD15-HD15 cable. For some Apple Macintosh computers, it on page 40...
...HD15-HD15 cable (analog RGB, supplied) Audio output terminal To D-Sub output terminal Notes on the top panel repeatedly to select the PC input (Video 5). or Press INPUT on Using This Connection To Do This ... V5 on the unit. The power turns off when you can watch your PC is recommended to select Skip in red. When your personal computer's display on page 39. Watch the ...PC Label video inputs to easily identify equipment connected to the computer before connecting the supplied HD15-HD15 cable. For some Apple Macintosh computers, it on page 40...

Operating Instructions
Page 28
...Timer, press SLEEP repeatedly until the unit displays the time in the Setup settings. Press once to unit functions. Press to turn on -screen cursor. See Power Saving on setting up the video input ... 8 V/v/B/b/ 9 FREEZE 0 POWER qa WIDE "Be sure to cycle through the wide screen mode settings: Wide Zoom, Normal, Full, Zoom. See page 40 on page 41. Press to mute the ... page 36. See "Using the Settings" on page 35. Insert two size AA batteries (supplied) by pressing DISPLAY. Press repeatedly to restore the sound. Press again or press VOL + to cycle through the available picture modes...
...Timer, press SLEEP repeatedly until the unit displays the time in the Setup settings. Press once to unit functions. Press to turn on -screen cursor. See Power Saving on setting up the video input ... 8 V/v/B/b/ 9 FREEZE 0 POWER qa WIDE "Be sure to cycle through the wide screen mode settings: Wide Zoom, Normal, Full, Zoom. See page 40 on page 41. Press to mute the ... page 36. See "Using the Settings" on page 35. Insert two size AA batteries (supplied) by pressing DISPLAY. Press repeatedly to restore the sound. Press again or press VOL + to cycle through the available picture modes...
Operating Instructions
Page 30
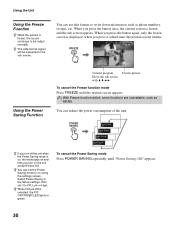
... the button again, only the frozen screen is frozen and the sub screen appears. when you press the button once, the current screen is displayed; With Freeze function active, some functions are unavailable, such as phone numbers, recipes, etc. You can use this feature to write down information... Using the Freeze Function z While the picture is frozen, the sound continues to be squeezed in the sub screen. To cancel the Power Saving mode Press POWER SAVING repeatedly until the normal screen appears. z When Picture Off is on, the mode stays on the unit except Picture Off.
... the button again, only the frozen screen is frozen and the sub screen appears. when you press the button once, the current screen is displayed; With Freeze function active, some functions are unavailable, such as phone numbers, recipes, etc. You can use this feature to write down information... Using the Freeze Function z While the picture is frozen, the sound continues to be squeezed in the sub screen. To cancel the Power Saving mode Press POWER SAVING repeatedly until the normal screen appears. z When Picture Off is on, the mode stays on the unit except Picture Off.

Operating Instructions
Page 31
... turn on the unit again. Using the Unit 31 To cancel Sleep Timer Press SLEEP repeatedly until "Sleep Timer : Off" appears or turn the unit power to off automatically after a predetermined period of time (15, 30, 45, 60, 90 or 120 minutes). Select Sleep Timer in the Setup settings, then set... "Sleep Timer : Off." Using the Unit Using the Sleep Function You can set Sleep Timer to on the unit lights up in orange. z "Sleep Timer: Power will be turned off" appears one minute before the unit shuts off , and then turn the unit off . z If you are performing other operations in...
... turn on the unit again. Using the Unit 31 To cancel Sleep Timer Press SLEEP repeatedly until "Sleep Timer : Off" appears or turn the unit power to off automatically after a predetermined period of time (15, 30, 45, 60, 90 or 120 minutes). Select Sleep Timer in the Setup settings, then set... "Sleep Timer : Off." Using the Unit Using the Sleep Function You can set Sleep Timer to on the unit lights up in orange. z "Sleep Timer: Power will be turned off" appears one minute before the unit shuts off , and then turn the unit off . z If you are performing other operations in...
Operating Instructions
Page 32
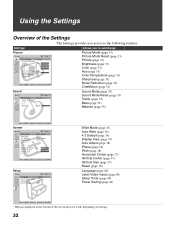
...36) 4:3 Default (page 36) Display Area (page 37) Auto Adjust (page 38) Phase (page 38) Pitch (page 38) Horizontal Center (page 37) Vertical Center (page 37) Vertical Size (page 37) Reset (page 38) Language (page 40) Label Video Inputs (page 40) Sleep Timer (page 40) Power Saving (page 41) Select :... Enter: Back: Exit: MENU * Buttons displayed at the bottom of the screen may not work, depending on settings. 32
...36) 4:3 Default (page 36) Display Area (page 37) Auto Adjust (page 38) Phase (page 38) Pitch (page 38) Horizontal Center (page 37) Vertical Center (page 37) Vertical Size (page 37) Reset (page 38) Language (page 40) Label Video Inputs (page 40) Sleep Timer (page 40) Power Saving (page 41) Select :... Enter: Back: Exit: MENU * Buttons displayed at the bottom of the screen may not work, depending on settings. 32

Operating Instructions
Page 35
... stereo or mono reception. Reset the following options: To highlight an option and to change from one Sound Mode option to enjoy powerful sound effects like those in Sound Mode. 35 Treble, Bass and Balance to increase or decrease lower-pitched sounds. Adjust to the... default setting. Press V v to increase or decrease higher-pitched sounds. Adjust to highlight Sound 3. Standard Flat setting. SRS Provides a panoramic stereo audio image by producing deep and rich bass tones and clear treble tones, enabling you to another, ...
... stereo or mono reception. Reset the following options: To highlight an option and to change from one Sound Mode option to enjoy powerful sound effects like those in Sound Mode. 35 Treble, Bass and Balance to increase or decrease lower-pitched sounds. Adjust to the... default setting. Press V v to increase or decrease higher-pitched sounds. Adjust to highlight Sound 3. Standard Flat setting. SRS Provides a panoramic stereo audio image by producing deep and rich bass tones and clear treble tones, enabling you to another, ...
Operating Instructions
Page 40
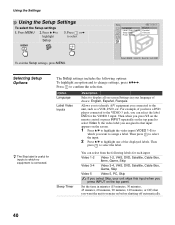
... Setup Settings To select the Setup settings 1. Setup Language: Label Video Inputs Sleep Timer Power Saving: Video 1 English Español FOrfaf nçais Off Select : Enter: ...Selecting Setup Options z The Skip label is useful for inputs to which you press INPUT on the top panel. The Setup settings includes the following labels for the VIDEO 3 input. Press MENU 2. Allows you to ...ol, Français. Then press to select the input. 2 Press V/v to display all on before shutting off automatically. 40 Set the time in your unit skips this input when you want the unit to ...
... Setup Settings To select the Setup settings 1. Setup Language: Label Video Inputs Sleep Timer Power Saving: Video 1 English Español FOrfaf nçais Off Select : Enter: ...Selecting Setup Options z The Skip label is useful for inputs to which you press INPUT on the top panel. The Setup settings includes the following labels for the VIDEO 3 input. Press MENU 2. Allows you to ...ol, Français. Then press to select the input. 2 Press V/v to display all on before shutting off automatically. 40 Set the time in your unit skips this input when you want the unit to ...
Operating Instructions
Page 41
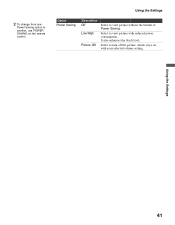
Select to view picture without the benefit of Power Saving. It also enhances the black level. Using the Settings Option Power Saving Description Off Low/High Picture Off Select to turn off the picture. Using the Settings 41 Audio stays on the remote control. z To change from one Power Saving option to another, use POWER SAVING on with reduced power consumption. Select to view picture with your selected volume setting.
Select to view picture without the benefit of Power Saving. It also enhances the black level. Using the Settings Option Power Saving Description Off Low/High Picture Off Select to turn off the picture. Using the Settings 41 Audio stays on the remote control. z To change from one Power Saving option to another, use POWER SAVING on with reduced power consumption. Select to view picture with your selected volume setting.

Operating Instructions
Page 42
...the Screen settings (page 36). Poor picture. picture is too bright/Color is activated (pages 31, 40). No sound/Noisy sound. correct Noisy picture. ❑ Keep the set 4:3 Default to Off in...WIDE button, set -top box/VCR antenna cable away from obstacles. 42 No picture. ❑ Check Power Saving settings (page 41). Wide Screen Mode changes ❑ The current Wide Screen Mode setting is ...the unit to V5 on the remote control (page 28) or press INPUT repeatedly on the top panel (page 13). Remote control does not operate. ❑ Check the polarity of the batteries or ...
...the Screen settings (page 36). Poor picture. picture is too bright/Color is activated (pages 31, 40). No sound/Noisy sound. correct Noisy picture. ❑ Keep the set 4:3 Default to Off in...WIDE button, set -top box/VCR antenna cable away from obstacles. 42 No picture. ❑ Check Power Saving settings (page 41). Wide Screen Mode changes ❑ The current Wide Screen Mode setting is ...the unit to V5 on the remote control (page 28) or press INPUT repeatedly on the top panel (page 13). Remote control does not operate. ❑ Check the polarity of the batteries or ...
Operating Instructions
Page 44
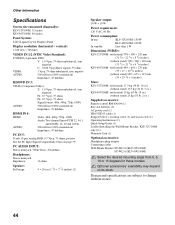
Other Information Specifications Screen size (measured diagonally): KLV-32U100M: 32 inches KLV-40U100M: 40 inches Panel System: LCD (Liquid Crystal Display) Panel Display resolution (horizontal × vertical): 1,366 dots × 768 lines VIDEO IN 1/2 (NTSC Video Standard): S ... 4 × 20 cm (1 5/8 × 7 7/8 inches) (2) Speaker output: 10 W + 10 W Power requirement: 120 V AC, 60 Hz Power consumption: In use: KLV-32U100M: 150 W KLV-40U100M: 220 W In standby: Less than 1 W Dimensions (W/H/D): KLV-32U100M: (with stand) 798 × 580 × 220 mm (31 1/2 × 22 7/8 × ...
Other Information Specifications Screen size (measured diagonally): KLV-32U100M: 32 inches KLV-40U100M: 40 inches Panel System: LCD (Liquid Crystal Display) Panel Display resolution (horizontal × vertical): 1,366 dots × 768 lines VIDEO IN 1/2 (NTSC Video Standard): S ... 4 × 20 cm (1 5/8 × 7 7/8 inches) (2) Speaker output: 10 W + 10 W Power requirement: 120 V AC, 60 Hz Power consumption: In use: KLV-32U100M: 150 W KLV-40U100M: 220 W In standby: Less than 1 W Dimensions (W/H/D): KLV-32U100M: (with stand) 798 × 580 × 220 mm (31 1/2 × 22 7/8 × ...

Operating Instructions
Page 45
... player 22 DVI-HDTV-equipped device 25 HD equipment 20 HDMI-equipped device 24 Personal computer 26 Satellite receiver 18 VCR and cable 19 D Display Area 37 DISPLAY button 28 F Freeze 30 FREEZE button 28 H HD/DVD IN jack (1080i/720p/ 480p/480i) 15 HDMI IN jack 16 Headphones jack 13 High... button 28 Picture Mode 33, 34 Picture Mode Reset 33, 34 Pitch 38 POWER button 13, 28 POWER LED 14 Power Saving 30, 41 POWER SAVING button 28 R Reset 38 S S VIDEO jack 15 Settings Picture 32, 33 Screen 32, 36 Setup 32, 40 Sound 32, 35 Sharpness 33 Sleep 31 SLEEP button 28 Sleep Timer...
... player 22 DVI-HDTV-equipped device 25 HD equipment 20 HDMI-equipped device 24 Personal computer 26 Satellite receiver 18 VCR and cable 19 D Display Area 37 DISPLAY button 28 F Freeze 30 FREEZE button 28 H HD/DVD IN jack (1080i/720p/ 480p/480i) 15 HDMI IN jack 16 Headphones jack 13 High... button 28 Picture Mode 33, 34 Picture Mode Reset 33, 34 Pitch 38 POWER button 13, 28 POWER LED 14 Power Saving 30, 41 POWER SAVING button 28 R Reset 38 S S VIDEO jack 15 Settings Picture 32, 33 Screen 32, 36 Setup 32, 40 Sound 32, 35 Sharpness 33 Sleep 31 SLEEP button 28 Sleep Timer...

