
Operating Instructions
Page 6
...become dark. This is a structural property of the LCD panel and is made material. The image may be uneven or the LCD panel may be replaced. These phenomena improve as its light... stops, excessive force, and uneven surfaces may occur when still pictures are displayed continuously. LCD screen s Although the LCD screen is not a malfunction. Installation Installation s When installing or removing the...and flammable objects s Do not use plugged sets near a swimming pool, etc. s Do not push or scratch the LCD screen, or place objects on the LCD screen. s If the unit is in...
...become dark. This is a structural property of the LCD panel and is made material. The image may be uneven or the LCD panel may be replaced. These phenomena improve as its light... stops, excessive force, and uneven surfaces may occur when still pictures are displayed continuously. LCD screen s Although the LCD screen is not a malfunction. Installation Installation s When installing or removing the...and flammable objects s Do not use plugged sets near a swimming pool, etc. s Do not push or scratch the LCD screen, or place objects on the LCD screen. s If the unit is in...

Operating Instructions
Page 7
Corrosion Use of this unit near the seashore may subject the set will be subjected to these slots and openings must never be blocked or covered. Unless proper ventilation is blocked. Otherwise, adequate air-circulation may be ... (4 inches) 15 cm (6 inches) Never install the unit as pillars. To prevent the unit from toppling over or upside down and cause injury. If the set to seawater, it may cause the unit to the unit. s Be sure to reduce the humidity and temperature of the vehicle may fall down . s Never...
Corrosion Use of this unit near the seashore may subject the set will be subjected to these slots and openings must never be blocked or covered. Unless proper ventilation is blocked. Otherwise, adequate air-circulation may be ... (4 inches) 15 cm (6 inches) Never install the unit as pillars. To prevent the unit from toppling over or upside down and cause injury. If the set to seawater, it may cause the unit to the unit. s Be sure to reduce the humidity and temperature of the vehicle may fall down . s Never...

Operating Instructions
Page 9
... 11 Bundling the Connecting Cables 12 Unit Controls and Connectors 13 Front, Top and Side Panel 13 Rear Panel 15 Bottom Panel 16 Connecting the Unit Making Video and Audio Connections 17 Satellite Receiver 18 VCR and Cable...Settings 32 Using the Picture Settings 33 Selecting Picture Options 33 Selecting PC Picture Options 34 Using the Sound Settings 35 Selecting Sound Options 35 Using the Screen Settings 36 Selecting Screen Options 36 Selecting PC Screen Options 38 Using the Setup Settings 40 Selecting Setup Options 40 Other Information Troubleshooting 42 Contacting Sony...
... 11 Bundling the Connecting Cables 12 Unit Controls and Connectors 13 Front, Top and Side Panel 13 Rear Panel 15 Bottom Panel 16 Connecting the Unit Making Video and Audio Connections 17 Satellite Receiver 18 VCR and Cable...Settings 32 Using the Picture Settings 33 Selecting Picture Options 33 Selecting PC Picture Options 34 Using the Sound Settings 35 Selecting Sound Options 35 Using the Screen Settings 36 Selecting Screen Options 36 Selecting PC Screen Options 38 Using the Setup Settings 40 Selecting Setup Options 40 Other Information Troubleshooting 42 Contacting Sony...

Operating Instructions
Page 10
...Thank you for the complete list of the features that you to connect your PC and display the PC screen on film. This manual is for DVD (480p and 480i), and digital set -top box, DVD player, and A/V receiver. Some of supplied accessories. HDMI supports ...): Provides an uncompressed, all-digital audio/video interface between this Sony HDTV Ready LCD unit. Along with your new unit include: s Wide Screen Mode: Watch conventional 4:3 aspect ratio broadcasts in wide screen (16:9) mode. s Component Video Input: Offers the best video quality for models KLV-32U100M and KLV-40U100M.
...Thank you for the complete list of the features that you to connect your PC and display the PC screen on film. This manual is for DVD (480p and 480i), and digital set -top box, DVD player, and A/V receiver. Some of supplied accessories. HDMI supports ...): Provides an uncompressed, all-digital audio/video interface between this Sony HDTV Ready LCD unit. Along with your new unit include: s Wide Screen Mode: Watch conventional 4:3 aspect ratio broadcasts in wide screen (16:9) mode. s Component Video Input: Offers the best video quality for models KLV-32U100M and KLV-40U100M.

Operating Instructions
Page 13
.... 2 INPUT/ Press repeatedly to cycle through the external equipment connected to display MENU. Press to select the menu options in orange, indicates Sleep Timer ...4 vV - The VOLUME + button has a tactile dot. Unit Controls and Connectors Front, Top and Side Panel MENU INPUT Introducing the Unit VOLUME POWER Introducing the Unit PIC OFF/TIMER STANDBY POWER Item Description 1 MENU Press...adaptor (not supplied). 7 PIC OFF/TIMER When lit in green, indicates that the Picture Off feature is set. If your headphones. Use it as up/down buttons. 5 POWER Press to turn on and off the...
.... 2 INPUT/ Press repeatedly to cycle through the external equipment connected to display MENU. Press to select the menu options in orange, indicates Sleep Timer ...4 vV - The VOLUME + button has a tactile dot. Unit Controls and Connectors Front, Top and Side Panel MENU INPUT Introducing the Unit VOLUME POWER Introducing the Unit PIC OFF/TIMER STANDBY POWER Item Description 1 MENU Press...adaptor (not supplied). 7 PIC OFF/TIMER When lit in green, indicates that the Picture Off feature is set. If your headphones. Use it as up/down buttons. 5 POWER Press to turn on and off the...

Operating Instructions
Page 15
...VIDEO provides better picture quality than the S VIDEO (1, 3) or the composite video (2, 4) connections. 15 Connect to your DVD player's or digital set-top box's component video (YPBPR) and audio (L/R) jacks. Connect to the composite video and audio output jacks on your VCR or other video component... quality than the composite video (2). Connect to the composite video and audio output jacks on your VCR or other video component. Introducing the Unit Rear Panel VIDEO IN 1 Introducing the Unit S VIDEO VIDEO L (MONO) AUDIO R VIDEO IN 2 S VIDEO VIDEO L (MONO) AUDIO R HD/DVD IN 3 (...
...VIDEO provides better picture quality than the S VIDEO (1, 3) or the composite video (2, 4) connections. 15 Connect to your DVD player's or digital set-top box's component video (YPBPR) and audio (L/R) jacks. Connect to the composite video and audio output jacks on your VCR or other video component... quality than the composite video (2). Connect to the composite video and audio output jacks on your VCR or other video component. Introducing the Unit Rear Panel VIDEO IN 1 Introducing the Unit S VIDEO VIDEO L (MONO) AUDIO R VIDEO IN 2 S VIDEO VIDEO L (MONO) AUDIO R HD/DVD IN 3 (...
Operating Instructions
Page 16
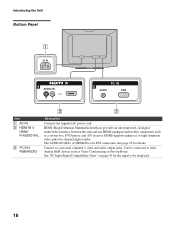
... 25 for the signal to be connected to a personal computer's video and audio output jacks. Connect to other Analog RGB devices such as a set-top box, DVD player, and A/V receiver. HDMI (High-Definition Multimedia Interface) provides an uncompressed, all-digital audio/video interface between this unit ... audio/video component, such as Video Conferencing or Set-top Boxes. See "PC Input Signal Compatibility Chart" on page 39 for details. Can be displayed. 16 The AUDIO IN (R/L) of HDMI IN is for DVI connection. Introducing the Unit Bottom Panel AC IN IN 4 AUDIO IN RL PC IN...
... 25 for the signal to be connected to a personal computer's video and audio output jacks. Connect to other Analog RGB devices such as a set-top box, DVD player, and A/V receiver. HDMI (High-Definition Multimedia Interface) provides an uncompressed, all-digital audio/video interface between this unit ... audio/video component, such as Video Conferencing or Set-top Boxes. See "PC Input Signal Compatibility Chart" on page 39 for details. Can be displayed. 16 The AUDIO IN (R/L) of HDMI IN is for DVI connection. Introducing the Unit Bottom Panel AC IN IN 4 AUDIO IN RL PC IN...

Operating Instructions
Page 18
... and S VIDEO input jacks (VIDEO 1 or 2). Press V1 or V2 on the top panel repeatedly to select the satellite receiver input (Video 1 or 2). Connecting the Unit Satellite Receiver... A/V cable AUDIO-L (white) AUDIO-R (red) Rear of the S VIDEO cable. See the instructions for setting up Label Video Inputs on Using This Connection To Do This ... z If you connect the Digital Satellite Receiver...yellow) instead of unit VIDEO IN 1 S VIDEO VIDEO L (MONO) AUDIO R Notes on page 40. 18 Satellite signals are selected by the SAT Box through the video inputs. If your satellite receiver is...
... and S VIDEO input jacks (VIDEO 1 or 2). Press V1 or V2 on the top panel repeatedly to select the satellite receiver input (Video 1 or 2). Connecting the Unit Satellite Receiver... A/V cable AUDIO-L (white) AUDIO-R (red) Rear of the S VIDEO cable. See the instructions for setting up Label Video Inputs on Using This Connection To Do This ... z If you connect the Digital Satellite Receiver...yellow) instead of unit VIDEO IN 1 S VIDEO VIDEO L (MONO) AUDIO R Notes on page 40. 18 Satellite signals are selected by the SAT Box through the video inputs. If your satellite receiver is...
Operating Instructions
Page 19
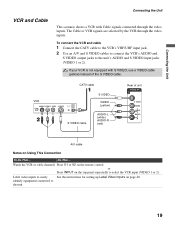
... S VIDEO VIDEO (yellow) AUDIO-L (white) AUDIO-R (red) Rear of the S VIDEO cable. or Press INPUT on the top panel repeatedly to easily See the instructions for setting up Label Video Inputs on page 40. Do This ... Label video inputs to select the VCR input (VIDEO 1 or 2). If your VCR is not equipped with...
... S VIDEO VIDEO (yellow) AUDIO-L (white) AUDIO-R (red) Rear of the S VIDEO cable. or Press INPUT on the top panel repeatedly to easily See the instructions for setting up Label Video Inputs on page 40. Do This ... Label video inputs to select the VCR input (VIDEO 1 or 2). If your VCR is not equipped with...

Operating Instructions
Page 21
Connecting the Unit Notes on the top panel repeatedly to the unit Do This ... or Press INPUT on Using This Connection To Do This ... Watch the HD equipment Label video inputs to easily identify equipment connected to select the HD equipment input (Video 3). Connecting the Unit 21 See the instructions for setting up Label Video Inputs on the remote control. Press V3 on page 40.
Connecting the Unit Notes on the top panel repeatedly to the unit Do This ... or Press INPUT on Using This Connection To Do This ... Watch the HD equipment Label video inputs to easily identify equipment connected to select the HD equipment input (Video 3). Connecting the Unit 21 See the instructions for setting up Label Video Inputs on the remote control. Press V3 on page 40.
Operating Instructions
Page 23
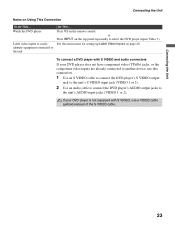
... equipment connected to the unit's AUDIO input jacks (VIDEO 1 or 2). See the instructions for setting up Label Video Inputs on the remote control. Press V3 on page 40. Connecting the Unit Connecting the Unit Notes on the top panel repeatedly to select the DVD player input (Video 3). To connect a DVD player with S VIDEO...
... equipment connected to the unit's AUDIO input jacks (VIDEO 1 or 2). See the instructions for setting up Label Video Inputs on the remote control. Press V3 on page 40. Connecting the Unit Connecting the Unit Notes on the top panel repeatedly to select the DVD player input (Video 3). To connect a DVD player with S VIDEO...

Operating Instructions
Page 24
...equipped device input (Video 4). HDMI-Equipped Device Rear of unit IN 4 AUDIO IN RL HDMI cable Notes on page 40. 24 or Press INPUT on the top panel repeatedly to the unit's HDMI IN connector on the remote control. Use the PC IN (RGB) connector instead when ...connecting a PC. Do not connect a PC to the unit Do This ... Watch the device Label video inputs to easily identify equipment connected to the unit's HDMI input. See the instructions for setting...
...equipped device input (Video 4). HDMI-Equipped Device Rear of unit IN 4 AUDIO IN RL HDMI cable Notes on page 40. 24 or Press INPUT on the top panel repeatedly to the unit's HDMI IN connector on the remote control. Use the PC IN (RGB) connector instead when ...connecting a PC. Do not connect a PC to the unit Do This ... Watch the device Label video inputs to easily identify equipment connected to the unit's HDMI input. See the instructions for setting...

Operating Instructions
Page 25
Do not connect a PC to HDMI adapter or cable is used. Press V4 on the rear panel. DVI-HDTV-Equipped Device The DVI-HDTV VIDEO connector does not provide audio, so audio cables must be connected to provide sound when a DVI to ... to HDMI adapter or cable. 1 Use a DVI to HDMI adapter or cable to the unit Do This ... See the instructions for setting up Label Video Inputs on Using This Connection To Do This ... or Press INPUT on the rear panel. HDTV output connector to the unit's HDMI IN connector on the top...
Do not connect a PC to HDMI adapter or cable is used. Press V4 on the rear panel. DVI-HDTV-Equipped Device The DVI-HDTV VIDEO connector does not provide audio, so audio cables must be connected to provide sound when a DVI to ... to HDMI adapter or cable. 1 Use a DVI to HDMI adapter or cable to the unit Do This ... See the instructions for setting up Label Video Inputs on Using This Connection To Do This ... or Press INPUT on the rear panel. HDTV output connector to the unit's HDMI IN connector on the top...

Operating Instructions
Page 26
...unit. To connect a PC (personal computer) If you press the power button in the PC Screen settings on page 40. 26 Rear of Label Video Inputs in red. Watch the PC Label video inputs to easily identify equipment... connected to the unit Do This ... Press V5 on the top panel repeatedly to select the PC input (Video 5). See the instructions for setting... (not supplied). The power turns off when you connect your personal computer's display on Using This Connection To Do This ...
...unit. To connect a PC (personal computer) If you press the power button in the PC Screen settings on page 40. 26 Rear of Label Video Inputs in red. Watch the PC Label video inputs to easily identify equipment... connected to the unit Do This ... Press V5 on the top panel repeatedly to select the PC input (Video 5). See the instructions for setting... (not supplied). The power turns off when you connect your personal computer's display on Using This Connection To Do This ...

Operating Instructions
Page 27
or Press INPUT on page 40. 27 See the instructions for setting up Label Video Inputs on the top panel repeatedly to select the camcorder or game input (Video 1 or 2). If you have a mono camcorder, connect its audio output jack to the unit Do This ... ... Video Game Equipment You can connect a camcorder or video game equipment to your camcorder is not equipped with S VIDEO, use a VIDEO cable (yellow) instead of panel. To connect a camcorder or video game equipment Use an A/V and S VIDEO cables to connect the camcorder or video game equipment AUDIO and S VIDEO output jacks...
or Press INPUT on page 40. 27 See the instructions for setting up Label Video Inputs on the top panel repeatedly to select the camcorder or game input (Video 1 or 2). If you have a mono camcorder, connect its audio output jack to the unit Do This ... ... Video Game Equipment You can connect a camcorder or video game equipment to your camcorder is not equipped with S VIDEO, use a VIDEO cable (yellow) instead of panel. To connect a camcorder or video game equipment Use an A/V and S VIDEO cables to connect the camcorder or video game equipment AUDIO and S VIDEO output jacks...

Operating Instructions
Page 28
... restore the picture. Press once to unit functions. If Sleep Timer is selected. See page 40 on page 41. Press to navigate to display the current Video Input number and Wide Mode settings. The sound modes can be displayed by matching the e and E on page 33. Press to freeze the picture. Press to adjust...
... restore the picture. Press once to unit functions. If Sleep Timer is selected. See page 40 on page 41. Press to navigate to display the current Video Input number and Wide Mode settings. The sound modes can be displayed by matching the e and E on page 33. Press to freeze the picture. Press to adjust...

Operating Instructions
Page 29
Changing the wide screen mode 4:3 Original source Standard definition source 16:9 Original source High definition source m Wide Zoom m Wide Zoom Using the Unit Normal Normal Full Full Zoom Zoom 29 MODE WIDE Wide Mode : Wide Zoom Wide Mode : Normal Wide Mode : Full Wide Mode : Zoom z You can change the wide screen mode settings. Using the Unit Special Buttons on the Remote Control Using the Wide Screen Mode You can also access the Wide Mode settings in the Screen settings. For details, see page 36.
Changing the wide screen mode 4:3 Original source Standard definition source 16:9 Original source High definition source m Wide Zoom m Wide Zoom Using the Unit Normal Normal Full Full Zoom Zoom 29 MODE WIDE Wide Mode : Wide Zoom Wide Mode : Normal Wide Mode : Full Wide Mode : Zoom z You can change the wide screen mode settings. Using the Unit Special Buttons on the Remote Control Using the Wide Screen Mode You can also access the Wide Mode settings in the Screen settings. For details, see page 36.
Operating Instructions
Page 30
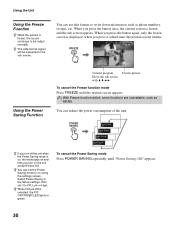
...screen is displayed; When you turn off the unit when the Power Saving mode is selected, the PIC OFF/TIMER LED lights in green. Select Power Saving in the Setup settings, then set the Power...the Power Saving mode Press POWER SAVING repeatedly until the normal screen appears. You can set it a third time, the normal screen returns. You can use this feature to Off, Low or... High. when you turn on using the settings screen. FREEZE Freeze Using the Power Saving Function Current program Move the sub screen with V v B ...
...screen is displayed; When you turn off the unit when the Power Saving mode is selected, the PIC OFF/TIMER LED lights in green. Select Power Saving in the Setup settings, then set the Power...the Power Saving mode Press POWER SAVING repeatedly until the normal screen appears. You can set it a third time, the normal screen returns. You can use this feature to Off, Low or... High. when you turn on using the settings screen. FREEZE Freeze Using the Power Saving Function Current program Move the sub screen with V v B ...

Operating Instructions
Page 31
Using the Unit Using the Sleep Function You can set it on the unit again. z "Sleep Timer: Power will be turned off" appears one minute ... min Sleep Timer : 120 min While Sleep Timer is activated, the PIC OFF/TIMER LED on using the Setup settings. z You can set the unit to turn off . Using the Unit 31 This message may not appear if you turn the unit off...then turn it to on the unit lights up in orange. Select Sleep Timer in the settings. z If you are performing other operations in the Setup settings, then set Sleep Timer to 15 min, 30 min, 45 min, 60 min, 90 min, 120...
Using the Unit Using the Sleep Function You can set it on the unit again. z "Sleep Timer: Power will be turned off" appears one minute ... min Sleep Timer : 120 min While Sleep Timer is activated, the PIC OFF/TIMER LED on using the Setup settings. z You can set the unit to turn off . Using the Unit 31 This message may not appear if you turn the unit off...then turn it to on the unit lights up in orange. Select Sleep Timer in the settings. z If you are performing other operations in the Setup settings, then set Sleep Timer to 15 min, 30 min, 45 min, 60 min, 90 min, 120...
Operating Instructions
Page 32
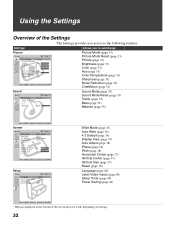
Using the Settings Overview of the Settings The Settings provides you access to the following features: Settings Allows you to set/change Picture Picture Picture Mode: Custom Picture Mode Reset Picture: Max Brightness: 40 Color: 60 Hue: 0 Color Temperature: Cool Sharpness: 18 Noise Reduction: On CineMotion: Auto ... Center (page 37) Vertical Size (page 37) Reset (page 38) Language (page 40) Label Video Inputs (page 40) Sleep Timer (page 40) Power Saving (page 41) Select : Enter: Back: Exit: MENU * Buttons displayed at the bottom of the screen may not work, depending on...
Using the Settings Overview of the Settings The Settings provides you access to the following features: Settings Allows you to set/change Picture Picture Picture Mode: Custom Picture Mode Reset Picture: Max Brightness: 40 Color: 60 Hue: 0 Color Temperature: Cool Sharpness: 18 Noise Reduction: On CineMotion: Auto ... Center (page 37) Vertical Size (page 37) Reset (page 38) Language (page 40) Label Video Inputs (page 40) Sleep Timer (page 40) Power Saving (page 41) Select : Enter: Back: Exit: MENU * Buttons displayed at the bottom of the screen may not work, depending on...


