
Operating Instructions
Page 3
... receiver is desirable to prevent blade exposure. s To obtain the best picture, do not expose the screen to cover the windows that may be placed on the unit. KLV-32U100M KLV-40U100M SONY WALL-MOUNT BRACKET MODEL NO. CAUTION To prevent electric shock, do not... for installing the specified product. Use with part 15 of Conformity Trade Name: SONY Model: KLV-32U100M/KLV-40U100M Responsible Party: Sony Electronics Inc. SONY APPLIANCE MODEL NO. SU-WL31 (KLV-32U100M) SU-WL51 (KLV-40U100M) To Customers Sufficient expertise is transported directly from that interference will not be of...
... receiver is desirable to prevent blade exposure. s To obtain the best picture, do not expose the screen to cover the windows that may be placed on the unit. KLV-32U100M KLV-40U100M SONY WALL-MOUNT BRACKET MODEL NO. CAUTION To prevent electric shock, do not... for installing the specified product. Use with part 15 of Conformity Trade Name: SONY Model: KLV-32U100M/KLV-40U100M Responsible Party: Sony Electronics Inc. SONY APPLIANCE MODEL NO. SU-WL31 (KLV-32U100M) SU-WL51 (KLV-40U100M) To Customers Sufficient expertise is transported directly from that interference will not be of...

Operating Instructions
Page 5
...blade wider than the other), or with dust and it may result in fire. Wiring For your dealer or service technician. s If the picture becomes dark after using the unit for unit's to make occasional snapping or popping sounds, particularly when being used. Consult qualified service personnel. Do...laws or regulations. If the AC power cord is left unattended and unused for grounding). Disposal of used batteries according to your dealer or Sony service center to exchange it from the screen, wipe it gently with a wet hand, it may be observed in fire or electric shock....
...blade wider than the other), or with dust and it may result in fire. Wiring For your dealer or service technician. s If the picture becomes dark after using the unit for unit's to make occasional snapping or popping sounds, particularly when being used. Consult qualified service personnel. Do...laws or regulations. If the AC power cord is left unattended and unused for grounding). Disposal of used batteries according to your dealer or Sony service center to exchange it from the screen, wipe it gently with a wet hand, it may be observed in fire or electric shock....

Operating Instructions
Page 6
... liquid (which is a safety hazard. Wall mount installation requires the use of broken glass and liquid crystal leakage If the LCD panel gets damaged, crystalline liquid leakage may occur, or scattered broken glass may result. The unit may damage the screen surface. Therefore... crystalline liquid get wet. Moisture and flammable objects s Do not use qualified contractors. The screen glass may occur when still pictures are displayed continuously. Disposal of the unit. Installation Installation s When installing or removing the unit on the cables. Cable wiring Take care...
... liquid (which is a safety hazard. Wall mount installation requires the use of broken glass and liquid crystal leakage If the LCD panel gets damaged, crystalline liquid leakage may occur, or scattered broken glass may result. The unit may damage the screen surface. Therefore... crystalline liquid get wet. Moisture and flammable objects s Do not use qualified contractors. The screen glass may occur when still pictures are displayed continuously. Disposal of the unit. Installation Installation s When installing or removing the unit on the cables. Cable wiring Take care...

Operating Instructions
Page 9
... the Unit from Toppling Over......... 11 Bundling the Connecting Cables 12 Unit Controls and Connectors 13 Front, Top and Side Panel 13 Rear Panel 15 Bottom Panel 16 Connecting the Unit Making Video and Audio Connections 17 Satellite Receiver 18 VCR and Cable 19 HD Equipment 20 DVD... Power Saving Function 30 Using the Sleep Function 31 Using the Settings Overview of the Settings 32 Using the Picture Settings 33 Selecting Picture Options 33 Selecting PC Picture Options 34 Using the Sound Settings 35 Selecting Sound Options 35 Using the Screen Settings 36 Selecting Screen Options...
... the Unit from Toppling Over......... 11 Bundling the Connecting Cables 12 Unit Controls and Connectors 13 Front, Top and Side Panel 13 Rear Panel 15 Bottom Panel 16 Connecting the Unit Making Video and Audio Connections 17 Satellite Receiver 18 VCR and Cable 19 HD Equipment 20 DVD... Power Saving Function 30 Using the Sleep Function 31 Using the Settings Overview of the Settings 32 Using the Picture Settings 33 Selecting Picture Options 33 Selecting PC Picture Options 34 Using the Sound Settings 35 Selecting Sound Options 35 Using the Screen Settings 36 Selecting Screen Options...

Operating Instructions
Page 10
...this Sony HDTV Ready LCD unit. This manual is for the complete list of the features that you to connect your unit. 10 See page 44 for models KLV-32U100M and KLV-40U100M. s CineMotion®: Using the reverse 3-2 pull down technology, the CineMotion feature provides smoother picture movement... when playing back movies or other video sources on your PC and display the PC screen on film.
...this Sony HDTV Ready LCD unit. This manual is for the complete list of the features that you to connect your unit. 10 See page 44 for models KLV-32U100M and KLV-40U100M. s CineMotion®: Using the reverse 3-2 pull down technology, the CineMotion feature provides smoother picture movement... when playing back movies or other video sources on your PC and display the PC screen on film.

Operating Instructions
Page 13
... up/down buttons. 5 POWER Press to turn on and off the unit. 6 Headphones jack Connects to display MENU. The VOLUME + button has a tactile dot. In the MENU screen, these buttons serve as ... when operating the unit. (Continued) 13 Unit Controls and Connectors Front, Top and Side Panel MENU INPUT Introducing the Unit VOLUME POWER Introducing the Unit PIC OFF/TIMER STANDBY POWER Item ...suitable plug adaptor (not supplied). 7 PIC OFF/TIMER When lit in green, indicates that the Picture Off feature is set. Press again to exit MENU. 2 INPUT/ Press repeatedly to cycle through...
... up/down buttons. 5 POWER Press to turn on and off the unit. 6 Headphones jack Connects to display MENU. The VOLUME + button has a tactile dot. In the MENU screen, these buttons serve as ... when operating the unit. (Continued) 13 Unit Controls and Connectors Front, Top and Side Panel MENU INPUT Introducing the Unit VOLUME POWER Introducing the Unit PIC OFF/TIMER STANDBY POWER Item ...suitable plug adaptor (not supplied). 7 PIC OFF/TIMER When lit in green, indicates that the Picture Off feature is set. Press again to exit MENU. 2 INPUT/ Press repeatedly to cycle through...

Operating Instructions
Page 15
... audio output jacks on your VCR or other video equipment that has S VIDEO. Connect to your VCR or other video component. Introducing the Unit Rear Panel VIDEO IN 1 Introducing the Unit S VIDEO VIDEO L (MONO) AUDIO R VIDEO IN 2 S VIDEO VIDEO L (MONO) AUDIO R HD/DVD IN 3 (...jack of your VCR or other video equipment that has S VIDEO. S VIDEO provides better picture quality than the S VIDEO (1, 3) or the composite video (2, 4) connections. 15 Component video provides better picture quality than the composite video (2). Connect to the S VIDEO output jack of your DVD ...
... audio output jacks on your VCR or other video equipment that has S VIDEO. Connect to your VCR or other video component. Introducing the Unit Rear Panel VIDEO IN 1 Introducing the Unit S VIDEO VIDEO L (MONO) AUDIO R VIDEO IN 2 S VIDEO VIDEO L (MONO) AUDIO R HD/DVD IN 3 (...jack of your VCR or other video equipment that has S VIDEO. S VIDEO provides better picture quality than the S VIDEO (1, 3) or the composite video (2, 4) connections. 15 Component video provides better picture quality than the composite video (2). Connect to the S VIDEO output jack of your DVD ...

Operating Instructions
Page 17
...). To view the VIDEO input, disconnect the S VIDEO cable. 17 Connecting the Unit Connecting the Unit To display clear crisp pictures, first you must connect your unit correctly and also need to choose the correct display format (see "Changing the wide screen mode" on your unit, use the inputs that provide the best...
...). To view the VIDEO input, disconnect the S VIDEO cable. 17 Connecting the Unit Connecting the Unit To display clear crisp pictures, first you must connect your unit correctly and also need to choose the correct display format (see "Changing the wide screen mode" on your unit, use the inputs that provide the best...

Operating Instructions
Page 20
Note that this unit displays all power sources before making any connections. 1 Using a component video cable, connect your equipment's YPBPR output jacks to the unit's YPBPR input jacks. Component video ... Component Video Audio cable Y PB PR AUDIO-L (white) AUDIO-R (red) Rear of unit HD/DVD IN 3 (1080i/720p/480p/480i) Y PB PR L AUDIO R Some of picture in a resolution 1,366 dots × 768 lines. 2 Using an audio cable, connect your equipment has an HDMI or DVI connector, see page 24. Disconnect all...
Note that this unit displays all power sources before making any connections. 1 Using a component video cable, connect your equipment's YPBPR output jacks to the unit's YPBPR input jacks. Component video ... Component Video Audio cable Y PB PR AUDIO-L (white) AUDIO-R (red) Rear of unit HD/DVD IN 3 (1080i/720p/480p/480i) Y PB PR L AUDIO R Some of picture in a resolution 1,366 dots × 768 lines. 2 Using an audio cable, connect your equipment has an HDMI or DVI connector, see page 24. Disconnect all...

Operating Instructions
Page 26
... on page 39. When your PC is recommended to the PC's video and audio output on the top panel repeatedly to the unit Do This ... or Press INPUT on the unit. Watch the PC Label video inputs...adjust the Phase and Pitch in red. To connect a PC (personal computer) If you connect your personal computer's display on page 40. 26 Rear of unit PC IN 5 AUDIO RGB To PC IN (AUDIO) jack Audio cable (optional: stereo mini... view and listen to select Skip in standby mode. z If the picture is connected. See the instructions for setting up Label Video Inputs on the unit.
... on page 39. When your PC is recommended to the PC's video and audio output on the top panel repeatedly to the unit Do This ... or Press INPUT on the unit. Watch the PC Label video inputs...adjust the Phase and Pitch in red. To connect a PC (personal computer) If you connect your personal computer's display on page 40. 26 Rear of unit PC IN 5 AUDIO RGB To PC IN (AUDIO) jack Audio cable (optional: stereo mini... view and listen to select Skip in standby mode. z If the picture is connected. See the instructions for setting up Label Video Inputs on the unit.

Operating Instructions
Page 28
...sure to insert the E first." Press to select the external equipment connected to display the current Video Input number and Wide Mode settings. Press to restore the picture. Press V/v/B/b to immediately cancel the display. Press repeatedly to adjust the volume. Some functions will be canceled after a ...use this feature to unit functions. See page 40 on and off . See Power Saving on page 41. The current program appears in the Picture settings. Using the Unit Button Descriptions MUTING DISPLAY POWER MODE SOUND PICTURE WIDE Button 1 MUTING 2 DISPLAY INPUT V1 V2 V3 V4 V5 3 SOUND ...
...sure to insert the E first." Press to select the external equipment connected to display the current Video Input number and Wide Mode settings. Press to restore the picture. Press V/v/B/b to immediately cancel the display. Press repeatedly to adjust the volume. Some functions will be canceled after a ...use this feature to unit functions. See page 40 on and off . See Power Saving on page 41. The current program appears in the Picture settings. Using the Unit Button Descriptions MUTING DISPLAY POWER MODE SOUND PICTURE WIDE Button 1 MUTING 2 DISPLAY INPUT V1 V2 V3 V4 V5 3 SOUND ...
Operating Instructions
Page 30
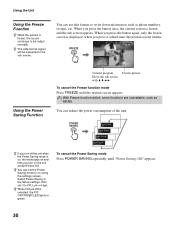
... in the sub screen. When you press it to Off, Low or High. Frozen picture To cancel the Freeze function mode Press FREEZE until "Power Saving: Off" appears. 30 z When Picture Off is displayed; You can use this feature to write down information such as MENU. You can reduce... the power consumption of the unit. POWER SAVING Power Saving : Off Power Saving : Low Power Saving : High Power Saving : Picture Off z If you turn off the...
... in the sub screen. When you press it to Off, Low or High. Frozen picture To cancel the Freeze function mode Press FREEZE until "Power Saving: Off" appears. 30 z When Picture Off is displayed; You can use this feature to write down information such as MENU. You can reduce... the power consumption of the unit. POWER SAVING Power Saving : Off Power Saving : Low Power Saving : High Power Saving : Picture Off z If you turn off the...
Operating Instructions
Page 32
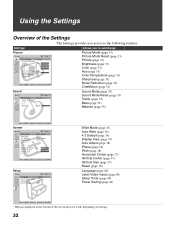
... to set/change Picture Picture Picture Mode: Custom Picture Mode Reset Picture: Max Brightness: 40 Color: 60 Hue: 0 Color Temperature: Cool Sharpness: 18 Noise Reduction: On CineMotion: Auto Video 1 Select : Enter: Back: Exit: MENU Picture Mode (page 33) Picture Mode Reset (page 33) Picture (page 33) ...page 35) Bass (page 35) Balance (page 35) Select : Enter: Back: Exit: MENU Screen Screen Wide Mode: Auto Wide: 4:3 Default: Display Area: Auto Adjust: Phase: Pitch: Horizontal Center: Vertical Center: Vertical Size: Reset: Video 1 Wide Zoom On Wide Zoom Normal 0 0 0 ...
... to set/change Picture Picture Picture Mode: Custom Picture Mode Reset Picture: Max Brightness: 40 Color: 60 Hue: 0 Color Temperature: Cool Sharpness: 18 Noise Reduction: On CineMotion: Auto Video 1 Select : Enter: Back: Exit: MENU Picture Mode (page 33) Picture Mode Reset (page 33) Picture (page 33) ...page 35) Bass (page 35) Balance (page 35) Select : Enter: Back: Exit: MENU Screen Screen Wide Mode: Auto Wide: 4:3 Default: Display Area: Auto Adjust: Phase: Pitch: Horizontal Center: Vertical Center: Vertical Size: Reset: Video 1 Wide Zoom On Wide Zoom Normal 0 0 0 ...
Operating Instructions
Page 33
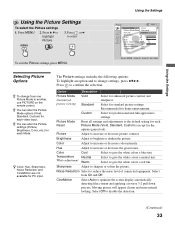
...appearance settings. Custom Select for home entertainment. Select to confirm the selection. Using the Settings Picture Video 1 Picture Mode: Vivid Picture Mode Reset Standard Picture: CMuasxtom Brightness: 40 Color: 60 Hue: 0 Color Temperature: Cool Sharpness: 18 Noise Reduction: On CineMotion: ... or decrease picture contrast. Moving picture will appear clearer and more natural looking. Picture Mode Reset Reset all settings and adjustments to the default setting for each video input. Picture Adjust to optimize the screen display automatically detecting ...
...appearance settings. Custom Select for home entertainment. Select to confirm the selection. Using the Settings Picture Video 1 Picture Mode: Vivid Picture Mode Reset Standard Picture: CMuasxtom Brightness: 40 Color: 60 Hue: 0 Color Temperature: Cool Sharpness: 18 Noise Reduction: On CineMotion: ... or decrease picture contrast. Moving picture will appear clearer and more natural looking. Picture Mode Reset Reset all settings and adjustments to the default setting for each video input. Picture Adjust to optimize the screen display automatically detecting ...
Operating Instructions
Page 34
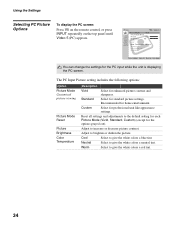
...picture contrast and sharpness. Neutral Select to give the white colors a blue tint. The PC Input Picture setting includes the following options: Option Picture Mode Customized picture viewing Picture Mode Reset Picture Brightness Color Temperature Description Vivid Select for home entertainment. Custom Select for the PC input while the unit is displaying the PC screen. Picture Picture Mode: Vivid Picture... Mode Reset Picture: Max Brightness: 40 Color: Hue: Color ...
...picture contrast and sharpness. Neutral Select to give the white colors a blue tint. The PC Input Picture setting includes the following options: Option Picture Mode Customized picture viewing Picture Mode Reset Picture Brightness Color Temperature Description Vivid Select for home entertainment. Custom Select for the PC input while the unit is displaying the PC screen. Picture Picture Mode: Vivid Picture... Mode Reset Picture: Max Brightness: 40 Color: Hue: Color ...

Operating Instructions
Page 36
...V v to select MENU To exit the Screen settings, press MENU. Select to display movies and other content on the remote control. Select to enlarge the 4:3 picture horizontally and vertically to enlarge the original picture without distorting the aspect ratio. z If 4:3 Default option is 16:9 (High ...definition source), select this mode to display 16:9 picture in the Wide Mode option to display 4:3 picture in original size when the original source is automatically replaced with minimum distortion. Select to an equal aspect ...
...V v to select MENU To exit the Screen settings, press MENU. Select to display movies and other content on the remote control. Select to enlarge the 4:3 picture horizontally and vertically to enlarge the original picture without distorting the aspect ratio. z If 4:3 Default option is 16:9 (High ...definition source), select this mode to display 16:9 picture in the Wide Mode option to display 4:3 picture in original size when the original source is automatically replaced with minimum distortion. Select to an equal aspect ...

Operating Instructions
Page 37
...bottom of the screen. Using the Settings Option Display Area Horizontal Center Vertical Center Vertical Size Description Normal Displays a standard size picture. -1/-2 Allows you to choose correction. Allows you to move the position of the picture left and right in Wide Zoom and Zoom ... PC Input. z Auto Wide, 4:3 Default, Display Area and Vertical Size are not available for horizontal adjustment of the picture being displayed. (Available only in Wide Zoom and Zoom modes.) Allows you to adjust the viewable picture area size. Press V/v and press to game equipment...
...bottom of the screen. Using the Settings Option Display Area Horizontal Center Vertical Center Vertical Size Description Normal Displays a standard size picture. -1/-2 Allows you to choose correction. Allows you to move the position of the picture left and right in Wide Zoom and Zoom ... PC Input. z Auto Wide, 4:3 Default, Display Area and Vertical Size are not available for horizontal adjustment of the picture being displayed. (Available only in Wide Zoom and Zoom modes.) Allows you to adjust the viewable picture area size. Press V/v and press to game equipment...

Operating Instructions
Page 38
...Screen setting includes the following options: Option Wide Mode Auto Adjust Phase Pitch Horizontal Center Vertical Center Reset Description Normal Select to display the picture in its original horizontal-to-vertical aspect ratio. Note that Auto Adjust may not work well with certain input signals. Clear... frame will appear on the top panel until Video 5 (PC) appears. Select to adjust the phase when the screen flickers. In such cases, manually adjust the options below. Select to automatically adjust the display position and phase of the picture when the unit receives an input ...
...Screen setting includes the following options: Option Wide Mode Auto Adjust Phase Pitch Horizontal Center Vertical Center Reset Description Normal Select to display the picture in its original horizontal-to-vertical aspect ratio. Note that Auto Adjust may not work well with certain input signals. Clear... frame will appear on the top panel until Video 5 (PC) appears. Select to adjust the phase when the screen flickers. In such cases, manually adjust the options below. Select to automatically adjust the display position and phase of the picture when the unit receives an input ...
Operating Instructions
Page 41
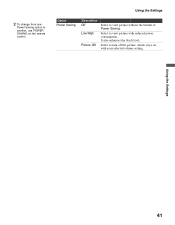
It also enhances the black level. Using the Settings 41 Select to turn off the picture. Select to view picture with your selected volume setting. Using the Settings Option Power Saving Description Off Low/High Picture Off Select to another, use POWER SAVING on with reduced power consumption. z To change from one Power Saving option to view picture without the benefit of Power Saving. Audio stays on the remote control.
It also enhances the black level. Using the Settings 41 Select to turn off the picture. Select to view picture with your selected volume setting. Using the Settings Option Power Saving Description Off Low/High Picture Off Select to another, use POWER SAVING on with reduced power consumption. z To change from one Power Saving option to view picture without the benefit of Power Saving. Audio stays on the remote control.

Operating Instructions
Page 42
...10065; Check the connection between your VCR and the unit to V5 on the remote control (page 28) or press INPUT repeatedly on the top panel (page 13). Remote control does not operate. ❑ Check the polarity of the batteries or replace the batteries. ❑ Point the remote control.... ❑ Do not use 300-ohm twin lead cables as interference may occur. Poor picture. picture is too bright/Color is not ❑ Adjust the Picture Mode options in the Screen settings is activated (pages 31, 40). Audio noise. ❑ Keep the set -top box/VCR antenna cable away from obstacles...
...10065; Check the connection between your VCR and the unit to V5 on the remote control (page 28) or press INPUT repeatedly on the top panel (page 13). Remote control does not operate. ❑ Check the polarity of the batteries or replace the batteries. ❑ Point the remote control.... ❑ Do not use 300-ohm twin lead cables as interference may occur. Poor picture. picture is too bright/Color is not ❑ Adjust the Picture Mode options in the Screen settings is activated (pages 31, 40). Audio noise. ❑ Keep the set -top box/VCR antenna cable away from obstacles...


