Operating Instructions
Page 2
... a circuit different from the broadcaster/cable company and/or program owner. CAUTION To prevent electric shock, do not expose the LCD Projection TV to persons. NOTIFICATION This equipment has been tested and found to comply with radio communications. If this television receiver for other outlet ... receiver provides display of the FCC Rules. This document is connected. ❑ Consult the dealer or an experienced radio/TV technician for the remote control RM-Y912. REFER SERVICING TO QUALIFIED SERVICE PERSONNEL. CAUTION RISK OF ELECTRIC SHOCK DO NOT OPEN ATTENTION RISQUE DE ...
... a circuit different from the broadcaster/cable company and/or program owner. CAUTION To prevent electric shock, do not expose the LCD Projection TV to persons. NOTIFICATION This equipment has been tested and found to comply with radio communications. If this television receiver for other outlet ... receiver provides display of the FCC Rules. This document is connected. ❑ Consult the dealer or an experienced radio/TV technician for the remote control RM-Y912. REFER SERVICING TO QUALIFIED SERVICE PERSONNEL. CAUTION RISK OF ELECTRIC SHOCK DO NOT OPEN ATTENTION RISQUE DE ...
Operating Instructions
Page 8
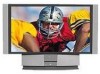
...Sony LCD Projection TV Presenting the Sony LCD Projection TV 9 Using This Manual 10 Enjoying Your LCD Projection TV 11 Replacing the Lamp 13 Installing and Connecting the LCD Projection TV Contents 17 Inserting Batteries into the Remote Control ..........17 Carrying Your LCD Projection TV 18 To Prevent the LCD Projection TV from Falling Down 19 When Installing Your LCD Projection TV... 42 Using the CONTROL S Feature 43 Setting Up the LCD projection TV Automatically 44 Watching Digital TV 49 Using Favorite Channels 50 Using Twin View 51 Using the Freeze Function 54 Using Scrolling ...
...Sony LCD Projection TV Presenting the Sony LCD Projection TV 9 Using This Manual 10 Enjoying Your LCD Projection TV 11 Replacing the Lamp 13 Installing and Connecting the LCD Projection TV Contents 17 Inserting Batteries into the Remote Control ..........17 Carrying Your LCD Projection TV 18 To Prevent the LCD Projection TV from Falling Down 19 When Installing Your LCD Projection TV... 42 Using the CONTROL S Feature 43 Setting Up the LCD projection TV Automatically 44 Watching Digital TV 49 Using Favorite Channels 50 Using Twin View 51 Using the Freeze Function 54 Using Scrolling ...
Operating Instructions
Page 10
...to select the wide screen mode automatically. It also shows you how to use your remote control functions. 3 Using the menus This section teaches you how to begin using your new LCD projection TV. Similar controls are written for connected equipment. ❑ Favorite Channel Preview: Preview ... to watch 4:3 normal broadcasts in wide screen mode (16:9 aspect ratio). ❑ Auto Wide: Allows you through your initial setup. Introducing the Sony LCD Projection TV ❑ Component Video Inputs: Offers the best video quality for DVD (480p, 480i) and Digital Set-top box (1080i, 720p, 480p, 480i...
...to select the wide screen mode automatically. It also shows you how to use your remote control functions. 3 Using the menus This section teaches you how to begin using your new LCD projection TV. Similar controls are written for connected equipment. ❑ Favorite Channel Preview: Preview ... to watch 4:3 normal broadcasts in wide screen mode (16:9 aspect ratio). ❑ Auto Wide: Allows you through your initial setup. Introducing the Sony LCD Projection TV ❑ Component Video Inputs: Offers the best video quality for DVD (480p, 480i) and Digital Set-top box (1080i, 720p, 480p, 480i...
Operating Instructions
Page 12
...when unplugging from the outlet or switching the breaker off the power switch on the main unit or on the remote control. On moisture condensation ❑ If your LCD projection TV is transported directly from a cold to sleep or going to a warm location, is easily scratched. If this...Cloth" below). Otherwise, this happens, leave the power on and let the moisture evaporate before using your LCD projection TV before going out. Introducing the Sony LCD Projection TV Notes on the LCD Projection TV To enjoy clear pictures ❑ Be sure not to allow sunlight or light from a lamp to blow ...
...when unplugging from the outlet or switching the breaker off the power switch on the main unit or on the remote control. On moisture condensation ❑ If your LCD projection TV is transported directly from a cold to sleep or going to a warm location, is easily scratched. If this...Cloth" below). Otherwise, this happens, leave the power on and let the moisture evaporate before using your LCD projection TV before going out. Introducing the Sony LCD Projection TV Notes on the LCD Projection TV To enjoy clear pictures ❑ Be sure not to allow sunlight or light from a lamp to blow ...
Operating Instructions
Page 17
...is high. ✍ Your remote control can be used for your new LCD projection TV, a remote control and two AAA batteries. No peripheral cables are included. Installing and Connecting the LCD Projection TV Installing and Connecting the LCD Projection TV Contents The box contains your desired... setup before you intend to add additional equipment to operate most video equipment. (See "Programming the Remote Control" on the batteries to ...
...is high. ✍ Your remote control can be used for your new LCD projection TV, a remote control and two AAA batteries. No peripheral cables are included. Installing and Connecting the LCD Projection TV Installing and Connecting the LCD Projection TV Contents The box contains your desired... setup before you intend to add additional equipment to operate most video equipment. (See "Programming the Remote Control" on the batteries to ...

Operating Instructions
Page 21
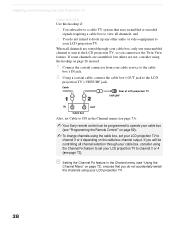
Installing and Connecting the LCD Projection TV How to the on-screen menus without the use of a remote control. Pressing MENU brings up the on -screen cursor in the menus and by pressing the button selects the menu item. Installing and Connecting the LCD Projection TV LCD Projection TV Controls and Connectors Front Panel Menu Controls The front panel menu controls allow access to open and close the front panel To open To close OPEN (Continued) 21 The arrow buttons move the on -screen menus.
Installing and Connecting the LCD Projection TV How to the on-screen menus without the use of a remote control. Pressing MENU brings up the on -screen cursor in the menus and by pressing the button selects the menu item. Installing and Connecting the LCD Projection TV LCD Projection TV Controls and Connectors Front Panel Menu Controls The front panel menu controls allow access to open and close the front panel To open To close OPEN (Continued) 21 The arrow buttons move the on -screen menus.
Operating Instructions
Page 23
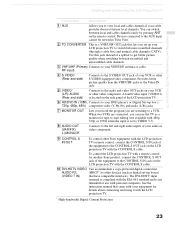
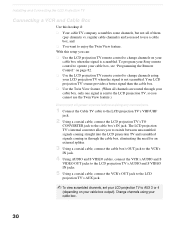
...LCD projection TV with the LCD projection TV. * High-bandwidth Digital Content Protection 23 Provides better picture quality than the VHF/UHF jacks or the Video IN jack. 5 VIDEO/ (L/R) AUDIO (Rear and side) Connects to a VCR. To control the LCD projection TV with a remote control for use the TV ...Connects to the left and right audio inputs of your audio or video component. 9 CONTROL S IN/OUT To control other Sony equipment with the LCD projection TV's remote control, connect the CONTROL S IN jack of the equipment to switch between scrambled channels (through a cable box) and normal...
...LCD projection TV with the LCD projection TV. * High-bandwidth Digital Content Protection 23 Provides better picture quality than the VHF/UHF jacks or the Video IN jack. 5 VIDEO/ (L/R) AUDIO (Rear and side) Connects to a VCR. To control the LCD projection TV with a remote control for use the TV ...Connects to the left and right audio inputs of your audio or video component. 9 CONTROL S IN/OUT To control other Sony equipment with the LCD projection TV's remote control, connect the CONTROL S IN jack of the equipment to switch between scrambled channels (through a cable box) and normal...

Operating Instructions
Page 26
CATV cable (No connection to TO CONVERTER) Antenna cable AUX Rear of them (pay channels vs. The LCD projection TV's internal converter allows you need to turn your Cable to OFF (see page 73) and perform the Auto Program function (see page 73). With this... to change channels using your cable box when the signal is scrambled. ❑ Use the LCD projection TV remote control to change channels using your LCD projection TV when the signal is not scrambled. (Your LCD projection TV's tuner provides a better signal than the cable box.) ❑ Use the Twin View feature. (When all channels are ...
CATV cable (No connection to TO CONVERTER) Antenna cable AUX Rear of them (pay channels vs. The LCD projection TV's internal converter allows you need to turn your Cable to OFF (see page 73) and perform the Auto Program function (see page 73). With this... to change channels using your cable box when the signal is scrambled. ❑ Use the LCD projection TV remote control to change channels using your LCD projection TV when the signal is not scrambled. (Your LCD projection TV's tuner provides a better signal than the cable box.) ❑ Use the Twin View feature. (When all channels are ...
Operating Instructions
Page 27
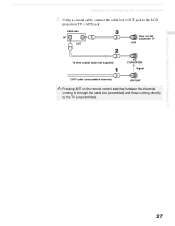
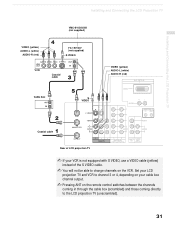
Installing and Connecting the LCD Projection TV Installing and Connecting the LCD Projection TV 3 Using a coaxial cable, connect the cable box's OUT jack to the TV (unscrambled). 27 Cable box IN OUT Rear of LCD projection TV AUX 75-ohm coaxial cable (not supplied) TO CONVERTER Signal CATV cable (unscrambled channels) VHF/UHF ✍ Pressing ANT on the remote control switches between the channels coming in through the cable box (scrambled) and those coming directly to the LCD projection TV's AUX jack.
Installing and Connecting the LCD Projection TV Installing and Connecting the LCD Projection TV 3 Using a coaxial cable, connect the cable box's OUT jack to the TV (unscrambled). 27 Cable box IN OUT Rear of LCD projection TV AUX 75-ohm coaxial cable (not supplied) TO CONVERTER Signal CATV cable (unscrambled channels) VHF/UHF ✍ Pressing ANT on the remote control switches between the channels coming in through the cable box (scrambled) and those coming directly to the LCD projection TV's AUX jack.
Operating Instructions
Page 28
... cable, connect the cable box's OUT jack to your cable box (see page 73). Cable Rear of LCD projection TV VHF/UHF IN OUT Cable box Also, set your LCD projection TV to the LCD projection TV, so you do not intend to hook up any other audio or video equipment to the LCD... others are routed through your cable box, consider using your LCD projection TV. 28 If you will be programmed to operate your LCD projection TV. z Setting the Channel Fix feature in the Channel menu (see page 73). ✍ Your Sony remote control can be controlling all channels, and ❑ You do ...
... cable, connect the cable box's OUT jack to your cable box (see page 73). Cable Rear of LCD projection TV VHF/UHF IN OUT Cable box Also, set your LCD projection TV to the LCD projection TV, so you do not intend to hook up any other audio or video equipment to the LCD... others are routed through your cable box, consider using your LCD projection TV. 28 If you will be programmed to operate your LCD projection TV. z Setting the Channel Fix feature in the Channel menu (see page 73). ✍ Your Sony remote control can be controlling all channels, and ❑ You do ...
Operating Instructions
Page 30
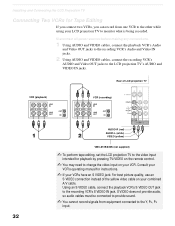
... box when the signal is sent to the LCD projection TV, so you cannot use a cable box, and ❑ You want to enjoy the Twin View feature. To program your Sony remote control to operate your cable box, see "Programming the Remote Control" on your cable box, only one signal is... scrambled. Installing and Connecting the LCD Projection TV Connecting a VCR and Cable Box Use this setup you can: ❑...
... box when the signal is sent to the LCD projection TV, so you cannot use a cable box, and ❑ You want to enjoy the Twin View feature. To program your Sony remote control to operate your cable box, see "Programming the Remote Control" on your cable box, only one signal is... scrambled. Installing and Connecting the LCD Projection TV Connecting a VCR and Cable Box Use this setup you can: ❑...
Operating Instructions
Page 31
...Coaxial cable VIDEO (yellow) AUDIO-L (white) AUDIO-R (red) Cable box S VIDEO Coaxial cable Rear of the S VIDEO cable. ✍ You will not be able to the LCD projection TV (unscrambled). 31 Set your LCD projection TV and VCR to channel 3 or 4, depending on your VCR is not equipped with S VIDEO, ...use a VIDEO cable (yellow) instead of LCD projection TV ✍ If your cable box channel output. ✍ Pressing ANT on the remote control switches between the channels coming in through the cable box (scrambled) and those coming directly to change...
...Coaxial cable VIDEO (yellow) AUDIO-L (white) AUDIO-R (red) Cable box S VIDEO Coaxial cable Rear of the S VIDEO cable. ✍ You will not be able to the LCD projection TV (unscrambled). 31 Set your LCD projection TV and VCR to channel 3 or 4, depending on your VCR is not equipped with S VIDEO, ...use a VIDEO cable (yellow) instead of LCD projection TV ✍ If your cable box channel output. ✍ Pressing ANT on the remote control switches between the channels coming in through the cable box (scrambled) and those coming directly to change...
Operating Instructions
Page 32
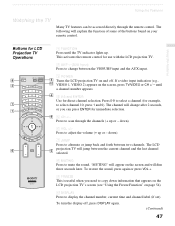
..., connect the playback VCR's S VIDEO OUT jack to the LCD projection TV's AUDIO and VIDEO IN jacks. Rear of the yellow video cable on your combined A/V cable. Installing and Connecting the LCD Projection TV Connecting Two VCRs for playback by pressing TV/VIDEO on the remote control. ✍ You may need to change the video input on...
..., connect the playback VCR's S VIDEO OUT jack to the LCD projection TV's AUDIO and VIDEO IN jacks. Rear of the yellow video cable on your combined A/V cable. Installing and Connecting the LCD Projection TV Connecting Two VCRs for playback by pressing TV/VIDEO on the remote control. ✍ You may need to change the video input on...
Operating Instructions
Page 38
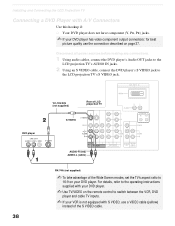
...not supplied) Rear of LCD projection TV S VIDEO AUDIO-R (red) AUDIO-L (white) RK-74A (not supplied) ✍ To take advantage of the S VIDEO cable. Disconnect all power sources before making any connections. 1 Using audio cables, connect the DVD player's Audio OUT jacks to the LCD projection TV's AUDIO IN...quality use a VIDEO cable (yellow) instead of the Wide Screen modes, set the TV's aspect ratio to 16:9 on page 37. For details, refer to the operating instructions supplied with your DVD player. ✍ Use TV/VIDEO on the remote control to the LCD projection TV's S VIDEO jack.
...not supplied) Rear of LCD projection TV S VIDEO AUDIO-R (red) AUDIO-L (white) RK-74A (not supplied) ✍ To take advantage of the S VIDEO cable. Disconnect all power sources before making any connections. 1 Using audio cables, connect the DVD player's Audio OUT jacks to the LCD projection TV's AUDIO IN...quality use a VIDEO cable (yellow) instead of the Wide Screen modes, set the TV's aspect ratio to 16:9 on page 37. For details, refer to the operating instructions supplied with your DVD player. ✍ Use TV/VIDEO on the remote control to the LCD projection TV's S VIDEO jack.

Operating Instructions
Page 43
In addition to allowing you to control multiple devices with one remote control, the CONTROL S feature allows you to control your LCD projection TV, instead of having to always point your remote control at your LCD projection TV system and other equipment, which might be hidden or out of direct line of sight. Installing and Connecting the LCD Projection TV Installing and Connecting the LCD Projection TV Using the CONTROL S Feature CONTROL S allows you to point it at the other Sony equipment with one remote control. Rear of LCD projection TV 43
In addition to allowing you to control multiple devices with one remote control, the CONTROL S feature allows you to control your LCD projection TV, instead of having to always point your remote control at your LCD projection TV system and other equipment, which might be hidden or out of direct line of sight. Installing and Connecting the LCD Projection TV Installing and Connecting the LCD Projection TV Using the CONTROL S Feature CONTROL S allows you to point it at the other Sony equipment with one remote control. Rear of LCD projection TV 43

Operating Instructions
Page 44
... that use the channel buttons on for all channel selection. If you turn on the LCD projection TV. 2 Press FUNCTION on the remote control until the TV indicator lights up. 3 Press CH+ on your LCD projection TV on your remote control, be sure to set up your channels. Using Auto Setup 1 Press POWER on the...You can do not want to run Auto Program by using the Auto Program feature in the Channel menu, as described on the remote control to turn your LCD projection TV to set up the channels at this time, you can run Auto Setup, or press CH- to exit. The Auto Setup...
... that use the channel buttons on for all channel selection. If you turn on the LCD projection TV. 2 Press FUNCTION on the remote control until the TV indicator lights up. 3 Press CH+ on your LCD projection TV on your remote control, be sure to set up your channels. Using Auto Setup 1 Press POWER on the...You can do not want to run Auto Program by using the Auto Program feature in the Channel menu, as described on the remote control to turn your LCD projection TV to set up the channels at this time, you can run Auto Setup, or press CH- to exit. The Auto Setup...
Operating Instructions
Page 45
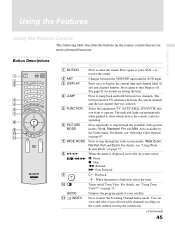
Using the Features Using the Features Using the Remote Control The following table describes the buttons on setting the time. Press again to jump back and forth between the current channel and the last channel that was selected. The LCD projection TV alternates between two channels. Turns on/off .... Press once to step through the wide screen modes: Wide Zoom, Normal, Full and Zoom. See page 81 for details on the remote control that you want to restore the sound. 2 ...
Using the Features Using the Features Using the Remote Control The following table describes the buttons on setting the time. Press again to jump back and forth between the current channel and the last channel that was selected. The LCD projection TV alternates between two channels. Turns on/off .... Press once to step through the wide screen modes: Wide Zoom, Normal, Full and Zoom. See page 81 for details on the remote control that you want to restore the sound. 2 ...
Operating Instructions
Page 46
... CH-. Freezes the window picture. For details, see "Using the Memory Stick Picture Viewer" on page 50. For details, see "Using Favorite Channels" on page 58 Press to select immediately. Scan through the Multi-channel TV Sound (MTS) options: Stereo, Auto SAP, and Mono. Press to the factory defaults. Press again... STICK w; MTS/SAP wa CH +/- Press ENTER to scroll through channels. Using the Features RM-Y912 Button qs VOL +/- For instructions, see "Programming the Remote Control" on and off the LCD projection TV and other audio/ video equipment you have programmed into the...
... CH-. Freezes the window picture. For details, see "Using the Memory Stick Picture Viewer" on page 50. For details, see "Using Favorite Channels" on page 58 Press to select immediately. Scan through the Multi-channel TV Sound (MTS) options: Stereo, Auto SAP, and Mono. Press to the factory defaults. Press again... STICK w; MTS/SAP wa CH +/- Press ENTER to scroll through channels. Using the Features RM-Y912 Button qs VOL +/- For instructions, see "Programming the Remote Control" on and off the LCD projection TV and other audio/ video equipment you have programmed into the...
Operating Instructions
Page 47
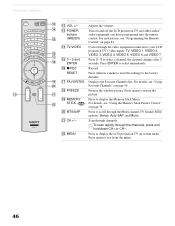
...and will appear on and off , press DISPLAY again. (Continued) 47 "MUTING" will dim three seconds later. This activates the remote control for use with the LCD projection TV. 2 ANT- (AUX input) Press to change after 2 seconds, or you need to copy down ). 6 VOL +/- To ... useful when you can be accessed directly through the channels (+ up . Press to scan through the remote control. Using the Features Watching the TV Many TV features can press ENTER for LCD Projection TV Operations RM-Y912 1 FUNCTION Press until a channel number appears. 4 0-9 and ENTER Use for example...
...and will appear on and off , press DISPLAY again. (Continued) 47 "MUTING" will dim three seconds later. This activates the remote control for use with the LCD projection TV. 2 ANT- (AUX input) Press to change after 2 seconds, or you need to copy down ). 6 VOL +/- To ... useful when you can be accessed directly through the channels (+ up . Press to scan through the remote control. Using the Features Watching the TV Many TV features can press ENTER for LCD Projection TV Operations RM-Y912 1 FUNCTION Press until a channel number appears. 4 0-9 and ENTER Use for example...

Operating Instructions
Page 50
...window Favorite Channels 2 Press V or v to highlight the channel you want to assign to other than TV mode, you cannot select the channel by using the Channel Menu, see page 74). 50 The Favorite Channel options appear. Press and then press RESET. 7 Press MENU to clear. z For details... on using V or v. Press to select. ✍ When the remote control mode is set to the Favorite Channel number. A preview...
...window Favorite Channels 2 Press V or v to highlight the channel you want to assign to other than TV mode, you cannot select the channel by using the Channel Menu, see page 74). 50 The Favorite Channel options appear. Press and then press RESET. 7 Press MENU to clear. z For details... on using V or v. Press to select. ✍ When the remote control mode is set to the Favorite Channel number. A preview...


