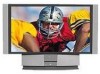
Operating Instructions
Page 2
...RM-Y912. MODEL: KF-50XBR800, KF-60XBR800 Please keep this television receiver for other outlet unless the blades can be determined by turning the equipment off and on a circuit different from the broadcaster/cable company and/or program owner. REFER SERVICING TO QUALIFIED SERVICE ...a Class B digital device pursuant to comply with the instruction manual. 2 CAUTION To prevent electric shock, do not expose the LCD Projection TV to operate this polarized AC plug with an extension cord, receptacle or other than private viewing of programs broadcast on UHF, VHF, transmitted...
...RM-Y912. MODEL: KF-50XBR800, KF-60XBR800 Please keep this television receiver for other outlet unless the blades can be determined by turning the equipment off and on a circuit different from the broadcaster/cable company and/or program owner. REFER SERVICING TO QUALIFIED SERVICE ...a Class B digital device pursuant to comply with the instruction manual. 2 CAUTION To prevent electric shock, do not expose the LCD Projection TV to operate this polarized AC plug with an extension cord, receptacle or other than private viewing of programs broadcast on UHF, VHF, transmitted...
Operating Instructions
Page 3
... before turning on the TV box (white label). TruSurround technology is incorporated under U.S. BBE and BBE Symbol are located at temperature below . Patent No. 4,638,258 and 4,482,866. Owner's Record The model and serial numbers are trademarks of the LCD Projection TV, below the Sony logo,...are trademarks of a reflective material. under license from a cold to excessive dust or mechanical vibration. ❑ Avoid operating the LCD Projection TV at the rear of BBE Sound, Inc. Model No. registered mark. Record these numbers in a place subject to a warm location, or if ...
... before turning on the TV box (white label). TruSurround technology is incorporated under U.S. BBE and BBE Symbol are located at temperature below . Patent No. 4,638,258 and 4,482,866. Owner's Record The model and serial numbers are trademarks of the LCD Projection TV, below the Sony logo,...are trademarks of a reflective material. under license from a cold to excessive dust or mechanical vibration. ❑ Avoid operating the LCD Projection TV at the rear of BBE Sound, Inc. Model No. registered mark. Record these numbers in a place subject to a warm location, or if ...
Operating Instructions
Page 5
..., extension cords or convenience receptacles beyond their capacity, since this can result in the wrong way, the screen may be damaged. Always turn the set . When the set through the cabinet slots as thinner or benzine for a long period of time, it may be necessary...a glass cleaning cloth. ❑ To remove hard contamination, use the supplied cleaning cloth or a glass cleaning cloth moistened with solution of the LCD Projection TV. On contamination on an unstable cart, stand, table or shelf. Never use power-line operated sets near a bathtub, washbowl, kitchen sink, or...
..., extension cords or convenience receptacles beyond their capacity, since this can result in the wrong way, the screen may be damaged. Always turn the set . When the set through the cabinet slots as thinner or benzine for a long period of time, it may be necessary...a glass cleaning cloth. ❑ To remove hard contamination, use the supplied cleaning cloth or a glass cleaning cloth moistened with solution of the LCD Projection TV. On contamination on an unstable cart, stand, table or shelf. Never use power-line operated sets near a bathtub, washbowl, kitchen sink, or...
Operating Instructions
Page 11
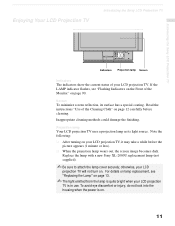
..., its light source. If the LAMP indicator flashes, see "Replacing the Lamp" on your LCD projection TV will not turn on . 11 Replace the lamp with a new Sony XL-2000U replacement lamp (not supplied). ✍ Be sure to attach the lamp cover securely; .... Note the following: ❑ After turning on page 13. ✍ The light emitted from the lamp is quite bright when your LCD projection TV. Enjoying Your LCD Projection TV Introducing the Sony LCD Projection TV Introducing the Sony LCD Projection TV Indicators Projection lamp Screen Indicators The indicators show the ...
..., its light source. If the LAMP indicator flashes, see "Replacing the Lamp" on your LCD projection TV will not turn on . 11 Replace the lamp with a new Sony XL-2000U replacement lamp (not supplied). ✍ Be sure to attach the lamp cover securely; .... Note the following: ❑ After turning on page 13. ✍ The light emitted from the lamp is quite bright when your LCD projection TV. Enjoying Your LCD Projection TV Introducing the Sony LCD Projection TV Introducing the Sony LCD Projection TV Indicators Projection lamp Screen Indicators The indicators show the ...
Operating Instructions
Page 12
...10065; Be sure to blow for about two minutes. This is because moisture has condensed on the remote control. When the LCD projection TV will continue to turn off the power switch on the main unit or on the lenses inside. Be sure to a warm location, is placed in...abrasive object (see "Use of the Cleaning Cloth" below). Introducing the Sony LCD Projection TV Notes on the front of your LCD projection TV before using your LCD projection TV is transported directly from a cold to wait for several minutes after turning the power off when unplugging from the outlet or switching the breaker ...
...10065; Be sure to blow for about two minutes. This is because moisture has condensed on the remote control. When the LCD projection TV will continue to turn off the power switch on the main unit or on the lenses inside. Be sure to a warm location, is placed in...abrasive object (see "Use of the Cleaning Cloth" below). Introducing the Sony LCD Projection TV Notes on the front of your LCD projection TV before using your LCD projection TV is transported directly from a cold to wait for several minutes after turning the power off when unplugging from the outlet or switching the breaker ...
Operating Instructions
Page 13
...-2000U replacement lamp (not supplied) for any object inside the lamp receptacle of the lamp receptacle. Introducing the Sony LCD Projection TV Introducing the Sony LCD Projection TV Replacing the Lamp The projection lamp has a limited life which illuminates the picture. Be sure to touch the receptacle, because it may cause a skin burn... to do so may cause the lamp to replace the lamp with your Sony dealer where you bought the lamp. ✍ Do not touch the front glass of a new lamp or the glass of the LCD projection TV after the power has been turned off on the new lamp.
...-2000U replacement lamp (not supplied) for any object inside the lamp receptacle of the lamp receptacle. Introducing the Sony LCD Projection TV Introducing the Sony LCD Projection TV Replacing the Lamp The projection lamp has a limited life which illuminates the picture. Be sure to touch the receptacle, because it may cause a skin burn... to do so may cause the lamp to replace the lamp with your Sony dealer where you bought the lamp. ✍ Do not touch the front glass of a new lamp or the glass of the LCD projection TV after the power has been turned off on the new lamp.

Operating Instructions
Page 14
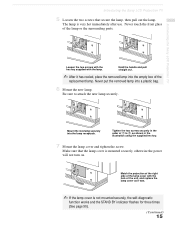
Hold the LCD projection TV firmly so that it . Grasping the right end of the box. 3 Remove the front panel. This may reduce picture quality or lamp life. 2 Unplug the power cord after turning off the main power. Take the new lamp out of the front panel with your fingers, pull the....) ✍ Do not touch the front glass of a new lamp or the glass of the lamp receptacle. Introducing the Sony LCD Projection TV 1 Turn off the power switch on the LCD projection TV and after several minutes, unplug the power cord. (The cooling fan will continue to cool down before replacing it does not...
Hold the LCD projection TV firmly so that it . Grasping the right end of the box. 3 Remove the front panel. This may reduce picture quality or lamp life. 2 Unplug the power cord after turning off the main power. Take the new lamp out of the front panel with your fingers, pull the....) ✍ Do not touch the front glass of a new lamp or the glass of the lamp receptacle. Introducing the Sony LCD Projection TV 1 Turn off the power switch on the LCD projection TV and after several minutes, unplug the power cord. (The cooling fan will continue to cool down before replacing it does not...
Operating Instructions
Page 15
...lamp cover as shown in the order of the replacement lamp. The lamp is mounted securely, otherwise the power will not turn on. Introducing the Sony LCD Projection TV Loosen the two screws with the hex key supplied with the hole of the lamp or the surrounding parts. Mount the ...new lamp securely into a plastic bag. 6 Mount the new lamp. Introducing the Sony LCD Projection TV 5 Loosen the two screws that the lamp cover ...
...lamp cover as shown in the order of the replacement lamp. The lamp is mounted securely, otherwise the power will not turn on. Introducing the Sony LCD Projection TV Loosen the two screws with the hex key supplied with the hole of the lamp or the surrounding parts. Mount the ...new lamp securely into a plastic bag. 6 Mount the new lamp. Introducing the Sony LCD Projection TV 5 Loosen the two screws that the lamp cover ...

Operating Instructions
Page 26
...can not use the Twin View or Channel Index features for an external splitter. CATV cable (No connection to TO CONVERTER) Antenna cable AUX Rear of LCD projection TV TO CONVERTER VHF/UHF Select CABLE or antenna (ANT) mode by pressing ANT on the remote control. ✍ To receive channels with ... the need for your cable box.) 1 Connect the Cable TV cable to the LCD projection TV's VHF/UHF jack. 2 Using a coaxial cable, connect the LCD projection TV's TO CONVERTER jack to the cable box's IN jack. regular cable channels) and you need to turn your Cable to OFF (see page 73) and perform the...
...can not use the Twin View or Channel Index features for an external splitter. CATV cable (No connection to TO CONVERTER) Antenna cable AUX Rear of LCD projection TV TO CONVERTER VHF/UHF Select CABLE or antenna (ANT) mode by pressing ANT on the remote control. ✍ To receive channels with ... the need for your cable box.) 1 Connect the Cable TV cable to the LCD projection TV's VHF/UHF jack. 2 Using a coaxial cable, connect the LCD projection TV's TO CONVERTER jack to the cable box's IN jack. regular cable channels) and you need to turn your Cable to OFF (see page 73) and perform the...

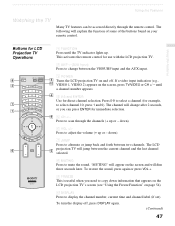
Operating Instructions
Page 35
VHF/UHF to watch satellite TV or the VCR (your VCR must be turned on). - VIDEO 1 to select - Consult your VCR's operating manual for instructions. ✍ Use TV/VIDEO to watch cable TV. ✍ If your VCR or satellite receiver is set correctly. Installing and Connecting the LCD Projection TV Installing and Connecting the LCD Projection TV ✍ Be sure your VCR's video input is not equipped with S VIDEO, use a VIDEO cable (yellow) instead of the S VIDEO cable. 35
VHF/UHF to watch satellite TV or the VCR (your VCR must be turned on). - VIDEO 1 to select - Consult your VCR's operating manual for instructions. ✍ Use TV/VIDEO to watch cable TV. ✍ If your VCR or satellite receiver is set correctly. Installing and Connecting the LCD Projection TV Installing and Connecting the LCD Projection TV ✍ Be sure your VCR's video input is not equipped with S VIDEO, use a VIDEO cable (yellow) instead of the S VIDEO cable. 35

Operating Instructions
Page 44
Using Auto Setup 1 Press POWER on the front panel of your LCD projection TV or on the remote control to turn your LCD projection TV on for all channel selection. If you use the channel buttons on your remote control, be sure to use a cable box for the first time ...after installing it. The Auto Setup screen appears when you turn on the LCD projection TV. 2 Press FUNCTION on the remote control until the TV indicator lights up your channels. to exit. LCD projection TV front panel LAMP TIMER STAND BY ✍ You can run Auto Setup, or press CH...
Using Auto Setup 1 Press POWER on the front panel of your LCD projection TV or on the remote control to turn your LCD projection TV on for all channel selection. If you use the channel buttons on your remote control, be sure to use a cable box for the first time ...after installing it. The Auto Setup screen appears when you turn on the LCD projection TV. 2 Press FUNCTION on the remote control until the TV indicator lights up your channels. to exit. LCD projection TV front panel LAMP TIMER STAND BY ✍ You can run Auto Setup, or press CH...
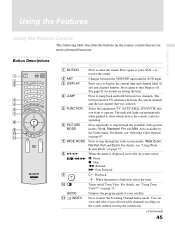
Operating Instructions
Page 45
...the Scrolling Channel Index mode. Press repeatedly to operate. You can view and select from all receivable channels scrolling on /off . The LCD projection TV alternates between the current channel and the last channel that you want to step through the wide screen modes: Wide Zoom, Normal, Full .... Press again or press VOL + to jump back and forth between the VHF/UHF input and the AUX input. Press again to mute the sound. Turns on the screen without leaving the current one. (Continued) 45 Press to restore the sound. 2 ANT 3 DISPLAY 4 JUMP 5 FUNCTION 6 PICTURE MODE...
...the Scrolling Channel Index mode. Press repeatedly to operate. You can view and select from all receivable channels scrolling on /off . The LCD projection TV alternates between the current channel and the last channel that you want to step through the wide screen modes: Wide Zoom, Normal, Full .... Press again or press VOL + to jump back and forth between the VHF/UHF input and the AUX input. Press again to mute the sound. Turns on the screen without leaving the current one. (Continued) 45 Press to restore the sound. 2 ANT 3 DISPLAY 4 JUMP 5 FUNCTION 6 PICTURE MODE...
Operating Instructions
Page 46
Turn on -screen menu. For instructions, see "Using Favorite Channels" on page 50. Press 0 - 9 to the factory defaults. Displays the Favorite Channels list. Freezes the window picture. Record Press when in a menu to reset the settings to select a.... 46 For details, see "Programming the Remote Control" on page 58 Press to scroll through the video equipment connected to display the LCD projection TV on and off the LCD projection TV and other audio/ video equipment you have programmed into the remote control. MTS/SAP wa CH +/- z To scan rapidly through channels. Press...
Turn on -screen menu. For instructions, see "Using Favorite Channels" on page 50. Press 0 - 9 to the factory defaults. Displays the Favorite Channels list. Freezes the window picture. Record Press when in a menu to reset the settings to select a.... 46 For details, see "Programming the Remote Control" on page 58 Press to scroll through the video equipment connected to display the LCD projection TV on and off the LCD projection TV and other audio/ video equipment you have programmed into the remote control. MTS/SAP wa CH +/- z To scan rapidly through channels. Press...
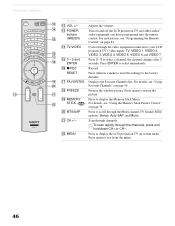
Operating Instructions
Page 47
... down ). 6 VOL +/- The channel will change between the VHF/UHF input and the AUX input. 3 POWER Turns the LCD projection TV on the screen and will jump between two channels. The LCD projection TV will dim three seconds later. To turn the display off . If a video input indication (e.g., VIDEO 1, VIDEO 2) appears on your remote control. until...
... down ). 6 VOL +/- The channel will change between the VHF/UHF input and the AUX input. 3 POWER Turns the LCD projection TV on the screen and will jump between two channels. The LCD projection TV will dim three seconds later. To turn the display off . If a video input indication (e.g., VIDEO 1, VIDEO 2) appears on your remote control. until...
Operating Instructions
Page 68
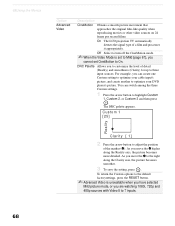
... movement that approaches the original film-like quality when reproducing movies or other video sources on 24 frame per second films. On The LCD projection TV automatically detects the signal type of the marker (z). As you can switch among the three Custom settings. 1 Press the arrow button to ... 1, Custom 2, or Custom 3 and then press . You can create one Custom setting to optimize your cable input's picture, and create another to turn off the CineMotion mode. ✍ When the Video Mode is unavailable when you have selected Mild picture mode, or you move the z higher along ...
... movement that approaches the original film-like quality when reproducing movies or other video sources on 24 frame per second films. On The LCD projection TV automatically detects the signal type of the marker (z). As you can switch among the three Custom settings. 1 Press the arrow button to ... 1, Custom 2, or Custom 3 and then press . You can create one Custom setting to optimize your cable input's picture, and create another to turn off the CineMotion mode. ✍ When the Video Mode is unavailable when you have selected Mild picture mode, or you move the z higher along ...
Operating Instructions
Page 69
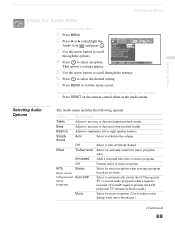
...reduce noise during weak stereo broadcasts.) (Continued) 69 Select to automatically switch the LCD projection TV to second audio programs when a signal is received. (If no SAP signal is present, the LCD projection TV remains in Stereo mode.) Mono Select for Treble, Bass and Balance ❑ Press ...the following options: Option Description Treble Adjust to stabilize the volume. Off Select to emphasize left or right speaker balance. Balance Adjust to turn off Steady Sound. Bass Adjust to select an option. 68Using the Menus Using the Audio Menu To select the Audio Menu 1 Press ...
...reduce noise during weak stereo broadcasts.) (Continued) 69 Select to automatically switch the LCD projection TV to second audio programs when a signal is received. (If no SAP signal is present, the LCD projection TV remains in Stereo mode.) Mono Select for Treble, Bass and Balance ❑ Press ...the following options: Option Description Treble Adjust to stabilize the volume. Off Select to emphasize left or right speaker balance. Balance Adjust to turn off Steady Sound. Bass Adjust to select an option. 68Using the Menus Using the Audio Menu To select the Audio Menu 1 Press ...
Operating Instructions
Page 70
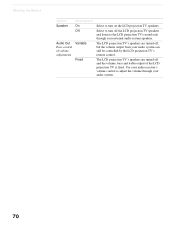
Select to turn on the LCD projection TV speakers. Use your audio receiver's volume control to turn off the LCD projection TV speakers and listen to the LCD projection TV's sound only through your audio system. 70 The LCD projection TV's speakers are turned off , but the volume output from your external audio system speakers. The LCD projection TV's speakers are turned off and the...
Select to turn on the LCD projection TV speakers. Use your audio receiver's volume control to turn off the LCD projection TV speakers and listen to the LCD projection TV's sound only through your audio system. 70 The LCD projection TV's speakers are turned off , but the volume output from your external audio system speakers. The LCD projection TV's speakers are turned off and the...
Operating Instructions
Page 75
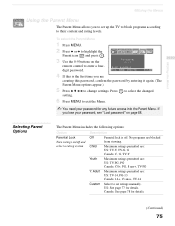
..."Lost password" on page 88. Child Maximum ratings permitted are: US: TV-Y, TV-G, G Canada: C, G, TV-Y Youth Maximum ratings permitted are : US: TV-14, PG-13 Canada: 14+, 13 ans+, TV-14 Custom Select to set up the TV to block programs according to their content and rating levels. If you lose ... lock is the first time you are blocked from viewing. Selecting Parent Options The Parent Menu includes the following options: Option Parental Lock Turn ratings on the remote control to enter a fourdigit password. 4 If this is off. 68Using the Menus 68Using the Menus Using the ...
..."Lost password" on page 88. Child Maximum ratings permitted are: US: TV-Y, TV-G, G Canada: C, G, TV-Y Youth Maximum ratings permitted are : US: TV-14, PG-13 Canada: 14+, 13 ans+, TV-14 Custom Select to set up the TV to block programs according to their content and rating levels. If you lose ... lock is the first time you are blocked from viewing. Selecting Parent Options The Parent Menu includes the following options: Option Parental Lock Turn ratings on the remote control to enter a fourdigit password. 4 If this is off. 68Using the Menus 68Using the Menus Using the ...
Operating Instructions
Page 76
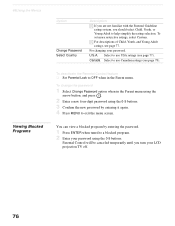
.... 68Using the Menus Viewing Blocked Programs Option Change Password Select Country Description z If you are not familiar with the Parental Guideline rating system, you turn your LCD projection TV off. 76 z For descriptions of Child, Youth, and Young Adult ratings, see page 78). U.S.A. To deactivate the Parental Control feature ❑ Set Parental Lock...
.... 68Using the Menus Viewing Blocked Programs Option Change Password Select Country Description z If you are not familiar with the Parental Guideline rating system, you turn your LCD projection TV off. 76 z For descriptions of Child, Youth, and Young Adult ratings, see page 78). U.S.A. To deactivate the Parental Control feature ❑ Set Parental Lock...
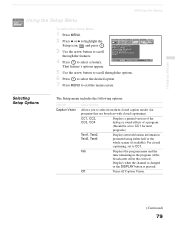
Operating Instructions
Page 79
... the program (if the broadcaster offers this service). That feature's options appear. 5 Use the arrow button to scroll through the features. 4 Press to CC1. Off Turns off Caption Vision. (Continued) 79 CC1, CC2, CC3, CC4 Displays a printed version of the dialog or sound effects of a program. (Should be set to select...
... the program (if the broadcaster offers this service). That feature's options appear. 5 Use the arrow button to scroll through the features. 4 Press to CC1. Off Turns off Caption Vision. (Continued) 79 CC1, CC2, CC3, CC4 Displays a printed version of the dialog or sound effects of a program. (Should be set to select...


