
Operating Instructions
Page 4
...outlet, try reversing the plug. Servicing is required when the apparatus has been damaged in any way, such as power-supply cord or plug is a safety feature. Use Power Sources This set . If you are unable to fit, contact your outlet, consult an electrician for replacement of ... such as radiators, heat registers, stoves, or other apparatus (including amplifiers) that produce heat. 9) Do not defeat the safety purpose of electrical power supplied to rain or moisture, does not operate normally, or has been dropped. 15) Apparatus shall not be observed in . This is damaged, liquid...
...outlet, try reversing the plug. Servicing is required when the apparatus has been damaged in any way, such as power-supply cord or plug is a safety feature. Use Power Sources This set . If you are unable to fit, contact your outlet, consult an electrician for replacement of ... such as radiators, heat registers, stoves, or other apparatus (including amplifiers) that produce heat. 9) Do not defeat the safety purpose of electrical power supplied to rain or moisture, does not operate normally, or has been dropped. 15) Apparatus shall not be observed in . This is damaged, liquid...
Operating Instructions
Page 5
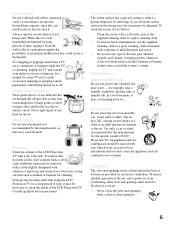
... that could create a fire hazard. If the picture becomes dark after using the LCD Projection TV for some TV sets to reduce a picture displayed by reflecting. Consult qualified service personnel...Clean the screen with a soft cloth, such as the supplied cleaning cloth or a glass cleaning cloth. ❑ To remove hard contamination, use the supplied cleaning cloth or a glass cleaning cloth moistened with a ... model of any type of mild soap and warm water. Attachments Do not use power-line operated sets near a swimming pool, etc. Installation Water and Moisture Do not...
... that could create a fire hazard. If the picture becomes dark after using the LCD Projection TV for some TV sets to reduce a picture displayed by reflecting. Consult qualified service personnel...Clean the screen with a soft cloth, such as the supplied cleaning cloth or a glass cleaning cloth. ❑ To remove hard contamination, use the supplied cleaning cloth or a glass cleaning cloth moistened with a ... model of any type of mild soap and warm water. Attachments Do not use power-line operated sets near a swimming pool, etc. Installation Water and Moisture Do not...
Operating Instructions
Page 11
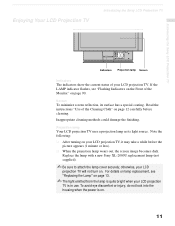
... The indicators show the current status of the Monitor" on page 90. Projection lamp Your LCD projection TV uses a projection lamp as its surface has a special coating. Replace the lamp with a new Sony XL-2000U replacement lamp (not supplied). ✍ Be sure to attach the lamp cover securely; Note the ...following: ❑ After turning on your LCD projection TV is on . To avoid eye discomfort or injury, do not look into the housing when the power is in use....
... The indicators show the current status of the Monitor" on page 90. Projection lamp Your LCD projection TV uses a projection lamp as its surface has a special coating. Replace the lamp with a new Sony XL-2000U replacement lamp (not supplied). ✍ Be sure to attach the lamp cover securely; Note the ...following: ❑ After turning on your LCD projection TV is on . To avoid eye discomfort or injury, do not look into the housing when the power is in use....
Operating Instructions
Page 12
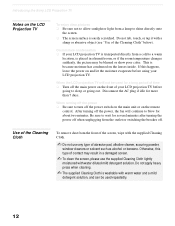
...fan will not be used repeatedly. 12 Otherwise, this happens, leave the power on and let the moisture evaporate before using your LCD projection TV before going out. Introducing the Sony LCD Projection TV Notes on the LCD Projection TV To enjoy clear pictures ❑ Be sure not to allow sunlight ... The screen surface is easily scratched. Do not apply heavy press when cleaning. ✍ The supplied Cleaning Cloth is because moisture has condensed on the lenses inside. After turning off the power switch on the main unit or on the front of the Cleaning Cloth" below). Be sure ...
...fan will not be used repeatedly. 12 Otherwise, this happens, leave the power on and let the moisture evaporate before using your LCD projection TV before going out. Introducing the Sony LCD Projection TV Notes on the LCD Projection TV To enjoy clear pictures ❑ Be sure not to allow sunlight ... The screen surface is easily scratched. Do not apply heavy press when cleaning. ✍ The supplied Cleaning Cloth is because moisture has condensed on the lenses inside. After turning off the power switch on the main unit or on the front of the Cleaning Cloth" below). Be sure ...
Operating Instructions
Page 13
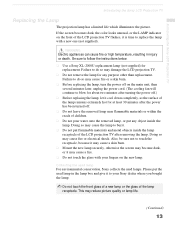
...a fire. ❑ Do not touch the glass with a new one (not supplied). Collecting the used lamp For environmental conservation, Sony collects the used lamp in injury or death. Doing so may damage the LCD projection TV. ❑ Do not remove the lamp for any object inside the lamp receptacle...it is time to follow the instructions below. ❑ Use a Sony XL-2000U replacement lamp (not supplied) for at least 30 minutes after the power has been turned off on the front of the LCD projection TV after turning the power off.) ❑ Before replacing the lamp, let it cool down ...
...a fire. ❑ Do not touch the glass with a new one (not supplied). Collecting the used lamp For environmental conservation, Sony collects the used lamp in injury or death. Doing so may damage the LCD projection TV. ❑ Do not remove the lamp for any object inside the lamp receptacle...it is time to follow the instructions below. ❑ Use a Sony XL-2000U replacement lamp (not supplied) for at least 30 minutes after the power has been turned off on the front of the LCD projection TV after turning the power off.) ❑ Before replacing the lamp, let it cool down ...
Operating Instructions
Page 15
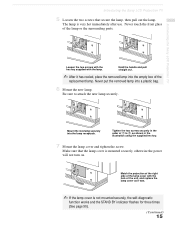
The lamp is mounted securely, otherwise the power will not turn on. Be sure to 2, as it has cooled, place the removed lamp into the empty box of the lamp or the surrounding ... self-diagnostic function works and the STAND BY indicator flashes for three times (See page 90). (Continued) 15 Introducing the Sony LCD Projection TV Loosen the two screws with the hex key supplied with the hole of 1 to attach the new lamp securely. Never put the removed lamp into the lamp receptacle. Never...
The lamp is mounted securely, otherwise the power will not turn on. Be sure to 2, as it has cooled, place the removed lamp into the empty box of the lamp or the surrounding ... self-diagnostic function works and the STAND BY indicator flashes for three times (See page 90). (Continued) 15 Introducing the Sony LCD Projection TV Loosen the two screws with the hex key supplied with the hole of 1 to attach the new lamp securely. Never put the removed lamp into the lamp receptacle. Never...

Operating Instructions
Page 29
Rear of LCD projection TV Coaxial cable S VIDEO VIDEO (yellow) AUDIO-L (white) AUDIO-R (red) VCR VMC-810S/820S (not supplied) Cable YC-15V/30V (not supplied) ✍ If your VCR is not equipped with S VIDEO, use a VIDEO cable (yellow) instead of the S VIDEO cable. 29 Disconnect all power sources before making any connections. 1 Connect the cable...
Rear of LCD projection TV Coaxial cable S VIDEO VIDEO (yellow) AUDIO-L (white) AUDIO-R (red) VCR VMC-810S/820S (not supplied) Cable YC-15V/30V (not supplied) ✍ If your VCR is not equipped with S VIDEO, use a VIDEO cable (yellow) instead of the S VIDEO cable. 29 Disconnect all power sources before making any connections. 1 Connect the cable...
Operating Instructions
Page 32
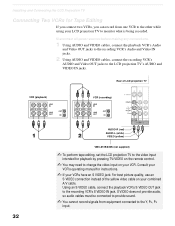
...to change the video input on your LCD projection TV to monitor what is being recorded. Rear of the yellow video cable on your VCR....projection TV VCR (playback) VCR (recording) AUDIO-R (red) AUDIO-L (white) VIDEO (yellow) VMC-810S/820S (not supplied) ✍ To perform tape editing, set the LCD projection... TV to the video input intended for Tape Editing If you connect two VCRs, you can record from equipment connected to the recording VCR's S VIDEO IN jack. Using an S VIDEO cable, connect the playback VCR's S VIDEO OUT jack to the Y, PB, PR input. 32 Disconnect all power...
...to change the video input on your LCD projection TV to monitor what is being recorded. Rear of the yellow video cable on your VCR....projection TV VCR (playback) VCR (recording) AUDIO-R (red) AUDIO-L (white) VIDEO (yellow) VMC-810S/820S (not supplied) ✍ To perform tape editing, set the LCD projection... TV to the video input intended for Tape Editing If you connect two VCRs, you can record from equipment connected to the recording VCR's S VIDEO IN jack. Using an S VIDEO cable, connect the playback VCR's S VIDEO OUT jack to the Y, PB, PR input. 32 Disconnect all power...

Operating Instructions
Page 33
... to the LCD projection TV's VHF/UHF jack. ✍ If your satellite receiver is not equipped with S VIDEO, use a VIDEO cable (yellow) instead of LCD projection TV Coaxial cable S VIDEO VIDEO (yellow) AUDIO-L (white) AUDIO-R (red) VMC-810S/820S (not supplied) YC-15V/30V (not supplied) Satellite receiver Satellite antenna cable 33 Rear of the...
... to the LCD projection TV's VHF/UHF jack. ✍ If your satellite receiver is not equipped with S VIDEO, use a VIDEO cable (yellow) instead of LCD projection TV Coaxial cable S VIDEO VIDEO (yellow) AUDIO-L (white) AUDIO-R (red) VMC-810S/820S (not supplied) YC-15V/30V (not supplied) Satellite receiver Satellite antenna cable 33 Rear of the...
Operating Instructions
Page 34
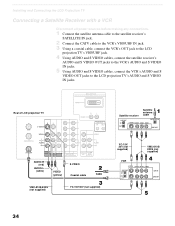
Rear of LCD projection TV Satellite receiver Satellite antenna cable AUDIO-R (red) AUDIO-L (white) VIDEO (yellow) S VIDEO Coaxial cable Cable VMC-810S/820S (not supplied) YC-15V/30V (not supplied) YC-15V/ 30V (not supplied) VCR VMC-810S/ 820S (not supplied) 34 Installing and Connecting the LCD Projection TV Connecting a Satellite Receiver with a VCR Disconnect all power sources before...
Rear of LCD projection TV Satellite receiver Satellite antenna cable AUDIO-R (red) AUDIO-L (white) VIDEO (yellow) S VIDEO Coaxial cable Cable VMC-810S/820S (not supplied) YC-15V/30V (not supplied) YC-15V/ 30V (not supplied) VCR VMC-810S/ 820S (not supplied) 34 Installing and Connecting the LCD Projection TV Connecting a Satellite Receiver with a VCR Disconnect all power sources before...

Operating Instructions
Page 36
Using audio cables, connect the LCD projection TV's AUDIO OUT (VAR/ FIX) jacks to the audio receiver's audio LINE IN jacks. Installing and Connecting the LCD Projection TV Connecting an Audio Receiver Disconnect all power sources before making any connections. Rear of LCD projection TV AUDIO-R (red) RK-74A (not supplied) AUDIO-L (white) Line input 36
Using audio cables, connect the LCD projection TV's AUDIO OUT (VAR/ FIX) jacks to the audio receiver's audio LINE IN jacks. Installing and Connecting the LCD Projection TV Connecting an Audio Receiver Disconnect all power sources before making any connections. Rear of LCD projection TV AUDIO-R (red) RK-74A (not supplied) AUDIO-L (white) Line input 36

Operating Instructions
Page 37
Rear of LCD projection TV Y VMC-10HG (not supplied) PB PR DVD player AUDIO-R (red) AUDIO-L (white) RK-74A (not supplied) ✍ To take advantage of inputs that you used for the video connection (HD/DVD IN 5 or 6). Be sure to 16:9 on your DVD ...DVD player are sometimes labeled Y, CB and CR, or Y, PB and PR. Installing and Connecting the LCD Projection TV Installing and Connecting the LCD Projection TV Connecting a DVD Player with your DVD player. 37 Disconnect all power sources before making any connections. 1 Using three separate component video cables, connect the DVD player's Y, B-Y...
Rear of LCD projection TV Y VMC-10HG (not supplied) PB PR DVD player AUDIO-R (red) AUDIO-L (white) RK-74A (not supplied) ✍ To take advantage of inputs that you used for the video connection (HD/DVD IN 5 or 6). Be sure to 16:9 on your DVD ...DVD player are sometimes labeled Y, CB and CR, or Y, PB and PR. Installing and Connecting the LCD Projection TV Installing and Connecting the LCD Projection TV Connecting a DVD Player with your DVD player. 37 Disconnect all power sources before making any connections. 1 Using three separate component video cables, connect the DVD player's Y, B-Y...
Operating Instructions
Page 38
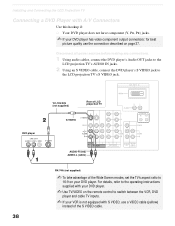
...(not supplied) Rear of LCD projection TV S VIDEO AUDIO-R (red) AUDIO-L (white) RK-74A (not supplied) ✍ To take advantage of the S VIDEO cable. For details, refer to the operating instructions supplied with S VIDEO, use the connection described on page 37. Disconnect all power sources before... making any connections. 1 Using audio cables, connect the DVD player's Audio OUT jacks to the LCD projection TV's AUDIO IN jacks. 2 Using...
...(not supplied) Rear of LCD projection TV S VIDEO AUDIO-R (red) AUDIO-L (white) RK-74A (not supplied) ✍ To take advantage of the S VIDEO cable. For details, refer to the operating instructions supplied with S VIDEO, use the connection described on page 37. Disconnect all power sources before... making any connections. 1 Using audio cables, connect the DVD player's Audio OUT jacks to the LCD projection TV's AUDIO IN jacks. 2 Using...
Operating Instructions
Page 39
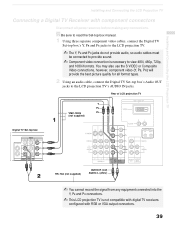
... the best picture quality for all power sources before making any equipment connected into the Y, PB and PR connectors. ✍ This LCD projection TV is necessary to the LCD projection TV's AUDIO IN jacks. Rear of LCD projection TV Y PB VMC-10HG PR (not supplied) Digital TV Set-top box RK...-74A (not supplied) AUDIO-R (red) AUDIO-L (white) ✍ You cannot ...
... the best picture quality for all power sources before making any equipment connected into the Y, PB and PR connectors. ✍ This LCD projection TV is necessary to the LCD projection TV's AUDIO IN jacks. Rear of LCD projection TV Y PB VMC-10HG PR (not supplied) Digital TV Set-top box RK...-74A (not supplied) AUDIO-R (red) AUDIO-L (white) ✍ You cannot ...
Operating Instructions
Page 40
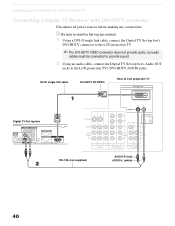
...Rear of LCD projection TV Digital TV Set-top box OPTICAL AUDIO OUT VIDEO OUT (480i) 1 2 L1 L2 OPTICAL S. VIDEO R1 R2 AUDIO OUT VIDEO OUT (1080i/720p/480p) Y PB TYPE PR AUTHORIZED SERVICES ONLY RGB OUT (1080i/720p/480p) DVI-HDTV OUT (1080i/720p/480p) RK-74A (not supplied...) AUDIO-R (red) AUDIO-L (white) 40 Installing and Connecting the LCD Projection TV Connecting a Digital TV Receiver with DVI-HDTV connector Disconnect all power sources before making any connections. z Be sure to read the Set-top box ...
...Rear of LCD projection TV Digital TV Set-top box OPTICAL AUDIO OUT VIDEO OUT (480i) 1 2 L1 L2 OPTICAL S. VIDEO R1 R2 AUDIO OUT VIDEO OUT (1080i/720p/480p) Y PB TYPE PR AUTHORIZED SERVICES ONLY RGB OUT (1080i/720p/480p) DVI-HDTV OUT (1080i/720p/480p) RK-74A (not supplied...) AUDIO-R (red) AUDIO-L (white) 40 Installing and Connecting the LCD Projection TV Connecting a Digital TV Receiver with DVI-HDTV connector Disconnect all power sources before making any connections. z Be sure to read the Set-top box ...
The Sony Guide to Home Theater
Page 11
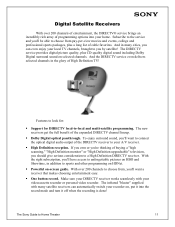
...turn it off when the recording is done! The infrared "blaster" supplied with your home. With over 200 channels of entertainment, the DIRECTV&#...buying a "high scanning," "High Definition monitor" or "High Definition upgradeable" television, you 'll have access to unforgettable pictures on HBO and Showtime, in... in addition to sports and other programming on HDNet. ƒ Powerful on , put it into your videocassette recorder or personal video recorder... sound including Dolby Digital surround sound on selected channels. The Sony Guide to choose from, you by satellite! Subscribe to the...
...turn it off when the recording is done! The infrared "blaster" supplied with your home. With over 200 channels of entertainment, the DIRECTV&#...buying a "high scanning," "High Definition monitor" or "High Definition upgradeable" television, you 'll have access to unforgettable pictures on HBO and Showtime, in... in addition to sports and other programming on HDNet. ƒ Powerful on , put it into your videocassette recorder or personal video recorder... sound including Dolby Digital surround sound on selected channels. The Sony Guide to choose from, you by satellite! Subscribe to the...
Marketing Specifications
Page 2
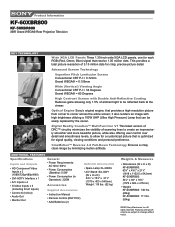
... • Monitor Out General • Power Requirements: AC120V, 60Hz • Power Consumption (Standby): 0.5W • Power Consumption (in Operation): 220W Accessories Supplied Accessories • Instruction Manual • ...0.72mm Grand WEGA® = 0.155mm Wide (Vertical) Viewing Angle Conventional CRT PJ = 34 Degrees Grand WEGA® = 60 Degrees...Sony's original engine, that resolve 1.05 million dots. This provides a total picture resolution of ambient light to corner across the entire screen; Product Information KF-60XBR800 KF-50XBR800 XBR Grand WEGA® Rear Projection Television...
... • Monitor Out General • Power Requirements: AC120V, 60Hz • Power Consumption (Standby): 0.5W • Power Consumption (in Operation): 220W Accessories Supplied Accessories • Instruction Manual • ...0.72mm Grand WEGA® = 0.155mm Wide (Vertical) Viewing Angle Conventional CRT PJ = 34 Degrees Grand WEGA® = 60 Degrees...Sony's original engine, that resolve 1.05 million dots. This provides a total picture resolution of ambient light to corner across the entire screen; Product Information KF-60XBR800 KF-50XBR800 XBR Grand WEGA® Rear Projection Television...

