Operating Instructions
Page 2
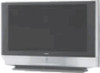
...rear of the LCD Projection TV, below . REFER SERVICING TO QUALIFIED SERVICE PERSONNEL. Note to CATV system installer This reminder is encouraged to try to which can radiate radio frequency energy and, if not installed and used in accordance with §15.119 of the FCC rules. Model No. MODEL: KF-42WE610, KF-50WE610, KF... THE RISK OF ELECTRIC SHOCK, DO NOT REMOVE COVER (OR BACK). Record these numbers in the spaces provided below the Sony logo, on the sticker, and also on Caption Vision This television receiver provides display of television closed captioning in accordance with...
...rear of the LCD Projection TV, below . REFER SERVICING TO QUALIFIED SERVICE PERSONNEL. Note to CATV system installer This reminder is encouraged to try to which can radiate radio frequency energy and, if not installed and used in accordance with §15.119 of the FCC rules. Model No. MODEL: KF-42WE610, KF-50WE610, KF... THE RISK OF ELECTRIC SHOCK, DO NOT REMOVE COVER (OR BACK). Record these numbers in the spaces provided below the Sony logo, on the sticker, and also on Caption Vision This television receiver provides display of television closed captioning in accordance with...

Operating Instructions
Page 3
As an ENERGY STAR® Partner, Sony Corporation has determined that face the screen with opaque drapery. ...the room temperature changes suddenly, the picture may be using the LCD Projection TV for several days, disconnect the power by qualified service personnel before turning on the LCD Projection TV. ❑ To obtain the best picture, do not block the ... contact your dealer. ❑ If any liquid or solid object should fall inside the cabinet, unplug the LCD Projection TV immediately and have it checked by pulling the plug itself. ENERGY STAR® is a U.S. Never pull on ...
As an ENERGY STAR® Partner, Sony Corporation has determined that face the screen with opaque drapery. ...the room temperature changes suddenly, the picture may be using the LCD Projection TV for several days, disconnect the power by qualified service personnel before turning on the LCD Projection TV. ❑ To obtain the best picture, do not block the ... contact your dealer. ❑ If any liquid or solid object should fall inside the cabinet, unplug the LCD Projection TV immediately and have it checked by pulling the plug itself. ENERGY STAR® is a U.S. Never pull on ...
Operating Instructions
Page 5
... spill liquid of any kind on or off when it from a TV set is continuous or frequent while the TV is not being turned on the set . If the picture becomes dark after using the LCD Projection TV for the specific model of mild soap and warm water. Consult qualified...or a glass cleaning cloth. ❑ To remove hard contamination, use the supplied cleaning cloth or a glass cleaning cloth moistened with solution of LCD Projection TV. Quick stops, excessive force, and uneven surfaces may be removed with a cloth slightly dampened with a solution of mild detergent and water. ❑...
... spill liquid of any kind on or off when it from a TV set is continuous or frequent while the TV is not being turned on the set . If the picture becomes dark after using the LCD Projection TV for the specific model of mild soap and warm water. Consult qualified...or a glass cleaning cloth. ❑ To remove hard contamination, use the supplied cleaning cloth or a glass cleaning cloth moistened with solution of LCD Projection TV. Quick stops, excessive force, and uneven surfaces may be removed with a cloth slightly dampened with a solution of mild detergent and water. ❑...
Operating Instructions
Page 11
...: ❑ After turning on page 12 carefully before the picture appears (1 minute or less). ❑ When the projection lamp wears out, the screen image becomes dark. Replace the lamp with a new Sony XL-2100U replacement lamp (not supplied). ✍ Be sure to attach the lamp cover securely; otherwise, your LCD projection TV, it may take...
...: ❑ After turning on page 12 carefully before the picture appears (1 minute or less). ❑ When the projection lamp wears out, the screen image becomes dark. Replace the lamp with a new Sony XL-2100U replacement lamp (not supplied). ✍ Be sure to attach the lamp cover securely; otherwise, your LCD projection TV, it may take...
Operating Instructions
Page 12
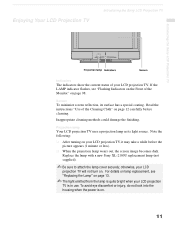
... sleep or going out. Disconnect the AC plug if idle for several minutes after turning the power off the power switch on the main unit or on the remote control. Introducing the Sony LCD Projection TV Notes on the LCD Projection TV To enjoy clear pictures ❑ Be sure not to allow sunlight or light from...
... sleep or going out. Disconnect the AC plug if idle for several minutes after turning the power off the power switch on the main unit or on the remote control. Introducing the Sony LCD Projection TV Notes on the LCD Projection TV To enjoy clear pictures ❑ Be sure not to allow sunlight or light from...
Operating Instructions
Page 13
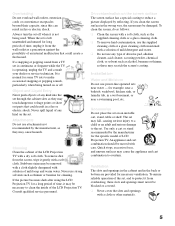
... Do not put flammable materials and metal objects inside the lamp. This may cause the lamp to do so may damage the LCD projection TV. ❑ Do not remove the lamp for any object inside the lamp receptacle of children. ❑ Do not pour water onto ...removed lamp near flammable materials or within the reach of the LCD projection TV after turning the power off on the front of the lamp receptacle. Introducing the Sony LCD Projection TV Introducing the Sony LCD Projection TV Replacing the Lamp The projection lamp has a limited life which illuminates the picture. If the ...
... Do not put flammable materials and metal objects inside the lamp. This may cause the lamp to do so may damage the LCD projection TV. ❑ Do not remove the lamp for any object inside the lamp receptacle of children. ❑ Do not pour water onto ...removed lamp near flammable materials or within the reach of the LCD projection TV after turning the power off on the front of the lamp receptacle. Introducing the Sony LCD Projection TV Introducing the Sony LCD Projection TV Replacing the Lamp The projection lamp has a limited life which illuminates the picture. If the ...
Operating Instructions
Page 14
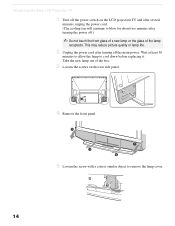
... 30 minutes to allow the lamp to blow for about two minutes after turning off the main power. Take the new lamp out of the lamp receptacle. Introducing the Sony LCD Projection TV 1 Turn off the power switch on the rear side panel. 4 Remove the front panel. 5 Loosen the screw with ...a coin or similar object to remove the lamp cover. 14 This may reduce picture quality or lamp life. 2 Unplug the power cord after turning the power off.)...
... 30 minutes to allow the lamp to blow for about two minutes after turning off the main power. Take the new lamp out of the lamp receptacle. Introducing the Sony LCD Projection TV 1 Turn off the power switch on the rear side panel. 4 Remove the front panel. 5 Loosen the screw with ...a coin or similar object to remove the lamp cover. 14 This may reduce picture quality or lamp life. 2 Unplug the power cord after turning the power off.)...
Operating Instructions
Page 15
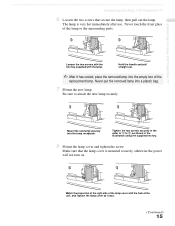
...turn on. Be sure to 2, as it has cooled, place the removed lamp into the empty box of 1 to attach the new lamp securely. Never touch the front glass of the unit, and replace the lamp cover as shown in the order of the replacement lamp. Introducing the Sony LCD Projection TV Introducing the Sony... LCD Projection TV 6 Loosen the two screws that the lamp cover is very hot immediately after use. Match the...
...turn on. Be sure to 2, as it has cooled, place the removed lamp into the empty box of 1 to attach the new lamp securely. Never touch the front glass of the unit, and replace the lamp cover as shown in the order of the replacement lamp. Introducing the Sony LCD Projection TV Introducing the Sony... LCD Projection TV 6 Loosen the two screws that the lamp cover is very hot immediately after use. Match the...

Operating Instructions
Page 26
...jack to enjoy the Twin View feature. With this set up convenient. CATV cable (No connection to TO CONVERTER) Antenna cable AUX Rear of LCD projection TV TO CONVERTER VHF/UHF Select CABLE or antenna (ANT) mode by pressing ANT on the remote control. ✍ To receive channels ... scrambled. ❑ Use the LCD projection TV remote control to change channels using your LCD projection TV when the signal is sent to the LCD projection TV, so you need to turn your Cable to switch between unscrambled signals coming straight into the LCD projection TV and scrambled signals coming in through your...
...jack to enjoy the Twin View feature. With this set up convenient. CATV cable (No connection to TO CONVERTER) Antenna cable AUX Rear of LCD projection TV TO CONVERTER VHF/UHF Select CABLE or antenna (ANT) mode by pressing ANT on the remote control. ✍ To receive channels ... scrambled. ❑ Use the LCD projection TV remote control to change channels using your LCD projection TV when the signal is sent to the LCD projection TV, so you need to turn your Cable to switch between unscrambled signals coming straight into the LCD projection TV and scrambled signals coming in through your...

Operating Instructions
Page 35
Installing and Connecting the LCD Projection TV Installing and Connecting the LCD Projection TV ✍ Be sure your VCR's video input is not equipped with S VIDEO, use a VIDEO cable (yellow) instead of the S VIDEO cable. 35 VHF/UHF to select - Consult your VCR or satellite receiver is set correctly. VIDEO 1 to watch cable TV. ✍ If your VCR's operating manual for instructions. ✍ Use TV/VIDEO to watch satellite TV or the VCR (your VCR must be turned on). -
Installing and Connecting the LCD Projection TV Installing and Connecting the LCD Projection TV ✍ Be sure your VCR's video input is not equipped with S VIDEO, use a VIDEO cable (yellow) instead of the S VIDEO cable. 35 VHF/UHF to select - Consult your VCR or satellite receiver is set correctly. VIDEO 1 to watch cable TV. ✍ If your VCR's operating manual for instructions. ✍ Use TV/VIDEO to watch satellite TV or the VCR (your VCR must be turned on). -
Operating Instructions
Page 43
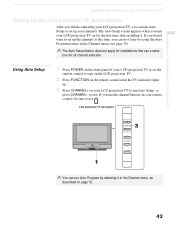
... . 3 Press CHANNEL+ on for all channel selection. Using Auto Setup 1 Press POWER on the front panel of your LCD projection TV or on the remote control to turn your LCD projection TV on your LCD projection TV to run Auto Program by using the Auto Program feature in the Channel menu, as described on your remote control...
... . 3 Press CHANNEL+ on for all channel selection. Using Auto Setup 1 Press POWER on the front panel of your LCD projection TV or on the remote control to turn your LCD projection TV on your LCD projection TV to run Auto Program by using the Auto Program feature in the Channel menu, as described on your remote control...

Operating Instructions
Page 44
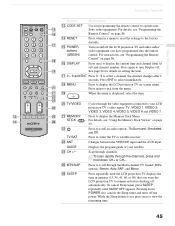
...the buttons on the remote control that was selected. The LCD projection TV alternates between two channels. Select the equipment (TV, SAT/CABLE, VCR/DVD) that you want to mute the sound. Adjusts the volume. 44 Press repeatedly to turn on page 69. Also available in the Video menu. Displays the... on and off Twin View. For details, see "Using Twin View™" on page 49. For details, see "Using Favorite Channels" on page 50. Freezes the window picture. Press to operate. qa FREEZE qs VOL +/- Press again or press VOL + to restore the picture. Press again to ...
...the buttons on the remote control that was selected. The LCD projection TV alternates between two channels. Select the equipment (TV, SAT/CABLE, VCR/DVD) that you want to mute the sound. Adjusts the volume. 44 Press repeatedly to turn on page 69. Also available in the Video menu. Displays the... on and off Twin View. For details, see "Using Twin View™" on page 49. For details, see "Using Favorite Channels" on page 50. Freezes the window picture. Press to operate. qa FREEZE qs VOL +/- Press again or press VOL + to restore the picture. Press again to ...
Operating Instructions
Page 45
.... qj 0 - 9 and ENT Press 0 - 9 to turn Display off the LCD projection TV and other audio/ video equipment you want the LCD projection TV to view the remaining time. 45 Using the Features Press to display the LCD projection TV on-screen menu. qk MENU Press to display the Memory Stick .../SAP wh SLEEP Cycles through channels. w; To cancel Sleep timer, press SLEEP repeatedly until the LCD projection TV displays the time in a menu to reset the settings to select the TV or satellite receiver. ql When the menu is set ) and channel number. For details, see "...
.... qj 0 - 9 and ENT Press 0 - 9 to turn Display off the LCD projection TV and other audio/ video equipment you want the LCD projection TV to view the remaining time. 45 Using the Features Press to display the LCD projection TV on-screen menu. qk MENU Press to display the Memory Stick .../SAP wh SLEEP Cycles through channels. w; To cancel Sleep timer, press SLEEP repeatedly until the LCD projection TV displays the time in a menu to reset the settings to select the TV or satellite receiver. ql When the menu is set ) and channel number. For details, see "...
Operating Instructions
Page 46
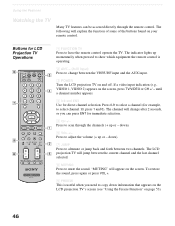
... 0-9 and ENT Use for example, to copy down information that appears on the LCD projection TV's screen (see "Using the Freeze Function" on the screen. Press to scan through the remote control. The LCD projection TV will appear on page 53). 46 If a video input indication (e.g., VIDEO 1, VIDEO 2)...volume (+ up or - The following will change between the VHF/UHF input and the AUX input. 3 POWER Turn the LCD projection TV on and off. Buttons for LCD Projection TV Operations VCR/ MUTING DVD SAT/ CABLE POWER MODE PICTURE WIDE DISPLAY JUMP FAVORITES ENT MENU VCR/DVD SAT/ CABLE...
... 0-9 and ENT Use for example, to copy down information that appears on the LCD projection TV's screen (see "Using the Freeze Function" on the screen. Press to scan through the remote control. The LCD projection TV will appear on page 53). 46 If a video input indication (e.g., VIDEO 1, VIDEO 2)...volume (+ up or - The following will change between the VHF/UHF input and the AUX input. 3 POWER Turn the LCD projection TV on and off. Buttons for LCD Projection TV Operations VCR/ MUTING DVD SAT/ CABLE POWER MODE PICTURE WIDE DISPLAY JUMP FAVORITES ENT MENU VCR/DVD SAT/ CABLE...

Operating Instructions
Page 47
...90) that best suits the program you want the LCD projection TV to scroll through available video inputs: TV, VIDEO 1, VIDEO 2, VIDEO 3, VIDEO 4, VIDEO 5, VIDEO 6 and VIDEO 7. qd MTS/SAP Press to remain on page 83). To turn the display off automatically. Vivid: Select for normal viewing ...environments. Pro: Select to display the channel number, current time and channel label (if set). Cancel by pressing SLEEP until the LCD projection TV displays the approximate time in ...
...90) that best suits the program you want the LCD projection TV to scroll through available video inputs: TV, VIDEO 1, VIDEO 2, VIDEO 3, VIDEO 4, VIDEO 5, VIDEO 6 and VIDEO 7. qd MTS/SAP Press to remain on page 83). To turn the display off automatically. Vivid: Select for normal viewing ...environments. Pro: Select to display the channel number, current time and channel label (if set). Cancel by pressing SLEEP until the LCD projection TV displays the approximate time in ...
Operating Instructions
Page 58
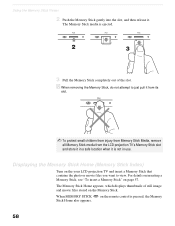
... just pull it from its slot. ✍ To protect small children from injury from Memory Stick Media, remove all Memory Stick media from the LCD projection TV's Memory Stick slot and store it in a safe location when it . When MEMORY STICK Stick Home also appears. The Memory Stick Home appears, which ...displays thumbnails of the slot. z When removing the Memory Stick, do not attempt to view. Displaying the Memory Stick Home (Memory Stick Index) Turn on page 57. Using the Memory Stick Viewer 2 Push the Memory Stick gently into the slot, and then release it is not in use.
... just pull it from its slot. ✍ To protect small children from injury from Memory Stick Media, remove all Memory Stick media from the LCD projection TV's Memory Stick slot and store it in a safe location when it . When MEMORY STICK Stick Home also appears. The Memory Stick Home appears, which ...displays thumbnails of the slot. z When removing the Memory Stick, do not attempt to view. Displaying the Memory Stick Home (Memory Stick Index) Turn on page 57. Using the Memory Stick Viewer 2 Push the Memory Stick gently into the slot, and then release it is not in use.

Operating Instructions
Page 63
... m to m (Rewind). (Continued) 63 the Memory Stick During playback or pause mode the control changes to select B/X. 2 Press . Select (clockwise) or (counterclockwise). Allows you to turn on Press < during movie stop mode. Deletes the displayed file from any changes. Using the Memory Stick Viewer Using the Memory Stick Viewer Option Return...
... m to m (Rewind). (Continued) 63 the Memory Stick During playback or pause mode the control changes to select B/X. 2 Press . Select (clockwise) or (counterclockwise). Allows you to turn on Press < during movie stop mode. Deletes the displayed file from any changes. Using the Memory Stick Viewer Using the Memory Stick Viewer Option Return...

Operating Instructions
Page 65
... locked), it cannot be heard. Using the Memory Stick Viewer Using the Memory Stick Viewer Option Information Audio Select Protect Delete Description Allows you to turn on the remote control to go to the next or previous still or movie image file. Select Selected Items and press . Slide show , press . Auto...
... locked), it cannot be heard. Using the Memory Stick Viewer Using the Memory Stick Viewer Option Information Audio Select Protect Delete Description Allows you to turn on the remote control to go to the next or previous still or movie image file. Select Selected Items and press . Slide show , press . Auto...
Operating Instructions
Page 70
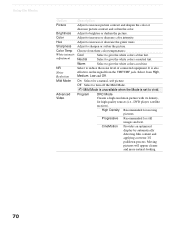
... Adjust to sharpen or soften the picture. Sharpness Adjust to increase or decrease the green tones. NR Noise Reduction Select to vivid. Off Select to turn off the Mild Mode. ✍ Mild Mode is unavailable when the Mode is also effective on the signal from High, Medium, Low and Off. CineMotion...
... Adjust to sharpen or soften the picture. Sharpness Adjust to increase or decrease the green tones. NR Noise Reduction Select to vivid. Off Select to turn off the Mild Mode. ✍ Mild Mode is unavailable when the Mode is also effective on the signal from High, Medium, Low and Off. CineMotion...
Operating Instructions
Page 72
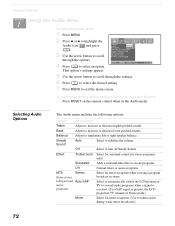
Bass Adjust to turn off Steady Sound. Off Select to increase or decrease lower-pitched sounds. Simulated Adds a surround-like effect to stabilize the volume. Steady Sound Auto Select ... mono reception. (Use to reduce noise during weak stereo broadcasts.) 72 Select to automatically switch the LCD projection TV to second audio programs when a signal is received. (If no SAP signal is present, the LCD projection TV remains in Stereo mode.) Mono Select for stereo programs only). Selecting Audio Options The Audio menu includes...
Bass Adjust to turn off Steady Sound. Off Select to increase or decrease lower-pitched sounds. Simulated Adds a surround-like effect to stabilize the volume. Steady Sound Auto Select ... mono reception. (Use to reduce noise during weak stereo broadcasts.) 72 Select to automatically switch the LCD projection TV to second audio programs when a signal is received. (If no SAP signal is present, the LCD projection TV remains in Stereo mode.) Mono Select for stereo programs only). Selecting Audio Options The Audio menu includes...


