Operating Instructions
Page 7
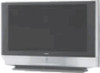
...; This LCD projection TV uses a cooling fan. For the best results, aim the remote control at least 1.8m (approx. 5.9ft.) for KF-42WE610, 2.0m (approx. 6.6ft.) for KF-50WE610 or 2.2m (approx. 7.2ft.) for a long period of broken glass remain inside the lamp unit noisily, but the lamp unit is in...technician to drop it . In some cases, the bulb bursts inside the lamp unit. (See "Replacing the Lamp" on your LCD projection TV, and within 60° of the vertical viewing area, and 130° of the TV. Safety Check Upon completion of any accessories or cables. Do not expose ...
...; This LCD projection TV uses a cooling fan. For the best results, aim the remote control at least 1.8m (approx. 5.9ft.) for KF-42WE610, 2.0m (approx. 6.6ft.) for KF-50WE610 or 2.2m (approx. 7.2ft.) for a long period of broken glass remain inside the lamp unit noisily, but the lamp unit is in...technician to drop it . In some cases, the bulb bursts inside the lamp unit. (See "Replacing the Lamp" on your LCD projection TV, and within 60° of the vertical viewing area, and 130° of the TV. Safety Check Upon completion of any accessories or cables. Do not expose ...
Operating Instructions
Page 8
...Sony LCD Projection TV Presenting the Sony LCD Projection TV 9 Using This Manual 10 Enjoying Your LCD Projection TV 11 Replacing the Lamp 13 Installing and Connecting the LCD Projection TV Contents 17 Inserting Batteries into the Remote Control ..........17 Carrying Your LCD Projection TV 18 To Prevent the LCD Projection TV from Falling Down 19 When Installing Your LCD Projection TV...Setting Up the LCD projection TV Automatically 43 Using the Features Using the Remote Control 44 Watching the TV 46 Watching Digital TV 48 Using Favorite Channels 49 Using Twin View 50 Using the Freeze ...
...Sony LCD Projection TV Presenting the Sony LCD Projection TV 9 Using This Manual 10 Enjoying Your LCD Projection TV 11 Replacing the Lamp 13 Installing and Connecting the LCD Projection TV Contents 17 Inserting Batteries into the Remote Control ..........17 Carrying Your LCD Projection TV 18 To Prevent the LCD Projection TV from Falling Down 19 When Installing Your LCD Projection TV...Setting Up the LCD projection TV Automatically 43 Using the Features Using the Remote Control 44 Watching the TV 46 Watching Digital TV 48 Using Favorite Channels 49 Using Twin View 50 Using the Freeze ...
Operating Instructions
Page 11
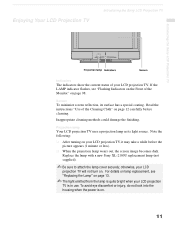
... emitted from the lamp is quite bright when your LCD projection TV. Projection lamp Your LCD projection TV uses a projection lamp as its surface has a special coating. Enjoying Your LCD Projection TV Introducing the Sony LCD Projection TV Introducing the Sony LCD Projection TV Projection lamp Indicators Screen Indicators The indicators show the current status of your LCD projection TV is in use. Replace the lamp with a new Sony XL-2100U replacement lamp (not supplied). ✍...
... emitted from the lamp is quite bright when your LCD projection TV. Projection lamp Your LCD projection TV uses a projection lamp as its surface has a special coating. Enjoying Your LCD Projection TV Introducing the Sony LCD Projection TV Introducing the Sony LCD Projection TV Projection lamp Indicators Screen Indicators The indicators show the current status of your LCD projection TV is in use. Replace the lamp with a new Sony XL-2100U replacement lamp (not supplied). ✍...
Operating Instructions
Page 13
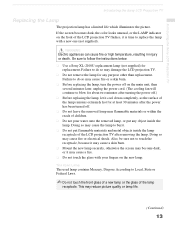
... the Sony LCD Projection TV Introducing the Sony LCD Projection TV Replacing the Lamp The projection lamp has a limited life which illuminates the picture. Doing so may cause the lamp to follow the instructions below. ❑ Use a Sony XL-2100U replacement lamp (not supplied) for any object inside the lamp. Be sure to burst. ❑ Do not put flammable materials and metal objects inside the lamp...
... the Sony LCD Projection TV Introducing the Sony LCD Projection TV Replacing the Lamp The projection lamp has a limited life which illuminates the picture. Doing so may cause the lamp to follow the instructions below. ❑ Use a Sony XL-2100U replacement lamp (not supplied) for any object inside the lamp. Be sure to burst. ❑ Do not put flammable materials and metal objects inside the lamp...
Operating Instructions
Page 14
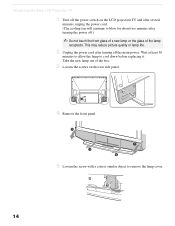
... will continue to blow for about two minutes after turning off the main power. Take the new lamp out of the lamp receptacle. Introducing the Sony LCD Projection TV 1 Turn off the power switch on the rear side panel. 4 Remove the front panel. 5 Loosen the screw with a coin or similar object to cool down before replacing it.
... will continue to blow for about two minutes after turning off the main power. Take the new lamp out of the lamp receptacle. Introducing the Sony LCD Projection TV 1 Turn off the power switch on the rear side panel. 4 Remove the front panel. 5 Loosen the screw with a coin or similar object to cool down before replacing it.
Operating Instructions
Page 15
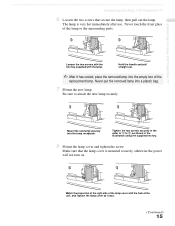
... touch the front glass of the replacement lamp. Make sure that secure the lamp, then pull out the lamp. Match the projection of the right side of the lamp cover with the lamp. Never put the removed lamp into the lamp receptacle. Introducing the Sony LCD Projection TV Introducing the Sony LCD Projection TV 6 Loosen the two screws that the lamp cover is very hot immediately...
... touch the front glass of the replacement lamp. Make sure that secure the lamp, then pull out the lamp. Match the projection of the right side of the lamp cover with the lamp. Never put the removed lamp into the lamp receptacle. Introducing the Sony LCD Projection TV Introducing the Sony LCD Projection TV 6 Loosen the two screws that the lamp cover is very hot immediately...
Operating Instructions
Page 16
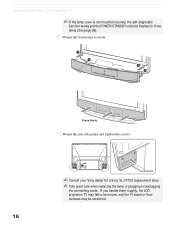
Press firmly. 10 Mount the rear side panel and tighten the screws. ✍ Consult your Sony dealer for three times (See page 98). 9 Mount the front panel securely. Introducing the Sony LCD Projection TV ✍ If the lamp cover is not mounted securely, the self-diagnostic function works and the POWER/STANDBY indicator flashes for a Sony XL-2100U replacement lamp. ✍ Take great care when replacing the lamp or plugging in/unplugging the connecting cords. If you handle them roughly, the LCD projection TV may fall or be moved, and the TV stand or floor surfaces may be scratched. 16
Press firmly. 10 Mount the rear side panel and tighten the screws. ✍ Consult your Sony dealer for three times (See page 98). 9 Mount the front panel securely. Introducing the Sony LCD Projection TV ✍ If the lamp cover is not mounted securely, the self-diagnostic function works and the POWER/STANDBY indicator flashes for a Sony XL-2100U replacement lamp. ✍ Take great care when replacing the lamp or plugging in/unplugging the connecting cords. If you handle them roughly, the LCD projection TV may fall or be moved, and the TV stand or floor surfaces may be scratched. 16
Operating Instructions
Page 94
...Unlock the Memory Stick. However there is no audio available while using Memory Stick. Cannot use with new Sony XL-2100U replacement lamp (see if the TV/VIDEO setting is correct: when watching TV, set to TV, and when watching connected equipment, set to be displayed" ❏ The photo or movie image to... folder when the Digi. be station trouble. 94 "No still file" is displayed ❏ Show Stills is selected from Filter of the LCD projection TV. ❏ Check to see page 13). ❏ Try another channel; Selecting the icon, however, displays the full-size image on the front...
...Unlock the Memory Stick. However there is no audio available while using Memory Stick. Cannot use with new Sony XL-2100U replacement lamp (see if the TV/VIDEO setting is correct: when watching TV, set to TV, and when watching connected equipment, set to be displayed" ❏ The photo or movie image to... folder when the Digi. be station trouble. 94 "No still file" is displayed ❏ Show Stills is selected from Filter of the LCD projection TV. ❏ Check to see page 13). ❏ Try another channel; Selecting the icon, however, displays the full-size image on the front...
Operating Instructions
Page 98
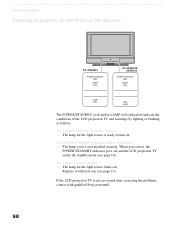
... burns out. Replace it with qualified Sony personnel. 98 Other Information Flashing Indicators on . If the LCD projection TV is ready to turn on the Front of the Monitor KF-42WE610 POWER/STANDBY TIMER KF-50WE610/ 60WE610 POWER/STANDBY TIMER LAMP LAMP The POWER/STANDBY (red) and/or LAMP (red) indicators indicate the conditions of the LCD projection TV and warnings by...
... burns out. Replace it with qualified Sony personnel. 98 Other Information Flashing Indicators on . If the LCD projection TV is ready to turn on the Front of the Monitor KF-42WE610 POWER/STANDBY TIMER KF-50WE610/ 60WE610 POWER/STANDBY TIMER LAMP LAMP The POWER/STANDBY (red) and/or LAMP (red) indicators indicate the conditions of the LCD projection TV and warnings by...
Operating Instructions
Page 102
... Installation of buttons 46 inserting batteries 17 programming 86-87 Remote control, operating other components with TV remote control 89 Screen menu 74 Setting up channels 43 Setup menu 68, 82 Sharpness, adjusting...43 Problems, troubleshooting 92, 97 R Ratings setting 80 viewing blocked programs 79 Remote control Function of the projection TV 25-42 J JUMP button 44 Jump, using with Cable box 89 DVD player 88 Satellite receiver 89... connecting 33 using 46 L Label Channels 77 video inputs 83 Lamp, replacing 13-16 M Memory Stick Advance 65 Audio Select 65 Close 61, 65 Delete 61, 63, 65 Digi...
... Installation of buttons 46 inserting batteries 17 programming 86-87 Remote control, operating other components with TV remote control 89 Screen menu 74 Setting up channels 43 Setup menu 68, 82 Sharpness, adjusting...43 Problems, troubleshooting 92, 97 R Ratings setting 80 viewing blocked programs 79 Remote control Function of the projection TV 25-42 J JUMP button 44 Jump, using with Cable box 89 DVD player 88 Satellite receiver 89... connecting 33 using 46 L Label Channels 77 video inputs 83 Lamp, replacing 13-16 M Memory Stick Advance 65 Audio Select 65 Close 61, 65 Delete 61, 63, 65 Digi...


