Operating Instructions
Page 6
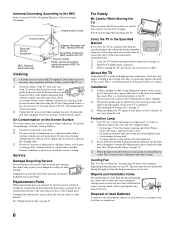
... shines on the display after using the TV for Antenna Grounding. Installation s If direct sunlight or other hazards. appeared on the screen, • the lamp replacement indicator on the unit. Never spill liquid of used replacement parts specified by the manufacturer that could ...Part H) Cleaning s Clean the rear cover area of the panel and is a structural property of the TV regularly. s Unplug the AC power cord when cleaning this type of any accessories or cables. This is not a defect. Projection Lamp s Your TV uses a projection lamp as thinner or benzine for ...
... shines on the display after using the TV for Antenna Grounding. Installation s If direct sunlight or other hazards. appeared on the screen, • the lamp replacement indicator on the unit. Never spill liquid of used replacement parts specified by the manufacturer that could ...Part H) Cleaning s Clean the rear cover area of the panel and is a structural property of the TV regularly. s Unplug the AC power cord when cleaning this type of any accessories or cables. This is not a defect. Projection Lamp s Your TV uses a projection lamp as thinner or benzine for ...

Operating Instructions
Page 7
...PC Settings 49 Other Information Replacing the Lamp 51 How to Optional Equipment.....18 Front Panel 18 Rear Panel 19 Setting Up the Channel List - Contents Getting Started Welcome 8 Features 8 Notes on the TV 9 Screen 10 Projection Lamp 10 Installing the TV 11 Carrying Your TV 11 Take Precaution during .../Antenna ........15 VCR and Cable 16 VCR and Cable Box/Digital Cable Box .......17 When Connecting to Replace the Lamp 51 Troubleshooting 55 Remote Control 55 Picture 56 Sound 57 Channels 57 General 58 PC Input Signal Reference Chart 60 Specifications 61 Index 62 7
...PC Settings 49 Other Information Replacing the Lamp 51 How to Optional Equipment.....18 Front Panel 18 Rear Panel 19 Setting Up the Channel List - Contents Getting Started Welcome 8 Features 8 Notes on the TV 9 Screen 10 Projection Lamp 10 Installing the TV 11 Carrying Your TV 11 Take Precaution during .../Antenna ........15 VCR and Cable 16 VCR and Cable Box/Digital Cable Box .......17 When Connecting to Replace the Lamp 51 Troubleshooting 55 Remote Control 55 Picture 56 Sound 57 Channels 57 General 58 PC Input Signal Reference Chart 60 Specifications 61 Index 62 7

Operating Instructions
Page 10
This is on the screen. As with a new Sony XL-5200 replacement lamp (not supplied). ❑ After the lamp is replaced, set the Lamp Replacement option, a message announcing that the lamp has reached its expected lifespan. Your TV uses a projection lamp as station logos and channel numbers are displayed for stubborn stains and dirt. Cleaning the Screen Surface Dust and dirt on...
This is on the screen. As with a new Sony XL-5200 replacement lamp (not supplied). ❑ After the lamp is replaced, set the Lamp Replacement option, a message announcing that the lamp has reached its expected lifespan. Your TV uses a projection lamp as station logos and channel numbers are displayed for stubborn stains and dirt. Cleaning the Screen Surface Dust and dirt on...

Operating Instructions
Page 31
...screen, these buttons serve as up in green when the TV is not securely attached (see the contacting Sony information on page 32). For details, see "Overview of the lamp unit or the lamp itself is turned on page 51. If the LED ...TV is turned off the TV. OPEN TIMER LAMP POWER POWER 0 MENU TV/VIDEO VOLUME CHANNEL TIMER LAMP POWER POWER 12 3 4 567 8 9 Item 1 MENU 2 TV/VIDEO 3 VOLUME +/- 4 CHANNEL +/- 5 TIMER LED 6 LAMP LED 7 POWER LED 8 (IR) Infrared Receiver 9 POWER q; Speaker Description Press to display MENU with TV functions and settings (see "Replacing the Lamp...
...screen, these buttons serve as up in green when the TV is not securely attached (see the contacting Sony information on page 32). For details, see "Overview of the lamp unit or the lamp itself is turned on page 51. If the LED ...TV is turned off the TV. OPEN TIMER LAMP POWER POWER 0 MENU TV/VIDEO VOLUME CHANNEL TIMER LAMP POWER POWER 12 3 4 567 8 9 Item 1 MENU 2 TV/VIDEO 3 VOLUME +/- 4 CHANNEL +/- 5 TIMER LED 6 LAMP LED 7 POWER LED 8 (IR) Infrared Receiver 9 POWER q; Speaker Description Press to display MENU with TV functions and settings (see "Replacing the Lamp...
Operating Instructions
Page 47
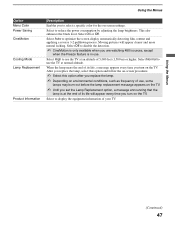
...the Menus Option Menu Color Power Saving CineMotion Cooling Mode Lamp Replacement Product Information Description Enables you to select a specific color for the on the TV. ✍ Until you set the Lamp Replacement option, a message announcing that the lamp is in use. Select to optimize the screen display automatically... the power consumption by adjusting the lamp brightness. Select Off to use the TV at an altitude of its life will appear clearer and more natural looking. Select to use , some lamps may burn out before the lamp replacement message appears on -screen settings. This...
...the Menus Option Menu Color Power Saving CineMotion Cooling Mode Lamp Replacement Product Information Description Enables you to select a specific color for the on the TV. ✍ Until you set the Lamp Replacement option, a message announcing that the lamp is in use. Select to optimize the screen display automatically... the power consumption by adjusting the lamp brightness. Select Off to use the TV at an altitude of its life will appear clearer and more natural looking. Select to use , some lamps may burn out before the lamp replacement message appears on -screen settings. This...

Operating Instructions
Page 51
... in injury or death. or (4) when the lamp replacement message appears on the TV screen. Other Information Other Information Replacing the Lamp The projection lamp, like all of the broken glass pieces inside the lamp receptacle of the TV after removing the lamp. This is normal and it . Consult your viewing experience, Sony recommends that you should be disposed of use...
... in injury or death. or (4) when the lamp replacement message appears on the TV screen. Other Information Other Information Replacing the Lamp The projection lamp, like all of the broken glass pieces inside the lamp receptacle of the TV after removing the lamp. This is normal and it . Consult your viewing experience, Sony recommends that you should be disposed of use...

Operating Instructions
Page 53
... illustration. ✍ If the lamp is very hot immediately after use. Insert the new lamp by inserting the two tabs in the illustration. Failure to do so may be triggered and the POWER LED blinks three times (see page 31). 8 Reattach the lamp door. Replace the door by pressing the two... parts firmly into the empty box of the lamp or the surrounding parts. ✍ After the used lamp into a plastic bag. 7 Put the new lamp into the compartment. Slide the lever to the right and...
... illustration. ✍ If the lamp is very hot immediately after use. Insert the new lamp by inserting the two tabs in the illustration. Failure to do so may be triggered and the POWER LED blinks three times (see page 31). 8 Reattach the lamp door. Replace the door by pressing the two... parts firmly into the empty box of the lamp or the surrounding parts. ✍ After the used lamp into a plastic bag. 7 Put the new lamp into the compartment. Slide the lever to the right and...

Operating Instructions
Page 54
... TV. ✍ Consult your local authorities or the Electronics Industries Alliance (http://www.eiae.org). ❑ Do not leave the used lamp For customers in the United States. Rough handling may cause the lamp to inform you set the Lamp Replacement option in /unplugging the connecting cords. For disposal or recycling information, please contact your Sony...
... TV. ✍ Consult your local authorities or the Electronics Industries Alliance (http://www.eiae.org). ❑ Do not leave the used lamp For customers in the United States. Rough handling may cause the lamp to inform you set the Lamp Replacement option in /unplugging the connecting cords. For disposal or recycling information, please contact your Sony...
Operating Instructions
Page 55
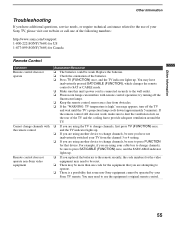
... channels, be operated by your Sony TV remote. If the remote control still does not work, make sure to dust the ventilation slots on the rear of the following numbers: http://www.sony.com/tvsupport 1-800-222-SONY(7669) for US 1-877-899-SONY(7669) for Canada Remote Control...10063; There is high." try turning off the TV and wait until the TV's projection lamp cools down (approximately 5 minutes). Replace the batteries. ❏ Check the orientation of your Sony TV, please visit our website or call one code for that some non-Sony equipment cannot be sure you have not inadvertently ...
... channels, be operated by your Sony TV remote. If the remote control still does not work, make sure to dust the ventilation slots on the rear of the following numbers: http://www.sony.com/tvsupport 1-800-222-SONY(7669) for US 1-877-899-SONY(7669) for Canada Remote Control...10063; There is high." try turning off the TV and wait until the TV's projection lamp cools down (approximately 5 minutes). Replace the batteries. ❏ Check the orientation of your Sony TV, please visit our website or call one code for that some non-Sony equipment cannot be sure you have not inadvertently ...
Operating Instructions
Page 58
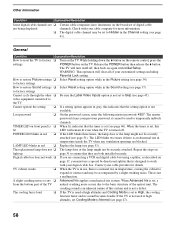
... off . video equipment connected to the TV Cannot operate the setting ❏ If a setting option appears in the Channel setting (see page 51). The master password clears your digital cable box. The replacement lamp does not ❏ The lamp door or the lamp might not be accompanied by a slight creaking... the setting option is a natural rise in red ❏ Replace the lamp (see page 41). The cooling fan is loud ❏ If the TV is used at high altitudes, set , a from the bottom part of the TV natural creaking noise occurs due to the basic structure of your ...
... off . video equipment connected to the TV Cannot operate the setting ❏ If a setting option appears in the Channel setting (see page 51). The master password clears your digital cable box. The replacement lamp does not ❏ The lamp door or the lamp might not be accompanied by a slight creaking... the setting option is a natural rise in red ❏ Replace the lamp (see page 41). The cooling fan is loud ❏ If the TV is used at high altitudes, set , a from the bottom part of the TV natural creaking noise occurs due to the basic structure of your ...

Operating Instructions
Page 59
...projection lamp when the power is time for lamp." see page 47). White spot on "How to Replace the Lamp" and follow the directions for you to replace the projection lamp used in the Setup settings (see page 10. "Projection lamp is nearing end ❏ It is turned off . Small bright or black dot in front of the projection TV...light sources. Wait for a while or let the TV run on the rear and both sides of the screen powered off may appear white even when TV is turned on again. This is not a defect with your TV and will not affect the overall picture performance or ...
...projection lamp when the power is time for lamp." see page 47). White spot on "How to Replace the Lamp" and follow the directions for you to replace the projection lamp used in the Setup settings (see page 10. "Projection lamp is nearing end ❏ It is turned off . Small bright or black dot in front of the projection TV...light sources. Wait for a while or let the TV run on the rear and both sides of the screen powered off may appear white even when TV is turned on again. This is not a defect with your TV and will not affect the overall picture performance or ...

Operating Instructions
Page 62
...) 9 Horizontal Center 40, 50 Hue 34 I Info Banner 45 Infrared Receiver (IR) 31 J JUMP button 22 L Label Channels 41 Label Video Inputs 45 LAMP LED 31 Lamp Replacement 47 Lamp, replacing 51-54 Language 46 Live Color 36 M MENU Antenna 33 Cable 33 External Inputs 32 Favorites 33 Settings 33 MENU button 25, 31 Menu...
...) 9 Horizontal Center 40, 50 Hue 34 I Info Banner 45 Infrared Receiver (IR) 31 J JUMP button 22 L Label Channels 41 Label Video Inputs 45 LAMP LED 31 Lamp Replacement 47 Lamp, replacing 51-54 Language 46 Live Color 36 M MENU Antenna 33 Cable 33 External Inputs 32 Favorites 33 Settings 33 MENU button 25, 31 Menu...


