
Operating Instructions
Page 4
... television programming via subscription service to Gemstar-TV Guide International, Inc. BBE and BBE symbol are registered trademarks of Sony Corporation. This TV is incorporated under license from Gemstar-TV Guide International, Inc. In Canada, TV Guide is a registered mark of its affiliates...affiliates. TruSurround XT, SRS and ( ) symbol are trademarks or registered trademarks of Gemstar-TV Guide International, Inc. under license from BBE Sound, Inc. For more of a set-top box. Availability of digital cable television programming in the U.S.A and other related marks...
... television programming via subscription service to Gemstar-TV Guide International, Inc. BBE and BBE symbol are registered trademarks of Sony Corporation. This TV is incorporated under license from Gemstar-TV Guide International, Inc. In Canada, TV Guide is a registered mark of its affiliates...affiliates. TruSurround XT, SRS and ( ) symbol are trademarks or registered trademarks of Gemstar-TV Guide International, Inc. under license from BBE Sound, Inc. For more of a set-top box. Availability of digital cable television programming in the U.S.A and other related marks...

Operating Instructions
Page 6
... such as the original parts. Service Damage Requiring Service Do not attempt to service the set by yourself since opening the cabinet may appear white due to reflections from the screen, ... cm) away from the wall outlet and refer servicing to qualified service personnel. Projection Lamp s Your TV uses a projection lamp as they may be necessary to contain all of broken glass pieces inside of...) Ground clamps Power service grounding electrode system (NEC Art 250 Part H) Cleaning s Clean the rear cover area of mild soap and warm water. s In rare instances, the bulb may be removed ...
... such as the original parts. Service Damage Requiring Service Do not attempt to service the set by yourself since opening the cabinet may appear white due to reflections from the screen, ... cm) away from the wall outlet and refer servicing to qualified service personnel. Projection Lamp s Your TV uses a projection lamp as they may be necessary to contain all of broken glass pieces inside of...) Ground clamps Power service grounding electrode system (NEC Art 250 Part H) Cleaning s Clean the rear cover area of mild soap and warm water. s In rare instances, the bulb may be removed ...

Operating Instructions
Page 7
...TV 9 Screen 10 Projection Lamp 10 Installing the TV 11 Carrying Your TV 11 Take Precaution during Installation 11 Preventing the TV from Toppling Over .......11 When Installing Your TV against a Wall......12 Detaching the Speakers (KDS-R70XBR2 only 13 Recommended Viewing Area 15 Connecting the TV... 70 TV Guide On Screen System 70 ...Settings 49 Sound Settings 52 Screen Settings 54 Channel Settings 56 Parental Lock Settings 57 Setup Settings 60 PC Settings 64 Other Information Replacing the Lamp 66 How to Optional Equipment.....22 Front Panel 22 Rear Panel 23 Setting...
...TV 9 Screen 10 Projection Lamp 10 Installing the TV 11 Carrying Your TV 11 Take Precaution during Installation 11 Preventing the TV from Toppling Over .......11 When Installing Your TV against a Wall......12 Detaching the Speakers (KDS-R70XBR2 only 13 Recommended Viewing Area 15 Connecting the TV... 70 TV Guide On Screen System 70 ...Settings 49 Sound Settings 52 Screen Settings 54 Channel Settings 56 Parental Lock Settings 57 Setup Settings 60 PC Settings 64 Other Information Replacing the Lamp 66 How to Optional Equipment.....22 Front Panel 22 Rear Panel 23 Setting...

Operating Instructions
Page 8
... channels (create a list of your favorite channels), TV Guide On ScreenTM system, cable channels (view cable channels), antenna channels (view antenna channels) or to customize your TV settings. ❑ Parental Control: Downloadable digital rating and ...and brightness from one scene to the program in the selected window. By adjusting the iris shutter, this Sony SXRDTM projection TV. You can watch 4:3 normal broadcasts in wide screen mode (16:9 aspect ratio). ❑ CineMotion®:...viewers. 8 Getting Started Welcome Features Thank you for models KDS-R60XBR2 and KDS-R70XBR2.
... channels (create a list of your favorite channels), TV Guide On ScreenTM system, cable channels (view cable channels), antenna channels (view antenna channels) or to customize your TV settings. ❑ Parental Control: Downloadable digital rating and ...and brightness from one scene to the program in the selected window. By adjusting the iris shutter, this Sony SXRDTM projection TV. You can watch 4:3 normal broadcasts in wide screen mode (16:9 aspect ratio). ❑ CineMotion®:...viewers. 8 Getting Started Welcome Features Thank you for models KDS-R60XBR2 and KDS-R70XBR2.

Operating Instructions
Page 9
...program search and reminder features. ❑ Steady Sound®: Equalizes volume levels so there is provided by your cable TV company, the card replaces the need for a separate set -top box, Blu-ray Disc™ Player (BD), DVD player, and A/V receiver. HDMI supports enhanced, or...before unplugging from shining directly onto the screen. ❑ The screen surface is inserted into the TV's rear panel CableCARD slot. After the service is activated with your cable TV company, is easily scratched. that will continue to digitally encrypted cable channels - To enjoy clear picture...
...program search and reminder features. ❑ Steady Sound®: Equalizes volume levels so there is provided by your cable TV company, the card replaces the need for a separate set -top box, Blu-ray Disc™ Player (BD), DVD player, and A/V receiver. HDMI supports enhanced, or...before unplugging from shining directly onto the screen. ❑ The screen surface is inserted into the TV's rear panel CableCARD slot. After the service is activated with your cable TV company, is easily scratched. that will continue to digitally encrypted cable channels - To enjoy clear picture...

Operating Instructions
Page 10
...a temporary condition. Getting Started Screen Projection Lamp To replace the lamp, see page 62). ✍ Until you set the Lamp Replacement option, a message announcing that the lamp has reached its expected lifespan. On moisture condensation ❑ If your TV is moved directly from the lamp is...the screen can affect the picture quality. Your TV uses a projection lamp as station logos and channel numbers are displayed for stubborn stains and dirt. As with the supplied Sony XL-5300 lamp. ❑ After the lamp is replaced, set the Lamp Replacement option in a humid room, ...
...a temporary condition. Getting Started Screen Projection Lamp To replace the lamp, see page 62). ✍ Until you set the Lamp Replacement option, a message announcing that the lamp has reached its expected lifespan. On moisture condensation ❑ If your TV is moved directly from the lamp is...the screen can affect the picture quality. Your TV uses a projection lamp as station logos and channel numbers are displayed for stubborn stains and dirt. As with the supplied Sony XL-5300 lamp. ❑ After the lamp is replaced, set the Lamp Replacement option in a humid room, ...
Operating Instructions
Page 11
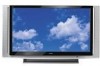
...Getting Started Do not grasp the pedestal or the speakers of the TV set, and then lift carefully. Support the TV by the pedestal or the speakers of children and the TV, keep children away from the TV during Installation Preventing the TV from Toppling Over If you must use the support belt. 11 ...As a protective measure, secure the TV as follows. To ensure the safety of the TV. Using the TV stand with support belts ❑ Sony strongly recommends using the SU-RS51U stand for your TV, you have connected cables and cords, be sure to break off....
...Getting Started Do not grasp the pedestal or the speakers of the TV set, and then lift carefully. Support the TV by the pedestal or the speakers of children and the TV, keep children away from the TV during Installation Preventing the TV from Toppling Over If you must use the support belt. 11 ...As a protective measure, secure the TV as follows. To ensure the safety of the TV. Using the TV stand with support belts ❑ Sony strongly recommends using the SU-RS51U stand for your TV, you have connected cables and cords, be sure to break off....
Operating Instructions
Page 16
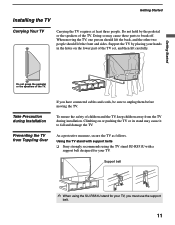
... the remote control (see page 17). A 300-ohm twin lead cable can also connect a variety of TV ✍ To set your TV to channel 3 or 4 depending on page 32. ✍ Press SAT/CABLE to your TV. Cable System and VHF/UHF Antenna System CATV cable Antenna cable ✍ Press ANT to your... TV (see page 28). CATV cable IN OUT Cable box Coaxial cable Antenna cable VHF/UHF CABLE Rear of optional...
... the remote control (see page 17). A 300-ohm twin lead cable can also connect a variety of TV ✍ To set your TV to channel 3 or 4 depending on page 32. ✍ Press SAT/CABLE to your TV. Cable System and VHF/UHF Antenna System CATV cable Antenna cable ✍ Press ANT to your... TV (see page 28). CATV cable IN OUT Cable box Coaxial cable Antenna cable VHF/UHF CABLE Rear of optional...

Operating Instructions
Page 17
... Box/ Digital Cable Box z To change channels using the cable box, set up the TV remote control, see page 28). The indicator will light up any other audio or video equipment to your TV to hook up . CATV cable Coaxial cable CABLE Rear of the S VIDEO cable. 17 Use this hookup if ❑ You... subscribe to a cable TV system that uses scrambled or encoded signals requiring a cable box to view all channels...
... Box/ Digital Cable Box z To change channels using the cable box, set up the TV remote control, see page 28). The indicator will light up any other audio or video equipment to your TV to hook up . CATV cable Coaxial cable CABLE Rear of the S VIDEO cable. 17 Use this hookup if ❑ You... subscribe to a cable TV system that uses scrambled or encoded signals requiring a cable box to view all channels...

Operating Instructions
Page 19
...A/V cable Coaxial cable Cable box A/V cable ✍ If your cable box. 19 Getting Started VCR and Cable Box/ Digital Cable Box VHF/UHF CABLE Rear of TV VIDEO IN HD/DVD IN (1080i/720p/480p/480i) CONTROL S IN OUT S VIDEO SERVICE ONLY PC IN AUDIO HDMI IN AUDIO L R VIDEO L ... Started S VIDEO S VIDEO cable CATV cable Coaxial cable VIDEO (yellow) AUDIO-L (white) AUDIO-R (red) Splitter z To change channels using the cable box, set your TV to work with your VCR is not equipped with S VIDEO, use a VIDEO cable (yellow) instead of the S VIDEO cable. ✍ If you are connecting...
...A/V cable Coaxial cable Cable box A/V cable ✍ If your cable box. 19 Getting Started VCR and Cable Box/ Digital Cable Box VHF/UHF CABLE Rear of TV VIDEO IN HD/DVD IN (1080i/720p/480p/480i) CONTROL S IN OUT S VIDEO SERVICE ONLY PC IN AUDIO HDMI IN AUDIO L R VIDEO L ... Started S VIDEO S VIDEO cable CATV cable Coaxial cable VIDEO (yellow) AUDIO-L (white) AUDIO-R (red) Splitter z To change channels using the cable box, set your TV to work with your VCR is not equipped with S VIDEO, use a VIDEO cable (yellow) instead of the S VIDEO cable. ✍ If you are connecting...

Operating Instructions
Page 20
..., you need for digital cable TV services, you to insert the CableCARD device (supplied by your cable TV company - not Sony. Activating CableCARD Service Before you can use a separate cable box for a separate set -top box - Check with your cable TV company) and activate the service,... as video-on-demand or, in permanent damage to receive programming using this time, these advanced services. Inserting the CableCARD incorrectly may be able to the card and the TV. 2 Gently push the card into the slot until it locks into the TV's rear...
..., you need for digital cable TV services, you to insert the CableCARD device (supplied by your cable TV company - not Sony. Activating CableCARD Service Before you can use a separate cable box for a separate set -top box - Check with your cable TV company) and activate the service,... as video-on-demand or, in permanent damage to receive programming using this time, these advanced services. Inserting the CableCARD incorrectly may be able to the card and the TV. 2 Gently push the card into the slot until it locks into the TV's rear...

Operating Instructions
Page 21
...require CableCARD. 1 Push the eject button on page 20. 21 A representative will guide you want to cancel your service, contact your cable TV company. ✍ Once the CableCARD device is removed, your CableCARD device is automatically displayed. Getting Started z You can activate your service.... Service" on the CableCARD slot to the lowest available channel. To install a different CableCARD device, follow the instructions in the Channel settings (see page 56). Eject button 2 Pull the CableCARD device straight out of the slot to the CableCARD device. Getting Started 3 The...
...require CableCARD. 1 Push the eject button on page 20. 21 A representative will guide you want to cancel your service, contact your cable TV company. ✍ Once the CableCARD device is removed, your CableCARD device is automatically displayed. Getting Started z You can activate your service.... Service" on the CableCARD slot to the lowest available channel. To install a different CableCARD device, follow the instructions in the Channel settings (see page 56). Eject button 2 Pull the CableCARD device straight out of the slot to the CableCARD device. Getting Started 3 The...

Operating Instructions
Page 23
that will enable you set -top box - This CABLE input jack, in conjunction with access to secure, digitally encrypted cable channels - For details, see...For details, see page 20. 2 VHF/UHF Connects to your VHF/UHF antenna. 3 CABLE Connects to your TV to switch between scrambled channels (coming through a cable box) and unscrambled cable channels. Getting Started Rear Panel 1 Getting Started 2 3 4 5 IN 7 8 PC IN RGB 9 VIDEO IN HD/DVD IN..., lets you to receive not only standard definition but also high definition television. without the need for a set up your cable signal.
that will enable you set -top box - This CABLE input jack, in conjunction with access to secure, digitally encrypted cable channels - For details, see...For details, see page 20. 2 VHF/UHF Connects to your VHF/UHF antenna. 3 CABLE Connects to your TV to switch between scrambled channels (coming through a cable box) and unscrambled cable channels. Getting Started Rear Panel 1 Getting Started 2 3 4 5 IN 7 8 PC IN RGB 9 VIDEO IN HD/DVD IN..., lets you to receive not only standard definition but also high definition television. without the need for a set up your cable signal.

Operating Instructions
Page 24
...1080i formats. Connect to the HDMI IN AUDIO 8 (rear panel). (DVI connector is located on your equipment's component video (YPBPR) and audio (L/R) jacks. Note that this TV displays all format types of picture in a resolution of the TV. If the equipment has a DVI jack and not ... ✍ Component video (YPBPR) connection is necessary to use an adapter (not supplied). Note that this TV displays all format types of picture in a resolution of the PC settings, as described on your DVI-equipped device. Getting Started Jack 4 HDMI IN 7/8 Description HDMI (High-Definition ...
...1080i formats. Connect to the HDMI IN AUDIO 8 (rear panel). (DVI connector is located on your equipment's component video (YPBPR) and audio (L/R) jacks. Note that this TV displays all format types of picture in a resolution of the TV. If the equipment has a DVI jack and not ... ✍ Component video (YPBPR) connection is necessary to use an adapter (not supplied). Note that this TV displays all format types of picture in a resolution of the PC settings, as described on your DVI-equipped device. Getting Started Jack 4 HDMI IN 7/8 Description HDMI (High-Definition ...

Operating Instructions
Page 26
... setup. 7 When the Welcome screen appears, press again to scan available channels (see page 56). Getting Started Setting Up the Channel List - Initial Setup After you finish connecting the TV, you select "No" during Initial Setup, the Initial Setup screen will automatically create a list of available analog ... it up the channels at a later time, select the Auto Program option in the Channel settings to begin the setup. ✍ Make sure you finish Auto Program before starting the TV Guide On Screen system setup. Auto Program performed through Initial Setup will reappear each time you ...
... setup. 7 When the Welcome screen appears, press again to scan available channels (see page 56). Getting Started Setting Up the Channel List - Initial Setup After you finish connecting the TV, you select "No" during Initial Setup, the Initial Setup screen will automatically create a list of available analog ... it up the channels at a later time, select the Auto Program option in the Channel settings to begin the setup. ✍ Make sure you finish Auto Program before starting the TV Guide On Screen system setup. Auto Program performed through Initial Setup will reappear each time you ...

Operating Instructions
Page 27
If it may take up the TV Guide On Screen system, it is correct. If you press TV GUIDE during this time you will appear when you set up to 24 hours to collect program listings. The Welcome screen appears. If not, select "No." Once program listings are collected, the Guide will see a setup progress screen. Getting Started 27 Repeat the setup process to make any corrections. ✍ After you press TV GUIDE. Getting Started 8 After all of the setup steps have been completed, verify the setup information is , select "Yes" to end setup.
If it may take up the TV Guide On Screen system, it is correct. If you press TV GUIDE during this time you will appear when you set up to 24 hours to collect program listings. The Welcome screen appears. If not, select "No." Once program listings are collected, the Guide will see a setup progress screen. Getting Started 27 Repeat the setup process to make any corrections. ✍ After you press TV GUIDE. Getting Started 8 After all of the setup steps have been completed, verify the setup information is , select "Yes" to end setup.
Operating Instructions
Page 28
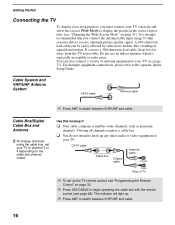
...and PLAY button have a tactile dot. the channel changes after two seconds. For example, to show which external equipment the remote control is set to change channels immediately. The FUNCTION button indicator lights up the video input labels, including the Skip function. Use the tactile dot as ...was selected. Press to select TruSurround XT audio effect or Off to remain on setting up momentarily when pressed to enter 2.1, press 2 , , 1 and ENT. Push and slide to select digital channels. The TV alternates between the VHF/UHF input and the CABLE input. See page 52. ...
...and PLAY button have a tactile dot. the channel changes after two seconds. For example, to show which external equipment the remote control is set to change channels immediately. The FUNCTION button indicator lights up the video input labels, including the Skip function. Use the tactile dot as ...was selected. Press to select TruSurround XT audio effect or Off to remain on setting up momentarily when pressed to enter 2.1, press 2 , , 1 and ENT. Push and slide to select digital channels. The TV alternates between the VHF/UHF input and the CABLE input. See page 52. ...
Operating Instructions
Page 29
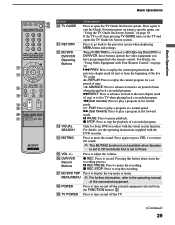
...for Sony DVD recorders with the visual search function. qg VOL +/- X REC PAUSE: Press to the previous screen when displaying MENU items and settings. qa RETURN Press to go back to pause the recording. For details, see "Using the TV Guide On Screen System" on the TV and opens the TV ...Guide On Screen system. qd VISUAL SEARCH Only for a set period of a recorded program. Pressing this button alone starts the recording process. m (fast reverse):...
...for Sony DVD recorders with the visual search function. qg VOL +/- X REC PAUSE: Press to the previous screen when displaying MENU items and settings. qa RETURN Press to go back to pause the recording. For details, see "Using the TV Guide On Screen System" on the TV and opens the TV ...Guide On Screen system. qd VISUAL SEARCH Only for a set period of a recorded program. Pressing this button alone starts the recording process. m (fast reverse):...

Operating Instructions
Page 30
... image of the active picture, press CH +/-, 0-9, TV/VIDEO, or ANT. ✍ If you adjust the picture sizes in progress Frozen picture ws PICTURE Freeze Press repeatedly to the HD/DVD IN 5-6, and HDMI IN 3, 7-8 inputs appear in the Picture settings. Then, press V/v to view all channels, the...✍ When you use the Twin View function, the memorized sizes appear. The next time you see "Picture Settings" on and off. Current program in Twin View, the TV memorizes the change the channel or the input source of the current program. To make FOX DVD the other picture...
... image of the active picture, press CH +/-, 0-9, TV/VIDEO, or ANT. ✍ If you adjust the picture sizes in progress Frozen picture ws PICTURE Freeze Press repeatedly to the HD/DVD IN 5-6, and HDMI IN 3, 7-8 inputs appear in the Picture settings. Then, press V/v to view all channels, the...✍ When you use the Twin View function, the memorized sizes appear. The next time you see "Picture Settings" on and off. Current program in Twin View, the TV memorizes the change the channel or the input source of the current program. To make FOX DVD the other picture...

Operating Instructions
Page 31
... ✍ The menus you can select may vary depending on page 34. 31 wk CH +/- To scan quickly through the Wide Mode settings: Wide Zoom, Normal, Full, Zoom. For details, see page 61). Basic Operations Button wd WIDE Basic Operations Description Press repeatedly to ...display the current channel number, channel label, program-related information (if available), time, Wide Mode settings and remaining sleep time (when Sleep is set, see "Using Other Equipment with TV functions and settings. The OSD (on -screen cursor. Changing the Wide Screen Mode 4:3 Original source 16:9 ...
... ✍ The menus you can select may vary depending on page 34. 31 wk CH +/- To scan quickly through the Wide Mode settings: Wide Zoom, Normal, Full, Zoom. For details, see page 61). Basic Operations Button wd WIDE Basic Operations Description Press repeatedly to ...display the current channel number, channel label, program-related information (if available), time, Wide Mode settings and remaining sleep time (when Sleep is set, see "Using Other Equipment with TV functions and settings. The OSD (on -screen cursor. Changing the Wide Screen Mode 4:3 Original source 16:9 ...


