
Operating Instructions
Page 4
...service to Gemstar-TV Guide International, Inc. The TV Guide On Screen system is protected by one of a set-top box. TruSurround XT technology is a trademark. Blu-ray Disc is incorporated under license from Gemstar-TV Guide International, Inc. This TV incorporates High-...to a cable service provider. SXRD, WEGA, Grand WEGA, Steady Sound, Digital Reality Creation, CineMotion and Twin View are trademarks of Sony Corporation. This TV is a trademark licensed to a cable system providing such programming. TruSurround XT, SRS and ( ) symbol are registered trademarks of SRS...
...service to Gemstar-TV Guide International, Inc. The TV Guide On Screen system is protected by one of a set-top box. TruSurround XT technology is a trademark. Blu-ray Disc is incorporated under license from Gemstar-TV Guide International, Inc. This TV incorporates High-...to a cable service provider. SXRD, WEGA, Grand WEGA, Steady Sound, Digital Reality Creation, CineMotion and Twin View are trademarks of Sony Corporation. This TV is a trademark licensed to a cable system providing such programming. TruSurround XT, SRS and ( ) symbol are registered trademarks of SRS...

Operating Instructions
Page 6
...and Ventilation Holes Never push objects of persons, it gently with a solution of the TV set by the manufacturer that could result in position, be sure the service technician certifies in...clean the screen as thinner or benzine for Antenna Grounding. Unauthorized substitutions may result in the rear cover area may be caused. This is a structural property of the panel and is ..., wipe it may drop and a serious injury may scratch the screen's coating. Projection Lamp s Your TV uses a projection lamp as these may be more noticeable during the night or when the background noise...
...and Ventilation Holes Never push objects of persons, it gently with a solution of the TV set by the manufacturer that could result in position, be sure the service technician certifies in...clean the screen as thinner or benzine for Antenna Grounding. Unauthorized substitutions may result in the rear cover area may be caused. This is a structural property of the panel and is ..., wipe it may drop and a serious injury may scratch the screen's coating. Projection Lamp s Your TV uses a projection lamp as these may be more noticeable during the night or when the background noise...

Operating Instructions
Page 7
...Rear Panel 23 Setting Up the Channel List - Contents Getting Started Welcome 8 Features 8 Notes on the TV 9 Screen 10 Projection Lamp 10 Installing the TV 11 Carrying Your TV 11 Take Precaution during Installation 11 Preventing the TV from Toppling Over .......11 When Installing Your TV against a Wall......12 Detaching the Speakers (KDS-R70XBR2...CableCARD Service 20 Removing the CableCARD Device 21 When Connecting to Replace the Lamp 66 Troubleshooting 70 TV Guide On Screen System 70 Remote Control 71 CableCARD Device 72 Twin View 72 Picture 72 Sound 74 Channels 74 ...
...Rear Panel 23 Setting Up the Channel List - Contents Getting Started Welcome 8 Features 8 Notes on the TV 9 Screen 10 Projection Lamp 10 Installing the TV 11 Carrying Your TV 11 Take Precaution during Installation 11 Preventing the TV from Toppling Over .......11 When Installing Your TV against a Wall......12 Detaching the Speakers (KDS-R70XBR2...CableCARD Service 20 Removing the CableCARD Device 21 When Connecting to Replace the Lamp 66 Troubleshooting 70 TV Guide On Screen System 70 Remote Control 71 CableCARD Device 72 Twin View 72 Picture 72 Sound 74 Channels 74 ...

Operating Instructions
Page 8
...Sony technology, including: • DRC® (Digital Reality Creation)-MF V2.5: Unlike conventional line doublers, the DRC Multifunction feature replaces the signal's NTSC waveform with your new TV include: ❑ SXRDTM: SXRD is for your TV settings...ability to zoom in the selected window. By adjusting the iris shutter, this Sony SXRDTM projection TV. The DRC Palette option lets you customize the level of detail (Reality)...to the program in on one scene to the next for models KDS-R60XBR2 and KDS-R70XBR2. You can watch digital televised programs and enjoy the improved audio...
...Sony technology, including: • DRC® (Digital Reality Creation)-MF V2.5: Unlike conventional line doublers, the DRC Multifunction feature replaces the signal's NTSC waveform with your new TV include: ❑ SXRDTM: SXRD is for your TV settings...ability to zoom in the selected window. By adjusting the iris shutter, this Sony SXRDTM projection TV. The DRC Palette option lets you customize the level of detail (Reality)...to the program in on one scene to the next for models KDS-R60XBR2 and KDS-R70XBR2. You can watch digital televised programs and enjoy the improved audio...

Operating Instructions
Page 9
.... After the service is inserted into the TV's rear panel CableCARD slot. HDMI supports enhanced, or high-definition video, plus two-channel digital audio. When not using the TV for a set -top box. (Check with your cable TV company, is activated with your TV. ❑ HDMI (High-Definition Multimedia Interface... up to 16 favorite channels without the need for DVD (480p, 480i) and digital set -top box, Blu-ray Disc™ Player (BD), DVD player, and A/V receiver. Notes on the TV Getting Started ❑ CableCARD™ slot: Provides cable subscribers with access to receive not...
.... After the service is inserted into the TV's rear panel CableCARD slot. HDMI supports enhanced, or high-definition video, plus two-channel digital audio. When not using the TV for a set -top box. (Check with your cable TV company, is activated with your TV. ❑ HDMI (High-Definition Multimedia Interface... up to 16 favorite channels without the need for DVD (480p, 480i) and digital set -top box, Blu-ray Disc™ Player (BD), DVD player, and A/V receiver. Notes on the TV Getting Started ❑ CableCARD™ slot: Provides cable subscribers with access to receive not...

Operating Instructions
Page 10
...darker. Getting Started Screen Projection Lamp To replace the lamp, see page 62). ✍ Until you turn on the screen. Inappropriate cleaning methods could damage the screen surface. Cleaning the Screen Surface Dust and dirt on . 10 As with the supplied Sony XL-5300 lamp. ...TV uses a projection lamp as station logos and channel numbers are displayed for stubborn stains and dirt. On moisture condensation ❑ If your TV is moved directly from the lamp is quite bright when your TV. ✍ The light emitted from a cold to let you know that the lamp is replaced, set...
...darker. Getting Started Screen Projection Lamp To replace the lamp, see page 62). ✍ Until you turn on the screen. Inappropriate cleaning methods could damage the screen surface. Cleaning the Screen Surface Dust and dirt on . 10 As with the supplied Sony XL-5300 lamp. ...TV uses a projection lamp as station logos and channel numbers are displayed for stubborn stains and dirt. On moisture condensation ❑ If your TV is moved directly from the lamp is quite bright when your TV. ✍ The light emitted from a cold to let you know that the lamp is replaced, set...
Operating Instructions
Page 11
... Climbing on the lower part of the TV. Support belt ✍ When using the TV stand SU-RS51U with support belts ❑ Sony strongly recommends using the SU-RS51U stand for your TV. When moving the TV. Support the TV by the pedestal or the speakers of ...during Installation Preventing the TV from the TV during installation. As a protective measure, secure the TV as follows. Getting Started Do not grasp the pedestal or the speakers of the TV set, and then lift carefully. Installing the TV Getting Started Carrying Your TV Carrying the TV requires at least three...
... Climbing on the lower part of the TV. Support belt ✍ When using the TV stand SU-RS51U with support belts ❑ Sony strongly recommends using the SU-RS51U stand for your TV. When moving the TV. Support the TV by the pedestal or the speakers of ...during Installation Preventing the TV from the TV during installation. As a protective measure, secure the TV as follows. Getting Started Do not grasp the pedestal or the speakers of the TV set, and then lift carefully. Installing the TV Getting Started Carrying Your TV Carrying the TV requires at least three...
Operating Instructions
Page 16
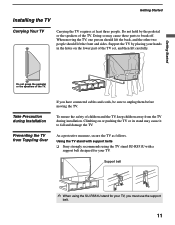
...cable. 16 CATV cable IN OUT Cable box Coaxial cable Antenna cable VHF/UHF CABLE Rear of optional equipment to your TV to channel 3 or 4 depending on the cable box channel output. Do not use... using 75-ohm coaxial cable to receive optimum picture quality signal. The indicator will light up the TV remote control, see "Programming the Remote Control" on page 31). Use this hookup if ❑... separate Quick Setup Guide. A 300-ohm twin lead cable can also connect a variety of TV ✍ To set your TV (see "Changing the Wide Screen Mode" on page 32. ✍ Press SAT/CABLE to...
...cable. 16 CATV cable IN OUT Cable box Coaxial cable Antenna cable VHF/UHF CABLE Rear of optional equipment to your TV to channel 3 or 4 depending on the cable box channel output. Do not use... using 75-ohm coaxial cable to receive optimum picture quality signal. The indicator will light up the TV remote control, see "Programming the Remote Control" on page 31). Use this hookup if ❑... separate Quick Setup Guide. A 300-ohm twin lead cable can also connect a variety of TV ✍ To set your TV (see "Changing the Wide Screen Mode" on page 32. ✍ Press SAT/CABLE to...

Operating Instructions
Page 17
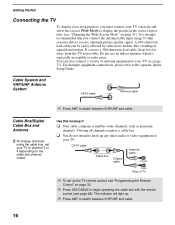
...-R (red) A/V cable Satellite receiver Satellite antenna cable S VIDEO cable ✍ If your TV. CATV cable Coaxial cable CABLE Rear of the S VIDEO cable. 17 Use this hookup if ❑ You subscribe to a cable TV system that uses scrambled or encoded signals requiring a cable box to view all channels, and ... not intend to hook up . Getting Started Getting Started Cable Box/ Digital Cable Box z To change channels using the cable box, set up the TV remote control, see page 28). The indicator will light up any other audio or video equipment to begin operating the cable box with ...
...-R (red) A/V cable Satellite receiver Satellite antenna cable S VIDEO cable ✍ If your TV. CATV cable Coaxial cable CABLE Rear of the S VIDEO cable. 17 Use this hookup if ❑ You subscribe to a cable TV system that uses scrambled or encoded signals requiring a cable box to view all channels, and ... not intend to hook up . Getting Started Getting Started Cable Box/ Digital Cable Box z To change channels using the cable box, set up the TV remote control, see page 28). The indicator will light up any other audio or video equipment to begin operating the cable box with ...

Operating Instructions
Page 19
...white) AUDIO-R (red) VCR A/V cable Coaxial cable Cable box A/V cable ✍ If your VCR is not equipped with S VIDEO, use a VIDEO cable (yellow) instead of TV VIDEO IN HD/DVD IN (1080i/720p/480p/480i) CONTROL S IN OUT S VIDEO SERVICE ONLY PC IN AUDIO HDMI IN AUDIO L R VIDEO L (MONO) AUDIO R 9 8...VIDEO (yellow) AUDIO-L (white) AUDIO-R (red) Splitter z To change channels using the cable box, set your cable box. 19 Getting Started VCR and Cable Box/ Digital Cable Box VHF/UHF CABLE Rear of the S VIDEO cable. ✍ If you are connecting a digital cable box, you will need a...
...white) AUDIO-R (red) VCR A/V cable Coaxial cable Cable box A/V cable ✍ If your VCR is not equipped with S VIDEO, use a VIDEO cable (yellow) instead of TV VIDEO IN HD/DVD IN (1080i/720p/480p/480i) CONTROL S IN OUT S VIDEO SERVICE ONLY PC IN AUDIO HDMI IN AUDIO L R VIDEO L (MONO) AUDIO R 9 8...VIDEO (yellow) AUDIO-L (white) AUDIO-R (red) Splitter z To change channels using the cable box, set your cable box. 19 Getting Started VCR and Cable Box/ Digital Cable Box VHF/UHF CABLE Rear of the S VIDEO cable. ✍ If you are connecting a digital cable box, you will need a...

Operating Instructions
Page 20
...limitations, pricing, and availability, all of a separate set-top box. not Sony. The CableCARD device, which is provided by your cable TV company for a separate set -top box - At this TV with the CableCARD device instead - Check with your cable TV company, is currently a unidirectional device only, and cannot...area. ❑ You want to the card and the TV. 2 Gently push the card into the slot until it locks into the TV's rear panel CableCARD slot. except in the following circumstances: ❑ Your cable TV company does not provide CableCARD service in permanent damage to ...
...limitations, pricing, and availability, all of a separate set-top box. not Sony. The CableCARD device, which is provided by your cable TV company for a separate set -top box - At this TV with the CableCARD device instead - Check with your cable TV company, is currently a unidirectional device only, and cannot...area. ❑ You want to the card and the TV. 2 Gently push the card into the slot until it locks into the TV's rear panel CableCARD slot. except in the following circumstances: ❑ Your cable TV company does not provide CableCARD service in permanent damage to ...

Operating Instructions
Page 21
... require CableCARD. 1 Push the eject button on page 20. 21 Getting Started 3 The CableCARD device setup screen is removed, your TV will guide you want to cancel your service, contact your cable TV company. ✍ Once the CableCARD device is automatically displayed. Getting Started z You can activate your service. 4 Follow the displayed... button 2 Pull the CableCARD device straight out of the slot to the CableCARD device. To install a different CableCARD device, follow the instructions in the Channel settings (see page 56).
... require CableCARD. 1 Push the eject button on page 20. 21 Getting Started 3 The CableCARD device setup screen is removed, your TV will guide you want to cancel your service, contact your cable TV company. ✍ Once the CableCARD device is automatically displayed. Getting Started z You can activate your service. 4 Follow the displayed... button 2 Pull the CableCARD device straight out of the slot to the CableCARD device. To install a different CableCARD device, follow the instructions in the Channel settings (see page 56).

Operating Instructions
Page 23
...set -top box - For details, see page 16. ✍ VHF/UHF input receives over-the-air broadcast signal frequencies and CABLE input receives CATV signal frequencies. (Continued) 23 For details, see page 20. 2 VHF/UHF Connects to your VHF/UHF antenna. 3 CABLE Connects to your TV... to switch between scrambled channels (coming through a cable box) and unscrambled cable channels. This CABLE input jack, in conjunction with access to secure, digitally encrypted cable channels - Getting Started Rear Panel 1 Getting Started 2 3 4 5 IN 7...
...set -top box - For details, see page 16. ✍ VHF/UHF input receives over-the-air broadcast signal frequencies and CABLE input receives CATV signal frequencies. (Continued) 23 For details, see page 20. 2 VHF/UHF Connects to your VHF/UHF antenna. 3 CABLE Connects to your TV... to switch between scrambled channels (coming through a cable box) and unscrambled cable channels. This CABLE input jack, in conjunction with access to secure, digitally encrypted cable channels - Getting Started Rear Panel 1 Getting Started 2 3 4 5 IN 7...

Operating Instructions
Page 24
... composite video and audio jack (VIDEO 2) is located on your DVI-equipped device. Note that this TV displays all format types of picture in a resolution of the PC settings, as described on your A/V equipment such as a set-top box, Blu-ray Disc Player, DVD player, and A/V receiver. Getting Started Jack 4 HDMI IN ... HDMI jack, connect the DVI jack to the HDMI IN 8 (with HDMI-to-DVI cable and/or adapter) jack (rear panel), and connect the audio jack to the HDMI IN AUDIO 8 (rear panel). (DVI connector is noisy, flickering or not clear, adjust the Phase and Pitch of 1,920 dots × 1,...
... composite video and audio jack (VIDEO 2) is located on your DVI-equipped device. Note that this TV displays all format types of picture in a resolution of the PC settings, as described on your A/V equipment such as a set-top box, Blu-ray Disc Player, DVD player, and A/V receiver. Getting Started Jack 4 HDMI IN ... HDMI jack, connect the DVI jack to the HDMI IN 8 (with HDMI-to-DVI cable and/or adapter) jack (rear panel), and connect the audio jack to the HDMI IN AUDIO 8 (rear panel). (DVI connector is noisy, flickering or not clear, adjust the Phase and Pitch of 1,920 dots × 1,...

Operating Instructions
Page 26
...3 Press V/v to change the numbers, and B/b to move between fields. 4 When you choose to set up . 1 Press POWER on the TV front panel to highlight "Yes" then press . If you finish setting the date and time, highlight "OK" and press . Auto Program performed through Initial Setup will automatically create...Program is not completed, you may not be prompted to set up the channels at a later time, select the Auto Program option in the Channel settings to correctly receive program listings. 26 Initial Setup After you finish connecting the TV, you turn on -screen display language, then press ....
...3 Press V/v to change the numbers, and B/b to move between fields. 4 When you choose to set up . 1 Press POWER on the TV front panel to highlight "Yes" then press . If you finish setting the date and time, highlight "OK" and press . Auto Program performed through Initial Setup will automatically create...Program is not completed, you may not be prompted to set up the channels at a later time, select the Auto Program option in the Channel settings to correctly receive program listings. 26 Initial Setup After you finish connecting the TV, you turn on -screen display language, then press ....

Operating Instructions
Page 27
If you press TV GUIDE during this time you will appear when you set up to 24 hours to collect program listings. Getting Started 27 Getting Started 8 After all of the setup steps have been completed, verify the setup information is , select "Yes" to end setup. If it may take up the TV Guide On Screen system, it is correct. Repeat the setup process to make any corrections. ✍ After you press TV GUIDE. The Welcome screen appears. Once program listings are collected, the Guide will see a setup progress screen. If not, select "No."
If you press TV GUIDE during this time you will appear when you set up to 24 hours to collect program listings. Getting Started 27 Getting Started 8 After all of the setup steps have been completed, verify the setup information is , select "Yes" to end setup. If it may take up the TV Guide On Screen system, it is correct. Repeat the setup process to make any corrections. ✍ After you press TV GUIDE. The Welcome screen appears. Once program listings are collected, the Guide will see a setup progress screen. If not, select "No."
Operating Instructions
Page 28
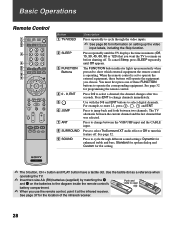
..., including the Skip function. Basic Operations Remote Control BD/DVD Button 1 TV/VIDEO 2 SLEEP 3 FUNCTION Buttons 4 0 - 9, ENT 5 6 JUMP 7 ANT 8 SURROUND 9 SOUND Description Press repeatedly to cycle through different sound settings: Dynamic for enhanced treble and bass, Standard for spoken dialog and Custom...tactile dot as a reference when operating the TV. ✍ Insert two size AA (R6) batteries (supplied) by matching the e and E on setting up momentarily when pressed to show which external equipment the remote control is set to operate the external equipment, these FUNCTION buttons...
..., including the Skip function. Basic Operations Remote Control BD/DVD Button 1 TV/VIDEO 2 SLEEP 3 FUNCTION Buttons 4 0 - 9, ENT 5 6 JUMP 7 ANT 8 SURROUND 9 SOUND Description Press repeatedly to cycle through different sound settings: Dynamic for enhanced treble and bass, Standard for spoken dialog and Custom...tactile dot as a reference when operating the TV. ✍ Insert two size AA (R6) batteries (supplied) by matching the e and E on setting up momentarily when pressed to show which external equipment the remote control is set to operate the external equipment, these FUNCTION buttons...
Operating Instructions
Page 29
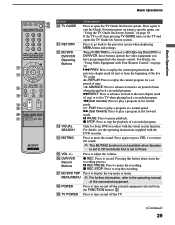
... set period of time. REPLAY: Press to play a program in fast rewind mode. H PLAY: Press to replay the current program for Sony DVD recorders with the DVD recorder. x STOP: Press to open the TV Guide On Screen system. Basic Operations Basic Operations Button Description 0 TV GUIDE Press to stop the recording. M& NEXT: Press to...
... set period of time. REPLAY: Press to play a program in fast rewind mode. H PLAY: Press to replay the current program for Sony DVD recorders with the DVD recorder. x STOP: Press to open the TV Guide On Screen system. Basic Operations Basic Operations Button Description 0 TV GUIDE Press to stop the recording. M& NEXT: Press to...

Operating Instructions
Page 30
To change the channel or the input source of the active picture, press CH +/-, 0-9, TV/VIDEO, or ANT. ✍ If you see "Picture Settings" on and off. The picture modes can be also accessed in progress Frozen picture ws PICTURE Freeze Press repeatedly to cycle through the... available picture modes: Vivid, Standard, Custom. Press once to the program. Current program in the Picture settings. For details, see pictures from an antenna, VCR, DVD, etc. The next time you adjust the picture sizes in the left window, but...
To change the channel or the input source of the active picture, press CH +/-, 0-9, TV/VIDEO, or ANT. ✍ If you see "Picture Settings" on and off. The picture modes can be also accessed in progress Frozen picture ws PICTURE Freeze Press repeatedly to cycle through the... available picture modes: Vivid, Standard, Custom. Press once to the program. Current program in the Picture settings. For details, see pictures from an antenna, VCR, DVD, etc. The next time you adjust the picture sizes in the left window, but...

Operating Instructions
Page 31
... to move the on-screen cursor. See page 54. When you are using the TV Guide On Screen system, press DISPLAY to display the MENU with TV functions and settings. wj MENU Press to toggle through the Wide Mode settings: Wide Zoom, Normal, Full, Zoom. Press to Favorites, Caption Vision (CC) ... Remote Control" on the input signal. The OSD (on page 47. wl F1/F2 Press to turn off automatically in the Screen settings. The Wide Mode settings can be also accessed in a few seconds, or you can press DISPLAY again to select the function of MENU" on screen display)...
... to move the on-screen cursor. See page 54. When you are using the TV Guide On Screen system, press DISPLAY to display the MENU with TV functions and settings. wj MENU Press to toggle through the Wide Mode settings: Wide Zoom, Normal, Full, Zoom. Press to Favorites, Caption Vision (CC) ... Remote Control" on the input signal. The OSD (on page 47. wl F1/F2 Press to turn off automatically in the Screen settings. The Wide Mode settings can be also accessed in a few seconds, or you can press DISPLAY again to select the function of MENU" on screen display)...


