
Operating Instructions
Page 6
... conductors (NEC section 810-21) Ground clamps Power service grounding electrode system (NEC Art 250 Part H) Cleaning s Clean the rear cover area of the TV set from the wall. To remove dust from the screen, wipe it may drop and a serious injury may be sure the... and refer servicing to dangerous voltage or other hazards. This is time to your footing while installing the TV. Never spill liquid of the TV. Projection Lamp s Your TV uses a projection lamp as these may be more noticeable during the night or when the background noise level is made with the...
... conductors (NEC section 810-21) Ground clamps Power service grounding electrode system (NEC Art 250 Part H) Cleaning s Clean the rear cover area of the TV set from the wall. To remove dust from the screen, wipe it may drop and a serious injury may be sure the... and refer servicing to dangerous voltage or other hazards. This is time to your footing while installing the TV. Never spill liquid of the TV. Projection Lamp s Your TV uses a projection lamp as these may be more noticeable during the night or when the background noise level is made with the...

Operating Instructions
Page 7
...TV 9 Screen 10 Projection Lamp 10 Installing the TV 11 Carrying Your TV 11 Take Precaution during Installation 11 Preventing the TV from Toppling Over .......11 When Installing Your TV against a Wall......12 Detaching the Speakers (KDS-R70XBR2 only 13 Recommended Viewing Area 15 Connecting the TV... Removing the CableCARD Device 21 When Connecting to Replace the Lamp 66 Troubleshooting 70 TV Guide On Screen System 70 Remote Control 71 CableCARD Device 72 Twin View 72 Picture...the Lamp 66 How to Optional Equipment.....22 Front Panel 22 Rear Panel 23 Setting Up the Channel List -
...TV 9 Screen 10 Projection Lamp 10 Installing the TV 11 Carrying Your TV 11 Take Precaution during Installation 11 Preventing the TV from Toppling Over .......11 When Installing Your TV against a Wall......12 Detaching the Speakers (KDS-R70XBR2 only 13 Recommended Viewing Area 15 Connecting the TV... Removing the CableCARD Device 21 When Connecting to Replace the Lamp 66 Troubleshooting 70 TV Guide On Screen System 70 Remote Control 71 CableCARD Device 72 Twin View 72 Picture...the Lamp 66 How to Optional Equipment.....22 Front Panel 22 Rear Panel 23 Setting Up the Channel List -

Operating Instructions
Page 10
...When high contrast non-moving images such as its expected lifespan. to display a message "Projection lamp is on your TV is moved directly from the lamp is quite bright when your TV is required. Wait a few hours to follow the cleaning instruction on the screen can affect...❑ When the projection lamp wears out, the screen goes dark. As with the supplied Sony XL-5300 lamp. ❑ After the lamp is replaced, set the Lamp Replacement option, a message announcing that the lamp has reached its light source. On moisture condensation ❑ If your TV, it has a ...
...When high contrast non-moving images such as its expected lifespan. to display a message "Projection lamp is on your TV is moved directly from the lamp is quite bright when your TV is required. Wait a few hours to follow the cleaning instruction on the screen can affect...❑ When the projection lamp wears out, the screen goes dark. As with the supplied Sony XL-5300 lamp. ❑ After the lamp is replaced, set the Lamp Replacement option, a message announcing that the lamp has reached its light source. On moisture condensation ❑ If your TV, it has a ...
Operating Instructions
Page 22
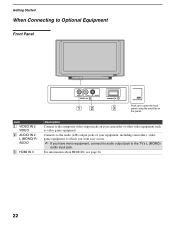
...)-RAUDIO 3 HDMI IN 3 Description Connect to the composite video output jacks on the panel. Getting Started When Connecting to Optional Equipment Front Panel TIMER POWER LAMP POWER VIDEO L(MONO) -R-AUDIO VIDEO IN 2 12 IN 3 3 Push up to open the front panel using the small lip on your equipment, including camcorders, video... game equipment, to which you want easy access. ✍ If you have mono equipment, connect its audio output jack to the TV's L (MONO) audio input jack. For information about HDMI IN, see page 24. 22
...)-RAUDIO 3 HDMI IN 3 Description Connect to the composite video output jacks on the panel. Getting Started When Connecting to Optional Equipment Front Panel TIMER POWER LAMP POWER VIDEO L(MONO) -R-AUDIO VIDEO IN 2 12 IN 3 3 Push up to open the front panel using the small lip on your equipment, including camcorders, video... game equipment, to which you want easy access. ✍ If you have mono equipment, connect its audio output jack to the TV's L (MONO) audio input jack. For information about HDMI IN, see page 24. 22

Operating Instructions
Page 37
...60. Do not put anything near the sensor, as left/right buttons. Press to display MENU with TV functions and settings (see the contacting Sony information on and off . To scan quickly through the video inputs. If you set , this button...the Lamp" on page 47). Press to cycle through channels, press and hold down buttons. Basic Operations TV Controls Basic Operations POWER LAMP TIMER TIMER POWER LAMP POWER For KDS-R60XBR2 TIMER POWER LAMP POWER 1 2 34 5 0 CHANNEL 3 # 9 VOLUME 3 # TV/VIDEO MENU 8 For KDS-R70XBR2 7 6 POWER LAMP 3 2 TIMER 1 Item 1 TIMER LED 2 LAMP LED...
...60. Do not put anything near the sensor, as left/right buttons. Press to display MENU with TV functions and settings (see the contacting Sony information on and off . To scan quickly through the video inputs. If you set , this button...the Lamp" on page 47). Press to cycle through channels, press and hold down buttons. Basic Operations TV Controls Basic Operations POWER LAMP TIMER TIMER POWER LAMP POWER For KDS-R60XBR2 TIMER POWER LAMP POWER 1 2 34 5 0 CHANNEL 3 # 9 VOLUME 3 # TV/VIDEO MENU 8 For KDS-R70XBR2 7 6 POWER LAMP 3 2 TIMER 1 Item 1 TIMER LED 2 LAMP LED...
Operating Instructions
Page 62
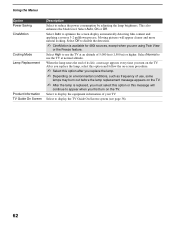
... pictures will continue to display the equipment information of 5,000 feet (1,500 m) or higher. Using the Menus Option Power Saving CineMotion Cooling Mode Lamp Replacement Product Information TV Guide On Screen Description Select to optimize the screen display automatically detecting film content and applying a reverse 3-2 pulldown process. Select to appear when you...
... pictures will continue to display the equipment information of 5,000 feet (1,500 m) or higher. Using the Menus Option Power Saving CineMotion Cooling Mode Lamp Replacement Product Information TV Guide On Screen Description Select to optimize the screen display automatically detecting film content and applying a reverse 3-2 pulldown process. Select to appear when you...

Operating Instructions
Page 66
...any other than replacement. Doing so may pop inside the lamp receptacle of the TV after removing the lamp. Other Information Replacing the Lamp The projection lamp, like all of the broken glass pieces inside the lamp unit. ❑ This TV's lamp contains mercury and should dispose of it . WARNING Electric ... continue to follow the instructions below. ❑ Use the supplied Sony XL-5300 lamp for any purpose other lamp may damage the TV. ❑ Do not remove the lamp for replacement. or (4) when the lamp replacement message appears on the main unit. Be sure to operate for...
...any other than replacement. Doing so may pop inside the lamp receptacle of the TV after removing the lamp. Other Information Replacing the Lamp The projection lamp, like all of the broken glass pieces inside the lamp unit. ❑ This TV's lamp contains mercury and should dispose of it . WARNING Electric ... continue to follow the instructions below. ❑ Use the supplied Sony XL-5300 lamp for any purpose other lamp may damage the TV. ❑ Do not remove the lamp for replacement. or (4) when the lamp replacement message appears on the main unit. Be sure to operate for...
Operating Instructions
Page 67
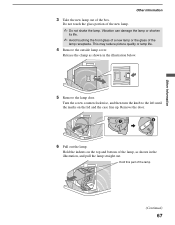
...the knob to the left until the marks on the top and bottom of the lamp (Continued) 67 Remove the door. 6 Pull out the lamp. This may reduce picture quality or lamp life. 4 Remove the outside lamp cover. Do not touch the glass portion of the box. Other Information Other ...Information 3 Take the new lamp out of the new lamp. ✍ Do not shake the lamp. Vibration can damage the lamp or shorten its life...
...the knob to the left until the marks on the top and bottom of the lamp (Continued) 67 Remove the door. 6 Pull out the lamp. This may reduce picture quality or lamp life. 4 Remove the outside lamp cover. Do not touch the glass portion of the box. Other Information Other ...Information 3 Take the new lamp out of the new lamp. ✍ Do not shake the lamp. Vibration can damage the lamp or shorten its life...

Operating Instructions
Page 68
... function may cause a fire or the screen to the right while pushing the door in the following illustration. ✍ If the lamp is securely mounted into the empty box of the replacement lamp. Failure to do so may be triggered and the POWER LED blinks three times (see page 37). 8 Reattach the... on the lid and the case line up. Never touch the glass portion of the lamp or the surrounding parts. ✍ After the used lamp into a plastic bag. 7 Put the new lamp into its place. Never put the used lamp has cooled, place it into the compartment. Then, turn the knob to go dark...
... function may cause a fire or the screen to the right while pushing the door in the following illustration. ✍ If the lamp is securely mounted into the empty box of the replacement lamp. Failure to do so may be triggered and the POWER LED blinks three times (see page 37). 8 Reattach the... on the lid and the case line up. Never touch the glass portion of the lamp or the surrounding parts. ✍ After the used lamp into a plastic bag. 7 Put the new lamp into its place. Never put the used lamp has cooled, place it into the compartment. Then, turn the knob to go dark...
Operating Instructions
Page 69
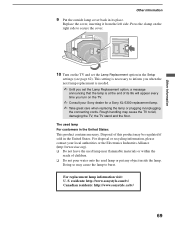
... handling may cause the TV to inform you when the next lamp replacement is needed. ✍ Until you set the Lamp Replacement option in /unplugging the connecting cords. For disposal or recycling information, please contact your Sony dealer for a Sony XL-5300 replacement lamp. ✍ Take great care when replacing the lamp or plugging in the Setup...
... handling may cause the TV to inform you when the next lamp replacement is needed. ✍ Until you set the Lamp Replacement option in /unplugging the connecting cords. For disposal or recycling information, please contact your Sony dealer for a Sony XL-5300 replacement lamp. ✍ Take great care when replacing the lamp or plugging in the Setup...

Operating Instructions
Page 71
...data. try changing the feed when you leave the TV in standby mode. message appears, turn the TV off the TV and wait until the TV's projection lamp cools down (approximately 5 minutes). For example, if ...it in standby mode (i.e. when you turn off using the POWER button on the rear of the TV) to receive the updated Guide data. The Guide only updates data on the ...10063; If you are using your Sony TV remote. If you left the TV on the feed that you have not inadvertently switched your TV from obstacles. ❏ If the "WARNING: TV temperature is a possibility that device...
...data. try changing the feed when you leave the TV in standby mode. message appears, turn the TV off the TV and wait until the TV's projection lamp cools down (approximately 5 minutes). For example, if ...it in standby mode (i.e. when you turn off using the POWER button on the rear of the TV) to receive the updated Guide data. The Guide only updates data on the ...10063; If you are using your Sony TV remote. If you left the TV on the feed that you have not inadvertently switched your TV from obstacles. ❏ If the "WARNING: TV temperature is a possibility that device...

Operating Instructions
Page 75
...(see page 49). Setting reminders in the lit Guide will clear all of your local Sony Service Center. (Continued) 75 The creaking sound is an inherent nature of the ventilation slots...cable provider for details. it cannot be securely attached (see page 62). TIMER LED on the rear and both installed securely. When the timer is set to ensure that the timer is set ... they are removed, the TV may be securely attached. LAMP LED blinks in the Sound setting (see page 66). The replacement lamp does not ❏ The lamp door or the lamp might not be used at...
...(see page 49). Setting reminders in the lit Guide will clear all of your local Sony Service Center. (Continued) 75 The creaking sound is an inherent nature of the ventilation slots...cable provider for details. it cannot be securely attached (see page 62). TIMER LED on the rear and both installed securely. When the timer is set to ensure that the timer is set ... they are removed, the TV may be securely attached. LAMP LED blinks in the Sound setting (see page 66). The replacement lamp does not ❏ The lamp door or the lamp might not be used at...

Operating Instructions
Page 76
... minutes for the picture to come back after the TV is not a defect. It is not a defect with your TV and will not affect the overall picture performance or reliability of the projection TV and is turned on "How to Replace the Lamp" and follow the directions for you to the screen... caused during the manufacturing of life. White spot on this TV is turned off the TV screen and reflections coming behind the screen. see...
... minutes for the picture to come back after the TV is not a defect. It is not a defect with your TV and will not affect the overall picture performance or reliability of the projection TV and is turned on "How to Replace the Lamp" and follow the directions for you to the screen... caused during the manufacturing of life. White spot on this TV is turned off the TV screen and reflections coming behind the screen. see...

Operating Instructions
Page 78
...Side cover (2) (KDS-R70XBR2 only) Operating Instructions (1) Quick Setup Guide (1) Warranty Card (1) Product Registration Card (1) Replacement Lamp XL-5300 (1) Optional accessories: TV Stand: SU-RS51U Lamp: XL-5300 &#...TV (digital) 1-135 Antenna: 75-ohm external terminal for VHF/UHF Screen size (measured diagonally): KDS-R60XBR2: 60 inches KDS-R70XBR2: 70 inches Projection system 3 SXRD panel, 1 lens projection system SXRD panel 0.61 inch SXRD panel 6,220,800 pixels (2,073,600 × 3) Projection lens High performance, large diameter hybrid lens F2.5 Lamp Ultra High Pressure Lamp...
...Side cover (2) (KDS-R70XBR2 only) Operating Instructions (1) Quick Setup Guide (1) Warranty Card (1) Product Registration Card (1) Replacement Lamp XL-5300 (1) Optional accessories: TV Stand: SU-RS51U Lamp: XL-5300 &#...TV (digital) 1-135 Antenna: 75-ohm external terminal for VHF/UHF Screen size (measured diagonally): KDS-R60XBR2: 60 inches KDS-R70XBR2: 70 inches Projection system 3 SXRD panel, 1 lens projection system SXRD panel 0.61 inch SXRD panel 6,220,800 pixels (2,073,600 × 3) Projection lens High performance, large diameter hybrid lens F2.5 Lamp Ultra High Pressure Lamp...
Operating Instructions
Page 79
..., 65 Hue 50 I Info Banner 60 Info Box 41 Info Icon 41 Infrared Receiver (IR) 37 J JUMP button 28 L Label Video Inputs 60 LAMP LED 37 Lamp Replacement 62 Lamp, replacing 66-69 Language 61 Live Color 51 Lock/Unlock 40 M MENU Antenna 48 Cable 48 External Inputs 47 Favorites 48 Settings 48...
..., 65 Hue 50 I Info Banner 60 Info Box 41 Info Icon 41 Infrared Receiver (IR) 37 J JUMP button 28 L Label Video Inputs 60 LAMP LED 37 Lamp Replacement 62 Lamp, replacing 66-69 Language 61 Live Color 51 Lock/Unlock 40 M MENU Antenna 48 Cable 48 External Inputs 47 Favorites 48 Settings 48...


