Operating Instructions
Page 6
... noise level is designed to dripping or splashing and no image appears on the display after using the TV for cleaning. Cleaning ❑ Clean the rear cover area of the panel and is not a defect. Dust in this unit. On Contamination on... service technician certifies in fire, electric shock or other strong illumination shines on your TV according to reduce reflections. Replacement Parts When replacement parts are required, be blocked causing overheating and cause fire or damage the unit. Projection Lamp ❑ Your TV uses a projection lamp as the original parts.
... noise level is designed to dripping or splashing and no image appears on the display after using the TV for cleaning. Cleaning ❑ Clean the rear cover area of the panel and is not a defect. Dust in this unit. On Contamination on... service technician certifies in fire, electric shock or other strong illumination shines on your TV according to reduce reflections. Replacement Parts When replacement parts are required, be blocked causing overheating and cause fire or damage the unit. Projection Lamp ❑ Your TV uses a projection lamp as the original parts.

Operating Instructions
Page 8
... Caption Vision 98 Selecting PC Setup Options 99 Accessing the Applications Settings 101 Selecting Applications Options 101 Other Information Overview 103 Contacting Sony 103 Replacing the Lamp 104 How to Replace the Lamp 105 Troubleshooting 108 Twin View 108 Remote Control 108 CableCARD Device 109 Memory Stick 109 Video 111 Audio 111 Channels 112 General...
... Caption Vision 98 Selecting PC Setup Options 99 Accessing the Applications Settings 101 Selecting Applications Options 101 Other Information Overview 103 Contacting Sony 103 Replacing the Lamp 104 How to Replace the Lamp 105 Troubleshooting 108 Twin View 108 Remote Control 108 CableCARD Device 109 Memory Stick 109 Video 111 Audio 111 Channels 112 General...
Operating Instructions
Page 12
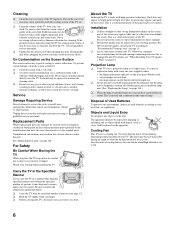
... know that it turns on. The projection lamp has burned out. When one (see page 104. Your TV uses a projection lamp as its light source. Introducing the TV Indicators Projection Lamp How to replace the lamp, see page 104). When it with a new Sony XL-5100 replacement lamp (not supplied). ✍ The light emitted from the lamp is quite bright when your attention. Green...
... know that it turns on. The projection lamp has burned out. When one (see page 104. Your TV uses a projection lamp as its light source. Introducing the TV Indicators Projection Lamp How to replace the lamp, see page 104). When it with a new Sony XL-5100 replacement lamp (not supplied). ✍ The light emitted from the lamp is quite bright when your attention. Green...
Operating Instructions
Page 16
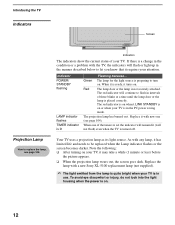
...its function may indicate the display unit needs servicing (see "Replacing the Lamp" on -screen setting and activate the , B, b, v, and V buttons. Press to exit the TV on page 2). Press again to scan through channels, press...TV. Introducing the TV TV Controls and Connectors Front Panel 6 STD/DUO POWER/STANDBY LAMP TIMER POWER POWER/STANDBY TIMER LAMP POWER CHANNEL 3 # VOLUME 3 # TV/VIDEO MENU 7 8 9 0 1 2 34 5 Item 1 POWER/ STANDBY LED 2 TIMER LED 3 LAMP LED 4 (IR) Infrared Receiver 5 POWER 6 Speaker 7 CHANNEL +/- 8 VOLUME +/- 9 TV/VIDEO q; For details, see "Contacting Sony...
...its function may indicate the display unit needs servicing (see "Replacing the Lamp" on -screen setting and activate the , B, b, v, and V buttons. Press to exit the TV on page 2). Press again to scan through channels, press...TV. Introducing the TV TV Controls and Connectors Front Panel 6 STD/DUO POWER/STANDBY LAMP TIMER POWER POWER/STANDBY TIMER LAMP POWER CHANNEL 3 # VOLUME 3 # TV/VIDEO MENU 7 8 9 0 1 2 34 5 Item 1 POWER/ STANDBY LED 2 TIMER LED 3 LAMP LED 4 (IR) Infrared Receiver 5 POWER 6 Speaker 7 CHANNEL +/- 8 VOLUME +/- 9 TV/VIDEO q; For details, see "Contacting Sony...
Operating Instructions
Page 103
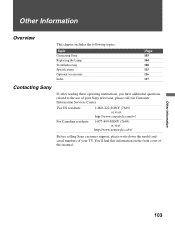
...tv/ Before calling Sony customer support, please write down the model and serial numbers of your Sony television, please call our Customer Information Services Center. Other Information 103 Other Information Overview This chapter includes the following topics: Topic Contacting Sony Replacing the Lamp... Troubleshooting Specifications Optional accessories: Index Page 103 104 108 115 116 117 Contacting Sony If, after reading these operating instructions, you have additional questions...
...tv/ Before calling Sony customer support, please write down the model and serial numbers of your Sony television, please call our Customer Information Services Center. Other Information 103 Other Information Overview This chapter includes the following topics: Topic Contacting Sony Replacing the Lamp... Troubleshooting Specifications Optional accessories: Index Page 103 104 108 115 116 117 Contacting Sony If, after reading these operating instructions, you have additional questions...
Operating Instructions
Page 104
... TV. ❑ Do not remove the lamp for replacement. If the screen becomes dark, the color looks unusual, or the LAMP indicator on the front of the used lamps, follow the instructions below. ❑ Use a Sony XL-5100 replacement lamp (not supplied) for any other than replacement...the lamp receptable once the lamp has been removed. ❑ When the lamp eventually burns out, you may cause injury or fire. ❑ Do not put flammable materials and metal objects inside the lamp unit. ❑ The lamps contain mercury. Other Information Replacing the Lamp The projection lamp, which...
... TV. ❑ Do not remove the lamp for replacement. If the screen becomes dark, the color looks unusual, or the LAMP indicator on the front of the used lamps, follow the instructions below. ❑ Use a Sony XL-5100 replacement lamp (not supplied) for any other than replacement...the lamp receptable once the lamp has been removed. ❑ When the lamp eventually burns out, you may cause injury or fire. ❑ Do not put flammable materials and metal objects inside the lamp unit. ❑ The lamps contain mercury. Other Information Replacing the Lamp The projection lamp, which...
Operating Instructions
Page 105
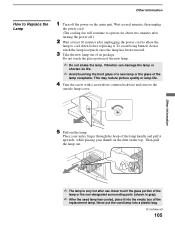
...unplugging the power cord to allow the lamp to Replace the Lamp 1 Turn off .) 2 Wait at least 30 minutes after use. Place your index finger through the hoop of the lamp receptacle. Vibration can damage the lamp or shorten its package. Never put the used lamp has cooled, place it upwards, ...Avoid touching the front glass of a new lamp or the glass of the lamp handle and pull it into a plastic bag. (Continued) 105 Do not touch the glass portion of the replacement lamp. Then pull the lamp out. Never touch the glass portion of the lamp or the non-designated surrounding parts (shown...
...unplugging the power cord to allow the lamp to Replace the Lamp 1 Turn off .) 2 Wait at least 30 minutes after use. Place your index finger through the hoop of the lamp receptacle. Vibration can damage the lamp or shorten its package. Never put the used lamp has cooled, place it upwards, ...Avoid touching the front glass of a new lamp or the glass of the lamp handle and pull it into a plastic bag. (Continued) 105 Do not touch the glass portion of the replacement lamp. Then pull the lamp out. Never touch the glass portion of the lamp or the non-designated surrounding parts (shown...
Operating Instructions
Page 107
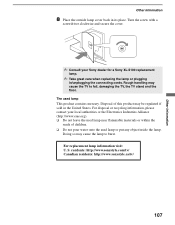
... not pour water onto the used lamp This product contains mercury. The used lamp or put any object inside the lamp. For disposal or recycling information, please contact your Sony dealer for a Sony XL-5100 replacement lamp. ✍ Take great care when replacing the lamp or plugging in/unplugging the connecting ...Do not leave the used lamp near flammable materials or within the reach of this product may cause the lamp to fall, damaging the TV, the TV stand and the floor. Rough handling may cause the TV to burst. residents: http://www.sonystyle.com/tv/ Canadian residents: http://...
... not pour water onto the used lamp This product contains mercury. The used lamp or put any object inside the lamp. For disposal or recycling information, please contact your Sony dealer for a Sony XL-5100 replacement lamp. ✍ Take great care when replacing the lamp or plugging in/unplugging the connecting ...Do not leave the used lamp near flammable materials or within the reach of this product may cause the lamp to fall, damaging the TV, the TV stand and the floor. Rough handling may cause the TV to burst. residents: http://www.sonystyle.com/tv/ Canadian residents: http://...
Operating Instructions
Page 108
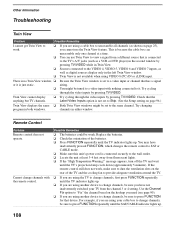
...; If you are using VIDEO 8 (PC) IN or i.LINK input. Try cycling through the video inputs by pressing TV/VIDEO. Replace the batteries. ❏ Check the orientation of the TV and the cooling fan to the wall outlet. ❏ Locate the unit at a time. ❏ You can use the Twin View feature. ... nothing connected to it is just static. ❏ Be sure the Twin View window is not set to Skip. (See the Setup setting on the rear of the batteries. ❏ Press FUNCTION repeatedly until the TV's projection lamp cools down (approximately 5 minutes). channels in both windows.
...; If you are using VIDEO 8 (PC) IN or i.LINK input. Try cycling through the video inputs by pressing TV/VIDEO. Replace the batteries. ❏ Check the orientation of the TV and the cooling fan to the wall outlet. ❏ Locate the unit at a time. ❏ You can use the Twin View feature. ... nothing connected to it is just static. ❏ Be sure the Twin View window is not set to Skip. (See the Setup setting on the rear of the batteries. ❏ Press FUNCTION repeatedly until the TV's projection lamp cools down (approximately 5 minutes). channels in both windows.
Operating Instructions
Page 113
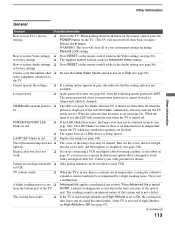
How to restore Video settings ❏ Press RESET on the remote control while in red. ❏ Replace the lamp (see page 81). it cannot be used at high altitudes, set High Altitude to work with your digital cable box. When lit, indicates that the ...timer is turned from an i.LINK device is not available. The replacement lamp does not ❏ The screw of the lamp cover may indicate the TV needs service. When Advanced Iris is set , this may be accompanied by a slight creaking noise. While holding down the...
How to restore Video settings ❏ Press RESET on the remote control while in red. ❏ Replace the lamp (see page 81). it cannot be used at high altitudes, set High Altitude to work with your digital cable box. When lit, indicates that the ...timer is turned from an i.LINK device is not available. The replacement lamp does not ❏ The screw of the lamp cover may indicate the TV needs service. When Advanced Iris is set , this may be accompanied by a slight creaking noise. While holding down the...
Operating Instructions
Page 118
... Receiver (IR) 16 Inputs, labeling 96 Iris 81, 85 J, K JUMP 54 JUMP button 47, 54 L Label Channels 91 Label Video Inputs 96 LAMP LED 16 Lamp, replacing 104-107 Language 97 M Memory Stick button 47 features 61 Index 64 indicator 17 playing movies 66 precautions 70 removing 63 Slide Show options 68 ... indictor 12 set current 102 TIMER LED 16 Timer setting 101 Transition Effect 68 Treble, adjusting 86 Troubleshooting 108-114 Turning on/off the TV 16 TV Rating 94 TV/VIDEO button 47 Twin View 55 Twin View button 46 U.S.A. Rating 94 Unrated 94 V VCR using with cable, connecting 36 Vertical Center ...
... Receiver (IR) 16 Inputs, labeling 96 Iris 81, 85 J, K JUMP 54 JUMP button 47, 54 L Label Channels 91 Label Video Inputs 96 LAMP LED 16 Lamp, replacing 104-107 Language 97 M Memory Stick button 47 features 61 Index 64 indicator 17 playing movies 66 precautions 70 removing 63 Slide Show options 68 ... indictor 12 set current 102 TIMER LED 16 Timer setting 101 Transition Effect 68 Treble, adjusting 86 Troubleshooting 108-114 Turning on/off the TV 16 TV Rating 94 TV/VIDEO button 47 Twin View 55 Twin View button 46 U.S.A. Rating 94 Unrated 94 V VCR using with cable, connecting 36 Vertical Center ...


