
Operating Instructions
Page 3
...TV Controls 19 Indicators 24 Programming the Remote Control 25 Operating Sony Brand Video Equipment .....25 Programming Non-Sony Video Equipment 25 Using Other Equipment with Your Remote Control 27 Using the Menus Adjusting TV Settings 30 Watching TV 30 Accessing the Equipment Connected to Your TV... HD Cable Box/HD Satellite Box 13 PC 15 Other Equipment 16 Using HDMI Control for BRAVIA Theatre Sync 17 4. Contents Important Safety Instructions 4 Welcome to the World of BRAVIA™ The Four Steps to Replace the Lamp 44 Troubleshooting 47 Specifications 50 Index 51 Quick...
...TV Controls 19 Indicators 24 Programming the Remote Control 25 Operating Sony Brand Video Equipment .....25 Programming Non-Sony Video Equipment 25 Using Other Equipment with Your Remote Control 27 Using the Menus Adjusting TV Settings 30 Watching TV 30 Accessing the Equipment Connected to Your TV... HD Cable Box/HD Satellite Box 13 PC 15 Other Equipment 16 Using HDMI Control for BRAVIA Theatre Sync 17 4. Contents Important Safety Instructions 4 Welcome to the World of BRAVIA™ The Four Steps to Replace the Lamp 44 Troubleshooting 47 Specifications 50 Index 51 Quick...
Operating Instructions
Page 5
... cloth moistened with a solution of the TV with the specified number of life. Service Damage Requiring Service Do not attempt to service the set by the manufacturer that he has used batteries according to your TV according to "Recommended Viewing Area" on page 44.) s When the lamp... be more noticeable during the night or when the background noise level is a structural property of the TV regularly. This is low. KDS-50A3000 KDS-55A3000/ KDS-60A3000 Cleaning s Clean the rear cover area of the TV. Caution Do not use any accessories or cables. To prevent screen damage,...
... cloth moistened with a solution of the TV with the specified number of life. Service Damage Requiring Service Do not attempt to service the set by the manufacturer that he has used batteries according to your TV according to "Recommended Viewing Area" on page 44.) s When the lamp... be more noticeable during the night or when the background noise level is a structural property of the TV regularly. This is low. KDS-50A3000 KDS-55A3000/ KDS-60A3000 Cleaning s Clean the rear cover area of the TV. Caution Do not use any accessories or cables. To prevent screen damage,...

Operating Instructions
Page 6
...HD programming. The Quick Setup Guide, enclosed separately, illustrates how to Full HD Experience: Set, Sound, Source, and Setup Along with different aspect ratios (the width-to-height ratio of BRAVIA™ Thank you see page 13). The quality of the TV to adjust the 4:3...than conventional standarddefinition TV. 16:9 (high-definition) source Most HDTV signals use a boxy 4:3 aspect ratio. The 1080 HD signals provide more about HDTV, visit: http://www.sony.com/HDTV The Four Steps to connect other external equipment Contact your new BRAVIA TV, you will see pages 22, 35 and 37)....
...HD programming. The Quick Setup Guide, enclosed separately, illustrates how to Full HD Experience: Set, Sound, Source, and Setup Along with different aspect ratios (the width-to-height ratio of BRAVIA™ Thank you see page 13). The quality of the TV to adjust the 4:3...than conventional standarddefinition TV. 16:9 (high-definition) source Most HDTV signals use a boxy 4:3 aspect ratio. The 1080 HD signals provide more about HDTV, visit: http://www.sony.com/HDTV The Four Steps to connect other external equipment Contact your new BRAVIA TV, you will see pages 22, 35 and 37)....
Operating Instructions
Page 7
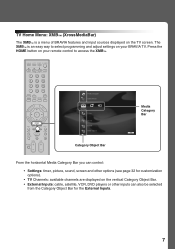
..., screen and other options (see page 32 for the External Inputs. 7 Press the HOME button on your remote control to select programming and adjust settings on your BRAVIA TV. TV Home Menu: XMB™ (XrossMediaBar) The XMB™ is an easy way to access the XMB™. The XMB™ is a... menu of BRAVIA features and input sources displayed on the vertical Category Object Bar. • External Inputs: cable, satellite, VCR, DVD players or other inputs can also be...
..., screen and other options (see page 32 for the External Inputs. 7 Press the HOME button on your remote control to select programming and adjust settings on your BRAVIA TV. TV Home Menu: XMB™ (XrossMediaBar) The XMB™ is an easy way to access the XMB™. The XMB™ is a... menu of BRAVIA features and input sources displayed on the vertical Category Object Bar. • External Inputs: cable, satellite, VCR, DVD players or other inputs can also be...
Operating Instructions
Page 10
... follow the cleaning instruction on the screen can replace the speaker grille with any lamp, it . For details, see the instructions supplied with a new Sony XL-5200 replacement lamp (not supplied). to Replace the Lamp", see page 43). s When the projection lamp wears out, the screen goes dark....the picture quality. Only remove the speaker grille when replacing it has a lifespan and needs to display a message, "Projection lamp is in the General settings (see page 44. ~ • The light emitted from the lamp is quite bright when your TV, it may be replaced when the Lamp Indicator...
... follow the cleaning instruction on the screen can replace the speaker grille with any lamp, it . For details, see the instructions supplied with a new Sony XL-5200 replacement lamp (not supplied). to Replace the Lamp", see page 43). s When the projection lamp wears out, the screen goes dark....the picture quality. Only remove the speaker grille when replacing it has a lifespan and needs to display a message, "Projection lamp is in the General settings (see page 44. ~ • The light emitted from the lamp is quite bright when your TV, it may be replaced when the Lamp Indicator...
Operating Instructions
Page 12
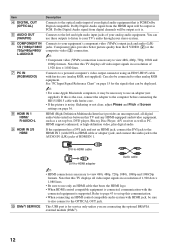
...Multimedia Interface) provides an uncompressed, all video input signals in a resolution of Screen settings on page 15 for service only unless you are connecting the optional BRAVIA external module (DMex). 12 Refer to page 43 to set -top box, DVD player, Blu-ray Disc Player, A/V receiver as well as ...Digital compatible. Note that this TV displays all -digital audio/video interface between this TV and any HDMI-equipped audio/video equipment, such as a set up this TV displays all video input signals in a resolution of 1,920 dots × 1,080 lines. Connects to a personal computer's video ...
...Multimedia Interface) provides an uncompressed, all video input signals in a resolution of Screen settings on page 15 for service only unless you are connecting the optional BRAVIA external module (DMex). 12 Refer to page 43 to set -top box, DVD player, Blu-ray Disc Player, A/V receiver as well as ...Digital compatible. Note that this TV displays all -digital audio/video interface between this TV and any HDMI-equipped audio/video equipment, such as a set up this TV displays all video input signals in a resolution of 1,920 dots × 1,080 lines. Connects to a personal computer's video ...
Operating Instructions
Page 13
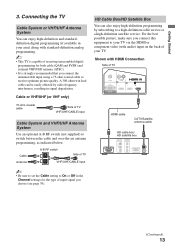
... TV via the HDMI or component video (with HDMI Connection Side of TV B VHF/UHF/CABLE input ~ • Be sure to set the Cable setting to a high-definition cable service or a high-definition satellite service. A 300-ohm twin lead cable can also enjoy high-definition programming ...by radio frequency interference, resulting in the Channel settings for both cable (QAM and 8VSB) and external VHF/UHF antenna (ATSC). • It is strongly recommended that you choose (see page ...
... TV via the HDMI or component video (with HDMI Connection Side of TV B VHF/UHF/CABLE input ~ • Be sure to set the Cable setting to a high-definition cable service or a high-definition satellite service. A 300-ohm twin lead cable can also enjoy high-definition programming ...by radio frequency interference, resulting in the Channel settings for both cable (QAM and 8VSB) and external VHF/UHF antenna (ATSC). • It is strongly recommended that you choose (see page ...
Operating Instructions
Page 15
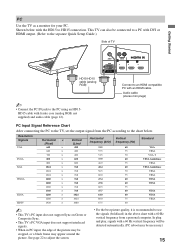
... from the PC according to an HDMI compatible PC with an HDMI cable. PC Input Signal Reference Chart After connecting the PC to the TV, set the output signal from a personal computer. Audio cable (stereo mini plugs) ~ • Connect the PC IN jack to the PC using an HD15HD15... to the chart below with ferrite core (analog RGB, not supplied) and audio cable (page 12). Shown below . Resolution Signals VGA SVGA XGA WXGA SXGA HDTV Horizontal × (Pixel) 640 × 640 × 720 × 800 × 800 × 1024 × 1024 × 1024 × 1280 × 1280 × ...
... from the PC according to an HDMI compatible PC with an HDMI cable. PC Input Signal Reference Chart After connecting the PC to the TV, set the output signal from a personal computer. Audio cable (stereo mini plugs) ~ • Connect the PC IN jack to the PC using an HD15HD15... to the chart below with ferrite core (analog RGB, not supplied) and audio cable (page 12). Shown below . Resolution Signals VGA SVGA XGA WXGA SXGA HDTV Horizontal × (Pixel) 640 × 640 × 720 × 800 × 800 × 1024 × 1024 × 1024 × 1280 × 1280 × ...
Operating Instructions
Page 17
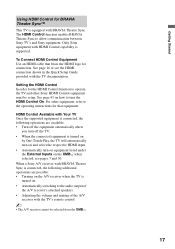
...HDMI Control Available with the TV documentation. Setting the HDMI Control In order for the HDMI Control function to operate, the TV and other equipment, refer to allow communication between Sony TV's and Sony equipment. When a Sony A/V receiver with BRAVIA Theatre Sync is connected, the following additional... respective HDMI input. • Automatically turn the HDMI Control On. Getting Started Using HDMI Control for BRAVIA Theatre Sync™ This TV is supported. Only Sony equipment with HDMI Control capability is equipped with the TV's remote control. ~ • The A/V receiver...
...HDMI Control Available with the TV documentation. Setting the HDMI Control In order for the HDMI Control function to operate, the TV and other equipment, refer to allow communication between Sony TV's and Sony equipment. When a Sony A/V receiver with BRAVIA Theatre Sync is connected, the following additional... respective HDMI input. • Automatically turn the HDMI Control On. Getting Started Using HDMI Control for BRAVIA Theatre Sync™ This TV is supported. Only Sony equipment with HDMI Control capability is equipped with the TV's remote control. ~ • The A/V receiver...
Operating Instructions
Page 18
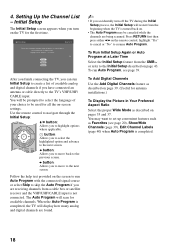
... described on page 43. Press RETURN first then press either B/b on . • The Auto Program may want to set up convenient features such as described on -screen settings. You may be used for all the on pages 35 and 37. 4. The Auto Program will restart from the XMB... Channels (page 39), Edit Channel Labels (page 40) when Auto Program is completed. 18 Language settings will be prompted to select the language of 5 Please select a language. You will apply to continue. Setting Up the Channel List - Initial Setup Step 1 of your choice to the TV's VHF/UHF/...
... described on page 43. Press RETURN first then press either B/b on . • The Auto Program may want to set up convenient features such as described on -screen settings. You may be used for all the on pages 35 and 37. 4. The Auto Program will restart from the XMB... Channels (page 39), Edit Channel Labels (page 40) when Auto Program is completed. 18 Language settings will be prompted to select the language of 5 Please select a language. You will apply to continue. Setting Up the Channel List - Initial Setup Step 1 of your choice to the TV's VHF/UHF/...

Operating Instructions
Page 19
... Description 1 DISPLAY Press once to display the information pertaining to show which external equipment the remote control is set the display to the channel and/or program when available. You can also set to operate the external equipment, these buttons will operate the equipment you want the TV to remain on before...
... Description 1 DISPLAY Press once to display the information pertaining to show which external equipment the remote control is set the display to the channel and/or program when available. You can also set to operate the external equipment, these buttons will operate the equipment you want the TV to remain on before...
Operating Instructions
Page 20
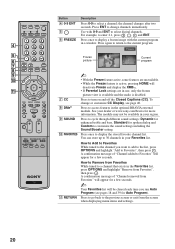
... press OPTIONS and highlight "Add to display the stored favorite channel list. Press again to return to cycle through different sound settings: Dynamic for enhanced treble and bass, Standard for Auto Program). A confirmation message of "Channel removed from Favorites", then press.... 4 Freeze 5 Frozen Current 6 picture program 7 8 9 ~ 0 • With the Freeze feature active, some features are in your dealer or www.sony.com/bravia for a few seconds. ~ Your Favorites list will appear for more information. For example, to enter 2.1, press 2 , , 1 and ENT. 6 FREEZE ...
... press OPTIONS and highlight "Add to display the stored favorite channel list. Press again to return to cycle through different sound settings: Dynamic for enhanced treble and bass, Standard for Auto Program). A confirmation message of "Channel removed from Favorites", then press.... 4 Freeze 5 Frozen Current 6 picture program 7 8 9 ~ 0 • With the Freeze feature active, some features are in your dealer or www.sony.com/bravia for a few seconds. ~ Your Favorites list will appear for more information. For example, to enter 2.1, press 2 , , 1 and ENT. 6 FREEZE ...
Operating Instructions
Page 21
.... X PAUSE: Press to your BRAVIA Theatre Sync audio system. Your BRAVIA Theatre Sync audio system must be switched to play a program in fast forward mode. TV Press to live TV cache. The TV alternates between two channels. JUMP JUMP (Continued) 21 For details, see page 16 for a set period of a recorded program. ADVANCE...
.... X PAUSE: Press to your BRAVIA Theatre Sync audio system. Your BRAVIA Theatre Sync audio system must be switched to play a program in fast forward mode. TV Press to live TV cache. The TV alternates between two channels. JUMP JUMP (Continued) 21 For details, see page 16 for a set period of a recorded program. ADVANCE...
Operating Instructions
Page 22
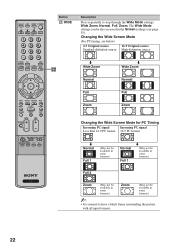
... be also accessed in the Screen settings (see below) 4:3 Original source 16:9 Original source Standard-definition source High-definition source m m Wide Zoom Wide Zoom ws Normal Normal Full Full Zoom Zoom Changing ... (May not be available in some formats.) Zoom (May not be available in some formats.) ~ • It is normal to step through the Wide Mode settings: Wide Zoom, Normal, Full, Zoom. Changing the Wide Screen Mode (For PC timing, see page 35). Button ws WIDE Description Press repeatedly to have a black...
... be also accessed in the Screen settings (see below) 4:3 Original source 16:9 Original source Standard-definition source High-definition source m m Wide Zoom Wide Zoom ws Normal Normal Full Full Zoom Zoom Changing ... (May not be available in some formats.) Zoom (May not be available in some formats.) ~ • It is normal to step through the Wide Mode settings: Wide Zoom, Normal, Full, Zoom. Changing the Wide Screen Mode (For PC timing, see page 35). Button ws WIDE Description Press repeatedly to have a black...

Operating Instructions
Page 23
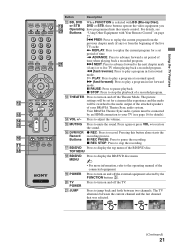
...channels, press and hold down either +/-. Press repeatedly to toggle through the inputs. ~ • Inputs can also be accessed in the Picture settings. wh OPTIONS Press to display a list of connected components. The OPTIONS menu items vary based on page 27. 23 To scan quickly through channels... to display the TV Home Menu/XMB™ to access the TV Home Menu items such as the TV Settings, TV channels and External Inputs list (see Picture settings on -screen cursor. Using the TV Features Button Description wd PICTURE Press repeatedly to cycle through the available picture...
...channels, press and hold down either +/-. Press repeatedly to toggle through the inputs. ~ • Inputs can also be accessed in the Picture settings. wh OPTIONS Press to display a list of connected components. The OPTIONS menu items vary based on page 27. 23 To scan quickly through channels... to display the TV Home Menu/XMB™ to access the TV Home Menu items such as the TV Settings, TV channels and External Inputs list (see Picture settings on -screen cursor. Using the TV Features Button Description wd PICTURE Press repeatedly to cycle through the available picture...
Operating Instructions
Page 24
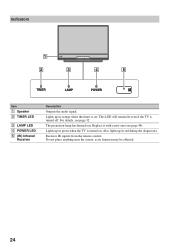
The projection lamp has burned out. Lights up in red during the diagnostics. Also lights up in orange when the timer is turned off. Do not place anything near the sensor, as its function may be affected. 24 For details, see page 44). Indicators 1 2 3 4 5 TIMER LAMP POWER Item 1 Speaker 2 TIMER LED 3 LAMP LED 4 POWER LED 5 (IR) Infrared Receiver Description Outputs the audio signal. This LED will remain lit even if the TV is set. Receives IR signals from the remote control. Replace it with a new one (see page 32. Lights up in green when the TV is turned on.
The projection lamp has burned out. Lights up in red during the diagnostics. Also lights up in orange when the timer is turned off. Do not place anything near the sensor, as its function may be affected. 24 For details, see page 44). Indicators 1 2 3 4 5 TIMER LAMP POWER Item 1 Speaker 2 TIMER LED 3 LAMP LED 4 POWER LED 5 (IR) Infrared Receiver Description Outputs the audio signal. This LED will remain lit even if the TV is set. Receives IR signals from the remote control. Replace it with a new one (see page 32. Lights up in green when the TV is turned on.
Operating Instructions
Page 28
... to operate the DVD DVD (FUNCTION) Turn on /off POWER Play H Replay the current program for a set period of time Advance forward a set period of time when playing back a recorded program Activate the remote control to the DAV F1 Disk skip F2... m during tape playback) Index search . > 28 To Do This ... Activate the remote control to the previous display Press ... . > RETURN 5.1ch DVD AV System (Sony DAV) To Do This ... Press ... or 0-9, ENT (using tuner) Adjust tracking (VCR) CH +/- (during playback Move highlight (cursor) and select (DVD) V v...
... to operate the DVD DVD (FUNCTION) Turn on /off POWER Play H Replay the current program for a set period of time Advance forward a set period of time when playing back a recorded program Activate the remote control to the DAV F1 Disk skip F2... m during tape playback) Index search . > 28 To Do This ... Activate the remote control to the previous display Press ... . > RETURN 5.1ch DVD AV System (Sony DAV) To Do This ... Press ... or 0-9, ENT (using tuner) Adjust tracking (VCR) CH +/- (during playback Move highlight (cursor) and select (DVD) V v...
Operating Instructions
Page 30
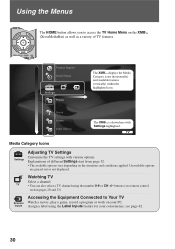
...) as well as a variety of TV features. Inputs Assign a label using the number 0-9 or CH +/- Product Support Clock/Timers Settings The XMB™ displays the Media Category icons (horizontally) and available features (vertically) within the highlighted icon. buttons (see page 42.... 30 TV Media Category Icons Settings Adjusting TV Settings Customize the TV settings with Settings highlighted. Using the Menus The HOME button allows you to Your TV External Watch a movie, play a game,...
...) as well as a variety of TV features. Inputs Assign a label using the number 0-9 or CH +/- Product Support Clock/Timers Settings The XMB™ displays the Media Category icons (horizontally) and available features (vertically) within the highlighted icon. buttons (see page 42.... 30 TV Media Category Icons Settings Adjusting TV Settings Customize the TV settings with Settings highlighted. Using the Menus The HOME button allows you to Your TV External Watch a movie, play a game,...
Operating Instructions
Page 31
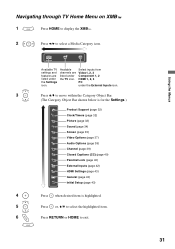
... are listed under the External Inputs icon. 3 Press V/v to move within the Category Object Bar. (The Category Object Bar shown below is for the Settings.) Product Support (page 32) Clock/Timers (page 32) Picture (page 32) Sound (page 34) Screen (page 35) Video Options (page 37) ...Audio Options (page 38) Channel (page 39) CC Closed Captions (CC) (page 40) Parental Lock (page 40) External Inputs (page 42) HDMI Settings (page 43) General (page 43) Initial Setup (page 43) 4 Press when desired item is highlighted. 5 Press or, V/v to select the highlighted item. 6 ...
... are listed under the External Inputs icon. 3 Press V/v to move within the Category Object Bar. (The Category Object Bar shown below is for the Settings.) Product Support (page 32) Clock/Timers (page 32) Picture (page 32) Sound (page 34) Screen (page 35) Video Options (page 37) ...Audio Options (page 38) Channel (page 39) CC Closed Captions (CC) (page 40) Parental Lock (page 40) External Inputs (page 42) HDMI Settings (page 43) General (page 43) Initial Setup (page 43) 4 Press when desired item is highlighted. 5 Press or, V/v to select the highlighted item. 6 ...
Operating Instructions
Page 32
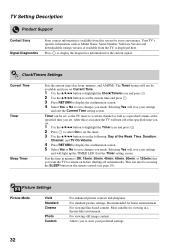
...Sony Signal Diagnostics Sony contact information is available from the TV, is executed the TV will save changes you made . Clock/Timers Settings Current Time Timer Sleep Timer Sets the current time (day, hour, minutes, and AM/PM). For standard picture settings. Timer can also be set..., Software Version and downloadable ratings version, if available from this is displayed here. Selecting Yes will turn off automatically. Allows you set the current time and press . 3 Press RETURN to display the confirmation screen. 4 Select Yes or No to store your convenience...
...Sony Signal Diagnostics Sony contact information is available from the TV, is executed the TV will save changes you made . Clock/Timers Settings Current Time Timer Sleep Timer Sets the current time (day, hour, minutes, and AM/PM). For standard picture settings. Timer can also be set..., Software Version and downloadable ratings version, if available from this is displayed here. Selecting Yes will turn off automatically. Allows you set the current time and press . 3 Press RETURN to display the confirmation screen. 4 Select Yes or No to store your convenience...


