Operating Instructions
Page 3
... TV Home Menu on XMB 39 TV Settings Descriptions 40 Product Support 40 Clock/Timers Settings 40 Picture Settings 41 Sound Settings 44 Screen Settings 45 Channel Settings 47 CC Closed Captions (CC) Settings 48 Parental Lock Settings 48 External Inputs Settings 51 HDMI Settings 51 Network Settings 52 General Setup Settings ...the Remote Control 25 Manufacturer's Code List 26 Sony Equipment Codes 26 Other Manufacturer Equipment Codes.........26 Using Other Equipment with Control for KDL-70XBR7 9 2. Contents Welcome to Use TV Guide On Screen 34 Using BRAVIA Sync with Your...
... TV Home Menu on XMB 39 TV Settings Descriptions 40 Product Support 40 Clock/Timers Settings 40 Picture Settings 41 Sound Settings 44 Screen Settings 45 Channel Settings 47 CC Closed Captions (CC) Settings 48 Parental Lock Settings 48 External Inputs Settings 51 HDMI Settings 51 Network Settings 52 General Setup Settings ...the Remote Control 25 Manufacturer's Code List 26 Sony Equipment Codes 26 Other Manufacturer Equipment Codes.........26 Using Other Equipment with Control for KDL-70XBR7 9 2. Contents Welcome to Use TV Guide On Screen 34 Using BRAVIA Sync with Your...
Operating Instructions
Page 4
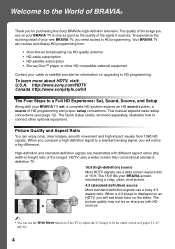
...). HDTV uses a wider screen than conventional standarddefinition TV. 16:9 (high-definition) source Most HDTV signals use a boxy 4:3 aspect ratio. http://www.sony.com/HDTV Canada http://www.sonystyle.ca/hd The Four Steps to a Full HD Experience: Set, Sound, Source, and Setup Along with different ...aspect ratios (the width-to connect other HD compatible external equipment Contact your BRAVIA TV set, a complete HD system requires...
...). HDTV uses a wider screen than conventional standarddefinition TV. 16:9 (high-definition) source Most HDTV signals use a boxy 4:3 aspect ratio. http://www.sony.com/HDTV Canada http://www.sonystyle.ca/hd The Four Steps to a Full HD Experience: Set, Sound, Source, and Setup Along with different ...aspect ratios (the width-to connect other HD compatible external equipment Contact your BRAVIA TV set, a complete HD system requires...
Operating Instructions
Page 5
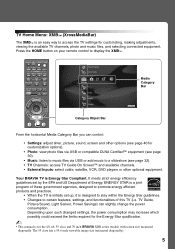
...Photo: view photo files via USB or compatible DLNA Certified™ equipment (see page 40 for the 40, 46, 55 class and 70 inch BRAVIA XBR series models with screen size measured diagonally. Your BRAVIA TV is designed to stay within the Energy Star guidelines. • Changes to a ...is an easy way to display the XMB™. Press the HOME button on your remote control to access the TV settings for customizing, making adjustments, viewing the available TV channels, photo and music files, and selecting connected equipment. ENERGY STAR is a joint program of these government agencies...
...Photo: view photo files via USB or compatible DLNA Certified™ equipment (see page 40 for the 40, 46, 55 class and 70 inch BRAVIA XBR series models with screen size measured diagonally. Your BRAVIA TV is designed to stay within the Energy Star guidelines. • Changes to a ...is an easy way to display the XMB™. Press the HOME button on your remote control to access the TV settings for customizing, making adjustments, viewing the available TV channels, photo and music files, and selecting connected equipment. ENERGY STAR is a joint program of these government agencies...
Operating Instructions
Page 7
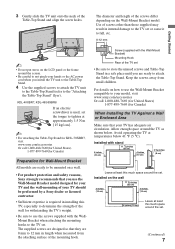
...the WallMount Bracket when attaching the mounting hooks to the TV set. For details on the LCD panel or the frame around the set . (Continued) 7 KDL-40XBR7, KDL-46/55XBR8 If an electric screwdriver is required in a safe place until you install the TV unit to the Table-Top Stand. 4 Use the ...10 cm) 2 3/8 inches (6 cm) Leave at approximately 1.5 N·m {15 kgf·cm}. ~ • For attaching the Table-Top Stand for KDL-70XBR7, visit www.sony.com/accessories Or call 1-800-488-7669(for United States) 1-877-899-7669(for Canada) Preparation for Wall-Mount Bracket All models are ready...
...the WallMount Bracket when attaching the mounting hooks to the TV set. For details on the LCD panel or the frame around the set . (Continued) 7 KDL-40XBR7, KDL-46/55XBR8 If an electric screwdriver is required in a safe place until you install the TV unit to the Table-Top Stand. 4 Use the ...10 cm) 2 3/8 inches (6 cm) Leave at approximately 1.5 N·m {15 kgf·cm}. ~ • For attaching the Table-Top Stand for KDL-70XBR7, visit www.sony.com/accessories Or call 1-800-488-7669(for United States) 1-877-899-7669(for Canada) Preparation for Wall-Mount Bracket All models are ready...
Operating Instructions
Page 8
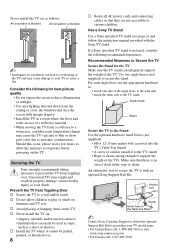
...-488-7669 or visit: www.sony.com/accessories • For Canada call: 1-877-899-7669 Make sure that they are not of a reflective material. • When moving the TV from Toppling Over s Secure the TV to secure the stand. Never install the TV set as a chest of drawers. Unsecured TVs may topple and result in the...
...-488-7669 or visit: www.sony.com/accessories • For Canada call: 1-877-899-7669 Make sure that they are not of a reflective material. • When moving the TV from Toppling Over s Secure the TV to secure the stand. Never install the TV set as a chest of drawers. Unsecured TVs may topple and result in the...
Operating Instructions
Page 11
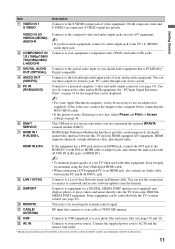
...jack, and connect the audio jack to the AUDIO IN (L/R) jacks of HDMI IN 1. ~ • To maintain picture quality of Screen settings on page 14 for the signals that can be displayed. ~ • For some DIGITAL MEDIA PORT equipment. Some equipment can be controlled... the TV's remote control (see page 14). Dolby and the double-D symbol are connected, S VIDEO signal has priority. Item 1 VIDEO IN 1 S VIDEO Description Connects to AC IN and the nearest wall outlet. * Manufactured under license from Dolby Laboratories. Connects to other equipment, Sony strongly ...
...jack, and connect the audio jack to the AUDIO IN (L/R) jacks of HDMI IN 1. ~ • To maintain picture quality of Screen settings on page 14 for the signals that can be displayed. ~ • For some DIGITAL MEDIA PORT equipment. Some equipment can be controlled... the TV's remote control (see page 14). Dolby and the double-D symbol are connected, S VIDEO signal has priority. Item 1 VIDEO IN 1 S VIDEO Description Connects to AC IN and the nearest wall outlet. * Manufactured under license from Dolby Laboratories. Connects to other equipment, Sony strongly ...
Operating Instructions
Page 12
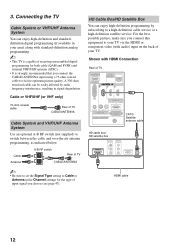
... be easily affected by subscribing to receive optimum picture quality. Cable Antenna A-B RF switch A Rear of TV B CABLE/ANTENNA ~ • Be sure to set the Signal Type setting to Cable or Antenna in your area) along with HDMI Connection Rear of input signal you connect this ...Antenna System Use an optional A-B RF switch (not supplied) to your TV. Connecting the TV Cable System or VHF/UHF Antenna System You can enjoy high-definition and standarddefinition digital programming (if available in the Channel settings for both cable (QAM and 8VSB) and external VHF/UHF antenna ...
... be easily affected by subscribing to receive optimum picture quality. Cable Antenna A-B RF switch A Rear of TV B CABLE/ANTENNA ~ • Be sure to set the Signal Type setting to Cable or Antenna in your area) along with HDMI Connection Rear of input signal you connect this ...Antenna System Use an optional A-B RF switch (not supplied) to your TV. Connecting the TV Cable System or VHF/UHF Antenna System You can enjoy high-definition and standarddefinition digital programming (if available in the Channel settings for both cable (QAM and 8VSB) and external VHF/UHF antenna ...
Operating Instructions
Page 14
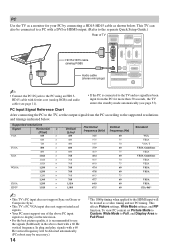
... PC IN jack to the PC using an HD15HD15 cable with a 60 Hz vertical frequency. To view PC content set Picture Mode to Custom, Wide Mode to Full, and Display Area to the TV, set the output signal from the PC for your PC by connecting a HD15-HD15 cable as a video timing and... not PC timing. PC Input Signal Reference Chart After connecting the PC to Full Pixel. PC Use the TV as a monitor for more than 30 seconds...
... PC IN jack to the PC using an HD15HD15 cable with a 60 Hz vertical frequency. To view PC content set Picture Mode to Custom, Wide Mode to Full, and Display Area to the TV, set the output signal from the PC for your PC by connecting a HD15-HD15 cable as a video timing and... not PC timing. PC Input Signal Reference Chart After connecting the PC to Full Pixel. PC Use the TV as a monitor for more than 30 seconds...
Operating Instructions
Page 16
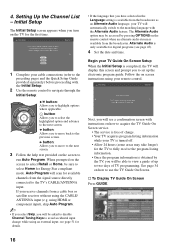
...using your cable connections (refer to use the TV Guide On Screen. This TV features an electronic program guide. Next, you to set up to the TV's CABLE/ANTENNA input. Language settings will display this screen and prompt you will see page 45). 4 Set the date and time. When prompted on the... screen to highlight options where applicable. B button: Allows you to run Auto Program. Follow the on screen display as well as an Alternate Audio language, your TV Guide On Screen Setup When the ...
...using your cable connections (refer to use the TV Guide On Screen. This TV features an electronic program guide. Next, you to set up to the TV's CABLE/ANTENNA input. Language settings will display this screen and prompt you will see page 45). 4 Set the date and time. When prompted on the... screen to highlight options where applicable. B button: Allows you to run Auto Program. Follow the on screen display as well as an Alternate Audio language, your TV Guide On Screen Setup When the ...
Operating Instructions
Page 17
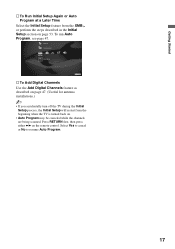
... a Later Time Select the Initial Setup feature from the beginning when the TV is turned back on. • Auto Program may be canceled while the channels are being scanned. Network General Setup Settings Initial Setup TV s To Add Digital Channels Use the Add Digital Channels feature as described... on page 47. (Useful for antenna installations.) ~ • If you accidentally turn off the TV during the Initial Setup process, the Initial Setup ...
... a Later Time Select the Initial Setup feature from the beginning when the TV is turned back on. • Auto Program may be canceled while the channels are being scanned. Network General Setup Settings Initial Setup TV s To Add Digital Channels Use the Add Digital Channels feature as described... on page 47. (Useful for antenna installations.) ~ • If you accidentally turn off the TV during the Initial Setup process, the Initial Setup ...

Operating Instructions
Page 19
...banner with the Control for a cinema-like experience and the audio will be available in all regions. (Continued) 19 ADVANCE: Press to advance forward a set period of time when playing back a recorded program. > NEXT: Press to advance forward to the next chapter mark (if any ) or from the .... The buttons listed below can also be used for the equipment mode the remote control is operating. When the TV FUNCTION button is not selected). PREV: Press to your dealer or www.sony.com/bravia for HDMI equipment). . m (fast reverse): Press to turn on all Control for details). N PLAY: ...
...banner with the Control for a cinema-like experience and the audio will be available in all regions. (Continued) 19 ADVANCE: Press to advance forward a set period of time when playing back a recorded program. > NEXT: Press to advance forward to the next chapter mark (if any ) or from the .... The buttons listed below can also be used for the equipment mode the remote control is operating. When the TV FUNCTION button is not selected). PREV: Press to your dealer or www.sony.com/bravia for HDMI equipment). . m (fast reverse): Press to turn on all Control for details). N PLAY: ...
Operating Instructions
Page 20
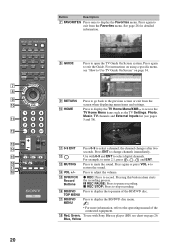
... Menu/XMB™ to change channels immediately. Press ENT to access the TV Home Menu items such as the TV Settings, Photo, Music, TV channels and External Inputs list (see pages 5 and 38). Press again or press VOL + to display the top menu of the connected equipment. qh BD/... to go back to exit from the screen when displaying menu items and settings. Product Support Clock/Timers Settings Sound Screen Channel TV qa 0-9 ENT qs qd MUTING qf VOL +/- Use with Sony Blu-ray player (BD) see "How to Use TV Guide On Screen" on page 26. X REC PAUSE: Press to adjust the volume...
... Menu/XMB™ to change channels immediately. Press ENT to access the TV Home Menu items such as the TV Settings, Photo, Music, TV channels and External Inputs list (see pages 5 and 38). Press again or press VOL + to display the top menu of the connected equipment. qh BD/... to go back to exit from the screen when displaying menu items and settings. Product Support Clock/Timers Settings Sound Screen Channel TV qa 0-9 ENT qs qd MUTING qf VOL +/- Use with Sony Blu-ray player (BD) see "How to Use TV Guide On Screen" on page 26. X REC PAUSE: Press to adjust the volume...

Operating Instructions
Page 21
... in the Screen settings (see pages 45 and 46). Changing the Wide Screen Mode for PC Timing Incoming PC signal Incoming PC signal 800 × 600 1,280 × 768 m Normal m Normal Full 1 Full 1 Full 2 Full 2 (Continued) 21 Operating the TV Button Description ql TV POWER Press to ...turn on and off the TV. DISPLAY LIGHT POWER TV POWER DVD AMP STB TV FUNCTION PREV REPLAY ADVANCE NEXT PLAY ql w; POWER wa WIDE Press to turn on and off the external equipment selected by FUNCTION buttons. Press repeatedly to cycle through the available Wide Mode settings: Wide Zoom, Normal,...
... in the Screen settings (see pages 45 and 46). Changing the Wide Screen Mode for PC Timing Incoming PC signal Incoming PC signal 800 × 600 1,280 × 768 m Normal m Normal Full 1 Full 1 Full 2 Full 2 (Continued) 21 Operating the TV Button Description ql TV POWER Press to ...turn on and off the TV. DISPLAY LIGHT POWER TV POWER DVD AMP STB TV FUNCTION PREV REPLAY ADVANCE NEXT PLAY ql w; POWER wa WIDE Press to turn on and off the external equipment selected by FUNCTION buttons. Press repeatedly to cycle through the available Wide Mode settings: Wide Zoom, Normal,...

Operating Instructions
Page 22
...Custom. (Available options depend on the current mode.) The picture modes can also be accessed in the Picture settings. DISPLAY LIGHT POWER TV POWER DVD AMP STB TV FUNCTION PREV REPLAY ADVANCE NEXT PLAY SYNC MENU PAUSE STOP THEATER SOUND PICTURE WIDE CC FREEZE ws wd wf wg... Description Press repeatedly to toggle through the inputs. ~ • See page 51 on setting up the External Inputs labels. Press V/v/B/b to Favorites/ Remove from Favorites MTS Alternate Audio Digital Rating Background TV Motion Enhancer Device Control Device Control (Menu) for Closed Captions (CC): On, Off,...
...Custom. (Available options depend on the current mode.) The picture modes can also be accessed in the Picture settings. DISPLAY LIGHT POWER TV POWER DVD AMP STB TV FUNCTION PREV REPLAY ADVANCE NEXT PLAY SYNC MENU PAUSE STOP THEATER SOUND PICTURE WIDE CC FREEZE ws wd wf wg... Description Press repeatedly to toggle through the inputs. ~ • See page 51 on setting up the External Inputs labels. Press V/v/B/b to Favorites/ Remove from Favorites MTS Alternate Audio Digital Rating Background TV Motion Enhancer Device Control Device Control (Menu) for Closed Captions (CC): On, Off,...

Operating Instructions
Page 24
... mode. Do not put anything near the sensor or the nearby general area (as shown above), as its function may indicate that the TV needs servicing (see page 40 (Timer) and page 53 (Picture Off). 7 (IR) Infrared Receives IR signals from the remote control. Indicators 3 POWER 4 1 STANDBY 2 5 PIC OFF...orange when the timer is in red continuously, this LED will illuminate when the TV is powered on. For details, see contacting Sony information on . 5 STANDBY LED Lights up in red when your TV is set , this may be affected. 24 Do not put Receiver anything near the sensor,...
... mode. Do not put anything near the sensor or the nearby general area (as shown above), as its function may indicate that the TV needs servicing (see page 40 (Timer) and page 53 (Picture Off). 7 (IR) Infrared Receives IR signals from the remote control. Indicators 3 POWER 4 1 STANDBY 2 5 PIC OFF...orange when the timer is in red continuously, this LED will illuminate when the TV is powered on. For details, see contacting Sony information on . 5 STANDBY LED Lights up in red when your TV is set , this may be affected. 24 Do not put Receiver anything near the sensor,...

Operating Instructions
Page 25
... be programmed to operate other equipment regardless of approximately five seconds with the INPUT button and release. Operating the TV DISPLAY LIGHT POWER TV POWER DVD AMP STB TV 2 FUNCTION PREV REPLAY ADVANCE NEXT PLAY SYNC MENU PAUSE STOP THEATER SOUND PICTURE WIDE CC FREEZE 2 4 Auto...Confirm the Programming If you may not be programmed to operate the following Sony equipment. If successfully programmed, the FUNCTION button blinks twice; If this is complete. If more than the default time setting of the labeling. Backlight Time Out The remote control can be able to...
... be programmed to operate other equipment regardless of approximately five seconds with the INPUT button and release. Operating the TV DISPLAY LIGHT POWER TV POWER DVD AMP STB TV 2 FUNCTION PREV REPLAY ADVANCE NEXT PLAY SYNC MENU PAUSE STOP THEATER SOUND PICTURE WIDE CC FREEZE 2 4 Auto...Confirm the Programming If you may not be programmed to operate the following Sony equipment. If successfully programmed, the FUNCTION button blinks twice; If this is complete. If more than the default time setting of the labeling. Backlight Time Out The remote control can be able to...
Operating Instructions
Page 28
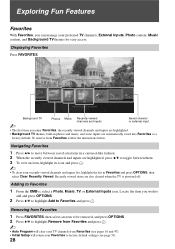
...or external input ~ • The first time you enter Favorites, the recently viewed channels and inputs are highlighted. • Background TV themes, built-in photos and music, and some inputs are highlighted, press V/v to toggle between saved selections in Favorites and press...Features Favorites With Favorites, you can manage your Favorites to factory default settings (see pages 16 and 47). • Initial Setup will return your preferred TV channels, External Inputs, Photo content, Music content, and Background TV themes for easy access. Navigating Favorites 1 Press B/b to move ...
...or external input ~ • The first time you enter Favorites, the recently viewed channels and inputs are highlighted. • Background TV themes, built-in photos and music, and some inputs are highlighted, press V/v to toggle between saved selections in Favorites and press...Features Favorites With Favorites, you can manage your Favorites to factory default settings (see pages 16 and 47). • Initial Setup will return your preferred TV channels, External Inputs, Photo content, Music content, and Background TV themes for easy access. Navigating Favorites 1 Press B/b to move ...
Operating Instructions
Page 31
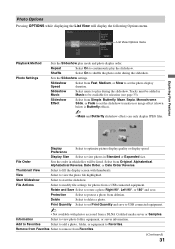
.... Rotate and Save Select to rotate a photo Right 90°, Left 90°, or 180° and save to modify file settings for selection (see page 33). Repeat Select On to be listed. Delete Select to start the slideshow. Start Slideshow Select to delete...file highlighted. Photo Options Pressing OPTIONS while displaying the List View will be available for photos from a USB connected equipment. Sets the Slideshow settings. Exploring Fun Features Display Preference Select to view photo folder, equipment, or server information. Information Select to optimize picture ...
.... Rotate and Save Select to rotate a photo Right 90°, Left 90°, or 180° and save to modify file settings for selection (see page 33). Repeat Select On to be listed. Delete Select to start the slideshow. Start Slideshow Select to delete...file highlighted. Photo Options Pressing OPTIONS while displaying the List View will be available for photos from a USB connected equipment. Sets the Slideshow settings. Exploring Fun Features Display Preference Select to view photo folder, equipment, or server information. Information Select to optimize picture ...
Operating Instructions
Page 32
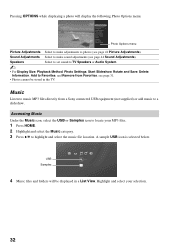
...to make adjustments to a slideshow. Speakers Select to set sound to TV Speakers or Audio System. ~ • For Display Size, Playback Method, Photo Settings, Start Slideshow, Rotate and Save, Delete, Information, Add to Favorites, and Remove from a Sony connected USB equipment (not supplied) or add music ...Music category. 3 Press V/v to music MP3 files directly from Favorites, see page 31. • Photos cannot be displayed in the TV. Accessing Music Under the Music icon, select the USB or Samples icon to make sound adjustments (see page 41 Picture Adjustments). USB ...
...to make adjustments to a slideshow. Speakers Select to set sound to TV Speakers or Audio System. ~ • For Display Size, Playback Method, Photo Settings, Start Slideshow, Rotate and Save, Delete, Information, Add to Favorites, and Remove from a Sony connected USB equipment (not supplied) or add music ...Music category. 3 Press V/v to music MP3 files directly from Favorites, see page 31. • Photos cannot be displayed in the TV. Accessing Music Under the Music icon, select the USB or Samples icon to make sound adjustments (see page 41 Picture Adjustments). USB ...
Operating Instructions
Page 33
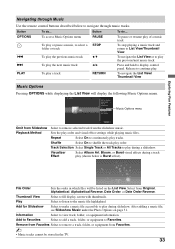
... play order. Track Selection Select Single Track or All Tracks to play during a track play . File Order Sets the order in the TV. 33 After adding a music file, see Slideshow Music under the Photo Options on the List View. Add to Favorites Select to add a ...Select to remove a track, folder, or equipment from the slideshow music. Play Select to listen to shuffle the track play order and visual effect settings while playing music files. Button To do ... Shuffle Select On to the music file highlighted. Select from Original, Alphabetical, Alphabetical Reverse, Date Order...
... play order. Track Selection Select Single Track or All Tracks to play during a track play . File Order Sets the order in the TV. 33 After adding a music file, see Slideshow Music under the Photo Options on the List View. Add to Favorites Select to add a ...Select to remove a track, folder, or equipment from the slideshow music. Play Select to listen to shuffle the track play order and visual effect settings while playing music files. Button To do ... Shuffle Select On to the music file highlighted. Select from Original, Alphabetical, Alphabetical Reverse, Date Order...


