Operating Instructions
Page 9
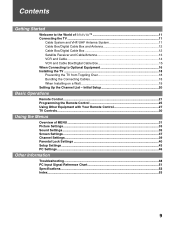
Contents Getting Started Welcome to Optional Equipment 16 Installing the TV ...18 Preventing the TV from Toppling Over 18 Bundling the Connecting Cables 18 When Installing on a Wall 19 Setting Up the Channel List - Initial Setup 20 Basic Operations Remote ... Cable Box 15 When Connecting to the World of MENU ...31 Picture Settings...33 Sound Settings...35 Screen Settings ...37 Channel Settings...39 Parental Lock Settings 40 Setup Settings ...43 PC Settings ...46 Other Information Troubleshooting...48 PC Input Signal Reference Chart 51 Specifications ...52 Index ...53 9
Contents Getting Started Welcome to Optional Equipment 16 Installing the TV ...18 Preventing the TV from Toppling Over 18 Bundling the Connecting Cables 18 When Installing on a Wall 19 Setting Up the Channel List - Initial Setup 20 Basic Operations Remote ... Cable Box 15 When Connecting to the World of MENU ...31 Picture Settings...33 Sound Settings...35 Screen Settings ...37 Channel Settings...39 Parental Lock Settings 40 Setup Settings ...43 PC Settings ...46 Other Information Troubleshooting...48 PC Input Signal Reference Chart 51 Specifications ...52 Index ...53 9

Operating Instructions
Page 16
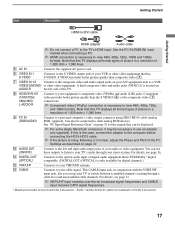
...-to-DVI cable or adapter) jack, and connect the audio jack to the TV's L (MONO) audio input jack. Connect to the composite video and audio output jacks on your camcorder or other video equipment such as a set-top box, Blu-ray DiscTM Player, DVD player, and A/V receiver. HDMI ...VIDEO VIDEO L (MONO) AUDIO R 1 4 VIDEO IN Y PB PR L AUDIO R 5 6 HD/DVD IN (1080i/720p/480p/480i) RGB DIGITAL OUT (OPTICAL) AUDIO L AUDIO R PC IN AUDIO OUT (VAR/FIX) qa 7 8 90 Item 1 Headphones jack 2 VIDEO IN 2 R-AUDIOL (MONO)/VIDEO 3 HDMI IN 3 4 HDMI IN 7/8 HDMI AUDIO IN/ L-R Description ...
...-to-DVI cable or adapter) jack, and connect the audio jack to the TV's L (MONO) audio input jack. Connect to the composite video and audio output jacks on your camcorder or other video equipment such as a set-top box, Blu-ray DiscTM Player, DVD player, and A/V receiver. HDMI ...VIDEO VIDEO L (MONO) AUDIO R 1 4 VIDEO IN Y PB PR L AUDIO R 5 6 HD/DVD IN (1080i/720p/480p/480i) RGB DIGITAL OUT (OPTICAL) AUDIO L AUDIO R PC IN AUDIO OUT (VAR/FIX) qa 7 8 90 Item 1 Headphones jack 2 VIDEO IN 2 R-AUDIOL (MONO)/VIDEO 3 HDMI IN 3 4 HDMI IN 7/8 HDMI AUDIO IN/ L-R Description ...
Operating Instructions
Page 17
... you set up your TV to the TV's HDMI input. S VIDEO provides better picture quality than the S VIDEO (6) or the composite video (7) connections. ✍ Component video (YPBPR) connection is located on page 47. 0 AUDIO OUT (VAR/FIX) Connect to the left side of your audio or video equipment. Use the PC IN (RGB IN) input instead...
... you set up your TV to the TV's HDMI input. S VIDEO provides better picture quality than the S VIDEO (6) or the composite video (7) connections. ✍ Component video (YPBPR) connection is located on page 47. 0 AUDIO OUT (VAR/FIX) Connect to the left side of your audio or video equipment. Use the PC IN (RGB IN) input instead...

Operating Instructions
Page 30
... to adjust the volume. Use it as confirming the selection or setting. 5 MENU Press to display MENU with TV functions and settings (see contacting Sony information on page 31). 6 PIC OFF/TIMER Lights up in the PC standby mode. For details, see page 44. 7 STANDBY LED Lights up /down either CHANNEL +/- ...not put anything near the sensor, as its function may indicate the TV needs servicing (see "Overview of MENU" on page 2). 8 POWER LED Lights up in Label Video Inputs, then the input will remain lit even if the TV is activated. In the MENU screen, these buttons serve as up ...
... to adjust the volume. Use it as confirming the selection or setting. 5 MENU Press to display MENU with TV functions and settings (see contacting Sony information on page 31). 6 PIC OFF/TIMER Lights up in the PC standby mode. For details, see page 44. 7 STANDBY LED Lights up /down either CHANNEL +/- ...not put anything near the sensor, as its function may indicate the TV needs servicing (see "Overview of MENU" on page 2). 8 POWER LED Lights up in Label Video Inputs, then the input will remain lit even if the TV is activated. In the MENU screen, these buttons serve as up ...
Operating Instructions
Page 31
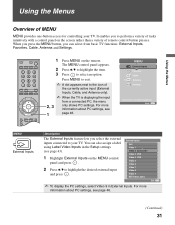
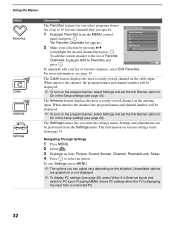
...). ✍ When the TV is displaying the input 2, 3 1 from connected equipment Exit: MENU MENU External Inputs Description The External Inputs feature lets you select the external inputs connected to highlight the desired external input and press . MENU External Inputs Favorites C Cable Antenna Settings Select from a connected PC, the menu only shows PC settings. For more information about PC settings, see page 46. Exit...
...). ✍ When the TV is displaying the input 2, 3 1 from connected equipment Exit: MENU MENU External Inputs Description The External Inputs feature lets you select the external inputs connected to highlight the desired external input and press . MENU External Inputs Favorites C Cable Antenna Settings Select from a connected PC, the menu only shows PC settings. For more information about PC settings, see page 46. Exit...
Operating Instructions
Page 32
..., Setup. 4 Press to 16 favorite channels that you specify. 1 Highlight Favorites from the MENU control panel and press . Pressing MENU shows PC settings when the TV is displaying the input from a connected PC. 32 Favorite Channels Add to Favorites 5 12 23 Edit Favorites Exit Exit: MENU To manually edit your selection by pressing V/v to On...
..., Setup. 4 Press to 16 favorite channels that you specify. 1 Highlight Favorites from the MENU control panel and press . Pressing MENU shows PC settings when the TV is displaying the input from a connected PC. 32 Favorite Channels Add to Favorites 5 12 23 Edit Favorites Exit Exit: MENU To manually edit your selection by pressing V/v to On...

Operating Instructions
Page 43
...input when you press the TV/VIDEO button. ✍ The Skip label is useful for inputs to create a custom 10-character label. Off Caption Vision (CC) is pressed. When On, displays the program name and the program information (if the broadcaster offers this at the factory default setting. You can edit the Label Video Inputs...you to which no equipment is connected. (Continued) 43 Displays for each input: Video 1-8 -, DVD, Cable Box, Satellite, BD, VCR, Receiver, DVR, Game, Camcorder, Edit, Skip Video 9 -, PC, Skip ✍ Edit allows you create channel labels, as a VCR, ...
...input when you press the TV/VIDEO button. ✍ The Skip label is useful for inputs to create a custom 10-character label. Off Caption Vision (CC) is pressed. When On, displays the program name and the program information (if the broadcaster offers this at the factory default setting. You can edit the Label Video Inputs...you to which no equipment is connected. (Continued) 43 Displays for each input: Video 1-8 -, DVD, Cable Box, Satellite, BD, VCR, Receiver, DVR, Game, Camcorder, Edit, Skip Video 9 -, PC, Skip ✍ Edit allows you create channel labels, as a VCR, ...

Operating Instructions
Page 46
... Text To display the PC settings, see "Navigating Through Settings" (see page 32). Warm 1,2 Select to increase or decrease picture contrast. Standard Provides standard sound. Reset the current settings to another input. Display Mode Text Reset Backlight Picture Brightness Adjust the picture settings Resolution: 1024x768/60Hz MENU Exit ✍ Press TV/VIDEO to switch to the default...
... Text To display the PC settings, see "Navigating Through Settings" (see page 32). Warm 1,2 Select to increase or decrease picture contrast. Standard Provides standard sound. Reset the current settings to another input. Display Mode Text Reset Backlight Picture Brightness Adjust the picture settings Resolution: 1024x768/60Hz MENU Exit ✍ Press TV/VIDEO to switch to the default...

Operating Instructions
Page 47
...original image size. Normal Select to adjust. Adjust after Pitch to move the position of the picture when the TV receives an input signal from the connected PC. Allows you to fill the display area, keeping its original aspect ratio. On Select to automatically switch to .... Resets the current settings to adjust. Press B/b and press to the default value. Full 2 Select to enlarge the picture to turn off Power Management. ✍ Power Management is no signal input for 30 seconds. Adjust uneven sharpness on screen. ✍ For the PC Input Signal Reference Chart, ...
...original image size. Normal Select to adjust. Adjust after Pitch to move the position of the picture when the TV receives an input signal from the connected PC. Allows you to fill the display area, keeping its original aspect ratio. On Select to automatically switch to .... Resets the current settings to adjust. Press B/b and press to the default value. Full 2 Select to enlarge the picture to turn off Power Management. ✍ Power Management is no signal input for 30 seconds. Adjust uneven sharpness on screen. ✍ For the PC Input Signal Reference Chart, ...
Operating Instructions
Page 48
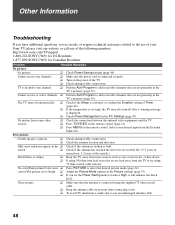
.... ❑ Check if the antenna has reached the end of its serviceable life. (3-5 years in the TV's memory (page 39). Only snow and noise appear on the power of your desired input from some video sources. ❑ Check the connection between the optional video equipment and the...❑ ❑ Press PICTURE to Low or High, it will enhance the black level. Adjust the Picture Mode options in the PC Settings (page 47). Select your Sony TV, please visit our website or call one channel. ❑ Perform Auto Program to add receivable channels that the antenna is activated,...
.... ❑ Check if the antenna has reached the end of its serviceable life. (3-5 years in the TV's memory (page 39). Only snow and noise appear on the power of your desired input from some video sources. ❑ Check the connection between the optional video equipment and the...❑ ❑ Press PICTURE to Low or High, it will enhance the black level. Adjust the Picture Mode options in the PC Settings (page 47). Select your Sony TV, please visit our website or call one channel. ❑ Perform Auto Program to add receivable channels that the antenna is activated,...
Operating Instructions
Page 52
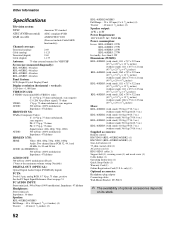
...PC AUDIO INPUT: Stereo mini jack, 500 mVrms (100% modulation), Impedance: 47 kilohms Headphones: Stereo mini jack Impedance: 16 ohms Speaker: KDL-40XBR2/40XBR3 Full Range : 40 × 100 mm (1 5/8 × 4 inches) (4) Tweeter : 40 mm (1 5/8 inches) (2) 52 KDL...size (measured diagonally): KDL-40XBR2: 40 inches KDL-46XBR2: 46 inches KDL-40XBR3: 40 inches KDL-46XBR3: 46 inches Panel System: LCD (Liquid Crystal Display...setting (Variable) DIGITAL OUT (OPTICAL): Optical Digital Audio Output (PCM/Dolby digital) PC IN: D-sub 15-pin, analog RGB, 0.7 Vp-p, 75 ohms, positive See the PC Input...
...PC AUDIO INPUT: Stereo mini jack, 500 mVrms (100% modulation), Impedance: 47 kilohms Headphones: Stereo mini jack Impedance: 16 ohms Speaker: KDL-40XBR2/40XBR3 Full Range : 40 × 100 mm (1 5/8 × 4 inches) (4) Tweeter : 40 mm (1 5/8 inches) (2) 52 KDL...size (measured diagonally): KDL-40XBR2: 40 inches KDL-46XBR2: 46 inches KDL-40XBR3: 40 inches KDL-46XBR3: 46 inches Panel System: LCD (Liquid Crystal Display...setting (Variable) DIGITAL OUT (OPTICAL): Optical Digital Audio Output (PCM/Dolby digital) PC IN: D-sub 15-pin, analog RGB, 0.7 Vp-p, 75 ohms, positive See the PC Input...
Operating Instructions
Page 53
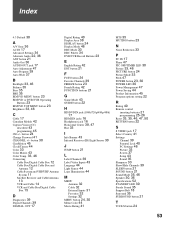
...Banner 43 Infrared Receiver (IR)/Light Sensor 30 J JUMP button 21 L Label Channels 39 Label Video Inputs 43 Language 44 Light Sensor 44 Logo Illumination 44 M MENU Antenna 32 Cable 32 External Inputs 31 Favorites 32 Settings 32 MENU button 24, 30 Menu Color 44 Movie Rating 41 MTS 35 MUTING button 23... control inserting batteries 21 programming 25-26 Reset 33, 35, 46, 47, 50 RETURN button 22 S S VIDEO jack 17 Select Country 41 Settings Channel 39 Parental Lock 40 PC Settings 46 Picture 33 Screen 37 Setup 43 Sound 35 Sharpness 33 Show/Hide Channels 39 SLEEP button 21 SOUND button 21 Sound Mode 35...
...Banner 43 Infrared Receiver (IR)/Light Sensor 30 J JUMP button 21 L Label Channels 39 Label Video Inputs 43 Language 44 Light Sensor 44 Logo Illumination 44 M MENU Antenna 32 Cable 32 External Inputs 31 Favorites 32 Settings 32 MENU button 24, 30 Menu Color 44 Movie Rating 41 MTS 35 MUTING button 23... control inserting batteries 21 programming 25-26 Reset 33, 35, 46, 47, 50 RETURN button 22 S S VIDEO jack 17 Select Country 41 Settings Channel 39 Parental Lock 40 PC Settings 46 Picture 33 Screen 37 Setup 43 Sound 35 Sharpness 33 Show/Hide Channels 39 SLEEP button 21 SOUND button 21 Sound Mode 35...


