Operating Instructions
Page 1
2-678-575-11(1) LCD Digital Color TV Operating Instructions KDL-40XBR2 KDL-46XBR2 KDL-40XBR3 KDL-46XBR3 © 2006 Sony Corporation
2-678-575-11(1) LCD Digital Color TV Operating Instructions KDL-40XBR2 KDL-46XBR2 KDL-40XBR3 KDL-46XBR3 © 2006 Sony Corporation
Operating Instructions
Page 2
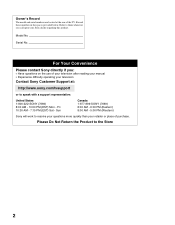
... regarding this product. Please Do Not Return the Product to resolve your questions more quickly than your television Contact Sony Customer Support at the rear of purchase. Refer to them whenever you : z Have questions on the use of your television after reading your manual z Experience ...difficulty operating your retailer or place of the TV. Record these numbers in the spaces provided below. Sun Canada 1-877-899-SONY (7669) 8:00 AM - 6:00 PM (Eastern) 8:00 AM - 5:00 PM (Western...
... regarding this product. Please Do Not Return the Product to resolve your questions more quickly than your television Contact Sony Customer Support at the rear of purchase. Refer to them whenever you : z Have questions on the use of your television after reading your manual z Experience ...difficulty operating your retailer or place of the TV. Record these numbers in the spaces provided below. Sun Canada 1-877-899-SONY (7669) 8:00 AM - 6:00 PM (Eastern) 8:00 AM - 5:00 PM (Western...
Operating Instructions
Page 3
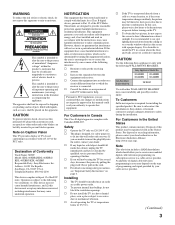
... a hot or humid place, or in Canada This Class B digital apparatus complies with part 15 of Conformity Trade Name: SONY Model: KDL-40XBR2/KDL-46XBR2/ KDL-40XBR3/KDL-46XBR3 Responsible Party: Sony Electronics Inc. s Avoid operating the TV at temperatures below 41°F (5°C). In this device must accept any changes or modifications not expressly approved in your...
... a hot or humid place, or in Canada This Class B digital apparatus complies with part 15 of Conformity Trade Name: SONY Model: KDL-40XBR2/KDL-46XBR2/ KDL-40XBR3/KDL-46XBR3 Responsible Party: Sony Electronics Inc. s Avoid operating the TV at temperatures below 41°F (5°C). In this device must accept any changes or modifications not expressly approved in your...
Operating Instructions
Page 4
... two blades and a third grounding prong. The wide blade or the third prong are trademarks of Sony Corporation. Macintosh is a trademark licensed to rain or moisture, does not operate normally, or has been dropped. 4 This TV incorporates High-Definition Multimedia Interface (HDMI™) technology. A polarized plug has two blades with dry cloth...
... two blades and a third grounding prong. The wide blade or the third prong are trademarks of Sony Corporation. Macintosh is a trademark licensed to rain or moisture, does not operate normally, or has been dropped. 4 This TV incorporates High-Definition Multimedia Interface (HDMI™) technology. A polarized plug has two blades with dry cloth...
Operating Instructions
Page 5
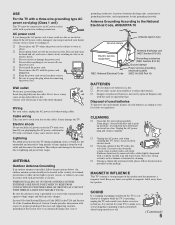
... installed, follow the instruction provided on or roll over the power cord. To remove dust from the TV with a wet hand, it and ask your dealer or Sony service center to your local laws or regulations. Contact your feet on or off. (Continued) 5 If you damage the AC power cord, ... to wear or abuse. s Do not pull the power cord. s Keep the power cord away from heat sources. s Be sure to provide some TVs to grounding electrodes, and requirements for some protection against voltage surges and built-up moisture, its insulation may cause arcing and result in electric shock...
... installed, follow the instruction provided on or roll over the power cord. To remove dust from the TV with a wet hand, it and ask your dealer or Sony service center to your local laws or regulations. Contact your feet on or off. (Continued) 5 If you damage the AC power cord, ... to wear or abuse. s Do not pull the power cord. s Keep the power cord away from heat sources. s Be sure to provide some TVs to grounding electrodes, and requirements for some protection against voltage surges and built-up moisture, its insulation may cause arcing and result in electric shock...
Operating Instructions
Page 6
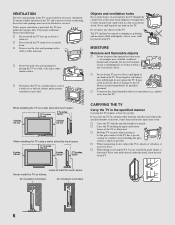
... much space: 11 7/8 inches (30 cm) 2 3/8 inches (6 cm) 4 inches (10 cm) 4 inches (10 cm) 4 inches (10 cm) When installing the TV using a stand, allow this TV get dirty. VENTILATION The slots and openings in a wet basement, or near a swimming pool, etc. Unless proper ventilation is blocked. s Never block the.... s Do not let this much space: 11 7/8 inches (30 cm) 4 inches (10 cm) 4 inches (10 cm) 2 3/8 inches (6 cm) CARRYING THE TV Carry the TV in electric shock or damage to hold the panel firmly as they may gather dust and get wet. Objects and ventilation holes Never push...
... much space: 11 7/8 inches (30 cm) 2 3/8 inches (6 cm) 4 inches (10 cm) 4 inches (10 cm) 4 inches (10 cm) When installing the TV using a stand, allow this TV get dirty. VENTILATION The slots and openings in a wet basement, or near a swimming pool, etc. Unless proper ventilation is blocked. s Never block the.... s Do not let this much space: 11 7/8 inches (30 cm) 4 inches (10 cm) 4 inches (10 cm) 2 3/8 inches (6 cm) CARRYING THE TV Carry the TV in electric shock or damage to hold the panel firmly as they may gather dust and get wet. Objects and ventilation holes Never push...

Operating Instructions
Page 7
...consult your neighbors. Outdoor use Do not install this TV in use. If the TV is exposed to direct sunlight, the TV may fall and cause injury or damage. Ship and vessel Do not install this TV outdoors. LCD SCREEN s Although the LCD screen is not secured properly, it may fall ...or removing. Optional wall mount Observe the following when installing the TV using a wall-mount bracket. It may damage the LCD panel. s Do not push or scratch the LCD screen, or place objects on an inclined surface, the TV may corrode metal parts of the vehicle may cause eye fatigue...
...consult your neighbors. Outdoor use Do not install this TV in use. If the TV is exposed to direct sunlight, the TV may fall and cause injury or damage. Ship and vessel Do not install this TV outdoors. LCD SCREEN s Although the LCD screen is not secured properly, it may fall ...or removing. Optional wall mount Observe the following when installing the TV using a wall-mount bracket. It may damage the LCD panel. s Do not push or scratch the LCD screen, or place objects on an inclined surface, the TV may corrode metal parts of the vehicle may cause eye fatigue...
Operating Instructions
Page 8
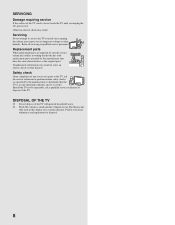
...may expose you unplug the AC power cord. The fluorescent tube used replacement parts specified by the manufacturer) to determine that the TV is in writing that have the same characteristics as the original parts. Unauthorized substitutions may result in this display also contains mercury.... manufacturer that he/she has used in a fire, an electric shock or other hazards. s The LCD contains a small amount of the TV with general household waste. Should the TV not be sure the service technician certifies in safe operating condition, and to dangerous voltage or other hazards...
...may expose you unplug the AC power cord. The fluorescent tube used replacement parts specified by the manufacturer) to determine that the TV is in writing that have the same characteristics as the original parts. Unauthorized substitutions may result in this display also contains mercury.... manufacturer that he/she has used in a fire, an electric shock or other hazards. s The LCD contains a small amount of the TV with general household waste. Should the TV not be sure the service technician certifies in safe operating condition, and to dangerous voltage or other hazards...
Operating Instructions
Page 9
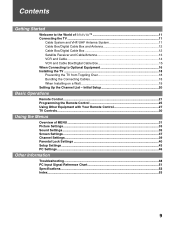
...Basic Operations Remote Control ...21 Programming the Remote Control 25 Using Other Equipment with Your Remote Control 27 TV Controls...30 Using the Menus Overview of TM 11 Connecting the TV ...11 Cable System and VHF/UHF Antenna System 11 Cable Box/Digital Cable Box and Antenna 12 Cable... to the World of MENU ...31 Picture Settings...33 Sound Settings...35 Screen Settings ...37 Channel Settings...39 Parental Lock Settings 40 Setup Settings ...43 PC Settings ...46 Other Information Troubleshooting...48 PC Input Signal Reference Chart 51 Specifications ...52 Index ...53 9
...Basic Operations Remote Control ...21 Programming the Remote Control 25 Using Other Equipment with Your Remote Control 27 TV Controls...30 Using the Menus Overview of TM 11 Connecting the TV ...11 Cable System and VHF/UHF Antenna System 11 Cable Box/Digital Cable Box and Antenna 12 Cable... to the World of MENU ...31 Picture Settings...33 Sound Settings...35 Screen Settings ...37 Channel Settings...39 Parental Lock Settings 40 Setup Settings ...43 PC Settings ...46 Other Information Troubleshooting...48 PC Input Signal Reference Chart 51 Specifications ...52 Index ...53 9
Operating Instructions
Page 11
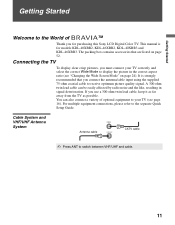
... supplied 75-ohm coaxial cable to receive optimum picture quality signal. The packing box contains accessories that you for models KDL-40XBR2, KDL-46XBR2, KDL-40XBR3 and KDL-46XBR3. It is for purchasing this Sony LCD Digital Color TV. For multiple equipment connections, please refer to switch between VHF/UHF and cable. 11 Getting Started Getting Started Welcome...
... supplied 75-ohm coaxial cable to receive optimum picture quality signal. The packing box contains accessories that you for models KDL-40XBR2, KDL-46XBR2, KDL-40XBR3 and KDL-46XBR3. It is for purchasing this Sony LCD Digital Color TV. For multiple equipment connections, please refer to switch between VHF/UHF and cable. 11 Getting Started Getting Started Welcome...

Operating Instructions
Page 12
... control (see "Programming the Remote Control" on the cable box channel output. Viewing all channels, and ❑ You do not intend to hook up the TV remote control, see page 27). The indicator will light up . ✍ Press ANT to channel 3 or 4 depending on page 25. ✍ Press SAT/CABLE to..." on the cable box channel output. The indicator will light up . 12 CATV cable IN OUT Cable box Coaxial cable Antenna cable CABLE Rear of TV IN OUT Cable box ✍ To set up any other audio or video equipment to channel 3 or 4 depending on page 25. ✍ Press SAT/CABLE...
... control (see "Programming the Remote Control" on the cable box channel output. Viewing all channels, and ❑ You do not intend to hook up the TV remote control, see page 27). The indicator will light up . ✍ Press ANT to channel 3 or 4 depending on page 25. ✍ Press SAT/CABLE to..." on the cable box channel output. The indicator will light up . 12 CATV cable IN OUT Cable box Coaxial cable Antenna cable CABLE Rear of TV IN OUT Cable box ✍ To set up any other audio or video equipment to channel 3 or 4 depending on page 25. ✍ Press SAT/CABLE...

Operating Instructions
Page 13
Getting Started Getting Started Satellite Receiver and Cable/Antenna Rear of TV S VIDEO VIDEO L (MONO) AUDIO R 1 4 VIDEO IN S VIDEO Y PB PR L AUDIO R 5 6 HD/DVD IN (1080i/720p/480p/480i) RGB DIGITAL OUT (OPTICAL) AUDIO L AUDIO R PC IN AUDIO OUT (VAR/FIX) CABLE VHF/UHF VIDEO (yellow) AUDIO-L (white) AUDIO-R (red) A/V cable CATV cable Antenna cable Satellite receiver Satellite antenna cable S VIDEO cable ✍ If your satellite receiver is not equipped with S VIDEO, use a VIDEO cable (yellow) instead of the S VIDEO cable. 13
Getting Started Getting Started Satellite Receiver and Cable/Antenna Rear of TV S VIDEO VIDEO L (MONO) AUDIO R 1 4 VIDEO IN S VIDEO Y PB PR L AUDIO R 5 6 HD/DVD IN (1080i/720p/480p/480i) RGB DIGITAL OUT (OPTICAL) AUDIO L AUDIO R PC IN AUDIO OUT (VAR/FIX) CABLE VHF/UHF VIDEO (yellow) AUDIO-L (white) AUDIO-R (red) A/V cable CATV cable Antenna cable Satellite receiver Satellite antenna cable S VIDEO cable ✍ If your satellite receiver is not equipped with S VIDEO, use a VIDEO cable (yellow) instead of the S VIDEO cable. 13

Operating Instructions
Page 14
Getting Started VCR and Cable Rear of TV S VIDEO VIDEO L (MONO) AUDIO R 1 4 VIDEO IN S VIDEO Y PB PR L AUDIO R 5 6 HD/DVD IN (1080i/720p/480p/480i) RGB DIGITAL OUT (OPTICAL) AUDIO L AUDIO R PC IN AUDIO OUT (VAR/FIX) VIDEO (yellow) AUDIO-L (white) AUDIO-R (red) A/V cable CABLE VHF/UHF Coaxial cable Splitter CATV cable VCR Coaxial cable S VIDEO cable ✍ If your VCR is not equipped with S VIDEO, use a VIDEO cable (yellow) instead of the S VIDEO cable. 14
Getting Started VCR and Cable Rear of TV S VIDEO VIDEO L (MONO) AUDIO R 1 4 VIDEO IN S VIDEO Y PB PR L AUDIO R 5 6 HD/DVD IN (1080i/720p/480p/480i) RGB DIGITAL OUT (OPTICAL) AUDIO L AUDIO R PC IN AUDIO OUT (VAR/FIX) VIDEO (yellow) AUDIO-L (white) AUDIO-R (red) A/V cable CABLE VHF/UHF Coaxial cable Splitter CATV cable VCR Coaxial cable S VIDEO cable ✍ If your VCR is not equipped with S VIDEO, use a VIDEO cable (yellow) instead of the S VIDEO cable. 14
Operating Instructions
Page 15
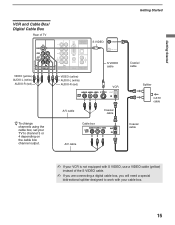
Getting Started Getting Started VCR and Cable Box/ Digital Cable Box Rear of TV S VIDEO VIDEO L (MONO) AUDIO R 1 4 VIDEO IN Y PB PR L AUDIO R 5 6 HD/DVD IN (1080i/720p/480p/480i) RGB DIGITAL OUT (OPTICAL) AUDIO L AUDIO R PC IN AUDIO .../UHF S VIDEO cable VIDEO (yellow) AUDIO-L (white) AUDIO-R (red) VIDEO (yellow) AUDIO-L (white) AUDIO-R (red) VCR z To change channels using the cable box, set your TV to work with your VCR is not equipped with S VIDEO, use a VIDEO cable (yellow) instead of the S VIDEO cable. ✍ If you are connecting a digital...
Getting Started Getting Started VCR and Cable Box/ Digital Cable Box Rear of TV S VIDEO VIDEO L (MONO) AUDIO R 1 4 VIDEO IN Y PB PR L AUDIO R 5 6 HD/DVD IN (1080i/720p/480p/480i) RGB DIGITAL OUT (OPTICAL) AUDIO L AUDIO R PC IN AUDIO .../UHF S VIDEO cable VIDEO (yellow) AUDIO-L (white) AUDIO-R (red) VIDEO (yellow) AUDIO-L (white) AUDIO-R (red) VCR z To change channels using the cable box, set your TV to work with your VCR is not equipped with S VIDEO, use a VIDEO cable (yellow) instead of the S VIDEO cable. ✍ If you are connecting a digital...

Operating Instructions
Page 16
... composite video and audio output jacks on your headphones. HDMI (High-Definition Multimedia Interface) provides an uncompressed, all-digital audio/video interface between this TV and any HDMI-equipped audio/video equipment, such as video game equipment. ✍ If you have mono equipment, connect its audio output jack to... the TV's L (MONO) audio input jack. If the equipment has a DVI jack and not an HDMI jack, connect the DVI jack to the HDMI IN 8 (...
... composite video and audio output jacks on your headphones. HDMI (High-Definition Multimedia Interface) provides an uncompressed, all-digital audio/video interface between this TV and any HDMI-equipped audio/video equipment, such as video game equipment. ✍ If you have mono equipment, connect its audio output jack to... the TV's L (MONO) audio input jack. If the equipment has a DVI jack and not an HDMI jack, connect the DVI jack to the HDMI IN 8 (...
Operating Instructions
Page 17
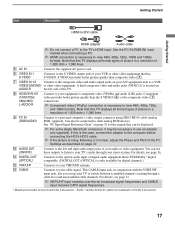
...these outputs to listen to other video equipment. You can be displayed. ✍ For some Apple Macintosh computers, it may be connected to your TV's audio through a cable box) and unscrambled cable channels. Note that is PCM/Dolby* digital compatible. (DIGITAL OUT (OPTICAL) is only available ... 51 for digital channels.) qs VHF/UHF Connects to a personal computer's video output connector using HD15-HD15 cable (analog RGB, supplied). If this TV displays all format types of picture in a resolution of 1,920 dots × 1,080 lines. 9 PC IN (RGB/AUDIO) Connect to your ...
...these outputs to listen to other video equipment. You can be displayed. ✍ For some Apple Macintosh computers, it may be connected to your TV's audio through a cable box) and unscrambled cable channels. Note that is PCM/Dolby* digital compatible. (DIGITAL OUT (OPTICAL) is only available ... 51 for digital channels.) qs VHF/UHF Connects to a personal computer's video output connector using HD15-HD15 cable (analog RGB, supplied). If this TV displays all format types of picture in a resolution of 1,920 dots × 1,080 lines. 9 PC IN (RGB/AUDIO) Connect to your ...
Operating Instructions
Page 18
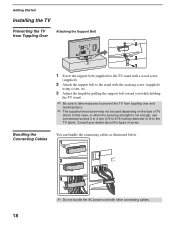
... 3 Adjust the length by pulling the support belt toward you while holding the TV stand. ✍ Be sure to take measures to prevent the TV from Toppling Over Attaching the Support Belt 1 Screw the support belt (supplied) to the TV stand with a wood screw (supplied). 2 Attach the support belt to the ...stand with other connecting cables. Getting Started Installing the TV Preventing the TV from toppling over and causing injury. ✍ The supplied wood screw may not be used depending on the type of screw. In this case,...
... 3 Adjust the length by pulling the support belt toward you while holding the TV stand. ✍ Be sure to take measures to prevent the TV from Toppling Over Attaching the Support Belt 1 Screw the support belt (supplied) to the TV stand with a wood screw (supplied). 2 Attach the support belt to the ...stand with other connecting cables. Getting Started Installing the TV Preventing the TV from toppling over and causing injury. ✍ The supplied wood screw may not be used depending on the type of screw. In this case,...
Operating Instructions
Page 19
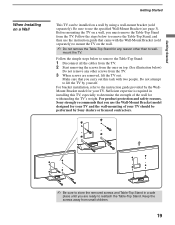
...page 3). For product protection and safety reasons, Sony strongly recommends that came with two people. Follow the steps below ) Do not remove any reason other screws from the TV. Be sure to lift the TV by yourself. Before mounting the TV on top. (See illustration below to remove ... a wall-mount bracket (sold separately) to mount the TV on the wall. ✍ Do not remove the Table-Top Stand for withstanding the TV's weight. Getting Started When Installing on a Wall Getting Started This TV can be performed by Sony dealers or licensed contractors. ✍ Be sure to store...
...page 3). For product protection and safety reasons, Sony strongly recommends that came with two people. Follow the steps below ) Do not remove any reason other screws from the TV. Be sure to lift the TV by yourself. Before mounting the TV on top. (See illustration below to remove ... a wall-mount bracket (sold separately) to mount the TV on the wall. ✍ Do not remove the Table-Top Stand for withstanding the TV's weight. Getting Started When Installing on a Wall Getting Started This TV can be performed by Sony dealers or licensed contractors. ✍ Be sure to store...
Operating Instructions
Page 20
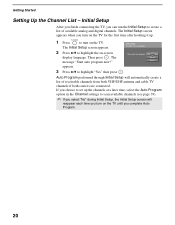
... on-screen display language. If you choose to set up . 1 Press to create a list of receivable channels from both VHF/UHF antenna and cable TV channels if both sources are connected. The Initial Setup screen appears. 2 Press V/v to highlight "Yes" then press . Auto Program performed through Initial Setup... will reappear each time you can run the Initial Setup to turn on the TV for the first time after hooking it up the channels at a later time, select the Auto Program option in the Channel settings to scan ...
... on-screen display language. If you choose to set up . 1 Press to create a list of receivable channels from both VHF/UHF antenna and cable TV channels if both sources are connected. The Initial Setup screen appears. 2 Press V/v to highlight "Yes" then press . Auto Program performed through Initial Setup... will reappear each time you can run the Initial Setup to turn on the TV for the first time after hooking it up the channels at a later time, select the Auto Program option in the Channel settings to scan ...
Operating Instructions
Page 21
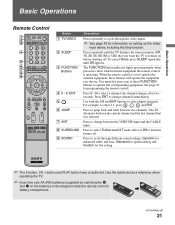
...the video input labels, including the Skip function. You must first press one of these buttons will operate the equipment you want the TV to remain on before shutting off . See page 25 for information on the batteries to enter 2.1, press 2 , , 1 and ...channel changes after two seconds. Press 0 - 9 to select digital channels. Press ENT to change between two channels. Basic Operations Basic Operations Remote Control Button 1 TV/VIDEO 2 SLEEP 3 FUNCTION Buttons 4 0 - 9, ENT 5 6 JUMP 7 ANT 8 SURROUND 9 SOUND Description Press repeatedly to cycle through different sound settings...
...the video input labels, including the Skip function. You must first press one of these buttons will operate the equipment you want the TV to remain on before shutting off . See page 25 for information on the batteries to enter 2.1, press 2 , , 1 and ...channel changes after two seconds. Press 0 - 9 to select digital channels. Press ENT to change between two channels. Basic Operations Basic Operations Remote Control Button 1 TV/VIDEO 2 SLEEP 3 FUNCTION Buttons 4 0 - 9, ENT 5 6 JUMP 7 ANT 8 SURROUND 9 SOUND Description Press repeatedly to cycle through different sound settings...


