Operating Instructions
Page 2
... this manual could void your Sony dealer regarding this equipment. Never pull on the TV. KDL-40W3000 KDL-46W3000 KDL-52W3000 Sony Wall-Mount Bracket Mode No. Trademark Information Macintosh is recommended to use this equipment does cause harmful interference to radio or television reception, which should allow you call upon your authority to a warm location, or if the room temperature changes suddenly, the picture...
... this manual could void your Sony dealer regarding this equipment. Never pull on the TV. KDL-40W3000 KDL-46W3000 KDL-52W3000 Sony Wall-Mount Bracket Mode No. Trademark Information Macintosh is recommended to use this equipment does cause harmful interference to radio or television reception, which should allow you call upon your authority to a warm location, or if the room temperature changes suddenly, the picture...
Operating Instructions
Page 3
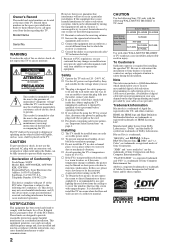
... Steps to Your TV 32 Navigating through TV Home Menu on XMB 33 TV Setting Description 34 Product Support 34 Clock/Timers Settings 34 Picture Settings 34 Sound Settings 36 Screen Settings 37 Video Options Settings 38 Audio Options Settings 39 Channel Settings 40 CC Closed Captions (CC) Settings 41 Parental Lock Settings 41 External Inputs Settings 44 HDMI Settings 44 General Settings 45 Initial Setup 45 Other Information Troubleshooting 46 Specifications 49 Index 51 Quick Setup Guide (separate volume) Provides a variety of P&P............31 To Exit from...
... Steps to Your TV 32 Navigating through TV Home Menu on XMB 33 TV Setting Description 34 Product Support 34 Clock/Timers Settings 34 Picture Settings 34 Sound Settings 36 Screen Settings 37 Video Options Settings 38 Audio Options Settings 39 Channel Settings 40 CC Closed Captions (CC) Settings 41 Parental Lock Settings 41 External Inputs Settings 44 HDMI Settings 44 General Settings 45 Initial Setup 45 Other Information Troubleshooting 46 Specifications 49 Index 51 Quick Setup Guide (separate volume) Provides a variety of P&P............31 To Exit from...
Operating Instructions
Page 4
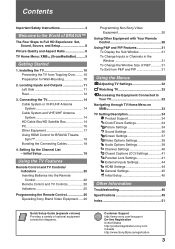
... AC power cord is positioned in use attachments/accessories specified by the manufacturer. 12) Use only with the cart, stand, tripod, bracket, or table specified by the manufacturer, or sold with the manufacturer's instructions. 8) Do not install near water. 6) Clean only with a wet hand. Wiring When connecting cables, be connected to wear or abuse. When not in close to the TV set . Overloading...
... AC power cord is positioned in use attachments/accessories specified by the manufacturer. 12) Use only with the cart, stand, tripod, bracket, or table specified by the manufacturer, or sold with the manufacturer's instructions. 8) Do not install near water. 6) Clean only with a wet hand. Wiring When connecting cables, be connected to wear or abuse. When not in close to the TV set . Overloading...
Operating Instructions
Page 5
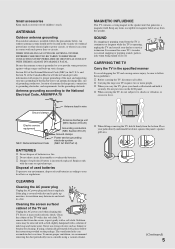
... popping sound from the screen, wipe it can accumulate dust over time. Never use strong solvents such as illustrated and hold it regularly. Section 810 of overhead power lines or other electric light or power circuits, or where it gently with the same or equivalent type. If using a vacuum cleaner. s When carrying the TV, do not squeeze the panel's speaker grill...
... popping sound from the screen, wipe it can accumulate dust over time. Never use strong solvents such as illustrated and hold it regularly. Section 810 of overhead power lines or other electric light or power circuits, or where it gently with the same or equivalent type. If using a vacuum cleaner. s When carrying the TV, do not squeeze the panel's speaker grill...
Operating Instructions
Page 7
... vessels Do not install this condition. Therefore, closing the windows or using headphones, adjust the volume so as to avoid excessive levels, as cuts, poisoning or skin irritation may be regulated due to trouble your eyes or mouth, rinse the contacted area thoroughly with rubber or plastic material. Changing the Picture mode, Backlight setting, enabling the Light Sensor, or turning on top of...
... vessels Do not install this condition. Therefore, closing the windows or using headphones, adjust the volume so as to avoid excessive levels, as cuts, poisoning or skin irritation may be regulated due to trouble your eyes or mouth, rinse the contacted area thoroughly with rubber or plastic material. Changing the Picture mode, Backlight setting, enabling the Light Sensor, or turning on top of...
Operating Instructions
Page 10
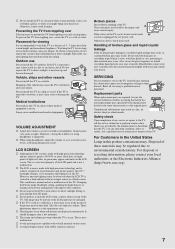
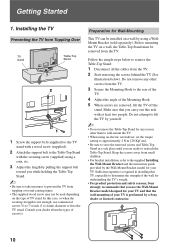
... the supplied Installing the Wall-Mount Bracket and the instruction guide provided by yourself. ~ • Do not remove the Table-Top Stand for Wall-Mounting This TV can be installed on the type of TV stand. Preparation for any other than to wall-mount the TV. • When using an electric screwdriver, set the torque setting to approximately 2 N·m {20 Kgf·cm}. • Be sure to store the removed screws...
... the supplied Installing the Wall-Mount Bracket and the instruction guide provided by yourself. ~ • Do not remove the Table-Top Stand for Wall-Mounting This TV can be installed on the type of TV stand. Preparation for any other than to wall-mount the TV. • When using an electric screwdriver, set the torque setting to approximately 2 N·m {20 Kgf·cm}. • Be sure to store the removed screws...
Operating Instructions
Page 18
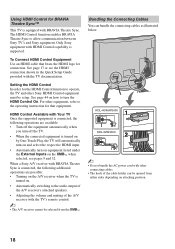
... Sony equipment with BRAVIA Theatre Sync. To Connect HDMI Control Equipment Use an HDMI cable that equipment. When a Sony A/V receiver with BRAVIA Theatre Sync is connected, the following operations are possible: • Turning on the A/V receiver when the TV is turned on by One-Touch-Play, the TV will automatically turn on . • Automatically switching to the audio output of the A/V receiver's attached speakers. • Adjusting the volume and muting of the cable...
... Sony equipment with BRAVIA Theatre Sync. To Connect HDMI Control Equipment Use an HDMI cable that equipment. When a Sony A/V receiver with BRAVIA Theatre Sync is connected, the following operations are possible: • Turning on the A/V receiver when the TV is turned on by One-Touch-Play, the TV will automatically turn on . • Automatically switching to the audio output of the A/V receiver's attached speakers. • Adjusting the volume and muting of the cable...
Operating Instructions
Page 19
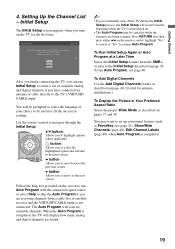
.../UHF/CABLE input is completed. 19 You may be used for available channels. You will display how many analog and digital channels are found. ~ • If you are being scanned. To run Initial Setup to create a list of 5 Please select a language. Follow the help text provided on the screen to run Auto Program with the connected signal source or select Skip to skip the Auto Program if you accidentally turn on the remote control...
.../UHF/CABLE input is completed. 19 You may be used for available channels. You will display how many analog and digital channels are found. ~ • If you are being scanned. To run Initial Setup to create a list of 5 Please select a language. Follow the help text provided on the screen to run Auto Program with the connected signal source or select Skip to skip the Auto Program if you accidentally turn on the remote control...
Operating Instructions
Page 21
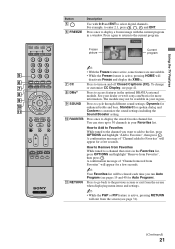
... to go back to display the stored favorite channel list. For example, to select digital channels. A confirmation message of "Channel removed from Favorites" will appear for a few seconds. ~ Your Favorites list will exit from Favorites", then press . Using the TV Features Button 5 6 FREEZE Description Use with the current program in the optional BRAVIA external module. The module may not be cleared each time you want to...
... to go back to display the stored favorite channel list. For example, to select digital channels. A confirmation message of "Channel removed from Favorites" will appear for a few seconds. ~ Your Favorites list will exit from Favorites", then press . Using the TV Features Button 5 6 FREEZE Description Use with the current program in the optional BRAVIA external module. The module may not be cleared each time you want to...

Operating Instructions
Page 22
... to adjust the volume. x REC STOP: Press to play a program at a normal speed. POWER wa SLEEP Press repeatedly until Off appears. 22 Button Description qs BD, DVD When FUNCTION is switched on BD (Blu-ray Disc), DVD or STB or STB, these buttons operate the video equipment you want the TV to remain on before shutting off the external equipment selected from the FUNCTION buttons 3. w; &m PREV...
... to adjust the volume. x REC STOP: Press to play a program at a normal speed. POWER wa SLEEP Press repeatedly until Off appears. 22 Button Description qs BD, DVD When FUNCTION is switched on BD (Blu-ray Disc), DVD or STB or STB, these buttons operate the video equipment you want the TV to remain on before shutting off the external equipment selected from the FUNCTION buttons 3. w; &m PREV...
Operating Instructions
Page 31
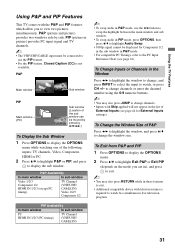
... of the following inputs: TV channels, Video, Component, HDMI or PC. 2 Press V/v to highlight P&P or PIP, and press to watch two simultaneous live television program. 31 P&P (picture and picture) provides two windows side by pressing V/v/B/b.) To Display the Sub Window 1 Press OPTIONS to display the OPTIONS menu while watching one of the sub window can be displayed for External Inputs settings). To Change Inputs or Channels in P&P mode, use the PIP...
... of the following inputs: TV channels, Video, Component, HDMI or PC. 2 Press V/v to highlight P&P or PIP, and press to watch two simultaneous live television program. 31 P&P (picture and picture) provides two windows side by pressing V/v/B/b.) To Display the Sub Window 1 Press OPTIONS to display the OPTIONS menu while watching one of the sub window can be displayed for External Inputs settings). To Change Inputs or Channels in P&P mode, use the PIP...
Operating Instructions
Page 33
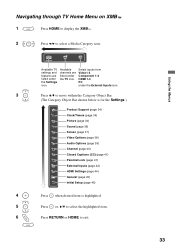
... Support (page 34) Clock/Timers (page 34) Picture (page 34) Sound (page 36) Screen (page 37) Video Options (page 38) Audio Options (page 39) Channel (page 40) CC Closed Captions (CC) (page 41) Parental Lock (page 41) External Inputs (page 44) HDMI Settings (page 44) General (page 45) Initial Setup (page 45) 4 Press when desired item is highlighted. 5 Press or, V/v to select the highlighted item. 6 Press RETURN or HOME...
... Support (page 34) Clock/Timers (page 34) Picture (page 34) Sound (page 36) Screen (page 37) Video Options (page 38) Audio Options (page 39) Channel (page 40) CC Closed Captions (CC) (page 41) Parental Lock (page 41) External Inputs (page 44) HDMI Settings (page 44) General (page 45) Initial Setup (page 45) 4 Press when desired item is highlighted. 5 Press or, V/v to select the highlighted item. 6 Press RETURN or HOME...
Operating Instructions
Page 36
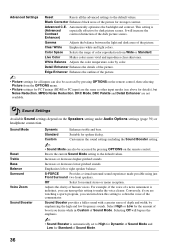
.... Advanced Settings Reset Resets all inputs can also be accessed by pressing OPTIONS on the Speakers setting under Audio Options settings (page 39) or headphone connection. It will bypass the emphasis. ~ • Sound Booster is indistinct, you can turn up this setting to the default values. Standard Suitable for Standard of boost you can turn down this setting to the default values. White Balance Adjusts the color temperature color by emphasizing...
.... Advanced Settings Reset Resets all inputs can also be accessed by pressing OPTIONS on the Speakers setting under Audio Options settings (page 39) or headphone connection. It will bypass the emphasis. ~ • Sound Booster is indistinct, you can turn up this setting to the default values. Standard Suitable for Standard of boost you can turn down this setting to the default values. White Balance Adjusts the color temperature color by emphasizing...
Operating Instructions
Page 41
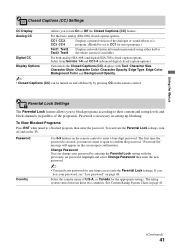
... a program. (Should be turned on and off and on the TV. Select from Service 1-6 and CC1-4 (advanced digital closed caption options). Using the Menus CC Closed Captions (CC) Settings CC Display Allows you to turn off directly by entering the Parental Lock setting with Text, Character Size, Character Style, Character Color, Character Opacity, Edge Type, Edge Color, Background Color and Background Opacity. ~ • Closed Captions (CC) can change your password by pressing CC on the remote control. The...
... a program. (Should be turned on and off and on the TV. Select from Service 1-6 and CC1-4 (advanced digital closed caption options). Using the Menus CC Closed Captions (CC) Settings CC Display Allows you to turn off directly by entering the Parental Lock setting with Text, Character Size, Character Style, Character Color, Character Opacity, Edge Type, Edge Color, Background Color and Background Opacity. ~ • Closed Captions (CC) can change your password by pressing CC on the remote control. The...

Operating Instructions
Page 44
... press . ~ • You can label your inputs with HDMI Control. Video 1-3, Component 1-2 and HDMI 1-3: -, DVD, Cable Box, Satellite, BD, VCR, Receiver, DVR, Game, Camcorder, PC, Skip. HDMI Control On/Off feature allows your TV to communicate with other Sony equipment equipped with the name of HDMI Control equipment connected to disable this function. External Inputs Settings Label Inputs You can select from your connected HDMI Control equipment to highlight the display label you have your connected HDMI Control equipment.
... press . ~ • You can label your inputs with HDMI Control. Video 1-3, Component 1-2 and HDMI 1-3: -, DVD, Cable Box, Satellite, BD, VCR, Receiver, DVR, Game, Camcorder, PC, Skip. HDMI Control On/Off feature allows your TV to communicate with other Sony equipment equipped with the name of HDMI Control equipment connected to disable this function. External Inputs Settings Label Inputs You can select from your connected HDMI Control equipment to highlight the display label you have your connected HDMI Control equipment.
Operating Instructions
Page 45
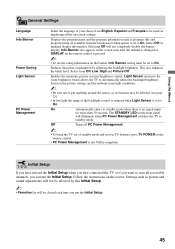
... the black level. Follow the instructions on the remote control. • PC Power Management is not VESA-compliant. Info Banner also appears on the screen each time you run the Initial Setup. Select from the broadcaster) when option is set to standby mode when there is set to On. The STANDBY LED on the front panel will be affected by adjusting the backlight brightness. Reduces the power consumption...
... the black level. Follow the instructions on the remote control. • PC Power Management is not VESA-compliant. Info Banner also appears on the screen each time you run the Initial Setup. Select from the broadcaster) when option is set to standby mode when there is set to On. The STANDBY LED on the front panel will be affected by adjusting the backlight brightness. Reduces the power consumption...

Operating Instructions
Page 46
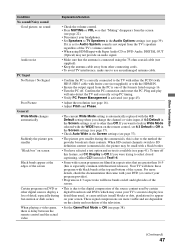
... No picture No picture • Check the Power Saving settings (see page 37). 46 See Quick Setup Guide (supplied) to display the best possible picture for your TV signal source. Cannot receive any channels • Make sure the power cord is connected securely. • Turn on the screen • Check if the antenna is activated, or confirm the Duration setting of the TV. • Check antenna/cable connections. • Make sure the Cable setting is...
... No picture No picture • Check the Power Saving settings (see page 37). 46 See Quick Setup Guide (supplied) to display the best possible picture for your TV signal source. Cannot receive any channels • Make sure the power cord is connected securely. • Turn on the screen • Check if the antenna is activated, or confirm the Duration setting of the TV. • Check antenna/cable connections. • Make sure the Cable setting is...
Operating Instructions
Page 47
... Speakers in aspect ratios that the antenna is connected using the 75-ohm coaxial cable (not supplied). • Keep the antenna cable away from the TV's speakers regardless of detail, especially during the commercials, this is especially common with black bands at the edges of Text1-4. Plug and play will auto-detect the TV and correctly set CC Display to lock in Wide Mode selected with Super Audio CD or DVD-Audio, DIGITAL OUT (Optical...
... Speakers in aspect ratios that the antenna is connected using the 75-ohm coaxial cable (not supplied). • Keep the antenna cable away from the TV's speakers regardless of detail, especially during the commercials, this is especially common with black bands at the edges of Text1-4. Plug and play will auto-detect the TV and correctly set CC Display to lock in Wide Mode selected with Super Audio CD or DVD-Audio, DIGITAL OUT (Optical...

Operating Instructions
Page 48
... STB indicator lights up. try turning off , then back on the broadcast of digital cable channels. How to reset the TV to enter a new password (see page 40). Lost password • Select the Password settings on the TV. Remote control does not operate non-Sony video equipment • If you replaced the batteries to the remote control recently, the code numbers for that you are not being displayed • Certain cable companies have...
... STB indicator lights up. try turning off , then back on the broadcast of digital cable channels. How to reset the TV to enter a new password (see page 40). Lost password • Select the Password settings on the TV. Remote control does not operate non-Sony video equipment • If you replaced the batteries to the remote control recently, the code numbers for that you are not being displayed • Certain cable companies have...
Operating Instructions
Page 51
... Settings Audio Options 39 Channel 40 Clock/Timers 34 Closed Captions (CC) 41 External Inputs 44 General 45 HDMI Settings 44 Initial Setup 45 Parental Lock 41 Picture 34 Product Support 34 Screen 37 Sound 36 Video Options 38 Sharpness 35 Show/Hide Channels 40 Signal Diagnostics 34 SLEEP button 22 Sleep Timer 34 Sound Booster 36 SOUND button 21 Sound Mode 36 Speaker 25 Speakers 39 STANDBY LED 25 Steady Sound 37 Surround 36 T THEATER button 22 Timer 34 Treble 36 Troubleshooting 46-48 TV Auto Power...
... Settings Audio Options 39 Channel 40 Clock/Timers 34 Closed Captions (CC) 41 External Inputs 44 General 45 HDMI Settings 44 Initial Setup 45 Parental Lock 41 Picture 34 Product Support 34 Screen 37 Sound 36 Video Options 38 Sharpness 35 Show/Hide Channels 40 Signal Diagnostics 34 SLEEP button 22 Sleep Timer 34 Sound Booster 36 SOUND button 21 Sound Mode 36 Speaker 25 Speakers 39 STANDBY LED 25 Steady Sound 37 Surround 36 T THEATER button 22 Timer 34 Treble 36 Troubleshooting 46-48 TV Auto Power...


