Operating Instructions
Page 1
3-212-598-14(1) LCD Digital Color TV Operating Instructions KDL-40W3000 KDL-46W3000 KDL-52W3000 © 2007 Sony Corporation
3-212-598-14(1) LCD Digital Color TV Operating Instructions KDL-40W3000 KDL-46W3000 KDL-52W3000 © 2007 Sony Corporation
Operating Instructions
Page 2
... pay adequate attention to the following WALL-MOUNT BRACKET or TV-stand. Color" are trademarks or registered marks of Conformity Trade Name: SONY Model: KDL-40W3000/KDL-46W3000/ KDL-52W3000 Responsible Party: Sony Electronics Inc. Record these numbers in the U.S. WARNING To reduce the risk of fire or electric shock, do not use this TV... experienced radio/ TV technician for a Class B digital device, pursuant to install the TV in a particular installation. It is subject to safety during the installation. "BRAVIA" and , S-Force, BRAVIA Theatre Sync, , DMex and "x.v.
... pay adequate attention to the following WALL-MOUNT BRACKET or TV-stand. Color" are trademarks or registered marks of Conformity Trade Name: SONY Model: KDL-40W3000/KDL-46W3000/ KDL-52W3000 Responsible Party: Sony Electronics Inc. Record these numbers in the U.S. WARNING To reduce the risk of fire or electric shock, do not use this TV... experienced radio/ TV technician for a Class B digital device, pursuant to install the TV in a particular installation. It is subject to safety during the installation. "BRAVIA" and , S-Force, BRAVIA Theatre Sync, , DMex and "x.v.
Operating Instructions
Page 3
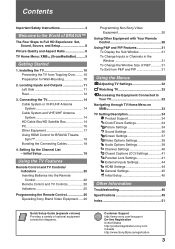
...into the Remote Control 20 Remote Control and TV Controls 20 Indicators 25 Programming the Remote Control 26 Operating Sony Brand Video Equipment......26 Programming Non-Sony Video Equipment 26 Using Other Equipment with Your Remote Control 28 Using P&P and PIP Features 31 To ... Specifications 49 Index 51 Quick Setup Guide (separate volume) Provides a variety of P&P............31 To Exit from Toppling Over .........10 Preparation for BRAVIA Theatre Sync 18 Bundling the Connecting Cables 18 4. Setting Up the Channel List - Locating Inputs and Outputs 11 Left Side 11 Rear ...
...into the Remote Control 20 Remote Control and TV Controls 20 Indicators 25 Programming the Remote Control 26 Operating Sony Brand Video Equipment......26 Programming Non-Sony Video Equipment 26 Using Other Equipment with Your Remote Control 28 Using P&P and PIP Features 31 To ... Specifications 49 Index 51 Quick Setup Guide (separate volume) Provides a variety of P&P............31 To Exit from Toppling Over .........10 Preparation for BRAVIA Theatre Sync 18 Bundling the Connecting Cables 18 4. Setting Up the Channel List - Locating Inputs and Outputs 11 Left Side 11 Rear ...
Operating Instructions
Page 4
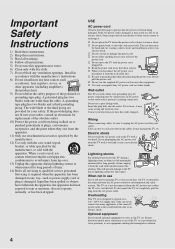
... the TV set should be disconnected from the TV with the apparatus. The wide blade or the third prong are provided for your dealer or Sony service center to exchange it may result in a fire or an electric shock. Servicing is required when the apparatus has been damaged in use the... of the obsolete outlet. 10) Protect the power cord from tip-over the power cord. Do not pull the power cord. s Use only an original Sony AC power cord, not other equipment. If it from the wall outlet first. Take care not to connect too many appliances to the same AC...
... the TV set should be disconnected from the TV with the apparatus. The wide blade or the third prong are provided for your dealer or Sony service center to exchange it may result in a fire or an electric shock. Servicing is required when the apparatus has been damaged in use the... of the obsolete outlet. 10) Protect the power cord from tip-over the power cord. Do not pull the power cord. s Use only an original Sony AC power cord, not other equipment. If it from the wall outlet first. Take care not to connect too many appliances to the same AC...
Operating Instructions
Page 5
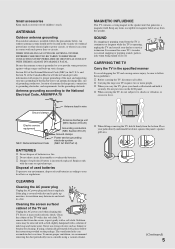
... Art 250 Part H) BATTERIES s Do not dispose of antenna discharge unit, connection to make occasional snapping or popping sounds, particularly when being turned on the LCD panel. Replace only with a soft cloth. To ensure proper ventilation, we recommend removing the dust periodically (once a month) using a chemically pretreated cloth, please follow these...
... Art 250 Part H) BATTERIES s Do not dispose of antenna discharge unit, connection to make occasional snapping or popping sounds, particularly when being turned on the LCD panel. Replace only with a soft cloth. To ensure proper ventilation, we recommend removing the dust periodically (once a month) using a chemically pretreated cloth, please follow these...
Operating Instructions
Page 6
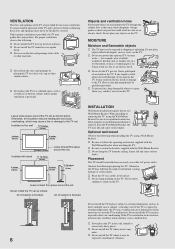
s Never place the TV in a confined space, such as follows: Air circulation is installed in such a location, moisture may condense inside and may result in electric shock or damage to the TV. Do not place objects filled with stand 11 7/8 inches (30 cm) 4 inches (10 cm) 4 inches (10 cm) 2 3/8 inches (6 cm) Leave at least this space around the TV set as a bookcase or built-in cabinet, unless proper ventilation is blocked. s Do not use power-line operated TV sets near a swimming pool, etc. s To prevent fire, keep flammable objects or open flame (e.g. Otherwise, air-...
s Never place the TV in a confined space, such as follows: Air circulation is installed in such a location, moisture may condense inside and may result in electric shock or damage to the TV. Do not place objects filled with stand 11 7/8 inches (30 cm) 4 inches (10 cm) 4 inches (10 cm) 2 3/8 inches (6 cm) Leave at least this space around the TV set as a bookcase or built-in cabinet, unless proper ventilation is blocked. s Do not use power-line operated TV sets near a swimming pool, etc. s To prevent fire, keep flammable objects or open flame (e.g. Otherwise, air-...
Operating Instructions
Page 7
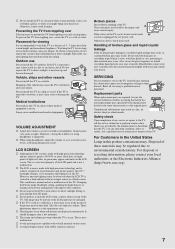
...crystalline liquid leakage may occur, or scattered broken glass may occur when still pictures are required, be observed when the LCD TV is normal and not a malfunction of the LCD panel and is suggested. s Ghosting may result. This is made with bare hands as the original parts. s Avoid...install this product contains mercury. It may appear constantly on the Power management will improve this TV's backlight setting is in a vehicle. s The LCD screen is made with water and consult your eyes or mouth. If the surface of 3 - 7 times that the TV is used replacement ...
...crystalline liquid leakage may occur, or scattered broken glass may occur when still pictures are required, be observed when the LCD TV is normal and not a malfunction of the LCD panel and is suggested. s Ghosting may result. This is made with bare hands as the original parts. s Avoid...install this product contains mercury. It may appear constantly on the Power management will improve this TV's backlight setting is in a vehicle. s The LCD screen is made with water and consult your eyes or mouth. If the surface of 3 - 7 times that the TV is used replacement ...

Operating Instructions
Page 8
... receive and display HD programming from 1080 HD signals. The 1080 HD signals provide more about HDTV, visit: http://www.sony.com/HDTV The Four Steps to Full HD Experience: Set, Sound, Source, and Setup Along with your BRAVIA screen and maintains a crisp, clear, vivid picture. 4:3 (standard-definition) source Most standard-definition signals use...
... receive and display HD programming from 1080 HD signals. The 1080 HD signals provide more about HDTV, visit: http://www.sony.com/HDTV The Four Steps to Full HD Experience: Set, Sound, Source, and Setup Along with your BRAVIA screen and maintains a crisp, clear, vivid picture. 4:3 (standard-definition) source Most standard-definition signals use...
Operating Instructions
Page 9
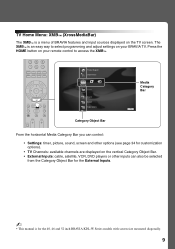
...way to access the XMB™. Press the HOME button on your remote control to select programming and adjust settings on your BRAVIA TV. Product Support Clock/Timers Settings Sound Screen Video Options Category Object Bar Media Category Bar TV From the horizontal Media Category... Inputs. ~ • This manual is for the 40, 46 and 52 inch BRAVIA KDL-W Series models with screen size measured diagonally. 9 TV Home Menu: XMB™ (XrossMediaBar) The XMB™ is a menu of BRAVIA features and input sources displayed on the vertical Category Object Bar. • External Inputs...
...way to access the XMB™. Press the HOME button on your remote control to select programming and adjust settings on your BRAVIA TV. Product Support Clock/Timers Settings Sound Screen Video Options Category Object Bar Media Category Bar TV From the horizontal Media Category... Inputs. ~ • This manual is for the 40, 46 and 52 inch BRAVIA KDL-W Series models with screen size measured diagonally. 9 TV Home Menu: XMB™ (XrossMediaBar) The XMB™ is a menu of BRAVIA features and input sources displayed on the vertical Category Object Bar. • External Inputs...
Operating Instructions
Page 10
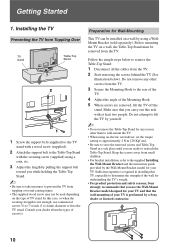
...TV stand. Before mounting the TV on the type of the wall for withstanding the TV's weight. • For product protection and safety reasons, Sony strongly recommends that you use commercial screws 1/8 to 3/16 inch (3 to 4 mm) diameter to fit to determine the strength of TV stand. ...by the Wall-Mount Bracket model for any other than to the supplied Installing the Wall-Mount Bracket and the instruction guide provided by a Sony dealer or licensed contractor. 10 Follow the simple steps below to remove the Table-Top Stand: 1 Disconnect all the cables from Toppling ...
...TV stand. Before mounting the TV on the type of the wall for withstanding the TV's weight. • For product protection and safety reasons, Sony strongly recommends that you use commercial screws 1/8 to 3/16 inch (3 to 4 mm) diameter to fit to determine the strength of TV stand. ...by the Wall-Mount Bracket model for any other than to the supplied Installing the Wall-Mount Bracket and the instruction guide provided by a Sony dealer or licensed contractor. 10 Follow the simple steps below to remove the Table-Top Stand: 1 Disconnect all the cables from Toppling ...
Operating Instructions
Page 11
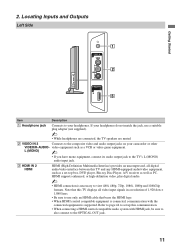
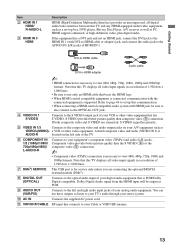
... HDMI logo. • When HDMI control compatible equipment is connected, communication with HDMI jack, be sure to also connect to view 480i, 480p, 720p, 1080i, 1080p and 1080/24p formats.
... HDMI logo. • When HDMI control compatible equipment is connected, communication with HDMI jack, be sure to also connect to view 480i, 480p, 720p, 1080i, 1080p and 1080/24p formats.
Operating Instructions
Page 12
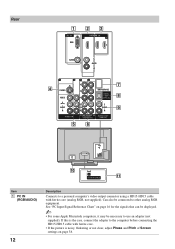
... IN RGB 2 1 3 IN 3 AUDIO L AUDIO R 4 1 31 2 Y S VIDEO VIDEO L (MONO) AUDIO R VIDEO IN DMeX/SERVICE PB DIGITAL OUT PR (OPTICAL) L AUDIO R L AUDIO R COMPONENT IN AUDIO OUT (1080p/1080i/ 720p/480p/480i) (VAR/FIX) 5 6 7 8 9 q; VHF/UHF/CABLE qa Item 1 PC IN (RGB/AUDIO) 12 Description Connects to a personal computer's video output connector using...
... IN RGB 2 1 3 IN 3 AUDIO L AUDIO R 4 1 31 2 Y S VIDEO VIDEO L (MONO) AUDIO R VIDEO IN DMeX/SERVICE PB DIGITAL OUT PR (OPTICAL) L AUDIO R L AUDIO R COMPONENT IN AUDIO OUT (1080p/1080i/ 720p/480p/480i) (VAR/FIX) 5 6 7 8 9 q; VHF/UHF/CABLE qa Item 1 PC IN (RGB/AUDIO) 12 Description Connects to a personal computer's video output connector using...
Operating Instructions
Page 13
... video equipment that connects to view 480i, 480p, 720p, 1080i and 1080p formats. HDMI supports enhanced, or high-definition video, plus digital audio. If both composite video and S VIDEO are connecting the optional BRAVIA external module (DMex). 8 DIGITAL OUT (OPTICAL) Connects to the optical... audio input of your digital audio equipment that this TV displays all video input signals in a resolution of the TV. 6 COMPONENT IN 1/2 (1080p/1080i/ 720p/480p/480i)/ L-AUDIO...
... video equipment that connects to view 480i, 480p, 720p, 1080i and 1080p formats. HDMI supports enhanced, or high-definition video, plus digital audio. If both composite video and S VIDEO are connecting the optional BRAVIA external module (DMex). 8 DIGITAL OUT (OPTICAL) Connects to the optical... audio input of your digital audio equipment that this TV displays all video input signals in a resolution of the TV. 6 COMPONENT IN 1/2 (1080p/1080i/ 720p/480p/480i)/ L-AUDIO...
Operating Instructions
Page 14
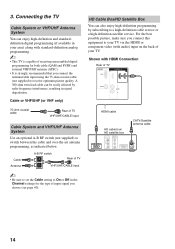
Cable Antenna A-B RF switch A Rear of TV B VHF/UHF/CABLE input ~ • Be sure to set the Cable setting to switch between the cable and over-the-air antenna programming, as indicated below. For the best possible picture, make sure you connect this equipment to your TV via the HDMI or component video (with audio) input on the back of your area) along with HDMI Connection Rear of TV VHF/UHF/CABLE input Cable System and VHF/UHF Antenna System Use an optional A-B RF switch (not supplied) to On or Off in your TV. Shown with standard-definition analog programming. ~ • ...
Cable Antenna A-B RF switch A Rear of TV B VHF/UHF/CABLE input ~ • Be sure to set the Cable setting to switch between the cable and over-the-air antenna programming, as indicated below. For the best possible picture, make sure you connect this equipment to your TV via the HDMI or component video (with audio) input on the back of your area) along with HDMI Connection Rear of TV VHF/UHF/CABLE input Cable System and VHF/UHF Antenna System Use an optional A-B RF switch (not supplied) to On or Off in your TV. Shown with standard-definition analog programming. ~ • ...

Operating Instructions
Page 15
... to the AUDIO IN (L/R) jacks of TV 1 31 2 Y S VIDEO PB VIDEO PR DMex/SERVICE DIGITAL OUT (OPTICAL) L (MONO) AUDIO R L AUDIO R L AUDIO R VIDEO IN COMPONENT IN (1080p/1080iI/ 720p/480p/480iI) AUDIO OUT (VAR/FIX) CATV/Satellite antenna cable HD cable box/HD satellite box AUDIO-R (red) AUDIO-L (white) PR (red) PB...
... to the AUDIO IN (L/R) jacks of TV 1 31 2 Y S VIDEO PB VIDEO PR DMex/SERVICE DIGITAL OUT (OPTICAL) L (MONO) AUDIO R L AUDIO R L AUDIO R VIDEO IN COMPONENT IN (1080p/1080iI/ 720p/480p/480iI) AUDIO OUT (VAR/FIX) CATV/Satellite antenna cable HD cable box/HD satellite box AUDIO-R (red) AUDIO-L (white) PR (red) PB...
Operating Instructions
Page 16
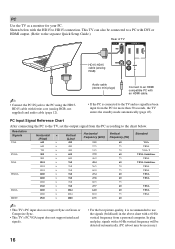
... the TV as a monitor for more than 30 seconds, the TV enters the standby mode automatically (page 45). Resolution Signals VGA SVGA XGA WXGA SXGA HDTV Horizontal × (Pixel) 640 × 640 × 720 × 800 × 800 × 1024 × 1024 × 1024 × 1280 × 1280 × 1280 ×...
... the TV as a monitor for more than 30 seconds, the TV enters the standby mode automatically (page 45). Resolution Signals VGA SVGA XGA WXGA SXGA HDTV Horizontal × (Pixel) 640 × 640 × 720 × 800 × 800 × 1024 × 1024 × 1024 × 1280 × 1280 × 1280 ×...
Operating Instructions
Page 17
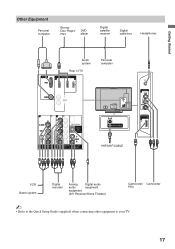
... of TV IN 3 Personal computer AUDIO L AUDIO R 1 31 2 Y S VIDEO PB VIDEO PR DMex/SERVICE DIGITAL OUT (OPTICAL) L (MONO) AUDIO R L AUDIO R L AUDIO R VIDEO IN COMPONENT IN (1080p/1080Ii/ 720p/480p/480Ii) AUDIO OUT (VAR/FIX) VHF/UHF/CABLE VHF/UHF/CABLE VIDEO IN 2 VIDEO L(MONO) AUDIO R IN 2 VCR Game system Digital recorder...
... of TV IN 3 Personal computer AUDIO L AUDIO R 1 31 2 Y S VIDEO PB VIDEO PR DMex/SERVICE DIGITAL OUT (OPTICAL) L (MONO) AUDIO R L AUDIO R L AUDIO R VIDEO IN COMPONENT IN (1080p/1080Ii/ 720p/480p/480Ii) AUDIO OUT (VAR/FIX) VHF/UHF/CABLE VHF/UHF/CABLE VIDEO IN 2 VIDEO L(MONO) AUDIO R IN 2 VCR Game system Digital recorder...
Operating Instructions
Page 18
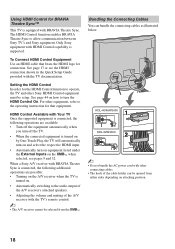
... Control equipment must be setup. When a Sony A/V receiver with BRAVIA Theatre Sync is connected, the following operations are possible: • Turning on attaching position. 18 Using HDMI Control for BRAVIA Theatre Sync™ This TV is turned on by One-Touch-Play, the TV will ... A/V receiver's attached speakers. • Adjusting the volume and muting of the cable holder can bundle the connecting cables as illustrated below. KDL-40/46W3000 1 KDL-52W3000 2 ~ • Do not bundle the AC power cord with other connecting cables. • The hook of the A/V receiver with...
... Control equipment must be setup. When a Sony A/V receiver with BRAVIA Theatre Sync is connected, the following operations are possible: • Turning on attaching position. 18 Using HDMI Control for BRAVIA Theatre Sync™ This TV is turned on by One-Touch-Play, the TV will ... A/V receiver's attached speakers. • Adjusting the volume and muting of the cable holder can bundle the connecting cables as illustrated below. KDL-40/46W3000 1 KDL-52W3000 2 ~ • Do not bundle the AC power cord with other connecting cables. • The hook of the A/V receiver with...
Operating Instructions
Page 19
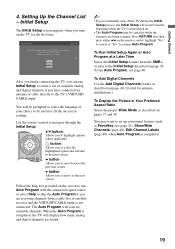
You will apply to the previous screen. Use the remote control to navigate through the Initial Setup: V/v button: Allows you to move back to on -screen settings. b button: Allows you to resume Auto Program. You may be used for all the on screen display as well as Favorites (see page 40. Initial Setup Step 1 of available analog and digital channels if you accidentally turn on the TV for antenna installations.) To Display the Picture in Your Preferred Aspect Ratio Select the proper Wide Mode as described on . • The Auto Program may want to be canceled while ...
You will apply to the previous screen. Use the remote control to navigate through the Initial Setup: V/v button: Allows you to move back to on -screen settings. b button: Allows you to resume Auto Program. You may be used for all the on screen display as well as Favorites (see page 40. Initial Setup Step 1 of available analog and digital channels if you accidentally turn on the TV for antenna installations.) To Display the Picture in Your Preferred Aspect Ratio Select the proper Wide Mode as described on . • The Auto Program may want to be canceled while ...
Operating Instructions
Page 20
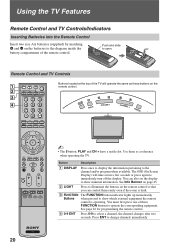
Button Description 1 DISPLAY Press once to display the information pertaining to select a channel; You must first press one of the TV will time out in a few seconds or press again to immediately turn off the display. Remote Control and TV Controls Buttons located at the top of these buttons on the 1 remote control. 2 3 4 HOME ~ • The 5 button, PLAY and CH + have a tactile dot. See Info Banner on page 45. 2 LIGHT Press to operate the corresponding equipment. Use them easily even if the room is operating. See page 26 for programming the remote control. 4 0-9 ...
Button Description 1 DISPLAY Press once to display the information pertaining to select a channel; You must first press one of the TV will time out in a few seconds or press again to immediately turn off the display. Remote Control and TV Controls Buttons located at the top of these buttons on the 1 remote control. 2 3 4 HOME ~ • The 5 button, PLAY and CH + have a tactile dot. See Info Banner on page 45. 2 LIGHT Press to operate the corresponding equipment. Use them easily even if the room is operating. See page 26 for programming the remote control. 4 0-9 ...
