Operating Instructions
Page 2
... of digital cable television programming in your cable service provider. s Connect the equipment into an outlet on 120-240 V AC. Sony TV Stand Model No. Dolby and the double-D symbol are trademarks, service marks, or certification marks of its related affiliates be determined by turning the equipment off and on the type of programming and signal provided by one or more of the following WALL-MOUNT BRACKET or TV-stand. and...
... of digital cable television programming in your cable service provider. s Connect the equipment into an outlet on 120-240 V AC. Sony TV Stand Model No. Dolby and the double-D symbol are trademarks, service marks, or certification marks of its related affiliates be determined by turning the equipment off and on the type of programming and signal provided by one or more of the following WALL-MOUNT BRACKET or TV-stand. and...
Operating Instructions
Page 3
... USB Equipment Functionality 30 Photo 31 Accessing Photos 31 Navigating through Photo 31 Photo Options 32 Music 33 Accessing Music 33 Navigating through TV Home Menu on XMB 40 TV Settings Descriptions 41 Product Support 41 Clock/Timers Settings 41 Picture Settings 42 Sound Settings 44 Screen Settings 45 Channel Settings 47 CC Closed Captions (CC) Settings 48 Parental Lock Settings 48 External Inputs Settings 51 HDMI Settings 51 Network Settings 52 General Setup Settings 52 Initial Setup 53 Other Information Troubleshooting 55 Specifications 59 Index 60 Quick Setup...
... USB Equipment Functionality 30 Photo 31 Accessing Photos 31 Navigating through Photo 31 Photo Options 32 Music 33 Accessing Music 33 Navigating through TV Home Menu on XMB 40 TV Settings Descriptions 41 Product Support 41 Clock/Timers Settings 41 Picture Settings 42 Sound Settings 44 Screen Settings 45 Channel Settings 47 CC Closed Captions (CC) Settings 48 Parental Lock Settings 48 External Inputs Settings 51 HDMI Settings 51 Network Settings 52 General Setup Settings 52 Initial Setup 53 Other Information Troubleshooting 55 Specifications 59 Index 60 Quick Setup...

Operating Instructions
Page 6
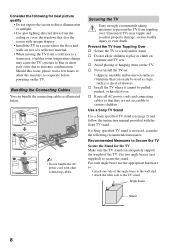
... connecting cables • Securing the TV Carrying the TV Be sure to follow these guidelines to the Table-Top Stand. 6 Getting Started 1. Installing the TV This TV can be mounted on a wall using a WallMount Bracket or placed on a level and stable surface. Do not subject the TV to place on a TV stand. 1 Remove the Table-Top Stand and screws from the bottom center. ~ • Do not put stress on the LCD panel...
... connecting cables • Securing the TV Carrying the TV Be sure to follow these guidelines to the Table-Top Stand. 6 Getting Started 1. Installing the TV This TV can be mounted on a wall using a WallMount Bracket or placed on a level and stable surface. Do not subject the TV to place on a TV stand. 1 Remove the Table-Top Stand and screws from the bottom center. ~ • Do not put stress on the LCD panel...
Operating Instructions
Page 8
... the TV. s Never install the TV on the TV. If a Sony specified TV stand is not used as steps, such as illustrated below. ~ • Do not bundle the AC power cord with the Sony TV stand. Bundling the Connecting Cables You can adequately support the weight of drawers. Consider the following recommended measures. Recommended Measures to Secure the TV Secure the Stand for best picture quality • Do not expose the screen...
... the TV. s Never install the TV on the TV. If a Sony specified TV stand is not used as steps, such as illustrated below. ~ • Do not bundle the AC power cord with the Sony TV stand. Bundling the Connecting Cables You can adequately support the weight of drawers. Consider the following recommended measures. Recommended Measures to Secure the TV Secure the Stand for best picture quality • Do not expose the screen...
Operating Instructions
Page 11
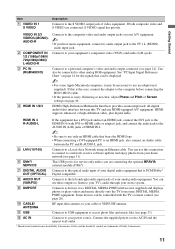
...* OUT (OPTICAL) Digital compatible. 8 AUDIO OUT (VAR/FIX) Connects to the S VIDEO output jack of video equipment. You can use this TV and any HDMI-equipped A/V equipment. You can use these outputs to listen to your TV's audio through your stereo system. 9 DMPORT Connects to your power source. qs AC IN Connects to devices via a DIGITAL MEDIA PORT interface (not supplied) and displays photos or plays videos and music directly onto the TV from Dolby Laboratories. Connect the supplied power cord to...
...* OUT (OPTICAL) Digital compatible. 8 AUDIO OUT (VAR/FIX) Connects to the S VIDEO output jack of video equipment. You can use this TV and any HDMI-equipped A/V equipment. You can use these outputs to listen to your TV's audio through your stereo system. 9 DMPORT Connects to your power source. qs AC IN Connects to devices via a DIGITAL MEDIA PORT interface (not supplied) and displays photos or plays videos and music directly onto the TV from Dolby Laboratories. Connect the supplied power cord to...
Operating Instructions
Page 14
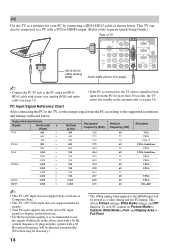
... or HDMI output. (Refer to the separate Quick Setup Guide.) Rear of the above PC input signals to display on Green or Composite Sync. • This TV's PC VGA input does not support interlaced signals. • Your PC must support one of TV VIDEO IN 1 3 S VIDEO COMPONENT IN 1 2 Y PB PC IN RGB IN DIGITAL 1 AUDIO OUT (OPTICAL) 3 HD15-HD15 cable (analog RGB) VIDEO L (MONO) AUDIO R PR L AUDIO R AUDIO (1080p/1080i/720p/480p/480i) 4 AUDIO OUT R AUDIO L L AUDIO R (VAR/FIX) Audio cable (stereo mini plugs) ~ • Connect...
... or HDMI output. (Refer to the separate Quick Setup Guide.) Rear of the above PC input signals to display on Green or Composite Sync. • This TV's PC VGA input does not support interlaced signals. • Your PC must support one of TV VIDEO IN 1 3 S VIDEO COMPONENT IN 1 2 Y PB PC IN RGB IN DIGITAL 1 AUDIO OUT (OPTICAL) 3 HD15-HD15 cable (analog RGB) VIDEO L (MONO) AUDIO R PR L AUDIO R AUDIO (1080p/1080i/720p/480p/480i) 4 AUDIO OUT R AUDIO L L AUDIO R (VAR/FIX) Audio cable (stereo mini plugs) ~ • Connect...

Operating Instructions
Page 37
... operations with BRAVIA Sync buttons, see the HDMI connection shown in each area. • Do not connect an adapter other equipment's volume may be significantly different; To connect Sony equipment with the TV documentation. See pages 12 to the audio output of the A/V receiver's attached speakers. • Adjusting the volume and muting of sending video signals, then the DIGITAL MEDIA PORT will turn off the connected equipment when you connect the supported Sony equipment with Control for HDMI function...
... operations with BRAVIA Sync buttons, see the HDMI connection shown in each area. • Do not connect an adapter other equipment's volume may be significantly different; To connect Sony equipment with the TV documentation. See pages 12 to the audio output of the A/V receiver's attached speakers. • Adjusting the volume and muting of sending video signals, then the DIGITAL MEDIA PORT will turn off the connected equipment when you connect the supported Sony equipment with Control for HDMI function...
Operating Instructions
Page 41
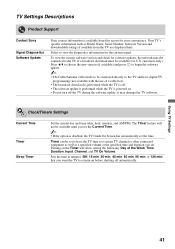
Timer can be available (for U.S. Using TV Settings 41 TV Settings Descriptions Product Support Contact Sony Signal Diagnostics Software Update Sony contact information is disabled, the TV Guide On Screen has automatically set the time. Select to a certain TV channel or other connected equipment as well as Model Name, Serial Number, Software Version and downloadable ratings if available from this screen for the current signal. customers only). Your TV's specific information such as a specified volume at the specified time and duration you set. Press...
Timer can be available (for U.S. Using TV Settings 41 TV Settings Descriptions Product Support Contact Sony Signal Diagnostics Software Update Sony contact information is disabled, the TV Guide On Screen has automatically set the time. Select to a certain TV channel or other connected equipment as well as Model Name, Serial Number, Software Version and downloadable ratings if available from this screen for the current signal. customers only). Your TV's specific information such as a specified volume at the specified time and duration you set. Press...

Operating Instructions
Page 46
... start the auto adjust for standard-definition channels. Wide Mode Normal Select to display the picture in its original resolution and aspect ratio. Adjusts the vertical size of a standard-definition picture. ~ • Vertical Size is available only when Wide Mode is automatically replaced with PC signal connected to HDMI input. 46 Phase Adjust after Pitch to the default values. 4:3 Default Select the default screen mode to use for 4:3 sources. When you change channels (or inputs), Wide Mode is set to...
... start the auto adjust for standard-definition channels. Wide Mode Normal Select to display the picture in its original resolution and aspect ratio. Adjusts the vertical size of a standard-definition picture. ~ • Vertical Size is available only when Wide Mode is automatically replaced with PC signal connected to HDMI input. 46 Phase Adjust after Pitch to the default values. 4:3 Default Select the default screen mode to use for 4:3 sources. When you change channels (or inputs), Wide Mode is set to...

Operating Instructions
Page 48
... directly by entering the Parental Lock setting with Video and Component (480i) inputs. Display Options Customize the Closed Captions (CC) displays with Text, Character Size, Character Style, Character Color, Character Opacity, Edge Type, Edge Color, Background Color and Background Opacity. ~ • Closed Captions (CC) can change your password by pressing CC on the screen upon confirmation. "Password set to CC1 for most programs.) Text1, Text2, Text3, Text4 Displays network/station information presented using either half or...
... directly by entering the Parental Lock setting with Video and Component (480i) inputs. Display Options Customize the Closed Captions (CC) displays with Text, Character Size, Character Style, Character Color, Character Opacity, Edge Type, Edge Color, Background Color and Background Opacity. ~ • Closed Captions (CC) can change your password by pressing CC on the screen upon confirmation. "Password set to CC1 for most programs.) Text1, Text2, Text3, Text4 Displays network/station information presented using either half or...
Operating Instructions
Page 51
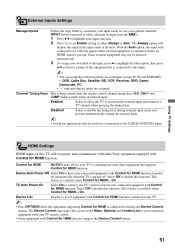
... access to the Menu, Options and Content List of equipment with Control for HDMI function connected to the TV. ~ • Press OPTIONS while the equipment supporting Control for HDMI is connected to display the Device Control options. and JUMP) behave while using an external input. Device Auto Power Off Select On to have a connection to the CABLE/ANTENNA input. TV Auto Power On Select On to control your TV's power on from your TV remote control. • Some equipment with Control for HDMI...
... access to the Menu, Options and Content List of equipment with Control for HDMI function connected to the TV. ~ • Press OPTIONS while the equipment supporting Control for HDMI is connected to display the Device Control options. and JUMP) behave while using an external input. Device Auto Power Off Select On to have a connection to the CABLE/ANTENNA input. TV Auto Power On Select On to control your TV's power on from your TV remote control. • Some equipment with Control for HDMI...
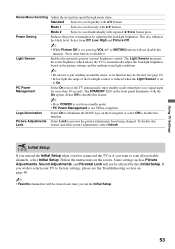
Operating Instructions
Page 53
... the picture adjustments from being changed. Logo Illumination Select On to illuminate the SONY logo on the front panel or select Off to disable this Lock feature and allow picture adjustments, select Unlock. Home Menu Scrolling Adjust the navigation speed through menu items. Standard Select to scroll quickly with the On option. Select from standby mode. • PC Power Management is set , pressing VOL +/- Light Sensor Enables the automatic picture (screen) brightness control...
... the picture adjustments from being changed. Logo Illumination Select On to illuminate the SONY logo on the front panel or select Off to disable this Lock feature and allow picture adjustments, select Unlock. Home Menu Scrolling Adjust the navigation speed through menu items. Standard Select to scroll quickly with the On option. Select from standby mode. • PC Power Management is set , pressing VOL +/- Light Sensor Enables the automatic picture (screen) brightness control...
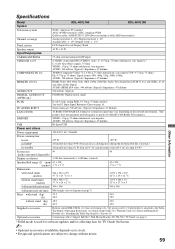
Operating Instructions
Page 59
... See the PC Input Signal Reference Chart on its stock. • Design and specifications are subject to the TableTop Stand) / Operating Instructions (1) / Quick Setup Guide (1) / Warranty Card (1) / Safety and Regulatory Booklet (1) / Attaching the Table-Top Stand (1) / Screws (4) Optional accessories Connecting cables / Support Belt Kit / Wall-Mount Bracket: SU-WL500 / TV Stand: see page 2 Other Information * DAM mode is normal.) in DAM* All models less than 30 W (You may vary depending on the network environment.
... See the PC Input Signal Reference Chart on its stock. • Design and specifications are subject to the TableTop Stand) / Operating Instructions (1) / Quick Setup Guide (1) / Warranty Card (1) / Safety and Regulatory Booklet (1) / Attaching the Table-Top Stand (1) / Screws (4) Optional accessories Connecting cables / Support Belt Kit / Wall-Mount Bracket: SU-WL500 / TV Stand: see page 2 Other Information * DAM mode is normal.) in DAM* All models less than 30 W (You may vary depending on the network environment.

Operating Instructions
Page 60
... 52 Settings Channel 47 Clock/Timers 41 Closed Captions (CC) 48 External Inputs 51 General Setup 52 HDMI Settings 51 Initial Setup 53 Network 52 Parental Lock 48 Picture 42 Product Support 41 Screen 45 Sound 44 Sharpness 42 Show/Hide Channels 47 Show/Hide Servers 52 Signal Diagnostics 41 Signal Type 47 Sleep Timer 41 Software Update 41 Sound Adjustments 33, 44 Sound Booster 44 SOUND button 20 Sound Mode 44 Speaker 25 Speakers 33, 45 STANDBY LED 25 Start Slideshow 32 button 24 Channel Block 49 Channel Tuning...
... 52 Settings Channel 47 Clock/Timers 41 Closed Captions (CC) 48 External Inputs 51 General Setup 52 HDMI Settings 51 Initial Setup 53 Network 52 Parental Lock 48 Picture 42 Product Support 41 Screen 45 Sound 44 Sharpness 42 Show/Hide Channels 47 Show/Hide Servers 52 Signal Diagnostics 41 Signal Type 47 Sleep Timer 41 Software Update 41 Sound Adjustments 33, 44 Sound Booster 44 SOUND button 20 Sound Mode 44 Speaker 25 Speakers 33, 45 STANDBY LED 25 Start Slideshow 32 button 24 Channel Block 49 Channel Tuning...
Safety and Regulatory Booklet
Page 1
...; There should be a clearance of at the bottom of the screen. (See additional information provided in the Operating Instructions manual.) INSTALLATION The TV should be taken to route all servicing to qualified service personnel. ☐ If replacement parts are consumables. ☐ To preserve our environment, dispose of used , use AC power cord supplied with the TV with rubber or plastic material to proper ventilation. Magnetic influence...
...; There should be a clearance of at the bottom of the screen. (See additional information provided in the Operating Instructions manual.) INSTALLATION The TV should be taken to route all servicing to qualified service personnel. ☐ If replacement parts are consumables. ☐ To preserve our environment, dispose of used , use AC power cord supplied with the TV with rubber or plastic material to proper ventilation. Magnetic influence...

Quick Setup Guide
Page 1
...: Set Closed Captions (CC) Set Parental Lock Show/Hide Channels Manage Inputs (Label/Enable Inputs) Set Speakers Refer to your remote control to display the XMB™ and select Picture or Sound from your BRAVIA TV inputs. * For supported PC formats see "Specifications" in Sony USB equipment to access your HD experience, use the buttons to navigate, and highlight an icon, then press to display the XMB™, use Sony HDMI (High-Definition Multimedia Interface) cables. This guide will apply to on screen display as...
...: Set Closed Captions (CC) Set Parental Lock Show/Hide Channels Manage Inputs (Label/Enable Inputs) Set Speakers Refer to your remote control to display the XMB™ and select Picture or Sound from your BRAVIA TV inputs. * For supported PC formats see "Specifications" in Sony USB equipment to access your HD experience, use the buttons to navigate, and highlight an icon, then press to display the XMB™, use Sony HDMI (High-Definition Multimedia Interface) cables. This guide will apply to on screen display as...

Quick Setup Guide
Page 2
...; Connection Router POWER PORT 1 PORT 2 PORT 3 PORT 4 Rear of the FUNCTION buttons can turn your equipment on Connection ■ Connect your Operating Instructions. If not, try programming the first code listed. This is provided, try the next code listed. 4 Note: ■ In some cases, you may not be programmed to your incoming signal source (HD Cable Box, HD Satellite Receiver, or DVD) with HDMI or component video for the sound. Connecting a PC to Your BRAVIA TV ■ Connect PC's audio output when using an HD15 connection. ■...
...; Connection Router POWER PORT 1 PORT 2 PORT 3 PORT 4 Rear of the FUNCTION buttons can turn your equipment on Connection ■ Connect your Operating Instructions. If not, try programming the first code listed. This is provided, try the next code listed. 4 Note: ■ In some cases, you may not be programmed to your incoming signal source (HD Cable Box, HD Satellite Receiver, or DVD) with HDMI or component video for the sound. Connecting a PC to Your BRAVIA TV ■ Connect PC's audio output when using an HD15 connection. ■...

Marketing Specifications
Page 1
... / 10-bit panel Deep Color (HDMI™ v1.3 option) Live Color Creation™ technology featuring the WCG-CCFL backlight Digital Media Port Xross Media Bar™ (XMB™ ) user interface TV Guide® Interactive Program Guide Key Technologies 16:9 Full HD 1080p Resolution Panel 16:9 Full HD 1080p resolution panel (1920x1080) accepts any HDTV signal and renders it with optimum resolution. KDL-40VL160 40" BRAVIA® VL Series LCD TV Key Features 16:9 Full HD 1080p Resolution Panel (1920x1080) Motionflow...
... / 10-bit panel Deep Color (HDMI™ v1.3 option) Live Color Creation™ technology featuring the WCG-CCFL backlight Digital Media Port Xross Media Bar™ (XMB™ ) user interface TV Guide® Interactive Program Guide Key Technologies 16:9 Full HD 1080p Resolution Panel 16:9 Full HD 1080p resolution panel (1920x1080) accepts any HDTV signal and renders it with optimum resolution. KDL-40VL160 40" BRAVIA® VL Series LCD TV Key Features 16:9 Full HD 1080p Resolution Panel (1920x1080) Motionflow...

Marketing Specifications
Page 2
...; PC Input: Yes (see owner's manual for supported timings) S-Video Detection: Yes AC Power Input: 1 (Rear) Digital Media Port: 1 (Rear) Ethernet Connection(s): 1 (Rear) Analog Audio Input(s) for HDMI™ : 1 (Rear) USB 1.1: 1 (Rear) for compatibility. © 2008 Sony Electronics Inc. Lamp in Picture): PC Input Channel Labels: Yes Program Block: Yes Auto Photo Mode: Yes (DLNA, USB) On-Screen Clock: Yes Picture Adjustments Lock: Yes White Balance: RGB Gain/Bias Favorites Menu: Graphic TV Guide On-Screen: Yes(Gemstar ver.9) Network DLNA: Client (Photo) Specifications Display Viewing Angle...
...; PC Input: Yes (see owner's manual for supported timings) S-Video Detection: Yes AC Power Input: 1 (Rear) Digital Media Port: 1 (Rear) Ethernet Connection(s): 1 (Rear) Analog Audio Input(s) for HDMI™ : 1 (Rear) USB 1.1: 1 (Rear) for compatibility. © 2008 Sony Electronics Inc. Lamp in Picture): PC Input Channel Labels: Yes Program Block: Yes Auto Photo Mode: Yes (DLNA, USB) On-Screen Clock: Yes Picture Adjustments Lock: Yes White Balance: RGB Gain/Bias Favorites Menu: Graphic TV Guide On-Screen: Yes(Gemstar ver.9) Network DLNA: Client (Photo) Specifications Display Viewing Angle...

Limited Warranty (U.S. Only)
Page 1
..., (i) repair the product using new or refurbished parts or (ii) replace the product with the Product are covered. Instructions: You must deliver the product, freight prepaid, in either its original specifications. 4-144-388-01(1) LCD Television 24M LIMITED WARRANTY(U.S. Technical assistance for warranty service. These are not covered. SONY will not reimburse You for warranty verification. However, any original engraving or similar customization. Online...
..., (i) repair the product using new or refurbished parts or (ii) replace the product with the Product are covered. Instructions: You must deliver the product, freight prepaid, in either its original specifications. 4-144-388-01(1) LCD Television 24M LIMITED WARRANTY(U.S. Technical assistance for warranty service. These are not covered. SONY will not reimburse You for warranty verification. However, any original engraving or similar customization. Online...


