Operating Instructions
Page 3
... separation between the equipment and receiver. s If you are designed to moisture condensation. KDL-23S2010 KDL-26S2010 KDL-32S2010 KDL-40S2010 KDL-46S2010 Sony Wall-Mount Bracket Model No. Be sure to subcontract the installation to Sony dealers or licensed contractors and pay adequate attention to excessive dust or mechanical vibration. WARNING To reduce the risk of important operating and maintenance (servicing) instructions in the literature accompanying...
... separation between the equipment and receiver. s If you are designed to moisture condensation. KDL-23S2010 KDL-26S2010 KDL-32S2010 KDL-40S2010 KDL-46S2010 Sony Wall-Mount Bracket Model No. Be sure to subcontract the installation to Sony dealers or licensed contractors and pay adequate attention to excessive dust or mechanical vibration. WARNING To reduce the risk of important operating and maintenance (servicing) instructions in the literature accompanying...
Operating Instructions
Page 5
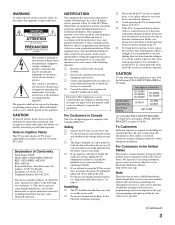
...) Ground clamps Power service grounding electrode system (NEC Art 250 Part H) BATTERIES s Do not dispose of time, unplug it may cause electric shock. s Do not pull the power cord. Cable wiring Take care not to your dealer or Sony service center to grasp the plug when disconnecting the power cord. An outdoor antenna system should not be located in the vicinity of used batteries according...
...) Ground clamps Power service grounding electrode system (NEC Art 250 Part H) BATTERIES s Do not dispose of time, unplug it may cause electric shock. s Do not pull the power cord. Cable wiring Take care not to your dealer or Sony service center to grasp the plug when disconnecting the power cord. An outdoor antenna system should not be located in the vicinity of used batteries according...
Operating Instructions
Page 9
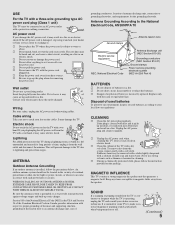
... Installing the TV ...16 Preventing the TV from Toppling Over 16 Bundling the Connecting Cables 17 Adjusting the Viewing Angle of MENU ...23 Using the Picture Settings 26 Using the Sound Settings 28 Using the Screen Settings 29 Using the Setup Settings 31 Using the PC Settings...36 Using the Analog Setup Settings 37 Using the Digital Setup Settings 38 Other Information Troubleshooting...41 Preparation for Wall Mounting the KDL-23S2010, KDL-26S2010 and KDL-32S2010.......43 Preparation for Wall Mounting the KDL-40S2010 and KDL-46S2010 44 PC Input Signal...
... Installing the TV ...16 Preventing the TV from Toppling Over 16 Bundling the Connecting Cables 17 Adjusting the Viewing Angle of MENU ...23 Using the Picture Settings 26 Using the Sound Settings 28 Using the Screen Settings 29 Using the Setup Settings 31 Using the PC Settings...36 Using the Analog Setup Settings 37 Using the Digital Setup Settings 38 Other Information Troubleshooting...41 Preparation for Wall Mounting the KDL-23S2010, KDL-26S2010 and KDL-32S2010.......43 Preparation for Wall Mounting the KDL-40S2010 and KDL-46S2010 44 PC Input Signal...

Operating Instructions
Page 11
... of receiving HDTV content from a cable or satellite box via the video inputs (HDMI and Y/PB/PR component video; The Quick Setup Guide provides a variety of optional equipment connection diagrams. It is capable of receiving unscrambled digital programming for models KDL-23S2010, KDL-26S2010, KDL-32S2010, KDL40S2010 and KDL-46S2010. After you can receive and view programming you should select the proper Wide Mode setting to display the picture in this Sony LCD Digital Color Television. The packing box contains accessories that you connect the antenna/cable input using the supplied 75...
... of receiving HDTV content from a cable or satellite box via the video inputs (HDMI and Y/PB/PR component video; The Quick Setup Guide provides a variety of optional equipment connection diagrams. It is capable of receiving unscrambled digital programming for models KDL-23S2010, KDL-26S2010, KDL-32S2010, KDL40S2010 and KDL-46S2010. After you can receive and view programming you should select the proper Wide Mode setting to display the picture in this Sony LCD Digital Color Television. The packing box contains accessories that you connect the antenna/cable input using the supplied 75...
Operating Instructions
Page 14
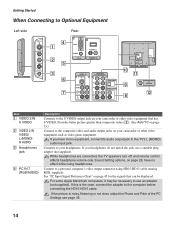
...-HD15 cable (analog RGB, supplied). If your headphones. Connect to a personal computer's video output connector using headphones. If the picture is the case, connect the adapter to the TV's L (MONO) audio input jack. If this is noisy, flickering or not clear, adjust the Phase and Pitch of the PC Settings see page 36. 14 While headphones are connected, the TV speakers turn off, and volume control affects headphone volume only. Connects...
...-HD15 cable (analog RGB, supplied). If your headphones. Connect to a personal computer's video output connector using headphones. If the picture is the case, connect the adapter to the TV's L (MONO) audio input jack. If this is noisy, flickering or not clear, adjust the Phase and Pitch of the PC Settings see page 36. 14 While headphones are connected, the TV speakers turn off, and volume control affects headphone volume only. Connects...
Operating Instructions
Page 15
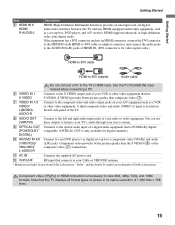
... the TV's HDMI input. Component video provides better picture quality than composite video (7). 7 VIDEO IN 1/3 VIDEO/ L(MONO)AUDIO-R Connect to the composite video and audio output jacks on the left side panel of the TV. 8 AUDIO OUT (VAR/FIX) Connect to your Cable or VHF/UHF antenna. * Manufactured under license from Dolby Laboratories. "Dolby" and the double-D symbol are trademarks of Dolby Laboratories. Component video (YPBPR) or HDMI connection is for digital channels.) DIGITAL) 0 HD/DVD IN...
... the TV's HDMI input. Component video provides better picture quality than composite video (7). 7 VIDEO IN 1/3 VIDEO/ L(MONO)AUDIO-R Connect to the composite video and audio output jacks on the left side panel of the TV. 8 AUDIO OUT (VAR/FIX) Connect to your Cable or VHF/UHF antenna. * Manufactured under license from Dolby Laboratories. "Dolby" and the double-D symbol are trademarks of Dolby Laboratories. Component video (YPBPR) or HDMI connection is for digital channels.) DIGITAL) 0 HD/DVD IN...
Operating Instructions
Page 18
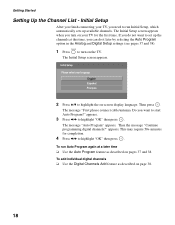
Getting Started Setting Up the Channel List - appears. 3 Press B/b to start Auto Program?" Do you need to turn on -screen display language. The message "Auto Program" appears. This may require 50+ minutes for the first time. The Initial Setup screen appears. 2 Press V/v to highlight "OK" then press . The Initial Setup screen appears when you can do not want to highlight "OK" then press . POWER 1 Press to run Auto Program again...
Getting Started Setting Up the Channel List - appears. 3 Press B/b to start Auto Program?" Do you need to turn on -screen display language. The message "Auto Program" appears. This may require 50+ minutes for the first time. The Initial Setup screen appears. 2 Press V/v to highlight "OK" then press . The Initial Setup screen appears when you can do not want to highlight "OK" then press . POWER 1 Press to run Auto Program again...

Operating Instructions
Page 22
... details). CHANNEL + 5 POWER 6 (IR) Infrared Receiver/ Light Sensor 7 PIC OFF/ TIMER LED 8 STANDBY LED 9 POWER LED 0 Speaker Description Press to scan through channels, press and hold down buttons. Press to display MENU with TV functions and settings (see page 33 for up /down either -/+. Press to cycle through the video inputs. Lights up in orange when the timer is turned off. Outputs audio signal. If you set , this button serves as left/right buttons. In the MENU screen, these buttons serve as...
... details). CHANNEL + 5 POWER 6 (IR) Infrared Receiver/ Light Sensor 7 PIC OFF/ TIMER LED 8 STANDBY LED 9 POWER LED 0 Speaker Description Press to scan through channels, press and hold down buttons. Press to display MENU with TV functions and settings (see page 33 for up /down either -/+. Press to cycle through the video inputs. Lights up in orange when the timer is turned off. Outputs audio signal. If you set , this button serves as left/right buttons. In the MENU screen, these buttons serve as...

Operating Instructions
Page 33
... the automatic picture (screen) brightness control. Timer feature will automatically select to On. Auto Program for analog channels is set the day(s), hour, minute, AM/PM, duration, channel number (VHF/UHF, CATV or Digital), and volume. Use this option when you want to receive the input signal from the composite video. 1 Press TV/VIDEO repeatedly until you turn it on the picture settings and the ambient room light conditions. When Digital is displayed as its...
... the automatic picture (screen) brightness control. Timer feature will automatically select to On. Auto Program for analog channels is set the day(s), hour, minute, AM/PM, duration, channel number (VHF/UHF, CATV or Digital), and volume. Use this option when you want to receive the input signal from the composite video. 1 Press TV/VIDEO repeatedly until you turn it on the picture settings and the ambient room light conditions. When Digital is displayed as its...
Operating Instructions
Page 34
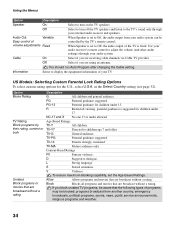
... service announcements, religious programs and weather. 34 Use your audio receiver's remote control to adjust the volume (and other audio settings) through your external audio receiver and speakers. Cable On Select if you are broadcast without a rating Description G All children and general audience. Information Select to display the equipment information of the TV is set the Age-Based Ratings. TV-Y7 Directed to turn on the TV speakers. You should run Auto Program...
... service announcements, religious programs and weather. 34 Use your audio receiver's remote control to adjust the volume (and other audio settings) through your external audio receiver and speakers. Cable On Select if you are broadcast without a rating Description G All children and general audience. Information Select to display the equipment information of the TV is set the Age-Based Ratings. TV-Y7 Directed to turn on the TV speakers. You should run Auto Program...
Operating Instructions
Page 41
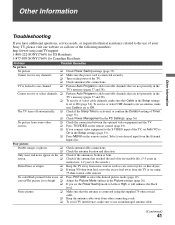
... on the remote control (page 19). ❑ If you connect video equipment to the S VIDEO input of the TV. ❑ Check antenna/cable connections. No picture. ❑ Check Power Saving settings (page 33). Cannot receive or select channels. ❑ Perform Auto Program to add receivable channels that are not presently in the Setup settings is connected using the supplied 75-ohm coaxial cable. ❑ Keep the antenna cable away from some video sources. ❑ Check the connection between the...
... on the remote control (page 19). ❑ If you connect video equipment to the S VIDEO input of the TV. ❑ Check antenna/cable connections. No picture. ❑ Check Power Saving settings (page 33). Cannot receive or select channels. ❑ Perform Auto Program to add receivable channels that are not presently in the Setup settings is connected using the supplied 75-ohm coaxial cable. ❑ Keep the antenna cable away from some video sources. ❑ Check the connection between the...
Operating Instructions
Page 42
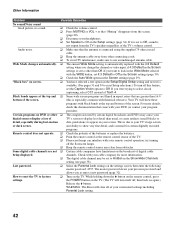
... the remote control sensor of digital cable being displayed. If it is due to factory settings. ❑ Turn on the broadcast of the TV. ❑ Florescent lamps can interfere with your screen. This is set to other ❑ The compression used by certain digital broadcasts and DVDs may be set to lock in the Show/Hide Channels setting (see page 38). "Black box" on the settings screen, then enter the following master password...
... the remote control sensor of digital cable being displayed. If it is due to factory settings. ❑ Turn on the broadcast of the TV. ❑ Florescent lamps can interfere with your screen. This is set to other ❑ The compression used by certain digital broadcasts and DVDs may be set to lock in the Show/Hide Channels setting (see page 38). "Black box" on the settings screen, then enter the following master password...
Operating Instructions
Page 43
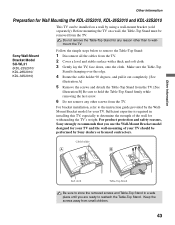
... the TV. Sony Wall-Mount Bracket Model SU-WL31 (KDL-23S2010/ KDL-26S2010/ KDL-32S2010) Follow the simple steps below to remove the Table-Top Stand: 1 Disconnect all the cables from small children. 43 For product protection and safety reasons, Sony strongly recommends that you are ready to the instruction guide provided by the WallMount Bracket model for your TV should be removed from the TV. For bracket installation, refer to...
... the TV. Sony Wall-Mount Bracket Model SU-WL31 (KDL-23S2010/ KDL-26S2010/ KDL-32S2010) Follow the simple steps below to remove the Table-Top Stand: 1 Disconnect all the cables from small children. 43 For product protection and safety reasons, Sony strongly recommends that you are ready to the instruction guide provided by the WallMount Bracket model for your TV should be removed from the TV. For bracket installation, refer to...

Operating Instructions
Page 44
... steps below to remove the Table-Top Stand: 1 Disconnect all the cables from the TV. 2 Start removing the screws from the ones on a wall by your TV. Before mounting the TV on a wall, the Table-Top Stand must be installed on top. (See illustration below) Do not remove any reason other screws from the TV. 3 When screws are ready to the instruction guide provided by Sony dealers or...
... steps below to remove the Table-Top Stand: 1 Disconnect all the cables from the TV. 2 Start removing the screws from the ones on a wall by your TV. Before mounting the TV on a wall, the Table-Top Stand must be installed on top. (See illustration below) Do not remove any reason other screws from the TV. 3 When screws are ready to the instruction guide provided by Sony dealers or...
Operating Instructions
Page 46
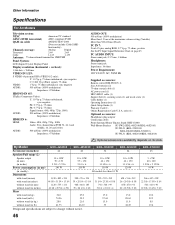
...: Headphones plug adapter Connecting cables Front Surround Home Theater Stand: RHT-G1000 Wall-Mount Bracket: SU-PW2 (KDL-40S2010/KDL-46S2010) SU-WL31 (KDL-23S2010/ KDL-26S2010/KDL-32S2010) SU-WL51 (KDL-40S2010/KDL-46S2010) Optional accessories availability depends on page 45 PC AUDIO INPUT: Stereo mini jack, 0.5 Vrms, 1 kilohm Headphones: Stereo mini jack Impedance: 16 ohms Power Requirement: 120 V-240 V AC, 50/60 Hz Supplied accessories: Remote control RM-YD005 (1) Size AA...
...: Headphones plug adapter Connecting cables Front Surround Home Theater Stand: RHT-G1000 Wall-Mount Bracket: SU-PW2 (KDL-40S2010/KDL-46S2010) SU-WL31 (KDL-23S2010/ KDL-26S2010/KDL-32S2010) SU-WL51 (KDL-40S2010/KDL-46S2010) Optional accessories availability depends on page 45 PC AUDIO INPUT: Stereo mini jack, 0.5 Vrms, 1 kilohm Headphones: Stereo mini jack Impedance: 16 ohms Power Requirement: 120 V-240 V AC, 50/60 Hz Supplied accessories: Remote control RM-YD005 (1) Size AA...
Operating Instructions
Page 47
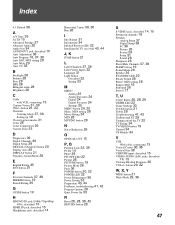
... Channels 37, 38 Label Video Inputs 32 Language 31 Light Sensor Described 22 Setting 33 M MENU Analog 24 Analog Favorites 24 Digital 24 Digital Favorites 24 Settings 25 MENU button 20, 22 Mono, MTS setting 28 Movie Rating 34 MTS 28 MUTING button 20 N Noise Reduction 26 O OPTICAL OUT 15 P, Q Parental Lock 32, 39 PC IN 14 Phase 36 PIC OFF LED 22 Picture 26 PICTURE button 19 Picture Mode 26 Pitch 36 POWER button 20, 22 POWER LED 22 Power Management...
... Channels 37, 38 Label Video Inputs 32 Language 31 Light Sensor Described 22 Setting 33 M MENU Analog 24 Analog Favorites 24 Digital 24 Digital Favorites 24 Settings 25 MENU button 20, 22 Mono, MTS setting 28 Movie Rating 34 MTS 28 MUTING button 20 N Noise Reduction 26 O OPTICAL OUT 15 P, Q Parental Lock 32, 39 PC IN 14 Phase 36 PIC OFF LED 22 Picture 26 PICTURE button 19 Picture Mode 26 Pitch 36 POWER button 20, 22 POWER LED 22 Power Management...
Quick Setup Guide (KDL23S2000)
Page 1
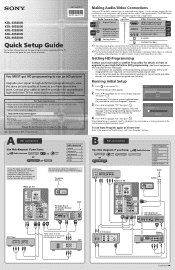
...) Running Initial Setup 1 POWER Press to connect digital video and audio signals with the TV. Now tuning 4 Press B/b to high-definition TV for additional details. HD Cable Box or HD Sat Receiver DVD AV Receiver Digital Recorder Player DVD Player Cables Required Splitter 1 Coaxial 4 Component 2 Audio 2 HDMI 1 Optical Audio 4 Cable Rear of your television after reading your AV receiver's instruction manual for stunning detail and richer sound. Upgrade your local cable or satellite TV provider for completion. Use the outputs/inputs that are recommendations...
...) Running Initial Setup 1 POWER Press to connect digital video and audio signals with the TV. Now tuning 4 Press B/b to high-definition TV for additional details. HD Cable Box or HD Sat Receiver DVD AV Receiver Digital Recorder Player DVD Player Cables Required Splitter 1 Coaxial 4 Component 2 Audio 2 HDMI 1 Optical Audio 4 Cable Rear of your television after reading your AV receiver's instruction manual for stunning detail and richer sound. Upgrade your local cable or satellite TV provider for completion. Use the outputs/inputs that are recommendations...

Limited Warranty
Page 1
... any Sony authorized service facility. This warranty does not cover customer instruction, installation, set up adjustments or signal reception problems. This warranty does not cover cosmetic damage or damage due to acts of God, accident, misuse, abuse, negligence, commercial use, or modification of sale or receipted invoice must be defective, Sony will pay for 30" (measured diagonally), or larger screen size through a Sony authorized service facility. SONY...
... any Sony authorized service facility. This warranty does not cover customer instruction, installation, set up adjustments or signal reception problems. This warranty does not cover cosmetic damage or damage due to acts of God, accident, misuse, abuse, negligence, commercial use, or modification of sale or receipted invoice must be defective, Sony will pay for 30" (measured diagonally), or larger screen size through a Sony authorized service facility. SONY...

Marketing Specifications
Page 1
... a separate screen while the programming continues to create better gradations and details, enhance contrast, dynamically improve color, and reduce image flicker. Freeze Function Sony's Freeze Function is equipped with a comprehensive range of the speaker itself. KDL-32S2010 32" Class BRAVIA® S-Series Digital LCD Television (31.5" diagonal) Key Features HDTV with ATSC Digital Tuner BRAVIA Engine™ full digital video processor Digital audio amplifier Light sensor backlighting control 1366 x 768 HD Panel Resolution HDTV with ATSC Digital Tuner BRAVIA Engine...
... a separate screen while the programming continues to create better gradations and details, enhance contrast, dynamically improve color, and reduce image flicker. Freeze Function Sony's Freeze Function is equipped with a comprehensive range of the speaker itself. KDL-32S2010 32" Class BRAVIA® S-Series Digital LCD Television (31.5" diagonal) Key Features HDTV with ATSC Digital Tuner BRAVIA Engine™ full digital video processor Digital audio amplifier Light sensor backlighting control 1366 x 768 HD Panel Resolution HDTV with ATSC Digital Tuner BRAVIA Engine...

Marketing Specifications
Page 2
... Spacing Compatible: Yes VESA® Hole Pitch: 200 x 200 hole pattern / M6 thread size / 14mm hole depth Service and Warranty Information Limited Warranty: 1 Year Parts / 1 Year Labor Dimensions Weight: 37.48lbs (17.0kg) with pedestal; 33.07lbs (15.0kg) without notice. KDL-32S2010 32" Class BRAVIA® S-Series Digital LCD Television (31.5" diagonal) Features General Video Label: Yes Closed Captions (CC): Yes On-Screen Display: Menu Video Video Processing: Yes (BRAVIA Engine™ System) Noise Reduction: Yes Picture Modes...
... Spacing Compatible: Yes VESA® Hole Pitch: 200 x 200 hole pattern / M6 thread size / 14mm hole depth Service and Warranty Information Limited Warranty: 1 Year Parts / 1 Year Labor Dimensions Weight: 37.48lbs (17.0kg) with pedestal; 33.07lbs (15.0kg) without notice. KDL-32S2010 32" Class BRAVIA® S-Series Digital LCD Television (31.5" diagonal) Features General Video Label: Yes Closed Captions (CC): Yes On-Screen Display: Menu Video Video Processing: Yes (BRAVIA Engine™ System) Noise Reduction: Yes Picture Modes...


