Operating Instructions
Page 7
...Projection Lamp 12 Installing the TV 13 Carrying Your TV 13 Take Precaution during Installation 13 Preventing the TV from Toppling Over .......... 14 When Installing Your TV against a Wall......... 14 Recommended Viewing Area 14 TV Controls and Connectors 15 Front Panel 15 Side Panel 16 Rear Panel 17 Connecting the TV Overview 19 Making Video and Audio...with DVI Connection 28 Equipment with Digital Audio (Optical 29 Using CableCARD Device 30 About Using CableCARD Device 30 Activating CableCARD Service 30 Removing the CableCARD Device 31 Setting Up the Channel List 32 Using ...
...Projection Lamp 12 Installing the TV 13 Carrying Your TV 13 Take Precaution during Installation 13 Preventing the TV from Toppling Over .......... 14 When Installing Your TV against a Wall......... 14 Recommended Viewing Area 14 TV Controls and Connectors 15 Front Panel 15 Side Panel 16 Rear Panel 17 Connecting the TV Overview 19 Making Video and Audio...with DVI Connection 28 Equipment with Digital Audio (Optical 29 Using CableCARD Device 30 About Using CableCARD Device 30 Activating CableCARD Service 30 Removing the CableCARD Device 31 Setting Up the Channel List 32 Using ...

Operating Instructions
Page 8
... Custom Rating Options 76 Accessing the Setup Settings 78 Selecting Setup Options 78 Programming Caption Vision 80 Selecting PC Setup Options 81 Accessing the Applications Settings 83 Selecting Applications Options 83 Other Information Overview 85 Contacting Sony 85 Replacing the Lamp 86 How to... Replace the Lamp 86 Troubleshooting 90 Remote Control 90 CableCARD Device 90 Video 91 Audio 92 Channels 92 General 93 ...
... Custom Rating Options 76 Accessing the Setup Settings 78 Selecting Setup Options 78 Programming Caption Vision 80 Selecting PC Setup Options 81 Accessing the Applications Settings 83 Selecting Applications Options 83 Other Information Overview 85 Contacting Sony 85 Replacing the Lamp 86 How to... Replace the Lamp 86 Troubleshooting 90 Remote Control 90 CableCARD Device 90 Video 91 Audio 92 Channels 92 General 93 ...

Operating Instructions
Page 9
without the need for purchasing this Sony's HD LCD projection TV. that will enjoy with the near-HD equivalent by digital mapping processing. See page 95 for models KDF-E42A10 and KDF-E50A10. This engine features unique Sony technology, including: • DRC® (Digital Reality Creation)-MF V1: ...for a set-top box - Along with access to receive not only standard definition but also high definition television. The CableCARD device, which is a new feature that you will enable you customize the level of packaging contents. This manual is inserted into the TV's rear panel ...
without the need for purchasing this Sony's HD LCD projection TV. that will enjoy with the near-HD equivalent by digital mapping processing. See page 95 for models KDF-E42A10 and KDF-E50A10. This engine features unique Sony technology, including: • DRC® (Digital Reality Creation)-MF V1: ...for a set-top box - Along with access to receive not only standard definition but also high definition television. The CableCARD device, which is a new feature that you will enable you customize the level of packaging contents. This manual is inserted into the TV's rear panel ...

Operating Instructions
Page 10
For more information about the CableCARD device in this TV and any HDMI-equipped audio/video component, such as a set -top box. (Check with your cable TV company about CableCARD service details, limitations, pricing, and availability. HDMI supports enhanced, or highdefinition video, plus two-channel digital audio. 10 After the service is consistent output between programs...
For more information about the CableCARD device in this TV and any HDMI-equipped audio/video component, such as a set -top box. (Check with your cable TV company about CableCARD service details, limitations, pricing, and availability. HDMI supports enhanced, or highdefinition video, plus two-channel digital audio. 10 After the service is consistent output between programs...
Operating Instructions
Page 15
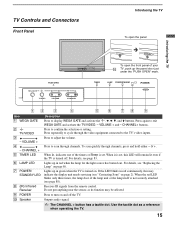
... through channels, press and hold either - To scan quickly through channels. Outputs audio signal. ✍ The CHANNEL + button has a tactile dot. or +. Lights up in red continuously, this LED will remain lit even if the TV is set . PUSH OPEN WEGA GATE TV/VIDEO VOLUME CHANNEL TIMER LAMP POWER/STANDBY POWER 12 3 4 5 6 78 9 Item... 2). For details, see page 88). If the LED blinks in red when the lamp for the light source has burned out. For details, see "Contacting Sony" on and off . Press to the...
... through channels, press and hold either - To scan quickly through channels. Outputs audio signal. ✍ The CHANNEL + button has a tactile dot. or +. Lights up in red continuously, this LED will remain lit even if the TV is set . PUSH OPEN WEGA GATE TV/VIDEO VOLUME CHANNEL TIMER LAMP POWER/STANDBY POWER 12 3 4 5 6 78 9 Item... 2). For details, see page 88). If the LED blinks in red when the lamp for the light source has burned out. For details, see "Contacting Sony" on and off . Press to the...
Operating Instructions
Page 16
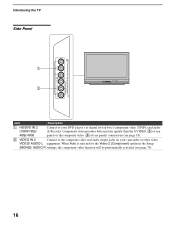
...picture quality than the S VIDEO (5 of rear panel) or the composite video (6 of rear panel) connections (see page 79). 16 When Auto is selected for the Video 2 (Component) option in the Setup (MONO)/ AUDIO R settings, the component video function will be preferentially ...activated (see page 18). 2 VIDEO IN 2 Connect to your camcorder or other video VIDEO/ AUDIO L equipment. Introducing the TV...
...picture quality than the S VIDEO (5 of rear panel) or the composite video (6 of rear panel) connections (see page 79). 16 When Auto is selected for the Video 2 (Component) option in the Setup (MONO)/ AUDIO R settings, the component video function will be preferentially ...activated (see page 18). 2 VIDEO IN 2 Connect to your camcorder or other video VIDEO/ AUDIO L equipment. Introducing the TV...
Operating Instructions
Page 17
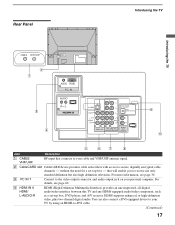
...) provides an uncompressed, all-digital audio/video interface between this TV and any HDMI-equipped audio/video component, such as a set -top box - without the need for a set -top box, DVD player, and A/V receiver. that connects to your personal computer. Rear Panel Introducing the TV Introducing the TV CABLE VHF/UHF 2 1 3 AUDIO RGB 7 PC IN AUDIO RL 6 4 S VIDEO VIDEO Y PB...
...) provides an uncompressed, all-digital audio/video interface between this TV and any HDMI-equipped audio/video component, such as a set -top box - without the need for a set -top box, DVD player, and A/V receiver. that connects to your personal computer. Rear Panel Introducing the TV Introducing the TV CABLE VHF/UHF 2 1 3 AUDIO RGB 7 PC IN AUDIO RL 6 4 S VIDEO VIDEO Y PB...

Operating Instructions
Page 18
... Description 5 VIDEO IN 1 S VIDEO Connects to the S VIDEO output jack of the TV. 7 HD/DVD IN 4/5 (1080i/720p/ 480p/480i)/ L-AUDIO-R Connect to your DVD player's or digital set-top box's component video (YPBPR) and audio (L/R) jacks. AC IN Connects the supplied AC power cord. * Manufactured under license from Dolby ... is located on your VCR or other video component. You can use (VAR/FIX) L/R these outputs to listen to your TV's audio through your audio or video equipment. Component video provides better picture quality than the composite video (6). 6 VIDEO IN 1/3 VIDEO...
... Description 5 VIDEO IN 1 S VIDEO Connects to the S VIDEO output jack of the TV. 7 HD/DVD IN 4/5 (1080i/720p/ 480p/480i)/ L-AUDIO-R Connect to your DVD player's or digital set-top box's component video (YPBPR) and audio (L/R) jacks. AC IN Connects the supplied AC power cord. * Manufactured under license from Dolby ... is located on your VCR or other video component. You can use (VAR/FIX) L/R these outputs to listen to your TV's audio through your audio or video equipment. Component video provides better picture quality than the composite video (6). 6 VIDEO IN 1/3 VIDEO...

Operating Instructions
Page 35
... picture quality than the output of your cable box when the signal is scrambled. To program your Sony remote control to operate your cable box, see "Using CableCARD Device" on your TV when the signal is set to (usually channel 3 or 4) and then use a cable box. Disconnect all of the S VIDEO cable. ... jack to the VCR's RF input jack. 5 Use an A/V cable to connect the cable box's A/V output jacks to the TV's A/V input jacks. 6 Use an A/V and S VIDEO cables to connect the VCR's AUDIO and S VIDEO OUT jacks to change channels on page 30. regular cable channels) and you can: ❑ Use the...
... picture quality than the output of your cable box when the signal is scrambled. To program your Sony remote control to operate your cable box, see "Using CableCARD Device" on your TV when the signal is set to (usually channel 3 or 4) and then use a cable box. Disconnect all of the S VIDEO cable. ... jack to the VCR's RF input jack. 5 Use an A/V cable to connect the cable box's A/V output jacks to the TV's A/V input jacks. 6 Use an A/V and S VIDEO cables to connect the VCR's AUDIO and S VIDEO OUT jacks to change channels on page 30. regular cable channels) and you can: ❑ Use the...
Operating Instructions
Page 37
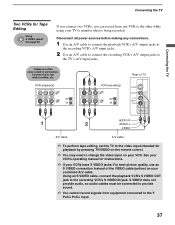
...quality, use an S VIDEO connection instead of TV S VIDEO VIDEO L (MONO) AUDIO R 1 3 VIDEO IN AUDIO-R AUDIO-L VIDEO A/V cable A/V cable ✍ To perform tape editing, set the TV to the video input intended for Tape Editing Using S VIDEO jacks? VCR (playback) VCR (recording) Rear of the VIDEO cable (yellow) on your ...; You may need to monitor what is being recorded. Connect red to red, white to the TV's A/V input jacks. See page 20. S VIDEO does not provide audio, so audio cables must be connected to provide sound. ✍ You cannot record signals from one VCR to...
...quality, use an S VIDEO connection instead of TV S VIDEO VIDEO L (MONO) AUDIO R 1 3 VIDEO IN AUDIO-R AUDIO-L VIDEO A/V cable A/V cable ✍ To perform tape editing, set the TV to the video input intended for Tape Editing Using S VIDEO jacks? VCR (playback) VCR (recording) Rear of the VIDEO cable (yellow) on your ...; You may need to monitor what is being recorded. Connect red to red, white to the TV's A/V input jacks. See page 20. S VIDEO does not provide audio, so audio cables must be connected to provide sound. ✍ You cannot record signals from one VCR to...

Operating Instructions
Page 38
...45 HD / DVD IN (1080i/720p/480p/480i) AUDIO-R AUDIO-L Audio cable ✍ To take advantage of inputs that you used for the video connection (HD/DVD IN 4 or 5). Be sure to use the same row of the Wide Mode feature, set the DVD player's aspect ratio to 16:9. Use the.... 2 Use an audio cable to connect the DVD player's AUDIO OUT jacks to the TV's AUDIO IN jacks. For details, refer to the operating instructions supplied with Component Video Connectors Use this hookup if: ❑ Your DVD player has component (YPBPR) jacks. DVD player Component video cable Rear of TV Y PB/CB PR...
...45 HD / DVD IN (1080i/720p/480p/480i) AUDIO-R AUDIO-L Audio cable ✍ To take advantage of inputs that you used for the video connection (HD/DVD IN 4 or 5). Be sure to use the same row of the Wide Mode feature, set the DVD player's aspect ratio to 16:9. Use the.... 2 Use an audio cable to connect the DVD player's AUDIO OUT jacks to the TV's AUDIO IN jacks. For details, refer to the operating instructions supplied with Component Video Connectors Use this hookup if: ❑ Your DVD player has component (YPBPR) jacks. DVD player Component video cable Rear of TV Y PB/CB PR...

Operating Instructions
Page 39
... red, white to the TV's S VIDEO jack. Rear of the S VIDEO cable. ✍ To watch a DVD, press TV/VIDEO repeatedly to select the DVD input (VIDEO 1 in the illustration). A/V cable ✍ If your DVD player is not equipped with S VIDEO and Audio Connectors DVD player Use this...does not have a non-Sony DVD player and want to set up Label Video Inputs on page 79. 39 Connecting the TV Connecting the TV DVD Player with S VIDEO, use a VIDEO cable (yellow) instead of TV S VIDEO S VIDEO cable S VIDEO VIDEO L (MONO) AUDIO R 1 3 VIDEO IN AUDIO-R AUDIO-L VIDEO Cables are often...
... red, white to the TV's S VIDEO jack. Rear of the S VIDEO cable. ✍ To watch a DVD, press TV/VIDEO repeatedly to select the DVD input (VIDEO 1 in the illustration). A/V cable ✍ If your DVD player is not equipped with S VIDEO and Audio Connectors DVD player Use this...does not have a non-Sony DVD player and want to set up Label Video Inputs on page 79. 39 Connecting the TV Connecting the TV DVD Player with S VIDEO, use a VIDEO cable (yellow) instead of TV S VIDEO S VIDEO cable S VIDEO VIDEO L (MONO) AUDIO R 1 3 VIDEO IN AUDIO-R AUDIO-L VIDEO Cables are often...

Operating Instructions
Page 40
... monitor port (15-pin D-Sub) To audio output jack 40 Rear of the computer. Connecting the TV Personal Computer z When connecting to an Apple Macintosh computer, use an adapter (not supplied). If this is noisy or flickering, adjust the Phase and Pitch in the Screen settings on the TV. When your PC is connected to...
... monitor port (15-pin D-Sub) To audio output jack 40 Rear of the computer. Connecting the TV Personal Computer z When connecting to an Apple Macintosh computer, use an adapter (not supplied). If this is noisy or flickering, adjust the Phase and Pitch in the Screen settings on the TV. When your PC is connected to...

Operating Instructions
Page 41
...is not equipped with S VIDEO, use VIDEO IN 2 on the rear panel of the TV. Connecting the TV Camcorder or "PlayStation" Rear of TV S VIDEO VIDEO L (MONO) AUDIO R 1 3 VIDEO IN Connecting the TV You can connect a camcorder or "PlayStation" to VIDEO IN 2 ...Select Off in the Video 2 (Component) option in the Setup settings (see page 79). "PlayStation" Camcorder S VIDEO VIDEO AUDIO-L AUDIO...
...is not equipped with S VIDEO, use VIDEO IN 2 on the rear panel of the TV. Connecting the TV Camcorder or "PlayStation" Rear of TV S VIDEO VIDEO L (MONO) AUDIO R 1 3 VIDEO IN Connecting the TV You can connect a camcorder or "PlayStation" to VIDEO IN 2 ...Select Off in the Video 2 (Component) option in the Setup settings (see page 79). "PlayStation" Camcorder S VIDEO VIDEO AUDIO-L AUDIO...

Operating Instructions
Page 45
... 59). X REC PAUSE: Press to switch between the satellite receiver and antenna. The MTS setting can be also accessed in SAT/CABLE FUNCTION, press to pause the recording. TV/SAT: While in the Audio setting. Press to turn on page 53. Press to scan through the WEGA GATE: • ...Watch TV (see page 58) • Select channels from the Favorites Channels you stored (see "Selecting Audio Options" on /off the TV. See page 83 for TV) Press to ...
... 59). X REC PAUSE: Press to switch between the satellite receiver and antenna. The MTS setting can be also accessed in SAT/CABLE FUNCTION, press to pause the recording. TV/SAT: While in the Audio setting. Press to turn on page 53. Press to scan through the WEGA GATE: • ...Watch TV (see page 58) • Select channels from the Favorites Channels you stored (see "Selecting Audio Options" on /off the TV. See page 83 for TV) Press to ...

Operating Instructions
Page 66
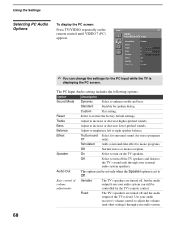
... to create the same surround effect produced by compensating for phase effects in the Treble/Bass options. Dynamic Standard Custom Selecting Audio Options z Sound Mode settings are independent of the current input (TV or video input) relative to turn off Steady Sound. Simulated Adds a surround-like effect to increase or decrease lower-pitched...
... to create the same surround effect produced by compensating for phase effects in the Treble/Bass options. Dynamic Standard Custom Selecting Audio Options z Sound Mode settings are independent of the current input (TV or video input) relative to turn off Steady Sound. Simulated Adds a surround-like effect to increase or decrease lower-pitched...
Operating Instructions
Page 68
... screen. Balance Adjust to restore the factory default settings. Audio Press WEGA GATE to turn off and the audio output of volume adjustments Variable The TV's speakers are turned off the TV speakers and listen to the TV's sound only through your audio system can be controlled by the TV's remote control. Speaker On Select to exit Sound...
... screen. Balance Adjust to restore the factory default settings. Audio Press WEGA GATE to turn off and the audio output of volume adjustments Variable The TV's speakers are turned off the TV speakers and listen to the TV's sound only through your audio system can be controlled by the TV's remote control. Speaker On Select to exit Sound...

Operating Instructions
Page 92
...72). Use headphones other than infrared cordless headphones. Then press TV(FUNCTION) once (the TV indicator lights up) and adjust the TV's volume. ❏ The TV's audio might be set to Auto SAP or Mono, when it might be input. In the Audio setting (see page 44). Channels Problem Possible Remedies Cannot receive ...10063; Press MUTING so that Muting disappears from the TV until the noise is eliminated, or move the infrared transceiver away from the screen (see page 44). ❏ Make sure the Speaker option is set to On in the Audio setting (see page 67). ❏ Make sure the ...
...72). Use headphones other than infrared cordless headphones. Then press TV(FUNCTION) once (the TV indicator lights up) and adjust the TV's volume. ❏ The TV's audio might be set to Auto SAP or Mono, when it might be input. In the Audio setting (see page 44). Channels Problem Possible Remedies Cannot receive ...10063; Press MUTING so that Muting disappears from the TV until the noise is eliminated, or move the infrared transceiver away from the screen (see page 44). ❏ Make sure the Speaker option is set to On in the Audio setting (see page 67). ❏ Make sure the ...

Operating Instructions
Page 93
... TV is used to restore Audio settings ❏ Select Reset setting option...TV to factory settings Cannot cycle through the other ❏ Be sure the Label Video Inputs option is not set , a from the ventilation slots on the rear and both sides of the optical unit. While holding down its projection... lamp when the power is designed to On, the cooling fan runs faster and its sound becomes louder. to factory settings ❏ Turn on again.) Release the M button. The master password clears your local Sony...
... TV is used to restore Audio settings ❏ Select Reset setting option...TV to factory settings Cannot cycle through the other ❏ Be sure the Label Video Inputs option is not set , a from the ventilation slots on the rear and both sides of the optical unit. While holding down its projection... lamp when the power is designed to On, the cooling fan runs faster and its sound becomes louder. to factory settings ❏ Turn on again.) Release the M button. The master password clears your local Sony...
Operating Instructions
Page 96
button 15 Channel settings 62, 72 Channel Show/Hide 72 Channels Auto Program 72 creating labels 73 CineMotion 9, 80 Clear White 65 Clock/Timers 83 Closed caption modes 78 Color Temp., adjusting 64, 65 Color, adjusting 63 Connecting Audio receiver 42 Cable box 23-...50 A A/V Sync 67 About Using CableCARD Device 30 AC IN 18 Adding channels to the channel list 72 Adjusting audio, Steady Sound 66 Advanced Iris 63 Advanced Video 65 Alternate Audio 52 Alternate Video 52 ANT button 44 Applications Settings 62, 83 Audio Out 67, 68 AUDIO OUT jack, described 18 Audio receiver, connecting 42 Audio settings...
button 15 Channel settings 62, 72 Channel Show/Hide 72 Channels Auto Program 72 creating labels 73 CineMotion 9, 80 Clear White 65 Clock/Timers 83 Closed caption modes 78 Color Temp., adjusting 64, 65 Color, adjusting 63 Connecting Audio receiver 42 Cable box 23-...50 A A/V Sync 67 About Using CableCARD Device 30 AC IN 18 Adding channels to the channel list 72 Adjusting audio, Steady Sound 66 Advanced Iris 63 Advanced Video 65 Alternate Audio 52 Alternate Video 52 ANT button 44 Applications Settings 62, 83 Audio Out 67, 68 AUDIO OUT jack, described 18 Audio receiver, connecting 42 Audio settings...


