
Operating Instructions
Page 3
... authority to operate this case, please wait a few hours to let the moisture evaporate before operating it checked by your projection TV, keep the brightness and contrast functions at temperatures below 41°F (5°C). The apparatus shall not be using... turning on the apparatus. In this equipment. WARNING To reduce the risk of fire or electric shock, do not expose this equipment does cause harmful interference to radio or television reception, which the receiver is connected. These types of Conformity Trade Name: SONY Model: KDF-E42A10/KDF-E50A10 Responsible Party: Sony ...
... authority to operate this case, please wait a few hours to let the moisture evaporate before operating it checked by your projection TV, keep the brightness and contrast functions at temperatures below 41°F (5°C). The apparatus shall not be using... turning on the apparatus. In this equipment. WARNING To reduce the risk of fire or electric shock, do not expose this equipment does cause harmful interference to radio or television reception, which the receiver is connected. These types of Conformity Trade Name: SONY Model: KDF-E42A10/KDF-E50A10 Responsible Party: Sony ...

Operating Instructions
Page 11
... reflection, the screen surface has a special coating. To dust off the power ❑ The cooling fan will return to normal. Allow several minutes before turning on the TV. Special care is required. When the condensation has evaporated, the picture will continue to operate for a long period of time ❑ Unplug the AC...
... reflection, the screen surface has a special coating. To dust off the power ❑ The cooling fan will return to normal. Allow several minutes before turning on the TV. Special care is required. When the condensation has evaporated, the picture will continue to operate for a long period of time ❑ Unplug the AC...

Operating Instructions
Page 12
...screen becomes darker. LAMP indicator The projection lamp has burned out. Your TV uses a projection lamp as its light source. Indicator Flashing because... red : The lamp door or the lamp is in the condition or a problem with a new Sony XL-2400 replacement lamp (not supplied)....lamp, see page 86). Note the following: ❑ After turning on . Replace the lamp with the TV, the indicators will turn STANDBY flashing on your TV is not securely attached. Introducing the TV Indicators Screen PUSH OPEN TIMER LAMP POWER/STANDBY POWER Indicators The indicators...
...screen becomes darker. LAMP indicator The projection lamp has burned out. Your TV uses a projection lamp as its light source. Indicator Flashing because... red : The lamp door or the lamp is in the condition or a problem with a new Sony XL-2400 replacement lamp (not supplied)....lamp, see page 86). Note the following: ❑ After turning on . Replace the lamp with the TV, the indicators will turn STANDBY flashing on your TV is not securely attached. Introducing the TV Indicators Screen PUSH OPEN TIMER LAMP POWER/STANDBY POWER Indicators The indicators...
Operating Instructions
Page 15
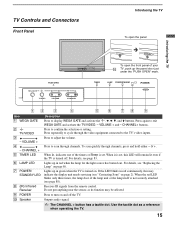
... to display WEGA GATE and activate the , B, b, v, and V buttons. For details, see "Contacting Sony" on and off . If the LED blinks in red continuously, this LED will remain lit even if the TV is set . Use the tactile dot as its function may indicate the display unit needs servicing... (see page 83. VOLUME + 4 - When lit, indicates one of the timers or Sleep is set , this may be affected. When it is turned off the TV. For details, see page 88). Receives IR signals from the remote control. Outputs audio signal. ✍ The CHANNEL + button has a tactile dot. ...
... to display WEGA GATE and activate the , B, b, v, and V buttons. For details, see "Contacting Sony" on and off . If the LED blinks in red continuously, this LED will remain lit even if the TV is set . Use the tactile dot as its function may indicate the display unit needs servicing... (see page 83. VOLUME + 4 - When lit, indicates one of the timers or Sleep is set , this may be affected. When it is turned off the TV. For details, see page 88). Receives IR signals from the remote control. Outputs audio signal. ✍ The CHANNEL + button has a tactile dot. ...

Operating Instructions
Page 32
...v to highlight "Yes" then press . Auto Program performed through Initial Setup will automatically create a list of receivable channels for each time you turn on the TV until you complete the Auto Program as a reminder. If you cancel the Auto Program before all channel selection. You will appear each RF input...now?" Then press . This may take a while (20 to 50 minutes) to complete. Connecting the TV Setting Up the Channel List After you finish connecting the TV, you can run Initial Setup the first time you turn on your TV 1 TV POWER Press to turn on the TV. If you choose to set up .
...v to highlight "Yes" then press . Auto Program performed through Initial Setup will automatically create a list of receivable channels for each time you turn on the TV until you complete the Auto Program as a reminder. If you cancel the Auto Program before all channel selection. You will appear each RF input...now?" Then press . This may take a while (20 to 50 minutes) to complete. Connecting the TV Setting Up the Channel List After you finish connecting the TV, you can run Initial Setup the first time you turn on your TV 1 TV POWER Press to turn on the TV. If you choose to set up .

Operating Instructions
Page 45
... PAUSE: Press to stop the recording. The MTS setting can be used only with visual search function. (Non-operable button for TV) Press to adjust the volume. Press repeatedly to turn on page 54. Press again to step through channels. x REC STOP: Press to pause the recording. Press to scan through... Press again to switch between the satellite receiver and antenna. For details, see "Using the FREEZE Button" on /off the TV. To select an item, press . Press to turn on page 53. MTS/SAP wa FREEZE ws TV/SAT/SUR wd WIDE wf DISPLAY wg V/v/B/b wh TOOLS wj WEGA GATE wk CH...
... PAUSE: Press to stop the recording. The MTS setting can be used only with visual search function. (Non-operable button for TV) Press to adjust the volume. Press repeatedly to turn on page 54. Press again to step through channels. x REC STOP: Press to pause the recording. Press to scan through... Press again to switch between the satellite receiver and antenna. For details, see "Using the FREEZE Button" on /off the TV. To select an item, press . Press to turn on page 53. MTS/SAP wa FREEZE ws TV/SAT/SUR wd WIDE wf DISPLAY wg V/v/B/b wh TOOLS wj WEGA GATE wk CH...

Operating Instructions
Page 47
...number using the --9 buttons while the button is preset to operate the non-Sony video equipment. 2 Find the three-digit code for your TV's remote control at the equipment, and press the green POWER button. If the equipment turns on page 48. DVD/ SAT/ 1 Press and hold the , DVR ...VCR or CABLE FUNCTION button you must perform step 1 again. 3 Press button. Watching the TV RETURN Watching the TV Programming the Remote Control The remote control is lit. ...
...number using the --9 buttons while the button is preset to operate the non-Sony video equipment. 2 Find the three-digit code for your TV's remote control at the equipment, and press the green POWER button. If the equipment turns on page 48. DVD/ SAT/ 1 Press and hold the , DVR ...VCR or CABLE FUNCTION button you must perform step 1 again. 3 Press button. Watching the TV RETURN Watching the TV Programming the Remote Control The remote control is lit. ...

Operating Instructions
Page 49
... Do This ... Press ... Activate the remote control to operate the DVD DVD/VCR (FUNCTION) Turn on/off POWER If you see the video input on the screen for your TV, first turn to operate the VCR DVD/VCR (FUNCTION) Turn on /off POWER To Do This ... Select a channel Change channels Back to resume normal...
... Do This ... Press ... Activate the remote control to operate the DVD DVD/VCR (FUNCTION) Turn on/off POWER If you see the video input on the screen for your TV, first turn to operate the VCR DVD/VCR (FUNCTION) Turn on /off POWER To Do This ... Select a channel Change channels Back to resume normal...

Operating Instructions
Page 50
...operate the DVD/HDD DVR (FUNCTION) Turn on /off POWER Select the HDD F 1 Select the DVD F 2 Play H Stop x Pause X Search the picture forward or backward M or m during tape playback) To Do This ... Watching the TV Operating a 5.1ch DVD AV System (Sony DAV) To Do This ... Press ... DVD/VCR (FUNCTION) Turn on /off POWER Select the DVD F 1 Select the VCR F 2 Display the top menu TOP MENU Display the disc menu Play MENU H Stop x Pause X Operating a HDD/DVD Combo Unit To Do This ... Press ... V v B b z . > MENU TOP MENU 50 Press ... Activate the ...
...operate the DVD/HDD DVR (FUNCTION) Turn on /off POWER Select the HDD F 1 Select the DVD F 2 Play H Stop x Pause X Search the picture forward or backward M or m during tape playback) To Do This ... Watching the TV Operating a 5.1ch DVD AV System (Sony DAV) To Do This ... Press ... DVD/VCR (FUNCTION) Turn on /off POWER Select the DVD F 1 Select the VCR F 2 Display the top menu TOP MENU Display the disc menu Play MENU H Stop x Pause X Operating a HDD/DVD Combo Unit To Do This ... Press ... V v B b z . > MENU TOP MENU 50 Press ... Activate the ...

Operating Instructions
Page 66
...spoken dialog. Adjust to stabilize the volume across all programs and commercials. Standard Suitable for stereo programs XT only). Adjust to turn off Steady Sound. Press WEGA GATE........ Dynamic Standard Custom Selecting Audio Options z Sound Mode settings are independent of the current input... (TV or video input) relative to the default setting: Treble, Bass, Balance, Steady Sound, Volume Offset, Effect and BBE. The Audio ...
...spoken dialog. Adjust to stabilize the volume across all programs and commercials. Standard Suitable for stereo programs XT only). Adjust to turn off Steady Sound. Press WEGA GATE........ Dynamic Standard Custom Selecting Audio Options z Sound Mode settings are independent of the current input... (TV or video input) relative to the default setting: Treble, Bass, Balance, Steady Sound, Volume Offset, Effect and BBE. The Audio ...

Operating Instructions
Page 67
...when a signal is fixed. Off Select to turn on your audio system. Easy control Variable of volume adjustments The TV's speakers are turned off and the audio output from your connected external equipment are turned off the TV speakers and listen to the TV's sound only through your remote control is ... Description MTS Stereo Enjoy stereo, bilingual and Auto SAP mono programs Select for analog programs. Speaker On Select to turn off , and the audio output of the TV. Audio Out This option can still be set only when the Speaker option is set to Variable, and becomes ...
...when a signal is fixed. Off Select to turn on your audio system. Easy control Variable of volume adjustments The TV's speakers are turned off and the audio output from your connected external equipment are turned off the TV speakers and listen to the TV's sound only through your remote control is ... Description MTS Stereo Enjoy stereo, bilingual and Auto SAP mono programs Select for analog programs. Speaker On Select to turn off , and the audio output of the TV. Audio Out This option can still be set only when the Speaker option is set to Variable, and becomes ...
Operating Instructions
Page 68
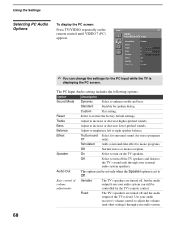
...Treble Adjust to restore the factory default settings. Speaker On Select to turn off the TV speakers and listen to turn on the Video 7 PC remote control until VIDEO 7 (PC) appears. Off Select to the TV's sound only through your audio system can change the settings for the ... fixed. Reset Select to increase or decrease higher-pitched sounds. Custom Flat setting. Fixed The TV's speakers are turned off and the audio output of the TV is displaying the PC screen. Audio Press WEGA GATE to mono programs. Off Normal stereo or mono reception. Simulated ...
...Treble Adjust to restore the factory default settings. Speaker On Select to turn off the TV speakers and listen to turn on the Video 7 PC remote control until VIDEO 7 (PC) appears. Off Select to the TV's sound only through your audio system can change the settings for the ... fixed. Reset Select to increase or decrease higher-pitched sounds. Custom Flat setting. Fixed The TV's speakers are turned off and the audio output of the TV is displaying the PC screen. Audio Press WEGA GATE to mono programs. Off Normal stereo or mono reception. Simulated ...

Operating Instructions
Page 74
... Options The Parental Lock settings include the following options: Option Parental Lock Turn ratings on page 93. No programs are : U.S.: TV-PG, PG Canada: C8+, PG, 8 ans+, TV-PG Y. Child Maximum ratings permitted are: U.S.: TV-Y, TV-G, G Canada: C, G, TV-Y Youth Maximum ratings permitted are blocked from viewing. S. If you to... change settings, press V v B b. Adult Maximum ratings permitted are: U.S.: TV-14, PG-13 Canada: 14+, 13 ans+, TV-14 Custom Select to set up the TV to block programs according to confirm the selection. To exit the Parental Lock, press WEGA GATE...
... Options The Parental Lock settings include the following options: Option Parental Lock Turn ratings on page 93. No programs are : U.S.: TV-PG, PG Canada: C8+, PG, 8 ans+, TV-PG Y. Child Maximum ratings permitted are: U.S.: TV-Y, TV-G, G Canada: C, G, TV-Y Youth Maximum ratings permitted are blocked from viewing. S. If you to... change settings, press V v B b. Adult Maximum ratings permitted are: U.S.: TV-14, PG-13 Canada: 14+, 13 ans+, TV-14 Custom Select to set up the TV to block programs according to confirm the selection. To exit the Parental Lock, press WEGA GATE...

Operating Instructions
Page 75
...feature ❑ Set Parental Lock to use the arrow buttons to highlight Change Password, and press to exit the setting screen. To change your TV off. Select to Off when in the Parental Lock setting. z For descriptions of Child, Youth, and Y.Adult ratings, see page 76).... To set more restrictive ratings, select Custom. U.S.A. Using the Settings z If you are not familiar with the Parental Guideline rating system, you turn your password. Viewing Blocked Programs You can view a blocked program by entering the password. 1 Press ENT when tuned to a blocked program. 2 Enter...
...feature ❑ Set Parental Lock to use the arrow buttons to highlight Change Password, and press to exit the setting screen. To change your TV off. Select to Off when in the Parental Lock setting. z For descriptions of Child, Youth, and Y.Adult ratings, see page 76).... To set more restrictive ratings, select Custom. U.S.A. Using the Settings z If you are not familiar with the Parental Guideline rating system, you turn your password. Viewing Blocked Programs You can view a blocked program by entering the password. 1 Press ENT when tuned to a blocked program. 2 Enter...

Operating Instructions
Page 78
WEGA GATE 2. Off Caption Vision is turned off the Game Mode. 78 Select On to optimize the lipsync when playing games. On Select to display the program name, time remaining and other ... Settings 3. To exit the Setup, press WEGA GATE . Also displays when the channel is changed or the DISPLAY button is turned on page 80. Off Select to confirm the selection. Press to turn off . Program Allows you to On or Off. See "Programming Caption Vision" on . Highlight 4. Press to select Antenna Setup...
WEGA GATE 2. Off Caption Vision is turned off the Game Mode. 78 Select On to optimize the lipsync when playing games. On Select to display the program name, time remaining and other ... Settings 3. To exit the Setup, press WEGA GATE . Also displays when the channel is changed or the DISPLAY button is turned on page 80. Off Select to confirm the selection. Press to turn off . Program Allows you to On or Off. See "Programming Caption Vision" on . Highlight 4. Press to select Antenna Setup...
Operating Instructions
Page 81
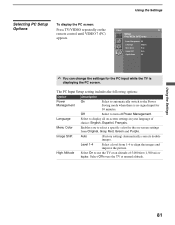
Select Off to turn off Power Management. Off Select to use the TV at normal altitude. Level 1-4 Select a level from Original, Gray, Red, Green and Purple. Using the Settings Selecting PC Setup To display the PC screen: Options Press TV/VIDEO repeatedly on -screen settings from 1-4 to exit Power ...remote control until VIDEO 7 (PC) appears. Setup Press WEGA GATE to align the images and improve the picture. Language Select to use the TV at an altitude of choice: English, Español, Français. High Altitude Select On to display all on-screen settings in your...
Select Off to turn off Power Management. Off Select to use the TV at normal altitude. Level 1-4 Select a level from Original, Gray, Red, Green and Purple. Using the Settings Selecting PC Setup To display the PC screen: Options Press TV/VIDEO repeatedly on -screen settings from 1-4 to exit Power ...remote control until VIDEO 7 (PC) appears. Setup Press WEGA GATE to align the images and improve the picture. Language Select to use the TV at an altitude of choice: English, Español, Français. High Altitude Select On to display all on-screen settings in your...

Operating Instructions
Page 83
...Clock/Timers Description Select to a specific channel at two scheduled viewing times. Once the options are set the clock and to program your TV to turn on and off and tune to set , TIMER LED lights up in red. Select Settings 3. Highlight Antenna Applications Change current time and...press WEGA GATE . Timer 1 Timer 2 You can use the Timers to program the TV to remain on and off automatically. Timer 1 and Timer 2 cannot be set until you want the TV to turn on before shutting off at two scheduled viewing times. Using the Settings Accessing the Applications ...
...Clock/Timers Description Select to a specific channel at two scheduled viewing times. Once the options are set the clock and to program your TV to turn on and off and tune to set , TIMER LED lights up in red. Select Settings 3. Highlight Antenna Applications Change current time and...press WEGA GATE . Timer 1 Timer 2 You can use the Timers to program the TV to remain on and off automatically. Timer 1 and Timer 2 cannot be set until you want the TV to turn on before shutting off at two scheduled viewing times. Using the Settings Accessing the Applications ...
Operating Instructions
Page 84
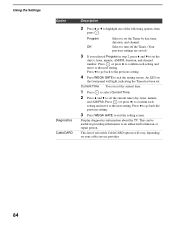
... cable service provider. 84 This can set the current time. 1 Press to select Current Time. 2 Press V and v to set . Select to turn off the Timer. (Your previous settings are saved.) 3 If you selected Program in providing information to an authorized technician or repair person. Press or press... AM/PM, duration, and channel number. Press (or press b) to confirm each setting and move to the next setting. Display diagnostics information about the TV. Press B to go back the previous setting. 3 Press WEGA GATE to exit the setting screen. Press B to go back to the previous setting. ...
... cable service provider. 84 This can set the current time. 1 Press to select Current Time. 2 Press V and v to set . Select to turn off the Timer. (Your previous settings are saved.) 3 If you selected Program in providing information to an authorized technician or repair person. Press or press... AM/PM, duration, and channel number. Press (or press b) to confirm each setting and move to the next setting. Display diagnostics information about the TV. Press B to go back the previous setting. 3 Press WEGA GATE to exit the setting screen. Press B to go back to the previous setting. ...

Operating Instructions
Page 86
...to cool down before replacing it is inherent to this type of the TV flashes, it is time to Replace the Lamp 1 Turn off .) 2 Wait at least 30 minutes after removing the lamp. ...inside the lamp unit. ❑ The lamps contain mercury. Other Information Replacing the Lamp The projection lamp, which illuminates the picture, has a limited life. Be sure to contain all of the used ...lamps, follow the instructions below. ❑ Use a Sony XL-2400 replacement lamp (not supplied) for about two minutes after turning the power off the power on the main unit. For proper disposal ...
...to cool down before replacing it is inherent to this type of the TV flashes, it is time to Replace the Lamp 1 Turn off .) 2 Wait at least 30 minutes after removing the lamp. ...inside the lamp unit. ❑ The lamps contain mercury. Other Information Replacing the Lamp The projection lamp, which illuminates the picture, has a limited life. Be sure to contain all of the used ...lamps, follow the instructions below. ❑ Use a Sony XL-2400 replacement lamp (not supplied) for about two minutes after turning the power off the power on the main unit. For proper disposal ...

Operating Instructions
Page 87
Hook a finger through the loop of the replacement lamp. Never put the used lamp has cooled, place it into a plastic bag. (Continued) 87 Other Information ✍ The lamp is very hot immediately after use. Turn the knob counterclockwise to OPEN and pull out the cover. Then pull the lamp straight out. 4 Remove the outside lamp cover. Never touch the glass portion of the lamp or the surrounding parts. ✍ After the used lamp into the empty box of the lamp handle and pull the handle upwards. Other Information 5 Remove the lamp door. Lamp door 6 Pull out the lamp.
Hook a finger through the loop of the replacement lamp. Never put the used lamp has cooled, place it into a plastic bag. (Continued) 87 Other Information ✍ The lamp is very hot immediately after use. Turn the knob counterclockwise to OPEN and pull out the cover. Then pull the lamp straight out. 4 Remove the outside lamp cover. Never touch the glass portion of the lamp or the surrounding parts. ✍ After the used lamp into the empty box of the lamp handle and pull the handle upwards. Other Information 5 Remove the lamp door. Lamp door 6 Pull out the lamp.


