Operating Instructions
Page 3
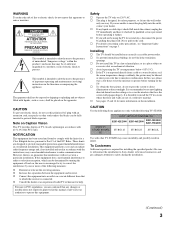
... from the ceiling or to persons. s If the TV is transported directly from that to which can be installed near an easily accessible power outlet. KDF-42E2000 KDF-46E2000 KDF-50E2000 KDF-55E2000 SONY TV STAND MODEL NO. The apparatus shall not be exposed to... dripping or splashing and no guarantee that interference will not be of sufficient magnitude to constitute a risk of electric shock to cover the windows that any liquid or solid object should be determined by turning...
... from the ceiling or to persons. s If the TV is transported directly from that to which can be installed near an easily accessible power outlet. KDF-42E2000 KDF-46E2000 KDF-50E2000 KDF-55E2000 SONY TV STAND MODEL NO. The apparatus shall not be exposed to... dripping or splashing and no guarantee that interference will not be of sufficient magnitude to constitute a risk of electric shock to cover the windows that any liquid or solid object should be determined by turning...
Operating Instructions
Page 11
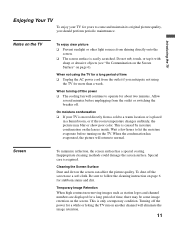
... the power ❑ The cooling fan will continue to operate for a while or letting the TV run on another channel will return to normal. When turning off the power for about two minutes. Wait a few hours to follow the cleaning instruction on page 6 for more than a week. This is caused by ...
... the power ❑ The cooling fan will continue to operate for a while or letting the TV run on another channel will return to normal. When turning off the power for about two minutes. Wait a few hours to follow the cleaning instruction on page 6 for more than a week. This is caused by ...
Operating Instructions
Page 12
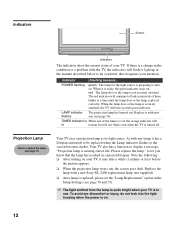
... less) before the picture appears. ❑ When the projection lamp wears out, the screen goes dark. If there is securely attached, the TV will turn on with the TV, the indicators will not flash) even when the TV is not securely attached. Replace the lamp with a new Sony XL-2400 replacement lamp (not supplied). ❑ After...
... less) before the picture appears. ❑ When the projection lamp wears out, the screen goes dark. If there is securely attached, the TV will turn on with the TV, the indicators will not flash) even when the TV is not securely attached. Replace the lamp with a new Sony XL-2400 replacement lamp (not supplied). ❑ After...
Operating Instructions
Page 17
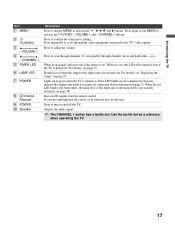
... B, b, v, and V buttons. Press to adjust the volume. When lit in green when the TV is turned off the TV. When the red LED blinks only three times, the lamp door of the timers is set , ...see "Replacing the Lamp" on and off . Flashes in red continuously, this LED will remain lit even if the TV is turned on page 2). Receives IR signals from the remote control. Outputs the audio signal. ✍ The CHANNEL + button has...LED 6 LAMP LED 7 POWER 8 Infrared Receiver 9 POWER q; For details, see contacting Sony information on . or +. Introducing the TV Item 1 MENU 2 TV/VIDEO 3 -
... B, b, v, and V buttons. Press to adjust the volume. When lit in green when the TV is turned off the TV. When the red LED blinks only three times, the lamp door of the timers is set , ...see "Replacing the Lamp" on and off . Flashes in red continuously, this LED will remain lit even if the TV is turned on page 2). Receives IR signals from the remote control. Outputs the audio signal. ✍ The CHANNEL + button has...LED 6 LAMP LED 7 POWER 8 Infrared Receiver 9 POWER q; For details, see contacting Sony information on . or +. Introducing the TV Item 1 MENU 2 TV/VIDEO 3 -
Operating Instructions
Page 28
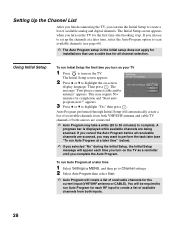
... Program. Then press . Auto Program performed through Initial Setup will automatically create a list of available channels from both VHF/UHF antenna and cable TV channels if both inputs. 28 This may take a while (20 to 50 minutes) to complete. A progress bar is displayed while available channels...Setting Up the Channel List After you finish connecting the TV, you choose to set up . The Initial Setup screen appears when you turn on the TV. To run Auto Program for each time you turn on the TV as a reminder until you turn on your TV 1 TV POWER Press to turn on -screen display language.
... Program. Then press . Auto Program performed through Initial Setup will automatically create a list of available channels from both VHF/UHF antenna and cable TV channels if both inputs. 28 This may take a while (20 to 50 minutes) to complete. A progress bar is displayed while available channels...Setting Up the Channel List After you finish connecting the TV, you choose to set up . The Initial Setup screen appears when you turn on the TV. To run Auto Program for each time you turn on the TV as a reminder until you turn on your TV 1 TV POWER Press to turn on -screen display language.

Operating Instructions
Page 39
... a set period of time (Off, 15 minutes, 30 minutes, 45 minutes, 60 minutes, 90 minutes or 120 minutes) before TV turns off . Press 0-9 to pause playback. The TV alternates between two channels. X PAUSE: Press to select a channel: the channel changes after 2 seconds. Use the tactile dot as... to either close the menu screen or move back to operate the corresponding equipment. ADVANCE: Press to advance forward a set to turn this feature off automatically. Press to select TruSurround XT audio effect or Off to operate the external equipment, these FUNCTION buttons to previous...
... a set period of time (Off, 15 minutes, 30 minutes, 45 minutes, 60 minutes, 90 minutes or 120 minutes) before TV turns off . Press 0-9 to pause playback. The TV alternates between two channels. X PAUSE: Press to select a channel: the channel changes after 2 seconds. Use the tactile dot as... to either close the menu screen or move back to operate the corresponding equipment. ADVANCE: Press to advance forward a set to turn this feature off automatically. Press to select TruSurround XT audio effect or Off to operate the external equipment, these FUNCTION buttons to previous...
Operating Instructions
Page 40
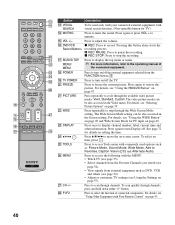
Press to turn Display off. Press to turn on/off the TV. Press to turn on page 43. 40 The video picture modes can be also accessed in the Video menu. Press repeatedly to Favorites, Caption Vision (CC) and Alternate .... button. For details, see Using the Settings on page 47. X REC PAUSE: Press to unmute. To select an item, press . TV/VIDEO SLEEP POWER TV POWER BD/DVD DVR/VCR SAT/CABLE TV FUNCTION ENT JUMP ANT FREEZE MODE SURROUND SOUND PICTURE WIDE DISPLAY GUIDE TOOLS RETURN MENU PREV REPLAY ADVANCE NEXT PLAY...
Press to turn Display off. Press to turn on/off the TV. Press to turn on page 43. 40 The video picture modes can be also accessed in the Video menu. Press repeatedly to Favorites, Caption Vision (CC) and Alternate .... button. For details, see Using the Settings on page 47. X REC PAUSE: Press to unmute. To select an item, press . TV/VIDEO SLEEP POWER TV POWER BD/DVD DVR/VCR SAT/CABLE TV FUNCTION ENT JUMP ANT FREEZE MODE SURROUND SOUND PICTURE WIDE DISPLAY GUIDE TOOLS RETURN MENU PREV REPLAY ADVANCE NEXT PLAY...
Operating Instructions
Page 41
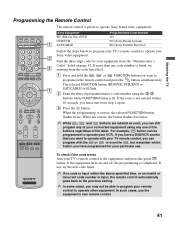
... is listed, try the next code listed. ✍ If no code is input within 10 seconds, you can be programmed to operate Sony brand video equipment. When the programming is correct, the selected FUNCTION button flashes twice. For example, BD/DVD button can program with your...and press the DISP button simultaneously. If the equipment turns on page 42. Watching the TV LAY RETURN Programming the Remote Control The remote control is preset to operate your VCR. TV/VIDEO SLEEP POWER TV POWER BD/DVD DVR/VCR SAT/CABLE TV FUNCTION ENT JUMP ANT FREEZE MODE SURROUND SOUND PICTURE...
... is listed, try the next code listed. ✍ If no code is input within 10 seconds, you can be programmed to operate Sony brand video equipment. When the programming is correct, the selected FUNCTION button flashes twice. For example, BD/DVD button can program with your...and press the DISP button simultaneously. If the equipment turns on page 42. Watching the TV LAY RETURN Programming the Remote Control The remote control is preset to operate your VCR. TV/VIDEO SLEEP POWER TV POWER BD/DVD DVR/VCR SAT/CABLE TV FUNCTION ENT JUMP ANT FREEZE MODE SURROUND SOUND PICTURE...

Operating Instructions
Page 43
...... In that case, operate by the remote control supplied with Your Remote Control To operate other equipment connected to your TV, first turn to operate the cable box SAT/CABLE (FUNCTION) Turn on the screen for your connected equipment. Press ... DISPLAY GUIDE MENU V v B b Operating a VCR To Do...fast forward the disc when pressed during playback > to operate the DVD DVD/VCR (FUNCTION) Turn on the equipment. Activate the remote control to step forward or . Watching the TV Using Other Equipment with the equipment. Operating a Cable Box ✍ Some functions cannot be operated...
...... In that case, operate by the remote control supplied with Your Remote Control To operate other equipment connected to your TV, first turn to operate the cable box SAT/CABLE (FUNCTION) Turn on the screen for your connected equipment. Press ... DISPLAY GUIDE MENU V v B b Operating a VCR To Do...fast forward the disc when pressed during playback > to operate the DVD DVD/VCR (FUNCTION) Turn on the equipment. Activate the remote control to step forward or . Watching the TV Using Other Equipment with the equipment. Operating a Cable Box ✍ Some functions cannot be operated...

Operating Instructions
Page 44
... z X x . > Activate the remote control to operate the Blu-ray Disc player BD/DVD (FUNCTION) Turn on /off Play Stop Pause POWER H x X (press again to operate the DVD/HDD DVR/VCR (FUNCTION) Turn on /off Select the HDD Select the DVD Play Stop POWER F 1 F 2 H x 44 To Do...Play Stop Pause Press ... Search the picture forward or backward M or m during tape playback) . > TV/VIDEO To Do This ... Activate the remote control to resume normal playback) Operating a 5.1ch DVD AV System (Sony DAV) To Do This ... Press ... or 0-9, ENT (using tuner) CH +/- (during playback Move ...
... z X x . > Activate the remote control to operate the Blu-ray Disc player BD/DVD (FUNCTION) Turn on /off Play Stop Pause POWER H x X (press again to operate the DVD/HDD DVR/VCR (FUNCTION) Turn on /off Select the HDD Select the DVD Play Stop POWER F 1 F 2 H x 44 To Do...Play Stop Pause Press ... Search the picture forward or backward M or m during tape playback) . > TV/VIDEO To Do This ... Activate the remote control to resume normal playback) Operating a 5.1ch DVD AV System (Sony DAV) To Do This ... Press ... or 0-9, ENT (using tuner) CH +/- (during playback Move ...
Operating Instructions
Page 45
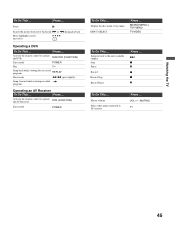
Jump forward to AV receiver Press ... BD/DVD MENU or TOP MENU TV/VIDEO To Do This ... VOL +/-, MUTING F1 45 Activate the remote control to operate the AV Receiver DVR (FUNCTION) Turn on /off POWER To Do This ... Master volume Select other input connected to the... Press ... Press ... Display the disc menu or top menu INPUT SELECT Press ... Press ... Watching the TV To Do This ... Activate the remote control to operate the DVR DVR/VCR (FUNCTION) Turn on /off POWER Play H Jump back while viewing live or record programs REPLAY Slow mode m/m (press ...
Jump forward to AV receiver Press ... BD/DVD MENU or TOP MENU TV/VIDEO To Do This ... VOL +/-, MUTING F1 45 Activate the remote control to operate the AV Receiver DVR (FUNCTION) Turn on /off POWER To Do This ... Master volume Select other input connected to the... Press ... Press ... Display the disc menu or top menu INPUT SELECT Press ... Press ... Watching the TV To Do This ... Activate the remote control to operate the DVR DVR/VCR (FUNCTION) Turn on /off POWER Play H Jump back while viewing live or record programs REPLAY Slow mode m/m (press ...
Operating Instructions
Page 62
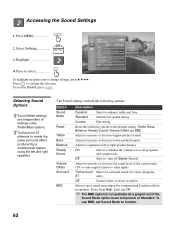
Selecting Sound Options z Sound Mode settings are independent of the current input (TV or video input) relative to other inputs. Adjust to change settings, press V v B b. Adjust to Dynamic or Standard. Press to select Antenna Sound Custom... (for stereo programs XT only). Accessing the Sound Settings 1. Select Settings 3. The Sound settings include the following options to Custom. 62 Press to turn off Steady Sound. Adjust to stabilize the volume across all programs and commercials. On Select to increase or decrease higher-pitched sounds. Off Normal stereo...
Selecting Sound Options z Sound Mode settings are independent of the current input (TV or video input) relative to other inputs. Adjust to change settings, press V v B b. Adjust to Dynamic or Standard. Press to select Antenna Sound Custom... (for stereo programs XT only). Accessing the Sound Settings 1. Select Settings 3. The Sound settings include the following options to Custom. 62 Press to turn off Steady Sound. Adjust to stabilize the volume across all programs and commercials. On Select to increase or decrease higher-pitched sounds. Off Normal stereo...

Operating Instructions
Page 63
... program is not broadcasted with alternate audio streams. Speaker On Select to turn off the TV speakers and listen to Fixed. Off Select to turn on your remote control is available when Audio Out is present, the TV remains in Stereo mode.) Mono Select for mono reception. (Use to...can be broadcast in a different language in the Digital alternate audio stream. Easy control Variable of volume adjustments The TV's speakers are turned off , and the audio output of the TV. A/V Sync Off/1/2/3 Use this option to make no SAP signal is set to Variable, and does not ...
... program is not broadcasted with alternate audio streams. Speaker On Select to turn off the TV speakers and listen to Fixed. Off Select to turn on your remote control is available when Audio Out is present, the TV remains in Stereo mode.) Mono Select for mono reception. (Use to...can be broadcast in a different language in the Digital alternate audio stream. Easy control Variable of volume adjustments The TV's speakers are turned off , and the audio output of the TV. A/V Sync Off/1/2/3 Use this option to make no SAP signal is set to Variable, and does not ...
Operating Instructions
Page 68
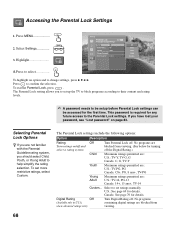
... are blocked from viewing. (See below for turning off the Digital Rating.) Child Maximum ratings permitted are: U.S.: TV-Y, TV-G, G Canada: C, G, TV-Y Youth Maximum ratings permitted are: U.S.: TV-PG, PG Canada: C8+, PG, 8 ans+, TV-PG Young Adult Maximum ratings permitted are: U.S.: TV-14, PG-13 Canada: 14+, 13 ans+, TV-14 Custom... Highlight Antenna Parental Lock Press to...
... are blocked from viewing. (See below for turning off the Digital Rating.) Child Maximum ratings permitted are: U.S.: TV-Y, TV-G, G Canada: C, G, TV-Y Youth Maximum ratings permitted are: U.S.: TV-PG, PG Canada: C8+, PG, 8 ans+, TV-PG Young Adult Maximum ratings permitted are: U.S.: TV-14, PG-13 Canada: 14+, 13 ans+, TV-14 Custom... Highlight Antenna Parental Lock Press to...
Operating Instructions
Page 69
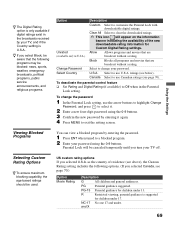
...exit the setting screen. Selecting Custom Rating Options z To ensure maximum blocking capability, the age-based ratings should be canceled temporarily until you turn your TV off. NC-17 No one 17 and under 13. Select to change the password 1 In the Parental Lock setting, use the arrow ... to select it again. 4 Press MENU to a blocked program. 2 Enter your password using the 0-9 buttons. 3 Confirm the new password by your TV, and if the Country setting is suggested . To deactivate the parental control feature ❑ Set Rating and Digital Rating (if available) to Off when in...
...exit the setting screen. Selecting Custom Rating Options z To ensure maximum blocking capability, the age-based ratings should be canceled temporarily until you turn your TV off. NC-17 No one 17 and under 13. Select to change the password 1 In the Parental Lock setting, use the arrow ... to select it again. 4 Press MENU to a blocked program. 2 Enter your password using the 0-9 buttons. 3 Confirm the new password by your TV, and if the Country setting is suggested . To deactivate the parental control feature ❑ Set Rating and Digital Rating (if available) to Off when in...
Operating Instructions
Page 71
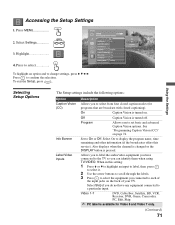
... and advanced Caption Vision options. See "Programming Caption Vision (CC)" on the back of your TV. When in this service). Also displays when the channel is changed or the DISPLAY button is turned on. Allows you to label the audio/video equipment you can identify them when using... TV/VIDEO. Accessing the Setup Settings 1. On Caption Vision is pressed. Off Program Caption Vision is available...
... and advanced Caption Vision options. See "Programming Caption Vision (CC)" on the back of your TV. When in this service). Also displays when the channel is changed or the DISPLAY button is turned on. Allows you to label the audio/video equipment you can identify them when using... TV/VIDEO. Accessing the Setup Settings 1. On Caption Vision is pressed. Off Program Caption Vision is available...
Operating Instructions
Page 72
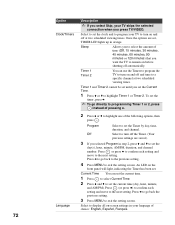
... 2 Press V and v to set the timer, press b. ✍ To go directly to programming Timer 1 or 2, press instead of pressing b. 2 Press V or v to turn on -screen settings in orange. Off Select to highlight one of the following options, then press . Select to highlight Timer 1 or Timer 2. Select to set... To set the current time (day, hour, minute, and AM/PM). Current Time You can use the Timers to program the TV to set . Language Program Select to turn on before shutting off the Timer. (Your previous settings are set the day(s), hour, minute, AM/PM, duration, and channel ...
... 2 Press V and v to set the timer, press b. ✍ To go directly to programming Timer 1 or 2, press instead of pressing b. 2 Press V or v to turn on -screen settings in orange. Off Select to highlight one of the following options, then press . Select to highlight Timer 1 or Timer 2. Select to set... To set the current time (day, hour, minute, and AM/PM). Current Time You can use the Timers to program the TV to set . Language Program Select to turn on before shutting off the Timer. (Your previous settings are set the day(s), hour, minute, AM/PM, duration, and channel ...
Operating Instructions
Page 73
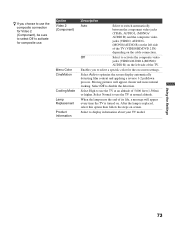
...Cooling Mode Lamp Replacement Product Information Description Auto Select to activate the composite video jacks (VIDEO/AUDIO L(MONO)/ AUDIO R) on the left side of the TV (VIDEO/HD/DVD 2 IN) depending on . Off Select to switch automatically between the component video jacks (YPBPR, AUDIO L (MONO)/ AUDIO R) and the composite .... When the lamp nears the end of its life, a message will appear clearer and more natural looking. After the lamp is turned on the cable connection. Enables you choose to use the composite connection for Video 2 (Component), be sure to select Off to use the...
...Cooling Mode Lamp Replacement Product Information Description Auto Select to activate the composite video jacks (VIDEO/AUDIO L(MONO)/ AUDIO R) on the left side of the TV (VIDEO/HD/DVD 2 IN) depending on . Off Select to switch automatically between the component video jacks (YPBPR, AUDIO L (MONO)/ AUDIO R) and the composite .... When the lamp nears the end of its life, a message will appear clearer and more natural looking. After the lamp is turned on the cable connection. Enables you choose to use the composite connection for Video 2 (Component), be sure to select Off to use the...
Operating Instructions
Page 76
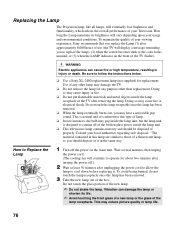
...main unit. Be sure to operate for about two minutes after turning the power off the power on the front of the TV flashes. Do not touch the lamp receptable once the lamp has...local authorities regarding safe disposal. This may hear a noticeable pop sound. Replacing the Lamp The Projection lamp, like all of the broken glass pieces inside the lamp unit. ❑ This ...upon your viewing experience, Sony recommends that you replace the Lamp (1) after approximately 8,000 hours of use (the TV will continue to follow the instructions below. ❑ Use a Sony XL-2400 replacement lamp...
...main unit. Be sure to operate for about two minutes after turning the power off the power on the front of the TV flashes. Do not touch the lamp receptable once the lamp has...local authorities regarding safe disposal. This may hear a noticeable pop sound. Replacing the Lamp The Projection lamp, like all of the broken glass pieces inside the lamp unit. ❑ This ...upon your viewing experience, Sony recommends that you replace the Lamp (1) after approximately 8,000 hours of use (the TV will continue to follow the instructions below. ❑ Use a Sony XL-2400 replacement lamp...
Operating Instructions
Page 77
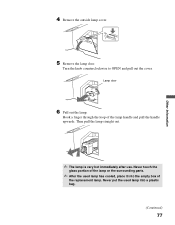
Never touch the glass portion of the lamp or the surrounding parts. ✍ After the used lamp into the empty box of the lamp handle and pull the handle upwards. Hook a finger through the loop of the replacement lamp. Other Information 4 Remove the outside lamp cover. 5 Remove the lamp door. Turn the knob counterclockwise to OPEN and pull out the cover. Then pull the lamp straight out. ✍ The lamp is very hot immediately after use. Never put the used lamp has cooled, place it into a plastic bag. (Continued) 77 Lamp door 6 Pull out the lamp.
Never touch the glass portion of the lamp or the surrounding parts. ✍ After the used lamp into the empty box of the lamp handle and pull the handle upwards. Hook a finger through the loop of the replacement lamp. Other Information 4 Remove the outside lamp cover. 5 Remove the lamp door. Turn the knob counterclockwise to OPEN and pull out the cover. Then pull the lamp straight out. ✍ The lamp is very hot immediately after use. Never put the used lamp has cooled, place it into a plastic bag. (Continued) 77 Lamp door 6 Pull out the lamp.


