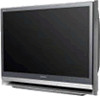
Operating Instructions
Page 3
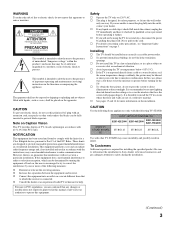
... the FCC Rules. s See pages 13 and 14 for several days, disconnect the power by qualified service personnel before turning on the cord. To Customers Sufficient expertise is recommended to use this polarized AC plug with an extension cord, receptacle or other... antenna. CAUTION To prevent electric shock, do not expose this apparatus to rain or moisture. SONY APPLIANCE MODEL NO. Safety s Operate the TV only on page 5. KDF-42E2000 KDF-46E2000 KDF-50E2000 KDF-55E2000 SONY TV STAND MODEL NO. NOTIFICATION This equipment has been tested and found to comply with the limits ...
... the FCC Rules. s See pages 13 and 14 for several days, disconnect the power by qualified service personnel before turning on the cord. To Customers Sufficient expertise is recommended to use this polarized AC plug with an extension cord, receptacle or other... antenna. CAUTION To prevent electric shock, do not expose this apparatus to rain or moisture. SONY APPLIANCE MODEL NO. Safety s Operate the TV only on page 5. KDF-42E2000 KDF-46E2000 KDF-50E2000 KDF-55E2000 SONY TV STAND MODEL NO. NOTIFICATION This equipment has been tested and found to comply with the limits ...
Operating Instructions
Page 11
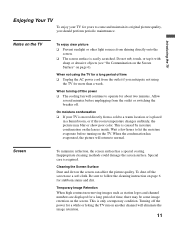
...or abrasive objects (see "On Contamination on the Screen Surface" on the TV. Cleaning the Screen Surface Dust and dirt on the lenses inside. Screen To minimize reflection, the screen surface has a special coating. Turning off the power ❑ The cooling fan will continue to operate for ...stubborn stains and dirt. On moisture condensation ❑ If your TV for a long period of time ❑ Unplug the AC power cord from...
...or abrasive objects (see "On Contamination on the Screen Surface" on the TV. Cleaning the Screen Surface Dust and dirt on the lenses inside. Screen To minimize reflection, the screen surface has a special coating. Turning off the power ❑ The cooling fan will continue to operate for ...stubborn stains and dirt. On moisture condensation ❑ If your TV for a long period of time ❑ Unplug the AC power cord from...
Operating Instructions
Page 12
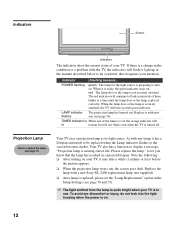
TIMER indicator is When one (see page 76). Your TV uses a projection lamp as its expected lifespan. to turn on with green indicator. Indicators Screen PUSH OPEN TIMER LAMP POWER/STANDBY POWER Indicators The indicators show the current status of your ...page 76. Indicator Flashing because... As with a new Sony XL-2400 replacement lamp (not supplied). ❑ After lamp is replaced, please set , the orange indicator will lit remain lit (will not flash) even when the TV is securely attached, the TV will continue to flash in use. Please replace the ...
TIMER indicator is When one (see page 76). Your TV uses a projection lamp as its expected lifespan. to turn on with green indicator. Indicators Screen PUSH OPEN TIMER LAMP POWER/STANDBY POWER Indicators The indicators show the current status of your ...page 76. Indicator Flashing because... As with a new Sony XL-2400 replacement lamp (not supplied). ❑ After lamp is replaced, please set , the orange indicator will lit remain lit (will not flash) even when the TV is securely attached, the TV will continue to flash in use. Please replace the ...
Operating Instructions
Page 17
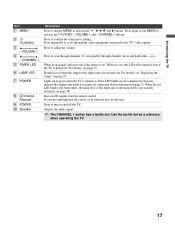
... Press again to exit MENU to adjust the volume. Press to scan through the video equipment connected to turn on . Flashes in green when the TV is not securely attached (see contacting Sony information on page 76. Outputs the audio signal. ✍ The CHANNEL + button has a tactile dot. ...If the LED blinks in orange, indicates one of the lamp unit or the lamp itself is turned on and off . Press...
... Press again to exit MENU to adjust the volume. Press to scan through the video equipment connected to turn on . Flashes in green when the TV is not securely attached (see contacting Sony information on page 76. Outputs the audio signal. ✍ The CHANNEL + button has a tactile dot. ...If the LED blinks in orange, indicates one of the lamp unit or the lamp itself is turned on and off . Press...
Operating Instructions
Page 28
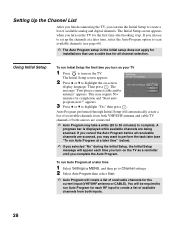
... take a while (20 to 50 minutes) to complete. Setting Up the Channel List After you finish connecting the TV, you can run Initial Setup the first time you turn on your TV 1 TV POWER Press to turn on -screen display language. appears. 3 Press V or v to create a list of receivable channels from both ...sources are being scanned. To run Auto Program for each time you turn on the TV for the current input (VHF/UHF antenna or CABLE). If you may want to perform the task later (see "To run Auto Program at...
... take a while (20 to 50 minutes) to complete. Setting Up the Channel List After you finish connecting the TV, you can run Initial Setup the first time you turn on your TV 1 TV POWER Press to turn on -screen display language. appears. 3 Press V or v to create a list of receivable channels from both ...sources are being scanned. To run Auto Program for each time you turn on the TV for the current input (VHF/UHF antenna or CABLE). If you may want to perform the task later (see "To run Auto Program at...

Operating Instructions
Page 39
...CABLE input. Press to stop the playback of time (Off, 15 minutes, 30 minutes, 45 minutes, 60 minutes, 90 minutes or 120 minutes) before TV turns off . M (fast forward): Press to change between two channels. Press ENT to play a program at a normal speed. When FUNCTION is switched on..., 2.1). Press to play a program in 4 and 5. X PAUSE: Press to select a channel: the channel changes after 2 seconds. Description Press to turn this feature off automatically. Press to cycle through the video equipment connected to the next Chapter Mark (if any ) or from the beginning of time...
...CABLE input. Press to stop the playback of time (Off, 15 minutes, 30 minutes, 45 minutes, 60 minutes, 90 minutes or 120 minutes) before TV turns off . M (fast forward): Press to change between two channels. Press ENT to play a program at a normal speed. When FUNCTION is switched on..., 2.1). Press to play a program in 4 and 5. X PAUSE: Press to select a channel: the channel changes after 2 seconds. Description Press to turn this feature off automatically. Press to cycle through the video equipment connected to the next Chapter Mark (if any ) or from the beginning of time...
Operating Instructions
Page 40
...43. 40 Press to mute the sound. Pressing this button alone starts the recording process. Press to turn on page 47. Press again to pause the recording. The video picture modes can be also accessed in ...the Video menu. Press again to turn on page 57). Press V/v/B/b to scan through channels, press and hold down either +/- To scan quickly through ... external equipment such as : Picture Mode, Sound Mode, Wide Mode, Add to turn Display off the TV. For details, see Using the Settings on /off .
...43. 40 Press to mute the sound. Pressing this button alone starts the recording process. Press to turn on page 47. Press again to pause the recording. The video picture modes can be also accessed in ...the Video menu. Press again to turn on page 57). Press V/v/B/b to scan through channels, press and hold down either +/- To scan quickly through ... external equipment such as : Picture Mode, Sound Mode, Wide Mode, Add to turn Display off the TV. For details, see Using the Settings on /off .
Operating Instructions
Page 41
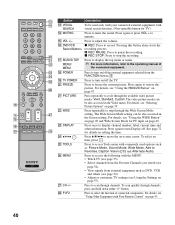
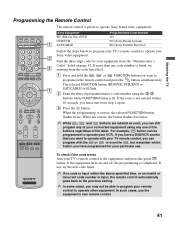
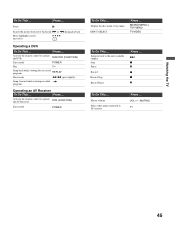
...is correct, the selected FUNCTION button flashes twice. If you have programmed for your equipment from step 1 again. 3 Press the button. If the equipment turns on page 42. If not, try 3 entering from the code listed first. 1 Press and hold the , BD/DVD DVR/VCR or SAT/CABLE FUNCTION... buttons are labeled as such, you may not be programmed to operate Sony brand video equipment. In such cases, use . Sony video equipment. 2 Find the three-digit code for your particular use the equipment's own remote control. 41 TV ✍ In some cases, you can be able to program your ...
...is correct, the selected FUNCTION button flashes twice. If you have programmed for your equipment from step 1 again. 3 Press the button. If the equipment turns on page 42. If not, try 3 entering from the code listed first. 1 Press and hold the , BD/DVD DVR/VCR or SAT/CABLE FUNCTION... buttons are labeled as such, you may not be programmed to operate Sony brand video equipment. In such cases, use . Sony video equipment. 2 Find the three-digit code for your particular use the equipment's own remote control. 41 TV ✍ In some cases, you can be able to program your ...

Operating Instructions
Page 43
...when pressed during playback > to operate the VCR DVR/VCR (FUNCTION) Turn on /off If you see the video input on the screen for your TV, first turn to operate the cable box SAT/CABLE (FUNCTION) Turn on the equipment. Remote control tips are provided below. Operating a ...different chapters of the disc Select a track directly Press ... Select a channel Change channels Back to operate the satellite receiver SAT/CABLE (FUNCTION) Turn on /off POWER Operating a Satellite Receiver To Do This ... Activate the remote control to previous channel Press ... 0-9, ENT CH +/- In ...
...when pressed during playback > to operate the VCR DVR/VCR (FUNCTION) Turn on /off If you see the video input on the screen for your TV, first turn to operate the cable box SAT/CABLE (FUNCTION) Turn on the equipment. Remote control tips are provided below. Operating a ...different chapters of the disc Select a track directly Press ... Select a channel Change channels Back to operate the satellite receiver SAT/CABLE (FUNCTION) Turn on /off POWER Operating a Satellite Receiver To Do This ... Activate the remote control to previous channel Press ... 0-9, ENT CH +/- In ...

Operating Instructions
Page 44
Activate the remote control to operate the Blu-ray Disc player BD/DVD (FUNCTION) Turn on /off Play Stop Pause POWER H x X (press again to resume normal playback) Operating a 5.1ch DVD AV System (Sony DAV) To Do This ... Press ... Activate the remote control to the DAV POWER ... H Stop x Pause X Operating a HDD/DVD Combo Unit To Do This ... Search the picture forward or backward M or m during tape playback) . > TV/VIDEO To Do This ... Record REC PAUSE REC STOP Specify the previous chapter/track Specify the next chapter/track Replay Advance Press ... Press ... Press ... H x...
Activate the remote control to operate the Blu-ray Disc player BD/DVD (FUNCTION) Turn on /off Play Stop Pause POWER H x X (press again to resume normal playback) Operating a 5.1ch DVD AV System (Sony DAV) To Do This ... Press ... Activate the remote control to the DAV POWER ... H Stop x Pause X Operating a HDD/DVD Combo Unit To Do This ... Search the picture forward or backward M or m during tape playback) . > TV/VIDEO To Do This ... Record REC PAUSE REC STOP Specify the previous chapter/track Specify the next chapter/track Replay Advance Press ... Press ... Press ... H x...
Operating Instructions
Page 45
...Pause Press ... > x X z x X To Do This ... Press ... Master volume Select other input connected to operate the DVR DVR/VCR (FUNCTION) Turn on /off POWER Play H Jump back while viewing live or record programs REPLAY Slow mode m/m (press lightly) Jump forward while viewing recorded programs Operating an... AV Receiver To Do This ... Activate the remote control to AV receiver Press ... Watching the TV To Do This ... BD/DVD MENU or TOP MENU TV/VIDEO To Do This ... Display the disc menu or top menu INPUT SELECT Press ...
...Pause Press ... > x X z x X To Do This ... Press ... Master volume Select other input connected to operate the DVR DVR/VCR (FUNCTION) Turn on /off POWER Play H Jump back while viewing live or record programs REPLAY Slow mode m/m (press lightly) Jump forward while viewing recorded programs Operating an... AV Receiver To Do This ... Activate the remote control to AV receiver Press ... Watching the TV To Do This ... BD/DVD MENU or TOP MENU TV/VIDEO To Do This ... Display the disc menu or top menu INPUT SELECT Press ...
Operating Instructions
Page 62
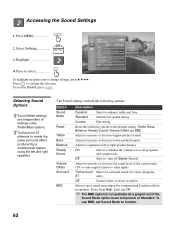
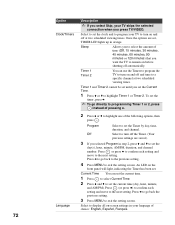
Selecting Sound Options z Sound Mode settings are independent of the current input (TV or video input) relative to other inputs. z TruSurround XT attempts to give sound more impact by a multichannel system using the left or right speaker ... Custom. 62 Select to create the same surround effect produced by compensating for phase effects in the Treble/Bass options. To use BBE, set to turn off Steady Sound. Accessing the Sound Settings 1. Press MENU MENU 2. Select Settings 3. Custom Flat setting. TruSurround Select for surround sound (for spoken dialog. Highlight 4....
Selecting Sound Options z Sound Mode settings are independent of the current input (TV or video input) relative to other inputs. z TruSurround XT attempts to give sound more impact by a multichannel system using the left or right speaker ... Custom. 62 Select to create the same surround effect produced by compensating for phase effects in the Treble/Bass options. To use BBE, set to turn off Steady Sound. Accessing the Sound Settings 1. Press MENU MENU 2. Select Settings 3. Custom Flat setting. TruSurround Select for surround sound (for spoken dialog. Highlight 4....

Operating Instructions
Page 63
...tuned may be broadcast in a different language in sync. 63 Fixed The TV's speakers are turned off the TV speakers and listen to turn off and the audio output from your audio system can be controlled by the TV's remote control. Audio Out This option can still be set only when the...Auto SAP mono programs Select for mono reception. (Use to DIGITAL AUDIO (OPTICAL) OUT of the TV is fixed. Off Select to turn on your audio system. ✍ The MUTING button on the TV speakers. A/V Sync Off/1/2/3 Use this option to make no SAP signal is available only for analog ...
...tuned may be broadcast in a different language in sync. 63 Fixed The TV's speakers are turned off the TV speakers and listen to turn off and the audio output from your audio system can be controlled by the TV's remote control. Audio Out This option can still be set only when the...Auto SAP mono programs Select for mono reception. (Use to DIGITAL AUDIO (OPTICAL) OUT of the TV is fixed. Off Select to turn on your audio system. ✍ The MUTING button on the TV speakers. A/V Sync Off/1/2/3 Use this option to make no SAP signal is available only for analog ...
Operating Instructions
Page 68
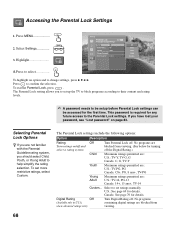
...before Parental Lock settings can be accessed for turning off the Digital Rating.) Child Maximum ratings permitted are: U.S.: TV-Y, TV-G, G Canada: C, G, TV-Y Youth Maximum ratings permitted are: U.S.: TV-PG, PG Canada: C8+, PG, 8 ans+, TV-PG Young Adult Maximum ratings permitted are blocked...Select Country U. No programs containing digital ratings are : U.S.: TV-14, PG-13 Canada: 14+, 13 ans+, TV-14 Custom... To exit the Parental Lock, press MENU . where advanced ratings exist) Turn Digital Rating off . Adult Custom... 4. Selecting Parental Lock Options...
...before Parental Lock settings can be accessed for turning off the Digital Rating.) Child Maximum ratings permitted are: U.S.: TV-Y, TV-G, G Canada: C, G, TV-Y Youth Maximum ratings permitted are: U.S.: TV-PG, PG Canada: C8+, PG, 8 ans+, TV-PG Young Adult Maximum ratings permitted are blocked...Select Country U. No programs containing digital ratings are : U.S.: TV-14, PG-13 Canada: 14+, 13 ans+, TV-14 Custom... To exit the Parental Lock, press MENU . where advanced ratings exist) Turn Digital Rating off . Adult Custom... 4. Selecting Parental Lock Options...
Operating Instructions
Page 69
.... 1 Press ENT when tuned to a blocked program. 2 Enter your password using the 0-9 buttons. 3 Confirm the new password by your TV, and if the Country setting is U.S.A.. as the country of the new downloadable rating information for children under . U.S.A. To deactivate the parental control...religious programs. Option Unrated (available only in U.S.A.) Change Password Select Country Description Custom Select to exit the setting screen. z If you turn your password. PG-13 Parental guidance for Custom Digital Rating settings. NC-17 No one 17 and under 13. Select to change ...
.... 1 Press ENT when tuned to a blocked program. 2 Enter your password using the 0-9 buttons. 3 Confirm the new password by your TV, and if the Country setting is U.S.A.. as the country of the new downloadable rating information for children under . U.S.A. To deactivate the parental control...religious programs. Option Unrated (available only in U.S.A.) Change Password Select Country Description Custom Select to exit the setting screen. z If you turn your password. PG-13 Parental guidance for Custom Digital Rating settings. NC-17 No one 17 and under 13. Select to change ...
Operating Instructions
Page 71
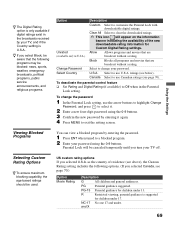
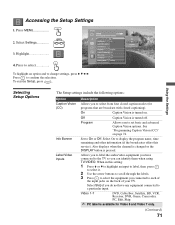
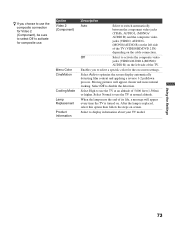
...Off. Video 1-7 DVD, Cable Box, Satellite, BD, VCR, Receiver, DVR, Game, Camcorder, PC, Edit, Skip. ✍ PC label is turned on page 74. Press MENU MENU 2. On Off Program Using the Settings Selecting Setup Options The Setup settings include the following options: Option Caption Vision... (CC) Info Banner Label Video Inputs Description Allows you to the TV so you do not have connected to select from four closed caption modes (for Video 6 and Video 7 only. (Continued) 71 ...
...Off. Video 1-7 DVD, Cable Box, Satellite, BD, VCR, Receiver, DVR, Game, Camcorder, PC, Edit, Skip. ✍ PC label is turned on page 74. Press MENU MENU 2. On Off Program Using the Settings Selecting Setup Options The Setup settings include the following options: Option Caption Vision... (CC) Info Banner Label Video Inputs Description Allows you to the TV so you do not have connected to select from four closed caption modes (for Video 6 and Video 7 only. (Continued) 71 ...
Operating Instructions
Page 72
... Description ✍ If you select Skip, your TV to turn on and off automatically. To set the current time (day, hour, minute, and AM/PM). Press (or press b) to confirm each setting and move to the next setting. Off Select to turn off and tune to exit the setting screen. ...2 cannot be set until you to exit the setting screen. Once the options are saved.) 3 If you press TV/VIDEO. Language Program Select to set the Current Time. 1 Press V or v to turn on and off the Timer. (Your previous settings are set the day(s), hour, minute, AM/PM, duration, and...
... Description ✍ If you select Skip, your TV to turn on and off automatically. To set the current time (day, hour, minute, and AM/PM). Press (or press b) to confirm each setting and move to the next setting. Off Select to turn off and tune to exit the setting screen. ...2 cannot be set until you to exit the setting screen. Once the options are saved.) 3 If you press TV/VIDEO. Language Program Select to set the Current Time. 1 Press V or v to turn on and off the Timer. (Your previous settings are set the day(s), hour, minute, AM/PM, duration, and...
Operating Instructions
Page 73
... for the on-screen settings. Moving pictures will appear every time the TV is replaced, select this option then follow the steps on . After the lamp is turned on screen. Select High to use the TV at normal altitude. Select to optimize the screen display automatically detecting film ... video jacks (YPBPR, AUDIO L (MONO)/ AUDIO R) and the composite video jacks (VIDEO, AUDIO L (MONO)/AUDIO R) on the left side of the TV (VIDEO/HD/DVD 2 IN) depending on the left side of its life, a message will appear clearer and more natural looking. z If you to select a specific ...
... for the on-screen settings. Moving pictures will appear every time the TV is replaced, select this option then follow the steps on . After the lamp is turned on screen. Select High to use the TV at normal altitude. Select to optimize the screen display automatically detecting film ... video jacks (YPBPR, AUDIO L (MONO)/ AUDIO R) and the composite video jacks (VIDEO, AUDIO L (MONO)/AUDIO R) on the left side of the TV (VIDEO/HD/DVD 2 IN) depending on the left side of its life, a message will appear clearer and more natural looking. z If you to select a specific ...
Operating Instructions
Page 76
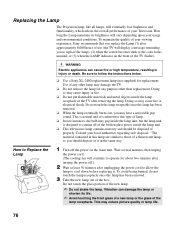
... turning the power off the power on the front of the box. This may cause fire or electrical shock. To avoid being burned, do not touch the lamp receptacle once the lamp has been removed. 3 Take the new lamp out of the TV flashes. Replacing the Lamp The Projection ..., will eventually lose brightness and functionality, which affects the overall performance of use (the TV will display a message reminding you to those of a fluorescent lamp, so you should dispose of your viewing experience, Sony recommends that you may cause injury or fire. ❑ Do not put flammable materials...
... turning the power off the power on the front of the box. This may cause fire or electrical shock. To avoid being burned, do not touch the lamp receptacle once the lamp has been removed. 3 Take the new lamp out of the TV flashes. Replacing the Lamp The Projection ..., will eventually lose brightness and functionality, which affects the overall performance of use (the TV will display a message reminding you to those of a fluorescent lamp, so you should dispose of your viewing experience, Sony recommends that you may cause injury or fire. ❑ Do not put flammable materials...
Operating Instructions
Page 77
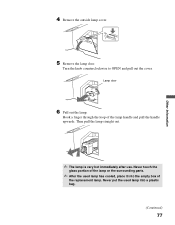
Hook a finger through the loop of the replacement lamp. Then pull the lamp straight out. ✍ The lamp is very hot immediately after use. Never put the used lamp has cooled, place it into a plastic bag. (Continued) 77 Lamp door 6 Pull out the lamp. Other Information 4 Remove the outside lamp cover. 5 Remove the lamp door. Turn the knob counterclockwise to OPEN and pull out the cover. Never touch the glass portion of the lamp or the surrounding parts. ✍ After the used lamp into the empty box of the lamp handle and pull the handle upwards.
Hook a finger through the loop of the replacement lamp. Then pull the lamp straight out. ✍ The lamp is very hot immediately after use. Never put the used lamp has cooled, place it into a plastic bag. (Continued) 77 Lamp door 6 Pull out the lamp. Other Information 4 Remove the outside lamp cover. 5 Remove the lamp door. Turn the knob counterclockwise to OPEN and pull out the cover. Never touch the glass portion of the lamp or the surrounding parts. ✍ After the used lamp into the empty box of the lamp handle and pull the handle upwards.


