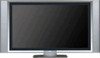
Instructions
Page 5
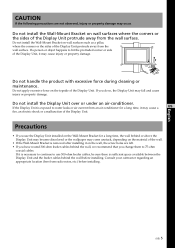
... or the wallpaper may come unstuck, depending on wall surfaces such as a pillar, where the corners or the sides of the Display Unit. If you use 300-ohm feeder cables, be sure there is exposed to water leaks or air current from the wall surface. Do not install the... precautions are left. • If you have routed 300-ohm feeder cables behind the wall, we recommend that you change them to 75-ohm coaxial cables. If the Display Unit is sufficient space available between the Display Unit and the feeder cables behind the wall before installing. (US) 5 Consult your contractor regarding...
... or the wallpaper may come unstuck, depending on wall surfaces such as a pillar, where the corners or the sides of the Display Unit. If you use 300-ohm feeder cables, be sure there is exposed to water leaks or air current from the wall surface. Do not install the... precautions are left. • If you have routed 300-ohm feeder cables behind the wall, we recommend that you change them to 75-ohm coaxial cables. If the Display Unit is sufficient space available between the Display Unit and the feeder cables behind the wall before installing. (US) 5 Consult your contractor regarding...
Instructions
Page 6
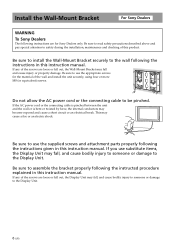
... to the wall following the instructed procedure explained in this instruction manual. Be sure to use the appropriate screws for Sony Dealers only. If you use substitute items, the Display Unit may fall , and cause bodily injury to someone or damage to be pinched. Do not allow the AC ...power cord or the connecting cable to the Display Unit. 6 (US) Be sure to assemble the bracket properly following the instructions in this instruction manual. If the AC power cord or the connecting cable is pinched between the unit and the wall or is bent...
... to the wall following the instructed procedure explained in this instruction manual. Be sure to use the appropriate screws for Sony Dealers only. If you use substitute items, the Display Unit may fall , and cause bodily injury to someone or damage to be pinched. Do not allow the AC ...power cord or the connecting cable to the Display Unit. 6 (US) Be sure to assemble the bracket properly following the instructions in this instruction manual. If the AC power cord or the connecting cable is pinched between the unit and the wall or is bent...
Instructions
Page 7
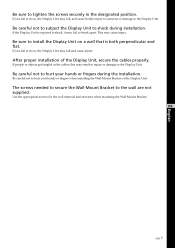
... to hurt your hands or fingers when installing the Wall-Mount Bracket or the Display Unit. US (US) 7 Be careful not to subject the Display Unit to shock during the installation. If you fail to do so, the Display Unit may fall, and cause bodily injury to someone or damage to the... sure to tighten the screws securely in injury or damage to the Display Unit. If the Display Unit is both perpendicular and flat. After proper installation of the Display Unit, secure the cables properly. If people or objects get tangled in the cables, this may cause injury. Be careful not to the wall are ...
... to hurt your hands or fingers when installing the Wall-Mount Bracket or the Display Unit. US (US) 7 Be careful not to subject the Display Unit to shock during the installation. If you fail to do so, the Display Unit may fall, and cause bodily injury to someone or damage to the... sure to tighten the screws securely in injury or damage to the Display Unit. If the Display Unit is both perpendicular and flat. After proper installation of the Display Unit, secure the cables properly. If people or objects get tangled in the cables, this may cause injury. Be careful not to the wall are ...

Operating Instructions
Page 3
...before operating it further. Model No Serial No Note on Caption Vision This television receiver provides display of television closed captioning in accordance with §15.119 of important operating and maintenance... and receiver. If you will not occur in this manual could void your Sony dealer regarding this equipment does cause harmful interference to prevent blade exposure. Refer to... AC. These limits are unable to the point of cable entry as a station logo is designed, for the use this Plasma Display Panel may cause harmful interference with your TV, or...
...before operating it further. Model No Serial No Note on Caption Vision This television receiver provides display of television closed captioning in accordance with §15.119 of important operating and maintenance... and receiver. If you will not occur in this manual could void your Sony dealer regarding this equipment does cause harmful interference to prevent blade exposure. Refer to... AC. These limits are unable to the point of cable entry as a station logo is designed, for the use this Plasma Display Panel may cause harmful interference with your TV, or...

Operating Instructions
Page 5
...Carefully observe and comply with all warnings, cautions and instructions placed on the AC power cord or display interface cable. Important Safeguards Before using it and ask your dealer or Sony service center to exchange it. Grounding or Polarization This set is covered with a polarized AC power... instructions or service manual. s Do not pinch, bend, or twist the cable excessively. s Do not convert or damage the AC power cord or display interface cable. Do not pull the AC power cord or display cable. Use Power Sources This set off . This is damaged, stop using your...
...Carefully observe and comply with all warnings, cautions and instructions placed on the AC power cord or display interface cable. Important Safeguards Before using it and ask your dealer or Sony service center to exchange it. Grounding or Polarization This set is covered with a polarized AC power... instructions or service manual. s Do not pinch, bend, or twist the cable excessively. s Do not convert or damage the AC power cord or display interface cable. Do not pull the AC power cord or display cable. Use Power Sources This set off . This is damaged, stop using your...

Operating Instructions
Page 9
...been exposed to rain or moisture, does not operate normally, or has been dropped. 7 Watch your foot or fingers. Be sure to dispose of the display unit cracks, do not touch it . It may damage the unit. Important Safety Instructions 1) Read these instructions. 2) Keep these instructions. 3) Heed all.... s As the glass surface of time. 14) Refer all servicing to catch your feet on your footing while installing the TV. Cable wiring Take care not to qualified service personnel. Refer all servicing to the unit. When the set is used replacement parts specified by ...
...been exposed to rain or moisture, does not operate normally, or has been dropped. 7 Watch your foot or fingers. Be sure to dispose of the display unit cracks, do not touch it . It may damage the unit. Important Safety Instructions 1) Read these instructions. 2) Keep these instructions. 3) Heed all.... s As the glass surface of time. 14) Refer all servicing to catch your feet on your footing while installing the TV. Cable wiring Take care not to qualified service personnel. Refer all servicing to the unit. When the set is used replacement parts specified by ...
Operating Instructions
Page 11
... and Connectors 18 Display unit 18 Media receiver unit Front Panel 20 Media receiver unit Rear Panel 22 Installing the TV 23 Detaching the speakers (KDE61XBR950 only 25 Basic Connections: Connecting a Cable or Antenna 26 Cable or Antenna Only 26 Cable Box and Cable Only 27 Cable Box Only 28 ...S Feature 47 Setting Up the Channel List 48 Using Auto Setup 48 Using the Remote Control Overview 49 Inserting Batteries 49 Button Descriptions 50 Programming the Remote Control 52 Using Other Equipment with Your TV Remote Control 55 All Equipment 55 Operating a VCR or D-VHS 55 Operating...
... and Connectors 18 Display unit 18 Media receiver unit Front Panel 20 Media receiver unit Rear Panel 22 Installing the TV 23 Detaching the speakers (KDE61XBR950 only 25 Basic Connections: Connecting a Cable or Antenna 26 Cable or Antenna Only 26 Cable Box and Cable Only 27 Cable Box Only 28 ...S Feature 47 Setting Up the Channel List 48 Using Auto Setup 48 Using the Remote Control Overview 49 Inserting Batteries 49 Button Descriptions 50 Programming the Remote Control 52 Using Other Equipment with Your TV Remote Control 55 All Equipment 55 Operating a VCR or D-VHS 55 Operating...
Operating Instructions
Page 15
...-XBR950) s Remote control (RM-Y1000) and two size AA batteries s Two AC power cords s AC plug holder s Display interface cable s Antenna cable s Cleaning cloth s Frame bars (KDE61XBR950 only) s Screws (KDE61XBR950 only) s Operating Instructions These items are all you need...WEGA Engine™: Delivers superb picture quality from any video source by minimizing the signal deterioration caused by these on hand before you for purchasing the Sony Flat Panel Color TV. Introducing the TV Welcome Thank you start to connect your new TV include: s Integrated HDTV: You can watch digital television...
...-XBR950) s Remote control (RM-Y1000) and two size AA batteries s Two AC power cords s AC plug holder s Display interface cable s Antenna cable s Cleaning cloth s Frame bars (KDE61XBR950 only) s Screws (KDE61XBR950 only) s Operating Instructions These items are all you need...WEGA Engine™: Delivers superb picture quality from any video source by minimizing the signal deterioration caused by these on hand before you for purchasing the Sony Flat Panel Color TV. Introducing the TV Welcome Thank you start to connect your new TV include: s Integrated HDTV: You can watch digital television...
Operating Instructions
Page 20
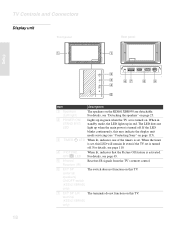
...the TV set is turned on this LED will remain lit even if the TV set . When in red. For details, see "Contacting Sony" on the KDE61XBR950 are detachable. The LED does not light up in standby mode, the LED lights up when the main power is ... OFF LED When lit, indicates that the Picture Off feature is activated. TV Controls and Connectors Display unit Front panel 1 Rear panel 1 Setup POWER ON/ STAND BY TIMER PICTURE OFF 2 3 4 5 67 SONY EXCLUSIVE CABLE ONLY BLACK WHITE DISPLAY SIGNAL IN 8 AC IN 9 Item Description 1 Speakers (Left/right) The speakers on page ...
...the TV set is turned on this LED will remain lit even if the TV set . When in red. For details, see "Contacting Sony" on the KDE61XBR950 are detachable. The LED does not light up in standby mode, the LED lights up when the main power is ... OFF LED When lit, indicates that the Picture Off feature is activated. TV Controls and Connectors Display unit Front panel 1 Rear panel 1 Setup POWER ON/ STAND BY TIMER PICTURE OFF 2 3 4 5 67 SONY EXCLUSIVE CABLE ONLY BLACK WHITE DISPLAY SIGNAL IN 8 AC IN 9 Item Description 1 Speakers (Left/right) The speakers on page ...
Operating Instructions
Page 21
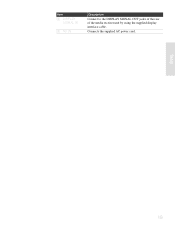
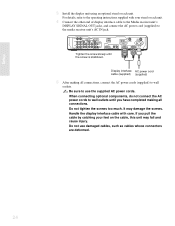
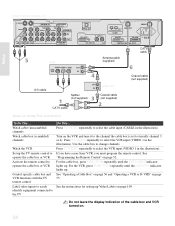
Setup 19 Connects the supplied AC power cord. Item 8 DISPLAY SIGNAL IN 9 AC IN Description Connect to the DISPLAY SIGNAL OUT jacks of the rear of the media receiver unit by using the supplied display interface cable.
Setup 19 Connects the supplied AC power cord. Item 8 DISPLAY SIGNAL IN 9 AC IN Description Connect to the DISPLAY SIGNAL OUT jacks of the rear of the media receiver unit by using the supplied display interface cable.

Operating Instructions
Page 24
... (7) connections. * "Dolby", "Pro Logic", and the double-D symbol are not intended for details about connecting and using the supplied OUT display interface cable. qs VIDEO IN 1/3 VIDEO/ L-AUDIO-R Connect to the composite A/V output jacks on the front panel of a digital audio component that...to the input jack of your audio or video equipment. Use a DVI-D single link cable. q; S VIDEO provides better picture quality than 1, 7, or qs. 3 SUB WOOFER OUT Connects to other Sony infrared-controlled audio or video equipment that has S VIDEO. These terminals are trademarks of your...
... (7) connections. * "Dolby", "Pro Logic", and the double-D symbol are not intended for details about connecting and using the supplied OUT display interface cable. qs VIDEO IN 1/3 VIDEO/ L-AUDIO-R Connect to the composite A/V output jacks on the front panel of a digital audio component that...to the input jack of your audio or video equipment. Use a DVI-D single link cable. q; S VIDEO provides better picture quality than 1, 7, or qs. 3 SUB WOOFER OUT Connects to other Sony infrared-controlled audio or video equipment that has S VIDEO. These terminals are trademarks of your...
Operating Instructions
Page 25
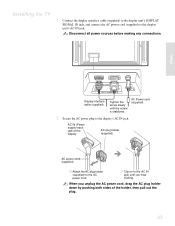
... supply input) jack of the holder, then pull out the plug. 23 When you hear clicking. Setup SONY EXCLUSIVE CABLE ONLY BLACK WHITE DISPLAY SIGNAL IN AC IN Display interface cable (supplied) Tighten the screw slowly until you unplug the AC power cord, drag the AC plug holder down.... Disconnect all power sources before making any connections. Installing the TV 1 Connect the display interface cable (supplied) to the display unit's DISPLAY SIGNAL IN jack, and connect the AC power cord (supplied) to the display's AC IN jack. AC Power cord (supplied) 2 Secure the AC power plug...
... supply input) jack of the holder, then pull out the plug. 23 When you hear clicking. Setup SONY EXCLUSIVE CABLE ONLY BLACK WHITE DISPLAY SIGNAL IN AC IN Display interface cable (supplied) Tighten the screw slowly until you unplug the AC power cord, drag the AC plug holder down.... Disconnect all power sources before making any connections. Installing the TV 1 Connect the display interface cable (supplied) to the display unit's DISPLAY SIGNAL IN jack, and connect the AC power cord (supplied) to the display's AC IN jack. AC Power cord (supplied) 2 Secure the AC power plug...
Operating Instructions
Page 26
... catching your stand or rack unit. 4 Connect the other end of display interface cable to the Media receiver unit's DISPLAY SIGNAL OUT jacks, and connect the AC power cord (supplied) to use damaged cables, such as cables whose connectors are deformed. 24 Do not tighten the screws too much. S VIDEO VIDEO L...to wall outlets until the screw is stabilized. Setup 3 Install the display unit using an optional stand or rack unit. It may fall and cause injury. Handle the display interface cable with your feet on the cable, this unit may damage the screws. Be sure to the media receiver...
... catching your stand or rack unit. 4 Connect the other end of display interface cable to the Media receiver unit's DISPLAY SIGNAL OUT jacks, and connect the AC power cord (supplied) to use damaged cables, such as cables whose connectors are deformed. 24 Do not tighten the screws too much. S VIDEO VIDEO L...to wall outlets until the screw is stabilized. Setup 3 Install the display unit using an optional stand or rack unit. It may fall and cause injury. Handle the display interface cable with your feet on the cable, this unit may damage the screws. Be sure to the media receiver...
Operating Instructions
Page 28
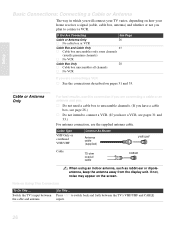
...-ear or dipoleantenna, keep the antenna away from the display unit. If You Are Connecting See Page Cable or Antenna Only 26 s No cable box or VCR Cable Box and Cable Only 27 s Cable box unscrambles only some channels (usually premium channels) s No VCR Cable Box Only 28 s Cable box unscrambles all channels s No VCR If you are...
...-ear or dipoleantenna, keep the antenna away from the display unit. If You Are Connecting See Page Cable or Antenna Only 26 s No cable box or VCR Cable Box and Cable Only 27 s Cable box unscrambles only some channels (usually premium channels) s No VCR Cable Box Only 28 s Cable box unscrambles all channels s No VCR If you are...
Operating Instructions
Page 29
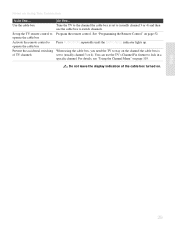
... To Do This ... Notes on page 52.) s Use the TV remote control to change channels coming through the cable box to lock in a specific channel. Do not leave the display indication of the cable box turned on page 52. See "Programming the Remote Control" on . (Continued) 27 s You do not... have a VCR. (If you have a VCR, see "Using the Channel Menu" on the channel the cable box is set to switch channels. ...
... To Do This ... Notes on page 52.) s Use the TV remote control to change channels coming through the cable box to lock in a specific channel. Do not leave the display indication of the cable box turned on page 52. See "Programming the Remote Control" on . (Continued) 27 s You do not... have a VCR. (If you have a VCR, see "Using the Channel Menu" on the channel the cable box is set to switch channels. ...
Operating Instructions
Page 31
... switching of the cable box turned on the channel the cable box is set to switch channels. You can use the cable box to (usually channel 3 or 4). Program the remote control. When using the cable box, you need the TV to lock in a specific channel. Do not leave the display indication of TV... channels Do This ... Tune the TV to the channel the cable box is set to (usually channel 3 or 4) and then use the...
... switching of the cable box turned on the channel the cable box is set to switch channels. You can use the cable box to (usually channel 3 or 4). Program the remote control. When using the cable box, you need the TV to lock in a specific channel. Do not leave the display indication of TV... channels Do This ... Tune the TV to the channel the cable box is set to (usually channel 3 or 4) and then use the...
Operating Instructions
Page 33
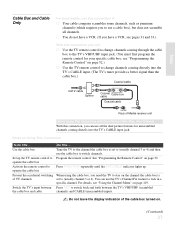
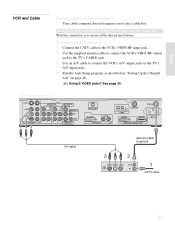
L S400 (TS/DV/MICROMV) i.LINK VHF/UHF CABLE WHITE BLACK ~ AC IN DVI-HDTV IN 6 DISPLAY SIGNAL OUT A/V cable Antenna cable (supplied) CATV cable 31 See page 30. Using S VIDEO jacks? Rear of Media receiver unit S VIDEO VIDEO L AUDIO R 1 VIDEO IN HD/DVD IN SUB WOOFER (1080i/...FIX) OPTICAL OUT DVI-HDTV R - To connect the VCR and cable 1 Connect the CATV cable to the VCR's VHF/UHF input jack. 2 Use the supplied antenna cable to connect the VCR's VHF/UHF output jack to the TV's CABLE jack. 3 Use an A/V cable to connect the VCR's A/V output jacks to use all the dual...
L S400 (TS/DV/MICROMV) i.LINK VHF/UHF CABLE WHITE BLACK ~ AC IN DVI-HDTV IN 6 DISPLAY SIGNAL OUT A/V cable Antenna cable (supplied) CATV cable 31 See page 30. Using S VIDEO jacks? Rear of Media receiver unit S VIDEO VIDEO L AUDIO R 1 VIDEO IN HD/DVD IN SUB WOOFER (1080i/...FIX) OPTICAL OUT DVI-HDTV R - To connect the VCR and cable 1 Connect the CATV cable to the VCR's VHF/UHF input jack. 2 Use the supplied antenna cable to connect the VCR's VHF/UHF output jack to the TV's CABLE jack. 3 Use an A/V cable to connect the VCR's A/V output jacks to use all the dual...

Operating Instructions
Page 34
...TV remote control Label video inputs to the TV Do not leave the display indication of the VCR turned on page 52. Notes on page 55. Watch cable channels Press TV/VIDEO repeatedly to If you have a non-Sony VCR, you must program the remote control. operate the VCR Control ... Watch the VCR Press TV/VIDEO repeatedly to Press FUNCTION repeatedly until the DVD/VCR indicator lights up the TV remote control to select the cable input (CABLE in the illustration). See operate the VCR "Programming the Remote Control" on . Activate the TV remote control to select the VCR input (VIDEO...
...TV remote control Label video inputs to the TV Do not leave the display indication of the VCR turned on page 52. Notes on page 55. Watch cable channels Press TV/VIDEO repeatedly to If you have a non-Sony VCR, you must program the remote control. operate the VCR Control ... Watch the VCR Press TV/VIDEO repeatedly to Press FUNCTION repeatedly until the DVD/VCR indicator lights up the TV remote control to select the cable input (CABLE in the illustration). See operate the VCR "Programming the Remote Control" on . Activate the TV remote control to select the VCR input (VIDEO...
Operating Instructions
Page 36
...) i.LINK VHF/UHF CABLE WHITE BLACK ~ AC IN DVI-HDTV IN 6 DISPLAY SIGNAL OUT CATV cable Antenna cable (supplied) Setup A/V cable Splitter (not supplied) Cable box Coaxial cable (not supplied) Coaxial cable (not supplied) CATV cable Notes on the VCR and tune it to the channel the cable box is set to ...the cable box to select the cable input (CABLE in the illustration). Rear of the cable box and VCR turned on page 52. Watch cable (unscrambled) channels Watch cable box (scrambled) channels Watch the VCR Set up Video Labels on page 55. If you have a non-Sony VCR,...
...) i.LINK VHF/UHF CABLE WHITE BLACK ~ AC IN DVI-HDTV IN 6 DISPLAY SIGNAL OUT CATV cable Antenna cable (supplied) Setup A/V cable Splitter (not supplied) Cable box Coaxial cable (not supplied) Coaxial cable (not supplied) CATV cable Notes on the VCR and tune it to the channel the cable box is set to ...the cable box to select the cable input (CABLE in the illustration). Rear of the cable box and VCR turned on page 52. Watch cable (unscrambled) channels Watch cable box (scrambled) channels Watch the VCR Set up Video Labels on page 55. If you have a non-Sony VCR,...
Operating Instructions
Page 39
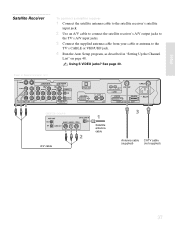
... "Setting Up the Channel List" on page 48. Using S VIDEO jacks? L S400 (TS/DV/MICROMV) i.LINK VHF/UHF CABLE WHITE BLACK ~ AC IN DVI-HDTV IN 6 DISPLAY SIGNAL OUT Satellite receiver A/V cable Satellite antenna cable Antenna cable CATV cable (supplied) (not supplied) 37 AUDIO - Rear of Media receiver unit S VIDEO VIDEO L AUDIO R 1 VIDEO IN HD/DVD...
... "Setting Up the Channel List" on page 48. Using S VIDEO jacks? L S400 (TS/DV/MICROMV) i.LINK VHF/UHF CABLE WHITE BLACK ~ AC IN DVI-HDTV IN 6 DISPLAY SIGNAL OUT Satellite receiver A/V cable Satellite antenna cable Antenna cable CATV cable (supplied) (not supplied) 37 AUDIO - Rear of Media receiver unit S VIDEO VIDEO L AUDIO R 1 VIDEO IN HD/DVD...


