
Operating Instructions
Page 3
... the right to make any modification to this limit requires permission of the copyright holders. Sony is not responsible for incomplete recording/downloading or damaged data due to problems of the IC recorder or computer. Depending on the types of a separate user license agreement. This... You can help preserve our environment by returning your used for Macintosh. The supplied connecting cable is for the IC recorder ICD-SX700. This is due to private use only. For the customers in the language or the character that is not supported by the...
... the right to make any modification to this limit requires permission of the copyright holders. Sony is not responsible for incomplete recording/downloading or damaged data due to problems of the IC recorder or computer. Depending on the types of a separate user license agreement. This... You can help preserve our environment by returning your used for Macintosh. The supplied connecting cable is for the IC recorder ICD-SX700. This is due to private use only. For the customers in the language or the character that is not supported by the...

Operating Instructions
Page 4
... Package 7 Index to Parts and Controls 8 Getting Started Step 1: Preparing a Power Source.........14 Inserting the alkaline batteries..........14 Inserting the rechargeable batteries 14 Disconnecting the IC recorder from your computer 16 When replacing/charging the batteries 17 Step 2: Setting the Clock 19 Continued directly from "Step 1: Preparing a Power Source 20 Setting the...
... Package 7 Index to Parts and Controls 8 Getting Started Step 1: Preparing a Power Source.........14 Inserting the alkaline batteries..........14 Inserting the rechargeable batteries 14 Disconnecting the IC recorder from your computer 16 When replacing/charging the batteries 17 Step 2: Setting the Clock 19 Continued directly from "Step 1: Preparing a Power Source 20 Setting the...

Operating Instructions
Page 5
... 93 Connecting the IC recorder to your computer 94 Disconnecting the IC recorder from your computer 95 Copying Files from Other Equipment.......49 To record using the synchronized recording function 49 To record without using the synchronized recording function.....51 Playback Playing Back Messages 53 Selecting the Playback Mode 56 Playing back a specified section repeatedly - the Digital Voice Up Function...
... 93 Connecting the IC recorder to your computer 94 Disconnecting the IC recorder from your computer 95 Copying Files from Other Equipment.......49 To record using the synchronized recording function 49 To record without using the synchronized recording function.....51 Playback Playing Back Messages 53 Selecting the Playback Mode 56 Playing back a specified section repeatedly - the Digital Voice Up Function...

Operating Instructions
Page 6
... Installing the software 103 Referring to the help files 107 Transferring the files using the Digital Voice Editor software 107 Using the IC Recorder as a USB Mass Storage Device 108 Precautions 126 Specifications 128 Index 130 Troubleshooting Troubleshooting 109 IC recorder 109 Error messages 119 System limitations 122 Additional Information Using a USB AC Adaptor (not supplied...
... Installing the software 103 Referring to the help files 107 Transferring the files using the Digital Voice Editor software 107 Using the IC Recorder as a USB Mass Storage Device 108 Precautions 126 Specifications 128 Index 130 Troubleshooting Troubleshooting 109 IC recorder 109 Error messages 119 System limitations 122 Additional Information Using a USB AC Adaptor (not supplied...

Operating Instructions
Page 7
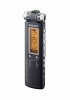
...headphones (1) Application Software, Digital Voice Editor (CD-ROM) Cradle* (1) Carrying pouch (1) Battery case* (1) Operating Instructions * The cradle and battery case are cautioned that any changes or modifications not expressly approved in some regions only. Checking the Contents of the Package IC Recorder (1) Wind Screen (1)... USB connecting cable (1) Remove the film on the display window before you use the IC recorder. You are supplied with some models in this manual could ...
...headphones (1) Application Software, Digital Voice Editor (CD-ROM) Cradle* (1) Carrying pouch (1) Battery case* (1) Operating Instructions * The cradle and battery case are cautioned that any changes or modifications not expressly approved in some regions only. Checking the Contents of the Package IC Recorder (1) Wind Screen (1)... USB connecting cable (1) Remove the film on the display window before you use the IC recorder. You are supplied with some models in this manual could ...

Operating Instructions
Page 10
... operation mode : stop : playback : review (fast backward)/ cue (fast forward) : backward/forward continuously Folder indicator : Folder for messages recorded using the IC recorder. : Folder for messages/music copyed from a computer, which can only be played back. Elapsed time/Remaining time.../ Recorded date and time indication Folder name/Message title/Artist name/File name indication Battery indicator When rechargeable ...
... operation mode : stop : playback : review (fast backward)/ cue (fast forward) : backward/forward continuously Folder indicator : Folder for messages recorded using the IC recorder. : Folder for messages/music copyed from a computer, which can only be played back. Elapsed time/Remaining time.../ Recorded date and time indication Folder name/Message title/Artist name/File name indication Battery indicator When rechargeable ...

Operating Instructions
Page 11
... Displays the following icon if the IC recorder cannot recognize the file. Recording level indicator Displays the microphone sensitivity with which the IC recorder recorded the selected message. : Recorded with the low recording level. : Recorded with the high recording level. : Recorded with the further high recording level. : Recorded with proper balance for music. : Recorded with the manual recording mode. 11GB Displays one of the...
... Displays the following icon if the IC recorder cannot recognize the file. Recording level indicator Displays the microphone sensitivity with which the IC recorder recorded the selected message. : Recorded with the low recording level. : Recorded with the high recording level. : Recorded with the further high recording level. : Recorded with proper balance for music. : Recorded with the manual recording mode. 11GB Displays one of the...

Operating Instructions
Page 12
... is displayed in hours, minutes, and seconds. Display during recording Operating mode indicator Displays the following, depending on the current operation of the IC recorder. : recording : Flashes while recording standby/recording pause : recording with the VOR function : recording pause with the VOR function (flashing) 12GB Remaining recording time indication Displays the remaining recording time in hours and minutes.
... is displayed in hours, minutes, and seconds. Display during recording Operating mode indicator Displays the following, depending on the current operation of the IC recorder. : recording : Flashes while recording standby/recording pause : recording with the VOR function : recording pause with the VOR function (flashing) 12GB Remaining recording time indication Displays the remaining recording time in hours and minutes.

Operating Instructions
Page 14
...AAA (size AAA) rechargeable batteries with correct polarity, and close the lid. 3 Charge the batteries by connecting the (USB) connector of the IC recorder to set the date and time. Inserting the alkaline batteries 1 Slide and lift the battery compartment lid. 2 Insert two LR03 (size AAA) ...from "Step 1: Preparing a Power Source"" on the display window before you insert batteries after the IC recorder has been without batteries for the first time, or when you use the IC recorder. Clock setting display appears and the year section flashes when you insert batteries for a certain period...
...AAA (size AAA) rechargeable batteries with correct polarity, and close the lid. 3 Charge the batteries by connecting the (USB) connector of the IC recorder to set the date and time. Inserting the alkaline batteries 1 Slide and lift the battery compartment lid. 2 Insert two LR03 (size AAA) ...from "Step 1: Preparing a Power Source"" on the display window before you insert batteries after the IC recorder has been without batteries for the first time, or when you use the IC recorder. Clock setting display appears and the year section flashes when you insert batteries for a certain period...
Operating Instructions
Page 15
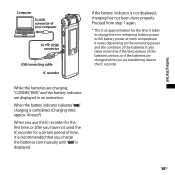
... the battery indicator indicates" ," charging is completed. (Charging time: approx. 4 hours*) When you use the IC recorder for the first time, or after you have not used the IC recorder for the time it is displayed. 15GB Getting Started Computer To USB connector of the batteries. It also takes ... batteries continuously until " " is recommended that you are displayed in an animation. Proceed from no remaining battery power to the IC recorder. While the batteries are charging, "CONNECTING" and the battery indicator are transferring data to full battery power at room temperature.
... the battery indicator indicates" ," charging is completed. (Charging time: approx. 4 hours*) When you use the IC recorder for the first time, or after you have not used the IC recorder for the time it is displayed. 15GB Getting Started Computer To USB connector of the batteries. It also takes ... batteries continuously until " " is recommended that you are displayed in an animation. Proceed from no remaining battery power to the IC recorder. While the batteries are charging, "CONNECTING" and the battery indicator are transferring data to full battery power at room temperature.

Operating Instructions
Page 16
... the battery indicator may not light fully. 16GB On the Macintosh screen, drag the "IC RECORDER" on the taskbar, and click "Safely remove USB Mass Storage Device." Disconnecting the IC recorder from the USB connector of the battery indicator, you cannot charge the batteries. otherwise,...While " " or " " is set to "ON" (page 91). During playback using your computer Follow the procedures below; For details on disconnecting the IC recorder, refer to the operating instructions supplied with a temperature of 5 °C - 35 °C (41 °F - 95 °F). If "USB ...
... the battery indicator may not light fully. 16GB On the Macintosh screen, drag the "IC RECORDER" on the taskbar, and click "Safely remove USB Mass Storage Device." Disconnecting the IC recorder from the USB connector of the battery indicator, you cannot charge the batteries. otherwise,...While " " or " " is set to "ON" (page 91). During playback using your computer Follow the procedures below; For details on disconnecting the IC recorder, refer to the operating instructions supplied with a temperature of 5 °C - 35 °C (41 °F - 95 °F). If "USB ...

Operating Instructions
Page 17
Battery remain indication : Replace the old batteries with new ones or charge the rechargeable batteries. : "LOW BATTERY" appears and the IC recorder will stop operation. MP3 192k*5 Approx. 22 hr. MP3 48k*7 Approx. 25 hr. LPEC STLP*10 Approx. 22 hr. LPEC LP*12 Approx. 26 ... Approx. 22 hr. Music file - (WMA 128 kbps/ 44.1 kHz) Playback*2 through speaker Approx. 21 hr. Approx. 21 hr. Playback using Sony LR03 (SG) (size AAA) alkaline batteries Recording LPCM 44/16*3 Approx. 25 hr. Approx. 26 hr. LPEC STHQ*8 Approx. 18 hr. LPEC ST*9 Approx. 20 hr. Approx. 21 hr...
Battery remain indication : Replace the old batteries with new ones or charge the rechargeable batteries. : "LOW BATTERY" appears and the IC recorder will stop operation. MP3 192k*5 Approx. 22 hr. MP3 48k*7 Approx. 25 hr. LPEC STLP*10 Approx. 22 hr. LPEC LP*12 Approx. 26 ... Approx. 22 hr. Music file - (WMA 128 kbps/ 44.1 kHz) Playback*2 through speaker Approx. 21 hr. Approx. 21 hr. Playback using Sony LR03 (SG) (size AAA) alkaline batteries Recording LPCM 44/16*3 Approx. 25 hr. Approx. 26 hr. LPEC STHQ*8 Approx. 18 hr. LPEC ST*9 Approx. 20 hr. Approx. 21 hr...

Operating Instructions
Page 18
LPCM 22/16*4 Approx. 17 hr. Approx. 15 hr. Approx. 17 hr. Playback using Sony NH-AAA rechargeable batteries Recording LPCM 44/16*3 Approx. 19 hr. Approx. 18 hr. Approx. 20 hr. While the IC recorder is accessing data when an updating animation and "UPDATING DATABASE..." MP3 128k*6 Approx. 17 hr. LPEC STLP*10 Approx...
LPCM 22/16*4 Approx. 17 hr. Approx. 15 hr. Approx. 17 hr. Playback using Sony NH-AAA rechargeable batteries Recording LPCM 44/16*3 Approx. 19 hr. Approx. 18 hr. Approx. 20 hr. While the IC recorder is accessing data when an updating animation and "UPDATING DATABASE..." MP3 128k*6 Approx. 17 hr. LPEC STLP*10 Approx...

Operating Instructions
Page 19
... Getting Started You need to set the clock to process a large amount of the IC recorder. Clock setting display appears when you insert batteries for the first time, or when you insert batteries after the IC recorder has been without batteries for an extended period of time, "SET DATE & TIME"... appears, and then the year section flashes in the display window. 19GB Note If the IC recorder is not a malfunction of data, an updating animation...
... Getting Started You need to set the clock to process a large amount of the IC recorder. Clock setting display appears when you insert batteries for the first time, or when you insert batteries after the IC recorder has been without batteries for an extended period of time, "SET DATE & TIME"... appears, and then the year section flashes in the display window. 19GB Note If the IC recorder is not a malfunction of data, an updating animation...

Operating Instructions
Page 20
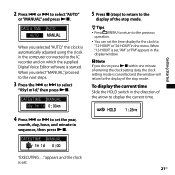
... sequence, then press . Continued directly from "Step 1: Preparing a Power Source" 1 Press or to set the clock using the menu While the IC recorder is set. 2 Press (stop) to return to the display of the stop mode, you can set the year, month, day, hour, and minute in...
... sequence, then press . Continued directly from "Step 1: Preparing a Power Source" 1 Press or to set the clock using the menu While the IC recorder is set. 2 Press (stop) to return to the display of the stop mode, you can set the year, month, day, hour, and minute in...
Operating Instructions
Page 21
... arrow to display the current time. 4 Press or to set the year, month, day, hour, and minute in the computer connected to the IC recorder and on which the supplied Digital Voice Editor software is set, "AM" or "PM" appears in the menu.
... arrow to display the current time. 4 Press or to set the year, month, day, hour, and minute in the computer connected to the IC recorder and on which the supplied Digital Voice Editor software is set, "AM" or "PM" appears in the menu.
Operating Instructions
Page 22
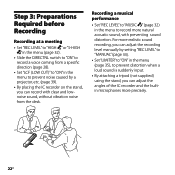
..., etc. (page 39). By placing the IC recorder on the stand, you can record with preventing sound distortion. Recording a musical performance Set "REC LEVEL" to "MUSIC " (page 32) in the menu to record more natural acoustic sound, with clear and lownoise sound, without...using the stand, you can adjust the angles of the IC recorder and the builtin microphones more precisely. 22GB Step 3: Preparations Required before Recording Recording at a meeting Set "REC LEVEL" to "HIGH " or "S‑HIGH " in the menu (page 35), to record a voice coming from the desk.
..., etc. (page 39). By placing the IC recorder on the stand, you can record with preventing sound distortion. Recording a musical performance Set "REC LEVEL" to "MUSIC " (page 32) in the menu to record more natural acoustic sound, with clear and lownoise sound, without...using the stand, you can adjust the angles of the IC recorder and the builtin microphones more precisely. 22GB Step 3: Preparations Required before Recording Recording at a meeting Set "REC LEVEL" to "HIGH " or "S‑HIGH " in the menu (page 35), to record a voice coming from the desk.

Operating Instructions
Page 23
... built-in the menu (page 32). Slide the DIRECTNL switch to "ON" to record a voice coming from a specific direction (page 28). To transcribe a message recorded on the IC recorder using voice recognition software (not supplied), set "REC MODE" to the LPCM, MP3 or LPEC (except ...LP) mode (page 29). Sound source Approx. 2 to 3 m Place the IC recorder with the voice recognition software you have to create a user ...
... built-in the menu (page 32). Slide the DIRECTNL switch to "ON" to record a voice coming from a specific direction (page 28). To transcribe a message recorded on the IC recorder using voice recognition software (not supplied), set "REC MODE" to the LPCM, MP3 or LPEC (except ...LP) mode (page 29). Sound source Approx. 2 to 3 m Place the IC recorder with the voice recognition software you have to create a user ...

Operating Instructions
Page 24
... or Off When you are not using the IC recorder, you can prevent the batteries from the corner of your mouth. To minimize the sound of more than one person. To obtain maximum ..., hold the microphone directly in front of your mouth. To obtain maximum recognition accuracy, avoid recording in a noisy place. You cannot transcribe a message recording the voices of your breath in the recordings, do not hold the IC recorder so that the microphone is about 1 inch (2 - 3cm) from getting weak quickly by turning the power...
... or Off When you are not using the IC recorder, you can prevent the batteries from the corner of your mouth. To minimize the sound of more than one person. To obtain maximum ..., hold the microphone directly in front of your mouth. To obtain maximum recognition accuracy, avoid recording in a noisy place. You cannot transcribe a message recording the voices of your breath in the recordings, do not hold the IC recorder so that the microphone is about 1 inch (2 - 3cm) from getting weak quickly by turning the power...

Operating Instructions
Page 25
... on, and an accessing animation is displayed. Turning the power on the IC recorder and left it without doing anything, the display goes off within a few seconds....OFF" is displayed. Tips When you are not going to use the IC recorder for a long time, we recommend to turn off the IC recorder. When about 10 minutes have passed after you have turned on Slide the HOLD... switch in the stop mode. The IC recorder turns off automatically. (Press any button to show the display.) 25GB Getting Started Turning the ...
... on, and an accessing animation is displayed. Turning the power on the IC recorder and left it without doing anything, the display goes off within a few seconds....OFF" is displayed. Tips When you are not going to use the IC recorder for a long time, we recommend to turn off the IC recorder. When about 10 minutes have passed after you have turned on Slide the HOLD... switch in the stop mode. The IC recorder turns off automatically. (Press any button to show the display.) 25GB Getting Started Turning the ...


