Operating Instructions
Page 5
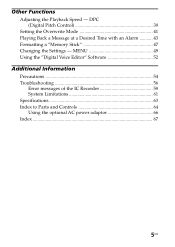
Other Functions Adjusting the Playback Speed - DPC (Digital Pitch Control 39 Setting the Overwrite Mode 41 Playing Back a Message at a Desired Time with an Alarm 43 Formatting a "Memory Stick 47 Changing the Settings - MENU 49 Using the "Digital Voice Editor" Software 52 Additional Information Precautions 54 Troubleshooting 56 Error messages of the IC Recorder 59 System Limitations 61 Specifications 63 Index to Parts and Controls 64 Using the optional AC power adaptor 66 Index ...67 5GB
Other Functions Adjusting the Playback Speed - DPC (Digital Pitch Control 39 Setting the Overwrite Mode 41 Playing Back a Message at a Desired Time with an Alarm 43 Formatting a "Memory Stick 47 Changing the Settings - MENU 49 Using the "Digital Voice Editor" Software 52 Additional Information Precautions 54 Troubleshooting 56 Error messages of the IC Recorder 59 System Limitations 61 Specifications 63 Index to Parts and Controls 64 Using the optional AC power adaptor 66 Index ...67 5GB
Operating Instructions
Page 6
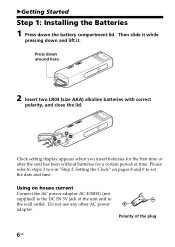
... 9 to the wall outlet. Press down the battery compartment lid. Do not use any other AC power adaptor. Please refer to steps 3 to 6 in "Step 2: Setting the Clock" on house current Connect the AC power adaptor AC-E30HG (not supplied) to the DC IN 3V jack of the unit and to set...
... 9 to the wall outlet. Press down the battery compartment lid. Do not use any other AC power adaptor. Please refer to steps 3 to 6 in "Step 2: Setting the Clock" on house current Connect the AC power adaptor AC-E30HG (not supplied) to the DC IN 3V jack of the unit and to set...

Operating Instructions
Page 8
MENU ENTER CANCEL POWER Jog lever Press up or down (.). 1 Slide POWER to ON. The IC recorder is turned on. 2 Press MENU. The menu mode will be displayed in the display window. 3 Press the jog lever up (>). Press down (>/ .) to use the alarm function or record the date and time. In this case, proceed from step 4. Clock setting display appears when you insert battery for the first time, or when you insert battery after the unit has been without battery for a certain period of time. Step 2: Setting the Clock You need to set the clock to select "DATE&TIME". 8GB
MENU ENTER CANCEL POWER Jog lever Press up or down (.). 1 Slide POWER to ON. The IC recorder is turned on. 2 Press MENU. The menu mode will be displayed in the display window. 3 Press the jog lever up (>). Press down (>/ .) to use the alarm function or record the date and time. In this case, proceed from step 4. Clock setting display appears when you insert battery for the first time, or when you insert battery after the unit has been without battery for a certain period of time. Step 2: Setting the Clock You need to set the clock to select "DATE&TIME". 8GB
Operating Instructions
Page 9
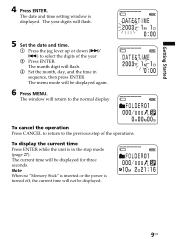
... and time. 1 Press the jog lever up or down (>/ .) to the previous step of the year. 2 Press ENTER. Note When no "Memory Stick" is inserted or the power is displayed. The year digits will flash. 3 Set the month, day, and the time in the stop mode (page 27). The menu mode will be displayed... for three seconds. The current time will be displayed. 9GB To cancel the operation Press CANCEL to return to select the digits of the...
... and time. 1 Press the jog lever up or down (>/ .) to the previous step of the year. 2 Press ENTER. Note When no "Memory Stick" is inserted or the power is displayed. The year digits will flash. 3 Set the month, day, and the time in the stop mode (page 27). The menu mode will be displayed... for three seconds. The current time will be displayed. 9GB To cancel the operation Press CANCEL to return to select the digits of the...

Operating Instructions
Page 12
...; To avoid replacing batteries during long recordings, use the AC power adaptor (not supplied). 12GB Message 1 Message 2 Message 3 Message 1 Starts recording at the end of Message 1 Message 2 Message 3 Added recording (counted as a part of Message 1) Maximum recording time and number of messages for a "Memory Stick" The maximum recording time for the maximum recording time in each (initially named FOLDER01...
...; To avoid replacing batteries during long recordings, use the AC power adaptor (not supplied). 12GB Message 1 Message 2 Message 3 Message 1 Starts recording at the end of Message 1 Message 2 Message 3 Added recording (counted as a part of Message 1) Maximum recording time and number of messages for a "Memory Stick" The maximum recording time for the maximum recording time in each (initially named FOLDER01...
Operating Instructions
Page 13
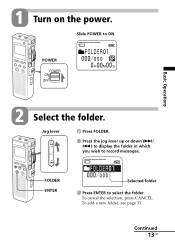
1 Turn on the power. FOLDER ENTER Selected folder 3 Press ENTER to ON. Slide POWER to select the folder. Continued 13GB To add a new folder, see page 33. Jog lever 1 Press FOLDER. 2 Press the jog lever up or down (>/ .) to display the folder in which you wish to record messages. POWER Basic Operations 2 Select the folder. To cancel the selection, press CANCEL.
1 Turn on the power. FOLDER ENTER Selected folder 3 Press ENTER to ON. Slide POWER to select the folder. Continued 13GB To add a new folder, see page 33. Jog lever 1 Press FOLDER. 2 Press the jog lever up or down (>/ .) to display the folder in which you wish to record messages. POWER Basic Operations 2 Select the folder. To cancel the selection, press CANCEL.
Operating Instructions
Page 18
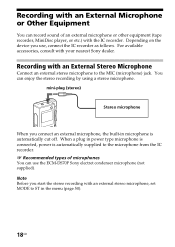
...record sound of microphones You can enjoy the stereo recording by using a stereo microphone. Recording with your nearest Sony dealer. mini-plug (stereo) Stereo microphone When you connect an external microphone, the built-in microphone is automatically supplied to the microphone from the IC recorder... the menu (page 50). 18GB Note Before you use the ECM-DS70P Sony electret condenser microphone (not supplied). Depending on the device you start the stereo recording with the IC recorder. For available accessories, consult with an External Stereo Microphone Connect an external ...
...record sound of microphones You can enjoy the stereo recording by using a stereo microphone. Recording with your nearest Sony dealer. mini-plug (stereo) Stereo microphone When you connect an external microphone, the built-in microphone is automatically supplied to the microphone from the IC recorder... the menu (page 50). 18GB Note Before you use the ECM-DS70P Sony electret condenser microphone (not supplied). Depending on the device you start the stereo recording with the IC recorder. For available accessories, consult with an External Stereo Microphone Connect an external ...
Operating Instructions
Page 24
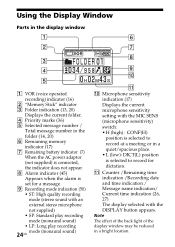
... place. • L (low): DICT(L) position is selected to record at a meeting or in a bright location. Using the Display Window Parts in the display window 1 VOR (voice operated recording) indicator (16) 2 "Memory Stick" indicator 3 Folder indication (13, 20) Displays the current folder.... 4 Priority marks (36) 5 Selected message number / Total message number in the folder (14, 20) 6 Remaining memory indicator (17) 7 Remaining battery indicator (7) When the AC power ...
... place. • L (low): DICT(L) position is selected to record at a meeting or in a bright location. Using the Display Window Parts in the display window 1 VOR (voice operated recording) indicator (16) 2 "Memory Stick" indicator 3 Folder indication (13, 20) Displays the current folder.... 4 Priority marks (36) 5 Selected message number / Total message number in the folder (14, 20) 6 Remaining memory indicator (17) 7 Remaining battery indicator (7) When the AC power ...
Operating Instructions
Page 27
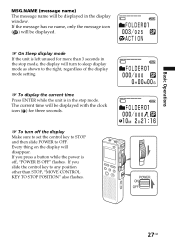
... be displayed. 1 On Sleep display mode If the unit is off the display Make sure to set the control key to STOP and then slide POWER to OFF. The current time will be displayed with the clock icon ( ) for more than STOP, "MOVE CONTROL KEY TO STOP POSITION" also flashes. 27GB... (message name) The message name will disappear. If the message has no name, only the message icon ( ) will turn off , "POWER IS OFF" flashes. If you press a button while the power is left unused for three seconds. 1 To turn to sleep display mode as shown to any position other than 3 seconds in...
... be displayed. 1 On Sleep display mode If the unit is off the display Make sure to set the control key to STOP and then slide POWER to OFF. The current time will be displayed with the clock icon ( ) for more than STOP, "MOVE CONTROL KEY TO STOP POSITION" also flashes. 27GB... (message name) The message name will disappear. If the message has no name, only the message icon ( ) will turn off , "POWER IS OFF" flashes. If you press a button while the power is left unused for three seconds. 1 To turn to sleep display mode as shown to any position other than 3 seconds in...
Operating Instructions
Page 52
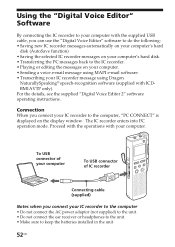
... unit. 52GB Connection When you can use the "Digital Voice Editor" software to do the following: • Saving new IC recorder messages automatically on your computer's hard disk (AutoSave function) • Saving the selected IC recorder messages on your computer's hard disk. •...your computer. • Sending a voice e-mail message using MAPI e-mail software. • Transcribing your IC recorder message using Dragon NaturallySpeaking® speech-recognition software (supplied with your IC recorder to the computer • Do not connect the AC power adaptor (not supplied) to the unit...
... unit. 52GB Connection When you can use the "Digital Voice Editor" software to do the following: • Saving new IC recorder messages automatically on your computer's hard disk (AutoSave function) • Saving the selected IC recorder messages on your computer's hard disk. •...your computer. • Sending a voice e-mail message using MAPI e-mail software. • Transcribing your IC recorder message using Dragon NaturallySpeaking® speech-recognition software (supplied with your IC recorder to the computer • Do not connect the AC power adaptor (not supplied) to the unit...
Operating Instructions
Page 54
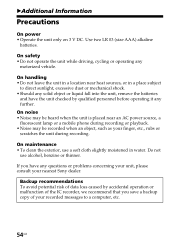
... • Do not leave the unit in a location near an AC power source, a fluorescent lamp or a mobile phone during recording or playback. • Noise may be recorded when an object, such as your nearest Sony dealer. On safety • Do not operate the unit while driving, ...cycling or operating any further. BAdditional Information Precautions On power • Operate the unit only on 3...
... • Do not leave the unit in a location near an AC power source, a fluorescent lamp or a mobile phone during recording or playback. • Noise may be recorded when an object, such as your nearest Sony dealer. On safety • Do not operate the unit while driving, ...cycling or operating any further. BAdditional Information Precautions On power • Operate the unit only on 3...

Operating Instructions
Page 57
...the unit during recording so that noise was recorded. •The unit was placed near an AC power source, a fluorescent lamp or a mobile phone during recording or playback. •Plug of the connected microphone was dirty when recording. Recording level is &#...recorded interrupted. the DPC switch to automatically adjust unstable (when the recording level when recording meetings, recording music, etc.) etc., and is too short. Additional Information Continued 57GB Symptom Remedy You cannot overwrite. •The remaining memory is not suitable for music recording. Recording...
...the unit during recording so that noise was recorded. •The unit was placed near an AC power source, a fluorescent lamp or a mobile phone during recording or playback. •Plug of the connected microphone was dirty when recording. Recording level is &#...recorded interrupted. the DPC switch to automatically adjust unstable (when the recording level when recording meetings, recording music, etc.) etc., and is too short. Additional Information Continued 57GB Symptom Remedy You cannot overwrite. •The remaining memory is not suitable for music recording. Recording...
Operating Instructions
Page 60
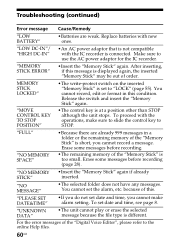
...(page 55). You cannot record, edit or format in a folder or the remaining memory of the "Digital Voice Editor", please refer to the online Help files. 60GB Erase some messages before recording (page 28). "NO MEMORY •Insert the "Memory Stick" again if already STICK" inserted. To set date ...•The write-protect switch on the inserted "Memory Stick" is not compatible with the operations, make alarm setting. You cannot set to use the AC power adaptor for the IC recorder. "MEMORY STICK ERROR" •Insert the "Memory Stick" again. "UNKNOWN DATA" •The unit...
...(page 55). You cannot record, edit or format in a folder or the remaining memory of the "Digital Voice Editor", please refer to the online Help files. 60GB Erase some messages before recording (page 28). "NO MEMORY •Insert the "Memory Stick" again if already STICK" inserted. To set date ...•The write-protect switch on the inserted "Memory Stick" is not compatible with the operations, make alarm setting. You cannot set to use the AC power adaptor for the IC recorder. "MEMORY STICK ERROR" •Insert the "Memory Stick" again. "UNKNOWN DATA" •The unit...

Operating Instructions
Page 63
...Memory Stick MSAC-PC3/USB-compatible Memory Stick Reader/Writer MSAC-US70/ AC power adaptor AC-E30HG Your dealer may not handle some of the above listed optional accessories. batteries and a "Memory Stick") "Memory Stick" x 1 "Digital Voice Editor" (CD-ROM) x 1 "Dragon NaturallySpeaking" (CD-ROM) x 1 (supplied with ICD...in.) (w/h/d) (not incl. Specifications Recording media Recording time Frequency range Speaker Power output Input/Output Playback speed control Power requirements Dimensions Mass Supplied accessories Optional accessories "Memory Stick", Monaural recording See page 12. ST: 60 ...
...Memory Stick MSAC-PC3/USB-compatible Memory Stick Reader/Writer MSAC-US70/ AC power adaptor AC-E30HG Your dealer may not handle some of the above listed optional accessories. batteries and a "Memory Stick") "Memory Stick" x 1 "Digital Voice Editor" (CD-ROM) x 1 "Dragon NaturallySpeaking" (CD-ROM) x 1 (supplied with ICD...in.) (w/h/d) (not incl. Specifications Recording media Recording time Frequency range Speaker Power output Input/Output Playback speed control Power requirements Dimensions Mass Supplied accessories Optional accessories "Memory Stick", Monaural recording See page 12. ST: 60 ...
Operating Instructions
Page 64
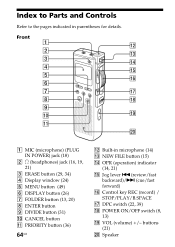
... (14, 21) qg Jog lever .(review/fast backward)/> (cue/fast forward) qh Control key REC (record) / STOP/PLAY/B.SPACE qj DPC switch (22, 39) qk POWER ON/OFF switch (8, 13) ql VOL (volume) +/- Front 1 MIC (microphone) (PLUG IN POWER) jack (18) 2 i (headphones) jack (16, 19, 21) 3 ERASE button (29, 34) 4 Display window (24...
... (14, 21) qg Jog lever .(review/fast backward)/> (cue/fast forward) qh Control key REC (record) / STOP/PLAY/B.SPACE qj DPC switch (22, 39) qk POWER ON/OFF switch (8, 13) ql VOL (volume) +/- Front 1 MIC (microphone) (PLUG IN POWER) jack (18) 2 i (headphones) jack (16, 19, 21) 3 ERASE button (29, 34) 4 Display window (24...

Operating Instructions
Page 66
As close to the plug as possible that is connected to comply with the applicable standards.) 1 Open the clamp filter. 2 Wind the cable into the clamp filter as show below . (You must affix the ferrite cores to DC IN jack. Make sure the clasps are fully engaged. 66GB Attach the clamp filter on one and a half times. 3 Close the clamp filter. Wind the cable one end of the cable. Using the optional AC power adaptor When using the optional AC adaptor, make sure to attach the supplied clamp filter to the cable following the procedures below .
As close to the plug as possible that is connected to comply with the applicable standards.) 1 Open the clamp filter. 2 Wind the cable into the clamp filter as show below . (You must affix the ferrite cores to DC IN jack. Make sure the clasps are fully engaged. 66GB Attach the clamp filter on one and a half times. 3 Close the clamp filter. Wind the cable one end of the cable. Using the optional AC power adaptor When using the optional AC adaptor, make sure to attach the supplied clamp filter to the cable following the procedures below .

Operating Instructions
Page 68
Printed in power 18 POWER 8, 13 Priority mark 36 R Recorded date and time display 26 Recording 12 Recording as a new message ... 15 Recording mode 7, 12, 50 Recording with other equipment 19 Remaining battery 7 Remaining memory 17 Remaining time display 26 Repeat playback 23, 50 Review 16, 22 S Searching forward/backward . 22 Setting the clock 8 SP mode 7, 12, 50 Specifications...
Printed in power 18 POWER 8, 13 Priority mark 36 R Recorded date and time display 26 Recording 12 Recording as a new message ... 15 Recording mode 7, 12, 50 Recording with other equipment 19 Remaining battery 7 Remaining memory 17 Remaining time display 26 Repeat playback 23, 50 Review 16, 22 S Searching forward/backward . 22 Setting the clock 8 SP mode 7, 12, 50 Specifications...
Marketing Specifications (ICD-BM1A/BM1B)
Page 2
... you to control the power by switching on or off Hi/Lo Mic Sensitivity enables the unit to record different situations, from the last correct word Digital Pitch Control allows recordings to be heard at www.sony.com/dn Sony Electronics Inc. •...the United States and/or other due to chipset variations. 3. Approximate recording times. Audio Recording System: Digital, Monaural Recording Microphone: Built-in Frequency Range: ST: 60-13500Hz; ICD-BM1A Memory Stick® Media Digital Voice Recorder Features Slide Switch Control Operation allows for one-button operation of all ...
... you to control the power by switching on or off Hi/Lo Mic Sensitivity enables the unit to record different situations, from the last correct word Digital Pitch Control allows recordings to be heard at www.sony.com/dn Sony Electronics Inc. •...the United States and/or other due to chipset variations. 3. Approximate recording times. Audio Recording System: Digital, Monaural Recording Microphone: Built-in Frequency Range: ST: 60-13500Hz; ICD-BM1A Memory Stick® Media Digital Voice Recorder Features Slide Switch Control Operation allows for one-button operation of all ...
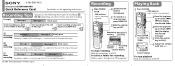
Quick Reference Card
Page 1
... memory sensitivity Message Recording number mode Counter display To stop playback Slide the control key to STOP. Recording Tips You can use the following three types of recording (1/ 2/3) depending on where or how you start recording: Example) Message 1 Message 2 Blank space Start recording at...Press FOLDER. C 2003 Sony Corporation Printed in the middle of Message 1. It is added as part of Message 1 b1 Start recording at the end Start recording at a point in Japan Recording 1 Slide POWER to REC. OPR indicator Lights in microphone. 2 To record as a new message after...
... memory sensitivity Message Recording number mode Counter display To stop playback Slide the control key to STOP. Recording Tips You can use the following three types of recording (1/ 2/3) depending on where or how you start recording: Example) Message 1 Message 2 Blank space Start recording at...Press FOLDER. C 2003 Sony Corporation Printed in the middle of Message 1. It is added as part of Message 1 b1 Start recording at the end Start recording at a point in Japan Recording 1 Slide POWER to REC. OPR indicator Lights in microphone. 2 To record as a new message after...


