Operating Instructions
Page 1
Model No. 3-290-149-11(1) Memory Recording Unit Operating Instructions Owner's record The model number and the serial number are located at the name plate on the left of the unit. HVR- Record the serial number in the space provided below. Refer to these numbers whenever you call upon your Sony dealer regarding this product. Serial No HVR-MRC1 2008 Sony Corporation
Model No. 3-290-149-11(1) Memory Recording Unit Operating Instructions Owner's record The model number and the serial number are located at the name plate on the left of the unit. HVR- Record the serial number in the space provided below. Refer to these numbers whenever you call upon your Sony dealer regarding this product. Serial No HVR-MRC1 2008 Sony Corporation
Operating Instructions
Page 2
...HDV and the HDV logo are trademarks of Sony Corporation and Victor Company of Japan, Ltd. • Microsoft, Windows, Windows Vista and Windows Media are either registered trademarks or trademarks of Microsoft Corporation in the United States and/or other product names mentioned herein ... Table of contents Overview 3 Names of parts 4 Memory Recording Unit / i.LINK Cradle 4 LCD screen display 5 Using in VIDEO mode 6 Connecting this unit to this unit 9 Recording images (POWER switch at the ON side 9 Playback the image recorded on the License ANY USE OF THIS PRODUCT OTHER THAN CONSUMER...
...HDV and the HDV logo are trademarks of Sony Corporation and Victor Company of Japan, Ltd. • Microsoft, Windows, Windows Vista and Windows Media are either registered trademarks or trademarks of Microsoft Corporation in the United States and/or other product names mentioned herein ... Table of contents Overview 3 Names of parts 4 Memory Recording Unit / i.LINK Cradle 4 LCD screen display 5 Using in VIDEO mode 6 Connecting this unit to this unit 9 Recording images (POWER switch at the ON side 9 Playback the image recorded on the License ANY USE OF THIS PRODUCT OTHER THAN CONSUMER...
Operating Instructions
Page 3
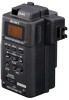
... connecting via the HVRA-CR1 i.LINK cradle, which enables you can output a record command without a cable to provide camcorder mobility. A loop recording mode is also available which device is connected. Supported models • This unit can be recognized as an external drive when connected to a computer via a...architecture to the camcorder • The body is small and light with a weight of about 1 hour and 12 minutes of recording of an HDV/ DVCAM/DV stream. • Connecting the unit to a computer via an i.LINK terminal. Can also connect to the HVRA-CR1 i.LINK cradle • The...
... connecting via the HVRA-CR1 i.LINK cradle, which enables you can output a record command without a cable to provide camcorder mobility. A loop recording mode is also available which device is connected. Supported models • This unit can be recognized as an external drive when connected to a computer via a...architecture to the camcorder • The body is small and light with a weight of about 1 hour and 12 minutes of recording of an HDV/ DVCAM/DV stream. • Connecting the unit to a computer via an i.LINK terminal. Can also connect to the HVRA-CR1 i.LINK cradle • The...
Operating Instructions
Page 4
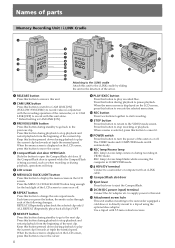
... lamp/Access lamp blinks while accessing the computer in COMPUTER mode. qk Attachment screw hole This unit enables mounting to the camcorder equipped a cold shoe or to directly mount to start recording. Press this button during playback to stop playback and restart playback from the beginning of the ... LINK button Press this button to switch to CAM LINK [ON] (FOLLOW/SYNCHRO) to record video in conjunction with the recording operation of the camcorder, or to CAM LINK [OFF] to record with this unit alone. * Default setting is CAM LINK [ON]. 3 PREVIOUS/REW button Press this button during ...
... lamp/Access lamp blinks while accessing the computer in COMPUTER mode. qk Attachment screw hole This unit enables mounting to the camcorder equipped a cold shoe or to directly mount to start recording. Press this button during playback to stop playback and restart playback from the beginning of the ... LINK button Press this button to switch to CAM LINK [ON] (FOLLOW/SYNCHRO) to record video in conjunction with the recording operation of the camcorder, or to CAM LINK [OFF] to record with this unit alone. * Default setting is CAM LINK [ON]. 3 PREVIOUS/REW button Press this button during ...
Operating Instructions
Page 5
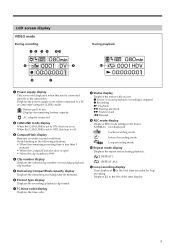
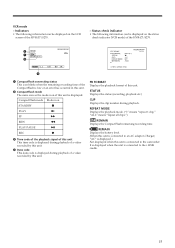
... time display. 5 Repeat mode display Displays the repeat status during playback. LCD screen display VIDEO mode During recording 12 3 4 5qa 9 6 During playback q; 8 7 1 Power supply display This icon is not displayed when this unit is stopped z Recording N Playback u Pausing playback M Fast-forward m Rewind 9 REC mode display Displays REC mode setting in the menu. Displays...
... time display. 5 Repeat mode display Displays the repeat status during playback. LCD screen display VIDEO mode During recording 12 3 4 5qa 9 6 During playback q; 8 7 1 Power supply display This icon is not displayed when this unit is stopped z Recording N Playback u Pausing playback M Fast-forward m Rewind 9 REC mode display Displays REC mode setting in the menu. Displays...
Operating Instructions
Page 6
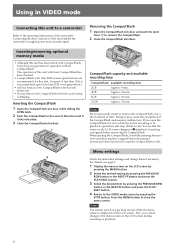
...recording time 2GB Approx. 9 min. 4GB Approx. 18 min. 8GB Approx. 36 min. 16GB Approx. 72 min. Connecting the shoe connector of time. Inserting/removing optional memory media • Although this unit has been tested with CompactFlash, Sony does not guarantee its operation with 133x 2GB or more specifications are recommended for this unit.... (A speed of less than 2GB is not guaranteed.) • Always format a new CompactFlash with this unit before removing the CompactFlash. The operation of this unit with Sony CompactFlash has been checked....
...recording time 2GB Approx. 9 min. 4GB Approx. 18 min. 8GB Approx. 36 min. 16GB Approx. 72 min. Connecting the shoe connector of time. Inserting/removing optional memory media • Although this unit has been tested with CompactFlash, Sony does not guarantee its operation with 133x 2GB or more specifications are recommended for this unit.... (A speed of less than 2GB is not guaranteed.) • Always format a new CompactFlash with this unit before removing the CompactFlash. The operation of this unit with Sony CompactFlash has been checked....
Operating Instructions
Page 7
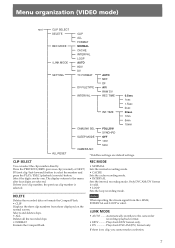
... Boldface settings are selected. The display returns to the menu after four digits are default settings. If there is valid. DELETE Deletes the recorded data or formats the CompactFlash. • CLIP Displays the three clip numbers from the i.LINK, INTERVAL and LOOP is no clip number,...PLAY/EXEC (playback/execute) button. Press the PREVIOUS/REW (previous clip/rewind) or NEXT/ FF (next clip/fast-forward) button to the camcorder recording/playback format. • HDV .......... Only DVCAM/DV format is selected. Plays back HDV format only. • DV Plays back DVCAM (DV) ...
... Boldface settings are selected. The display returns to the menu after four digits are default settings. If there is valid. DELETE Deletes the recorded data or formats the CompactFlash. • CLIP Displays the three clip numbers from the i.LINK, INTERVAL and LOOP is no clip number,...PLAY/EXEC (playback/execute) button. Press the PREVIOUS/REW (previous clip/rewind) or NEXT/ FF (next clip/fast-forward) button to the camcorder recording/playback format. • HDV .......... Only DVCAM/DV format is selected. Plays back HDV format only. • DV Plays back DVCAM (DV) ...
Operating Instructions
Page 8
...[ON], select the type of the time code from the camcorder is not obtained, this unit or turn the POWER switch off but continues to the most recent recording setting. The unit operates simultaneously with the camcorder. The display returns to select the number and press the PLAY.../EXEC (playback/execute) button. The factory default setting is NDF. DV FILE TYPE Changes the DV recording format. • AVI Records video in DV format. Uses this unit automatically switches to a camcorder that has an "external REC control" function. SLEEP MODE Switches the sleep mode ON...
...[ON], select the type of the time code from the camcorder is not obtained, this unit or turn the POWER switch off but continues to the most recent recording setting. The unit operates simultaneously with the camcorder. The display returns to select the number and press the PLAY.../EXEC (playback/execute) button. The factory default setting is NDF. DV FILE TYPE Changes the DV recording format. • AVI Records video in DV format. Uses this unit automatically switches to a camcorder that has an "external REC control" function. SLEEP MODE Switches the sleep mode ON...
Operating Instructions
Page 9
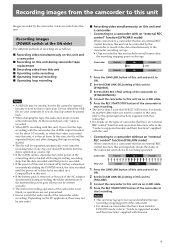
... video data. At the recorded part, only video is recorded. • When HDV recording with this unit, if you do, this clip cannot be any audio. x Recording video simultaneously on this unit during camcorder tape replacement x Recording video from the camcorder to this unit Images recorded by the camcorder can be recorded onto this unit. Camcorder This unit STANDBY STANDBY REC REC...
... video data. At the recorded part, only video is recorded. • When HDV recording with this unit, if you do, this clip cannot be any audio. x Recording video simultaneously on this unit during camcorder tape replacement x Recording video from the camcorder to this unit Images recorded by the camcorder can be recorded onto this unit. Camcorder This unit STANDBY STANDBY REC REC...
Operating Instructions
Page 10
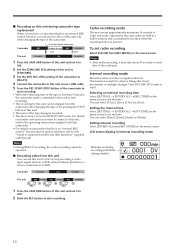
...to write data of the tape is less than 5 minutes, the camcorder sends a command to this unit to start recording. • The recording by pressing the STOP button of the tape change is recorded. • The above Step 3 is pressed. This function is valid. You can select [0.5sec...], [1sec], [1.5sec] or [2sec]. Notes • During RELAY recording, the cache recording cannot be stopped from [REC MODE] on the menu screen. x Recording video from this unit You can use this unit can record video on this unit. Setting the interval time Select [SETTING] t [INTERVAL] t [INT TIME]...
...to write data of the tape is less than 5 minutes, the camcorder sends a command to this unit to start recording. • The recording by pressing the STOP button of the tape change is recorded. • The above Step 3 is pressed. This function is valid. You can select [0.5sec...], [1sec], [1.5sec] or [2sec]. Notes • During RELAY recording, the cache recording cannot be stopped from [REC MODE] on the menu screen. x Recording video from this unit You can use this unit can record video on this unit. Setting the interval time Select [SETTING] t [INTERVAL] t [INT TIME]...
Operating Instructions
Page 11
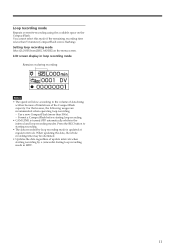
... of update intervals when starting loop recording. • CAM LINK is flashing). LCD screen display in loop recording mode Remains on during loop recording mode in the interval and loop recording modes. When updating the data, the whole recording time may be shortened. •...while in HDV. 11 Format a CompactFlash before starting recording by loop recording mode is updated at regular intervals. Setting loop recording mode Select [LOOP] from [REC MODE] on the CompactFlash. Loop recording mode Repeats overwrite-recording using the available space on the menu screen. You...
... of update intervals when starting loop recording. • CAM LINK is flashing). LCD screen display in loop recording mode Remains on during loop recording mode in the interval and loop recording modes. When updating the data, the whole recording time may be shortened. •...while in HDV. 11 Format a CompactFlash before starting recording by loop recording mode is updated at regular intervals. Setting loop recording mode Select [LOOP] from [REC MODE] on the CompactFlash. Loop recording mode Repeats overwrite-recording using the available space on the menu screen. You...
Operating Instructions
Page 12
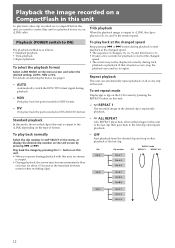
...at the changed speed Keep pressing . ALL REPEAT ALL REPEAT plays back all or one clip in this unit. Playback the image recorded on a CompactFlash in this unit To play back the part recorded in HDV format. - Trick playback When the playback image is output. • During playback, the screen... ALL Clip A File A-1 File A-2 File A-3 Clip B File B-1 File B-2 File B-3 Clip C File C-1 File C-2 File C-3 12 DV Only play back the part recorded in this unit to replay. REPEAT 1 The recorded image in CLIP SELECT of the menu, or display the desired clip number on the type of all...
...at the changed speed Keep pressing . ALL REPEAT ALL REPEAT plays back all or one clip in this unit. Playback the image recorded on a CompactFlash in this unit To play back the part recorded in HDV format. - Trick playback When the playback image is output. • During playback, the screen... ALL Clip A File A-1 File A-2 File A-3 Clip B File B-1 File B-2 File B-3 Clip C File C-1 File C-2 File C-3 12 DV Only play back the part recorded in this unit to replay. REPEAT 1 The recorded image in CLIP SELECT of the menu, or display the desired clip number on the type of all...
Operating Instructions
Page 13
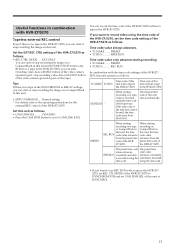
... part on the tape.) Tips If there is no tape in the HVR-Z7/S270, you can start or stop recording the image on a CompactFlash in this unit. • STBY COMMAND ..... You can record the time code of the tape base cannot be read, the time code starts from the code of this... with HVR-Z7/S270 Tapeless external REC control Even if there is no tape in the SYNCHRONUS or RELAY settings, you can start or stop recording the image on this unit. Set this unit as follows. • REC CTRL MODE ..... preset time code of the HVR-Z7/S270. If you want to...
... part on the tape.) Tips If there is no tape in the HVR-Z7/S270, you can start or stop recording the image on a CompactFlash in this unit. • STBY COMMAND ..... You can record the time code of the tape base cannot be read, the time code starts from the code of this... with HVR-Z7/S270 Tapeless external REC control Even if there is no tape in the SYNCHRONUS or RELAY settings, you can start or stop recording the image on this unit. Set this unit as follows. • REC CTRL MODE ..... preset time code of the HVR-Z7/S270. If you want to...
Operating Instructions
Page 14
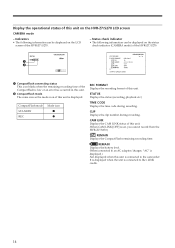
... HVR-Z7/S270. - Display the operational status of this unit. It is displayed when the unit is connected to the i.LINK cradle. 14 CompactFlash mode STANDBY REC Mode icon x z REC FORMAT Displays the recording format of this unit on the status check indicator (CAMERA mode) of the HVR...-Z7/S270. 1 2 1 CompactFlash connecting status This icon blinks when the remaining recording time of the CompactFlash is low or an error has occurred ...
... HVR-Z7/S270. - Display the operational status of this unit. It is displayed when the unit is connected to the i.LINK cradle. 14 CompactFlash mode STANDBY REC Mode icon x z REC FORMAT Displays the recording format of this unit on the status check indicator (CAMERA mode) of the HVR...-Z7/S270. 1 2 1 CompactFlash connecting status This icon blinks when the remaining recording time of the CompactFlash is low or an error has occurred ...
Operating Instructions
Page 15
... HVR-Z7/S270. - REPEAT MODE Displays the playback mode. ("1" means "repeat 1 clip," "ALL" means "repeat all clips.") REMAIN Displays the CompactFlash remaining recording time. It is displayed when the unit is displayed during playback. Status check indicator • The following information can be displayed on the status check indicator (VCR mode) of...
... HVR-Z7/S270. - REPEAT MODE Displays the playback mode. ("1" means "repeat 1 clip," "ALL" means "repeat all clips.") REMAIN Displays the CompactFlash remaining recording time. It is displayed when the unit is displayed during playback. Status check indicator • The following information can be displayed on the status check indicator (VCR mode) of...

Operating Instructions
Page 16
... COMPUTER mode Connecting to a computer You can still be operated with the battery pack attached. 2 Connect this unit to the computer via the optional i.LINK cable. 3 Slide the POWER switch of this unit to ON. Operation is recommended. For extended use, the AC adaptor is not assured if the above OS... has been upgraded. For Macintosh users • OS: Mac OS X (v10.3 or later) 16 This unit can transfer recorded images on the LCD screen. Using in HDV or DV format to a nonlinear editing system or computer. 1 Attach the HVRA-CR1 i.LINK cradle and...
... COMPUTER mode Connecting to a computer You can still be operated with the battery pack attached. 2 Connect this unit to the computer via the optional i.LINK cable. 3 Slide the POWER switch of this unit to ON. Operation is recommended. For extended use, the AC adaptor is not assured if the above OS... has been upgraded. For Macintosh users • OS: Mac OS X (v10.3 or later) 16 This unit can transfer recorded images on the LCD screen. Using in HDV or DV format to a nonlinear editing system or computer. 1 Attach the HVRA-CR1 i.LINK cradle and...
Operating Instructions
Page 18
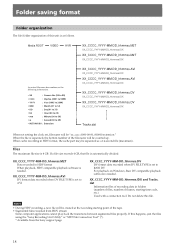
... delete this happens, join the files using the "Sony Recording Unit Utility" or "M2T File Connection Tool" (*). * Available from HDV stream Some computer applications cannot play back the transitions between segmented files properly. Notes • During HDV recording, a new file will be "xx_cccc_0000-00-00_000000....starting point of the tape. • Segmented files recorded from the Sony support page 18 If a file size exceeds 4 GB, that file is 4 GB. Folder saving format Folder organization The file/folder organization of this unit is separated, the bottom number of the file ...
... delete this happens, join the files using the "Sony Recording Unit Utility" or "M2T File Connection Tool" (*). * Available from HDV stream Some computer applications cannot play back the transitions between segmented files properly. Notes • During HDV recording, a new file will be "xx_cccc_0000-00-00_000000....starting point of the tape. • Segmented files recorded from the Sony support page 18 If a file size exceeds 4 GB, that file is 4 GB. Folder saving format Folder organization The file/folder organization of this unit is separated, the bottom number of the file ...
Operating Instructions
Page 20
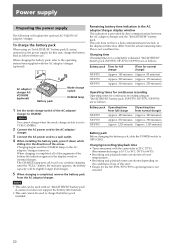
... window (normal charge). When charging the battery pack, refer to the operating instructions supplied with the camcorder at lower temperatures. • Recording and playback times are as the power supply for the NP-F570/F770/F970, operating time is not ensured. 20 Charging time Charging .../charger comes on the conditions of use . The CHARGE lamp goes off, but does not support the battery info function. • This unit cannot be used with an "InfoLITHIUM" battery pack (L-series), but if you continue charging until the "FULL" battery life indicator appears, the...
... window (normal charge). When charging the battery pack, refer to the operating instructions supplied with the camcorder at lower temperatures. • Recording and playback times are as the power supply for the NP-F570/F770/F970, operating time is not ensured. 20 Charging time Charging .../charger comes on the conditions of use . The CHARGE lamp goes off, but does not support the battery info function. • This unit cannot be used with an "InfoLITHIUM" battery pack (L-series), but if you continue charging until the "FULL" battery life indicator appears, the...
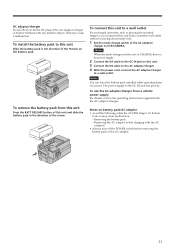
Operating Instructions
Page 21
...power. To connect this unit to the operating instructions supplied with any metallic objects. Failure to the DC IN jack has priority. To use the AC adaptor/charger from a vehicle power supply For details, refer to a wall outlet For prolonged operation, such as playing the recorded images, you can ...leave the battery pack installed while operating from a domestic wall outlet without worrying about battery life. 1 Set the mode change switch is set to CHARGE, there is no power supply. 2 Connect the DK cable to the DC IN jack on this unit Slide ...
...power. To connect this unit to the operating instructions supplied with any metallic objects. Failure to the DC IN jack has priority. To use the AC adaptor/charger from a vehicle power supply For details, refer to a wall outlet For prolonged operation, such as playing the recorded images, you can ...leave the battery pack installed while operating from a domestic wall outlet without worrying about battery life. 1 Set the mode change switch is set to CHARGE, there is no power supply. 2 Connect the DK cable to the DC IN jack on this unit Slide ...
Operating Instructions
Page 22
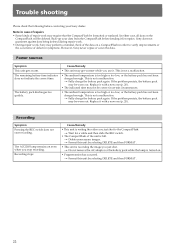
...8226; This unit is recording the image you just shot to verify improvements or the occurrence of the unit is too high or too low, or the battery pack has not been charged enough. Power sources Symptom This unit gets warm. This is not a malfunction. t Wait for repairs. Sony does not guarantee...If the problem persists, the battery pack may be correct in case of repairs • Some kinds of repair work , Sony may get warmer while you stop recording. Trouble shooting Please check the following before sending it for a while and then slide the REC switch. • The CompactFlash...
...8226; This unit is recording the image you just shot to verify improvements or the occurrence of the unit is too high or too low, or the battery pack has not been charged enough. Power sources Symptom This unit gets warm. This is not a malfunction. t Wait for repairs. Sony does not guarantee...If the problem persists, the battery pack may be correct in case of repairs • Some kinds of repair work , Sony may get warmer while you stop recording. Trouble shooting Please check the following before sending it for a while and then slide the REC switch. • The CompactFlash...


