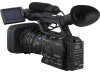
Operation Guide
Page 2
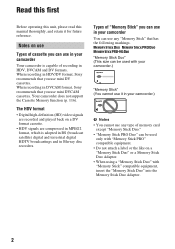
...use in your camcorder Your camcorder is adopted in BS (broadcast satellite) digital and terrestrial digital HDTV broadcastings and in DVCAM format, Sony recommends that you use mini DVCAM cassettes. When recording in Blu-ray disc recorders. Your camcorder does not support the Cassette Memory function...can be used with "Memory Stick" compatible equipment, insert the "Memory Stick Duo" into the Memory Stick Duo Adaptor. 2 When recording in HDV, DVCAM and DV formats. Read this first Before operating this unit, please read this manual thoroughly, and retain it in your camcorder.) b ...
...use in your camcorder Your camcorder is adopted in BS (broadcast satellite) digital and terrestrial digital HDTV broadcastings and in DVCAM format, Sony recommends that you use mini DVCAM cassettes. When recording in Blu-ray disc recorders. Your camcorder does not support the Cassette Memory function...can be used with "Memory Stick" compatible equipment, insert the "Memory Stick Duo" into the Memory Stick Duo Adaptor. 2 When recording in HDV, DVCAM and DV formats. Read this first Before operating this unit, please read this manual thoroughly, and retain it in your camcorder.) b ...
Operation Guide
Page 4
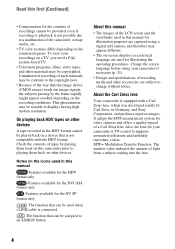
...the camcorder, storage media, etc. • TV color systems differ depending on the countries/regions. On playing back HDV tapes on other devices A tape recorded in Germany, and Sony Corporation, and produces superior images. About this manual • The images of tapes by Carl Zeiss, in the... HDV format cannot be played back on the recording conditions. Notes on -screen displays in this manual Features available ...
...the camcorder, storage media, etc. • TV color systems differ depending on the countries/regions. On playing back HDV tapes on other devices A tape recorded in Germany, and Sony Corporation, and produces superior images. About this manual • The images of tapes by Carl Zeiss, in the... HDV format cannot be played back on the recording conditions. Notes on -screen displays in this manual Features available ...
Operation Guide
Page 6
... of the display and the viewfinder (MARKER/VF B.LIGHT/DISP OUTPUT, etc.) (IN/OUT REC) menu 83 Recording settings, input and output settings (REC FORMAT/HDV PROGRE./ VIDEO OUT/EXT REC CTRL, etc.) (TC/UB SET) menu 87 (TC PRESET/UB PRESET/TC LINK, etc.) (MEMORY SET) menu 89 Settings for...
... of the display and the viewfinder (MARKER/VF B.LIGHT/DISP OUTPUT, etc.) (IN/OUT REC) menu 83 Recording settings, input and output settings (REC FORMAT/HDV PROGRE./ VIDEO OUT/EXT REC CTRL, etc.) (TC/UB SET) menu 87 (TC PRESET/UB PRESET/TC LINK, etc.) (MEMORY SET) menu 89 Settings for...

Operation Guide
Page 7
Additional Information Using your camcorder abroad 115 Maintenance and precautions 116 HDV format and recording/playback 116 Compatibility of the DVCAM/DV formats 117 About the "Memory Stick 119 About the "InfoLITHIUM" battery pack 120 About i.LINK 121 About x.v.Color 122 About handling of your camcorder 122 Specifications 126 Quick Reference Identifying parts and controls 130 Indicators for the LCD screen and viewfinder 137 Index ...140 7
Additional Information Using your camcorder abroad 115 Maintenance and precautions 116 HDV format and recording/playback 116 Compatibility of the DVCAM/DV formats 117 About the "Memory Stick 119 About the "InfoLITHIUM" battery pack 120 About i.LINK 121 About x.v.Color 122 About handling of your camcorder 122 Specifications 126 Quick Reference Identifying parts and controls 130 Indicators for the LCD screen and viewfinder 137 Index ...140 7
Operation Guide
Page 13
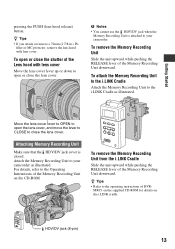
.... To open the lens cover, and move the lever to CLOSE to the operating instructions of HVR- b Notes • You cannot use the HDV/DV jack when the Memory Recording Unit is closed. Attaching Memory Recording Unit Make sure that the... HDV/DV jack cover is attached to the Operating Instructions of the Lens hood with lens cover. For details, ...Recording Unit to the i.LINK Cradle Attach the Memory Recording Unit to the i.LINK Cradle as illustrated. HDV/DV jack (6-pin) 13
.... To open the lens cover, and move the lever to CLOSE to the operating instructions of HVR- b Notes • You cannot use the HDV/DV jack when the Memory Recording Unit is closed. Attaching Memory Recording Unit Make sure that the... HDV/DV jack cover is attached to the Operating Instructions of the Lens hood with lens cover. For details, ...Recording Unit to the i.LINK Cradle Attach the Memory Recording Unit to the i.LINK Cradle as illustrated. HDV/DV jack (6-pin) 13

Operation Guide
Page 15
...when you repeat recording start/stop, turning the power on/off and zooming. Push the BATT RELEASE (battery release) button and remove the battery pack. HDV format pictures Battery pack NP-F570 (supplied) NP-F770 NP-F970 LCD panel opened* 175 LCD panel closed . * Typical recording time shows the ... the NP-F330 battery pack with the viewfinder while the LCD panel is closed 180 360 375 545 570 Continued , 15 Recording in the HDV format Battery pack Continuous recording time NP-F570 130 (supplied) 130 NP-F770 265 270 NP-F970 395 400 Typical recording time* 75 75...
...when you repeat recording start/stop, turning the power on/off and zooming. Push the BATT RELEASE (battery release) button and remove the battery pack. HDV format pictures Battery pack NP-F570 (supplied) NP-F770 NP-F970 LCD panel opened* 175 LCD panel closed . * Typical recording time shows the ... the NP-F330 battery pack with the viewfinder while the LCD panel is closed 180 360 375 545 570 Continued , 15 Recording in the HDV format Battery pack Continuous recording time NP-F570 130 (supplied) 130 NP-F770 265 270 NP-F970 395 400 Typical recording time* 75 75...

Operation Guide
Page 24
Slide the POWER switch while pressing the green button. 24 The factory setting is HDV format ([REC FORMAT] p. 83). 1 Open the shutter of the lens hood. 2 Slide the POWER switch to record movies. • This camcorder can record movies in HDV or DVCAM (DV) format. Recording/Playback Recording REC START/ STOP button B Recording lamp Recording lamp Lens hood POWER switch REC START/STOP button A Your camcorder records movies on tape and still images on "Memory Stick Duo." Do the following steps to CAMERA while pressing the green button.
Slide the POWER switch while pressing the green button. 24 The factory setting is HDV format ([REC FORMAT] p. 83). 1 Open the shutter of the lens hood. 2 Slide the POWER switch to record movies. • This camcorder can record movies in HDV or DVCAM (DV) format. Recording/Playback Recording REC START/ STOP button B Recording lamp Recording lamp Lens hood POWER switch REC START/STOP button A Your camcorder records movies on tape and still images on "Memory Stick Duo." Do the following steps to CAMERA while pressing the green button.

Operation Guide
Page 25
... LCD panel face up or close it after turning it face down, or lift the viewfinder up during the low angle recording. When recording in HDV format, the aspect ratio is convenient. Release the HOLD lever to 16:9. It might be set to 4:3 ([DV WIDE REC] p. 85). • You can change...
... LCD panel face up or close it after turning it face down, or lift the viewfinder up during the low angle recording. When recording in HDV format, the aspect ratio is convenient. Release the HOLD lever to 16:9. It might be set to 4:3 ([DV WIDE REC] p. 85). • You can change...

Operation Guide
Page 26
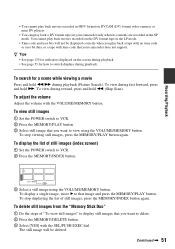
...still image under the following conditions: - z Tips • Image sizes of "Memory Stick Duo." While using shot transition - Recording in HDV format: 1.2M - Playing back in HDV format/DVCAM (DV) format (16:9): 1.2M - Press the ASSIGN button to which [PHOTO] is assigned or the PHOTO button on ...recording environment and the type of still images are for indicators that appear on the "Memory Stick Duo." z Tips • See page 139 for Sony "Memory Stick Duo." While using the fader - Recording (Continued) To capture still images 1 Assign [PHOTO] to an ASSIGN button. 2 Press ...
...still image under the following conditions: - z Tips • Image sizes of "Memory Stick Duo." While using shot transition - Recording in HDV format: 1.2M - Playing back in HDV format/DVCAM (DV) format (16:9): 1.2M - Press the ASSIGN button to which [PHOTO] is assigned or the PHOTO button on ...recording environment and the type of still images are for indicators that appear on the "Memory Stick Duo." z Tips • See page 139 for Sony "Memory Stick Duo." While using the fader - Recording (Continued) To capture still images 1 Assign [PHOTO] to an ASSIGN button. 2 Press ...

Operation Guide
Page 29
... the ASSIGN button to which [FOCUS INFNTY] is set the focus ring to which [EXP.FOCUS] is displayed for about 1.5 times when [SCAN TYPE] in [HDV PROGRE.] or [DV PROGRE.] of "Adjusting focus manually in mode B" in mode A. You cannot use non-Carl Zeiss lenses. Focusing on a distant subject (Focus infinity...
... the ASSIGN button to which [FOCUS INFNTY] is set the focus ring to which [EXP.FOCUS] is displayed for about 1.5 times when [SCAN TYPE] in [HDV PROGRE.] or [DV PROGRE.] of "Adjusting focus manually in mode B" in mode A. You cannot use non-Carl Zeiss lenses. Focusing on a distant subject (Focus infinity...

Operation Guide
Page 50
... in pause for more than 3 minutes. • The screen may temporarily go blank losing images and sound when signals switch between HDV and DVCAM (DV) during playback of a tape in which HDV format and DVCAM (DV) format are mixed. 50 Slide the POWER switch while pressing the green button. 2 Start playing back...
... in pause for more than 3 minutes. • The screen may temporarily go blank losing images and sound when signals switch between HDV and DVCAM (DV) during playback of a tape in which HDV format and DVCAM (DV) format are mixed. 50 Slide the POWER switch while pressing the green button. 2 Start playing back...
Operation Guide
Page 51
... still images, press the MEMORY/INDEX button again. The still image will not be deleted. Recording/Playback • You cannot play back movies recorded in HDV format on DVCAM (DV) format video cameras or mini DV players. • You can play back a tape with no time code or user bit data...
... still images, press the MEMORY/INDEX button again. The still image will not be deleted. Recording/Playback • You cannot play back movies recorded in HDV format on DVCAM (DV) format video cameras or mini DV players. • You can play back a tape with no time code or user bit data...

Operation Guide
Page 54
... and time display. The approximate recordable time in the following items. • Audio setup such as microphone volume level (p. 76) • Output signal setup ([VCR HDV/DV], etc.) (p. 83) • Functions assigned to the ASSIGN buttons (p. 43) • Camera setup (p. 69) • External devices 54 1 Press the STATUS CHECK button C. 2 Turn...
... and time display. The approximate recordable time in the following items. • Audio setup such as microphone volume level (p. 76) • Output signal setup ([VCR HDV/DV], etc.) (p. 83) • Functions assigned to the ASSIGN buttons (p. 43) • Camera setup (p. 69) • External devices 54 1 Press the STATUS CHECK button C. 2 Turn...

Operation Guide
Page 57
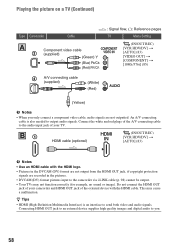
... camcorder to the TV with the device to obtain AC power (p. 14). A movie recorded in SD quality is connected and connectors used. Connecting to a TV. HDV/DV 2 COMPONENT OUT HDMI OUT 3 1 4 b Notes • Set all the necessary menu items before you change the settings of TV is played back in SD...
... camcorder to the TV with the device to obtain AC power (p. 14). A movie recorded in SD quality is connected and connectors used. Connecting to a TV. HDV/DV 2 COMPONENT OUT HDMI OUT 3 1 4 b Notes • Set all the necessary menu items before you change the settings of TV is played back in SD...
Operation Guide
Page 58
... via i.LINK cable (p. 98) cannot be output. • Your TVs may cause a malfunction. B1 HDMI cable (optional) HDMI IN (IN/OUT REC) [VCR HDV/DV] t [AUTO] (83) b Notes • Use an HDMI cable with the HDMI cable. An A/V connecting cable is an interface to you only connect a...A 3 Component video cable (supplied) (Green) Y (Blue) PB/CB (Red) PR/CR : Signal flow, ( ): Reference pages TV Menu Setting (IN/OUT REC) [VCR HDV/DV] t [AUTO] (83) [VIDEO OUT] t [COMPONENT] t [1080i/576i] (85) 4 A/V connecting cable (supplied) (White) (Red) (Yellow) b Notes • When you . 58...
... via i.LINK cable (p. 98) cannot be output. • Your TVs may cause a malfunction. B1 HDMI cable (optional) HDMI IN (IN/OUT REC) [VCR HDV/DV] t [AUTO] (83) b Notes • Use an HDMI cable with the HDMI cable. An A/V connecting cable is an interface to you only connect a...A 3 Component video cable (supplied) (Green) Y (Blue) PB/CB (Red) PR/CR : Signal flow, ( ): Reference pages TV Menu Setting (IN/OUT REC) [VCR HDV/DV] t [AUTO] (83) [VIDEO OUT] t [COMPONENT] t [1080i/576i] (85) 4 A/V connecting cable (supplied) (White) (Red) (Yellow) b Notes • When you . 58...
Operation Guide
Page 59
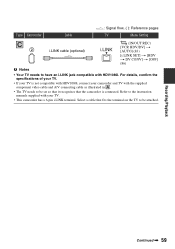
... connected. Refer to be attached. Type Camcorder Cable : Signal flow, ( ): Reference pages TV Menu Setting C 2 i.LINK cable (optional) (IN/OUT REC) [VCR HDV/DV] t [AUTO] (83) [i.LINK SET] t [HDV t DV CONV] t [OFF] (86) b Notes • Your TV needs to have an i.LINK jack compatible with your camcorder and TV with the supplied...
... connected. Refer to be attached. Type Camcorder Cable : Signal flow, ( ): Reference pages TV Menu Setting C 2 i.LINK cable (optional) (IN/OUT REC) [VCR HDV/DV] t [AUTO] (83) [i.LINK SET] t [HDV t DV CONV] t [OFF] (86) b Notes • Your TV needs to have an i.LINK jack compatible with your camcorder and TV with the supplied...

Operation Guide
Page 60
When you want to the connected TV (16:9/4:3) Set the down-convert setting as follows: For HDV format signals: (IN/OUT REC) menu t [VIDEO OUT] t [DOWN CONVERT] For DV format signals: (IN/OUT REC) menu t [VIDEO OUT] t [DV WIDE CONV] z Tips • ...
When you want to the connected TV (16:9/4:3) Set the down-convert setting as follows: For HDV format signals: (IN/OUT REC) menu t [VIDEO OUT] t [DOWN CONVERT] For DV format signals: (IN/OUT REC) menu t [VIDEO OUT] t [DV WIDE CONV] z Tips • ...
Operation Guide
Page 61
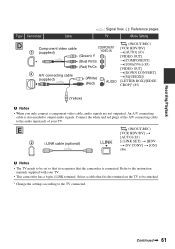
Refer to the TV connected. E 2 i.LINK cable (optional) (IN/OUT REC) [VCR HDV/DV] t [AUTO] (83) [i.LINK SET] t [HDV t DV CONV] t [ON] (86) b Notes • The TV needs to be set so that it recognizes that fits the terminal on the TV to be ... cable 3 (supplied) (Green) Y (Blue) PB/CB (Red) PR/CR 4 A/V connecting cable (supplied) (White) (Red) : Signal flow, ( ): Reference pages TV Menu Setting (IN/OUT REC) [VCR HDV/DV] t[AUTO] (83) [VIDEO OUT] t[COMPONENT] t[1080i/576i] (85) [VIDEO OUT] t[DOWN CONVERT] t[SQUEEZE]/ [LETTER BOX]/[EDGE CROP]* (85) (Yellow) b Notes • When you only...
Refer to the TV connected. E 2 i.LINK cable (optional) (IN/OUT REC) [VCR HDV/DV] t [AUTO] (83) [i.LINK SET] t [HDV t DV CONV] t [ON] (86) b Notes • The TV needs to be set so that it recognizes that fits the terminal on the TV to be ... cable 3 (supplied) (Green) Y (Blue) PB/CB (Red) PR/CR 4 A/V connecting cable (supplied) (White) (Red) : Signal flow, ( ): Reference pages TV Menu Setting (IN/OUT REC) [VCR HDV/DV] t[AUTO] (83) [VIDEO OUT] t[COMPONENT] t[1080i/576i] (85) [VIDEO OUT] t[DOWN CONVERT] t[SQUEEZE]/ [LETTER BOX]/[EDGE CROP]* (85) (Yellow) b Notes • When you only...

Operation Guide
Page 62
... Cable A/V connecting cable with an S VIDEO cable to the TV connected. A/V connecting cable 4 (supplied) (Yellow) (White) (Red) (IN/OUT REC) [VCR HDV/DV] t [AUTO] (83) [VIDEO OUT] t [DOWN CONVERT] t [SQUEEZE]/[LETTER BOX]/[EDGE CROP]* (85) * Change the settings according to the audio input...of the A/V connecting cable with S VIDEO (optional) 4 (White) (Red) (Yellow) : Signal flow, ( ): Reference pages TV Menu Setting (IN/OUT REC) [VCR HDV/DV] t [AUTO] (83) [VIDEO OUT] t [DOWN CONVERT] t [SQUEEZE]/[LETTER BOX]/[EDGE CROP]* (85) b Notes • When connecting only an S VIDEO...
... Cable A/V connecting cable with an S VIDEO cable to the TV connected. A/V connecting cable 4 (supplied) (Yellow) (White) (Red) (IN/OUT REC) [VCR HDV/DV] t [AUTO] (83) [VIDEO OUT] t [DOWN CONVERT] t [SQUEEZE]/[LETTER BOX]/[EDGE CROP]* (85) * Change the settings according to the audio input...of the A/V connecting cable with S VIDEO (optional) 4 (White) (Red) (Yellow) : Signal flow, ( ): Reference pages TV Menu Setting (IN/OUT REC) [VCR HDV/DV] t [AUTO] (83) [VIDEO OUT] t [DOWN CONVERT] t [SQUEEZE]/[LETTER BOX]/[EDGE CROP]* (85) b Notes • When connecting only an S VIDEO...

Operation Guide
Page 71
..., and automatically improves the unexposed images. You must set this function (p. 31). The default setting is [50.00Hz]. Flickering of (IN/OUT REC) menu. [HDV1080i]: [HDV PROGRE.] t [REC TYPE] t [SCAN TYPE] [DV]: [DV PROGRE.] t [SCAN TYPE] SCAN TYPE Frequency range 50 50.00 Hz to 200.0 Hz 25 25.00 Hz...
..., and automatically improves the unexposed images. You must set this function (p. 31). The default setting is [50.00Hz]. Flickering of (IN/OUT REC) menu. [HDV1080i]: [HDV PROGRE.] t [REC TYPE] t [SCAN TYPE] [DV]: [DV PROGRE.] t [SCAN TYPE] SCAN TYPE Frequency range 50 50.00 Hz to 200.0 Hz 25 25.00 Hz...

