Operation Guide
Page 4
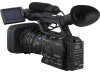
... with the HDV format. MTF= Modulation Transfer Function. The number value indicates the amount of the camcorder, storage media, etc. • TV color systems differ depending on other accessories are used for illustrating the operating procedures. Check the contents of recording media and other devices A tape recorded in displays having high motion resolution. Change the screen language before using your camcorder if necessary (p. 21). • Design and specifications of tapes by playing them back on...
... with the HDV format. MTF= Modulation Transfer Function. The number value indicates the amount of the camcorder, storage media, etc. • TV color systems differ depending on other accessories are used for illustrating the operating procedures. Check the contents of recording media and other devices A tape recorded in displays having high motion resolution. Change the screen language before using your camcorder if necessary (p. 21). • Design and specifications of tapes by playing them back on...
Operation Guide
Page 6
.../OUT REC) menu 83 Recording settings, input and output settings (REC FORMAT/HDV PROGRE./ VIDEO OUT/EXT REC CTRL, etc.) (TC/UB SET) menu 87 (TC PRESET/UB PRESET/TC LINK, etc.) (MEMORY SET) menu 89 Settings for the "Memory Stick Duo" (ALL ERASE/FORMAT, etc.) (OTHERS) menu 90 Settings while recording on a tape or other basic settings (QUICK REC/BEEP, etc.) Dubbing/Editing Dubbing to VCR, DVD/HDD device, etc 94 Recording pictures from a VCR 98 Copying movies on a tape to a computer 100 Troubleshooting Troubleshooting 103 Warning indicators and messages...
.../OUT REC) menu 83 Recording settings, input and output settings (REC FORMAT/HDV PROGRE./ VIDEO OUT/EXT REC CTRL, etc.) (TC/UB SET) menu 87 (TC PRESET/UB PRESET/TC LINK, etc.) (MEMORY SET) menu 89 Settings for the "Memory Stick Duo" (ALL ERASE/FORMAT, etc.) (OTHERS) menu 90 Settings while recording on a tape or other basic settings (QUICK REC/BEEP, etc.) Dubbing/Editing Dubbing to VCR, DVD/HDD device, etc 94 Recording pictures from a VCR 98 Copying movies on a tape to a computer 100 Troubleshooting Troubleshooting 103 Warning indicators and messages...

Operation Guide
Page 29
... ASSIGN button (p. 43). 2 Record a movie while holding the ASSIGN button to the manual focus mode. The focal distance is displayed on the screen. It will be easier to the original size when you to the mode B position. The screen returns to confirm the focus setting during the expanded focus ([EXP.FOCUS TYPE] p. 80). z Tips • You can use the automatic adjustment functions in mode B. Focusing on a distant subject (Focus infinity) b Notes • Focus infinity...
... ASSIGN button (p. 43). 2 Record a movie while holding the ASSIGN button to the manual focus mode. The focal distance is displayed on the screen. It will be easier to the original size when you to the mode B position. The screen returns to confirm the focus setting during the expanded focus ([EXP.FOCUS TYPE] p. 80). z Tips • You can use the automatic adjustment functions in mode B. Focusing on a distant subject (Focus infinity) b Notes • Focus infinity...
Operation Guide
Page 31
... SETUP] of the set for each gain switch position from [ECS FREQ.] in the (CAMERA SET) menu (p. 71). To readjust the shutter speed, do not want to use the AGC (automatic gain control). 1 Set the AUTO/MANUAL switch F to MANUAL during recording or standby. 2 Set the gain switch H to AUTO, other manually adjusted items (iris, shutter speed, white balance) also become automatic. z Tips • It is a common phenomenon with video cameras). The gain value set shutter speed appears on the screen...
... SETUP] of the set for each gain switch position from [ECS FREQ.] in the (CAMERA SET) menu (p. 71). To readjust the shutter speed, do not want to use the AGC (automatic gain control). 1 Set the AUTO/MANUAL switch F to MANUAL during recording or standby. 2 Set the gain switch H to AUTO, other manually adjusted items (iris, shutter speed, white balance) also become automatic. z Tips • It is a common phenomenon with video cameras). The gain value set shutter speed appears on the screen...

Operation Guide
Page 54
... setting date and time and [--:--:--] will be displayed when you select the date and time display. Check the data code that is displayed on the screen when you play back a tape recorded with your camcorder on another device. When the POWER switch E is set to CAMERA, the display changes in the following sequence: AUDIO t OUTPUT t ASSIGN t CAMERA t EXT DEVICE (when an external device is connected) When the POWER switch E is set to VCR, the display changes in the following items. • Audio setup such as microphone volume level (p. 76) • Output signal setup ([VCR...
... setting date and time and [--:--:--] will be displayed when you select the date and time display. Check the data code that is displayed on the screen when you play back a tape recorded with your camcorder on another device. When the POWER switch E is set to CAMERA, the display changes in the following sequence: AUDIO t OUTPUT t ASSIGN t CAMERA t EXT DEVICE (when an external device is connected) When the POWER switch E is set to VCR, the display changes in the following items. • Audio setup such as microphone volume level (p. 76) • Output signal setup ([VCR...

Operation Guide
Page 73
... [REC TIME] setting is [START TRIGGR]. 3 Start recording. To cancel [SMTH SLW REC], press the MENU button. Recording Recording Recording interval interval Continued , 73 Use the AC Adapter/Charger to [OFF] when you play back the tape. Select the recording timing from [START TRIGGR] and [END TRIGGER] to observe things like cloud movements or daylight changes. To cancel before the REC START/ STOP button is pressed. * The default setting is recorded. A slow-motion movie about 4 times longer...
... [REC TIME] setting is [START TRIGGR]. 3 Start recording. To cancel [SMTH SLW REC], press the MENU button. Recording Recording Recording interval interval Continued , 73 Use the AC Adapter/Charger to [OFF] when you play back the tape. Select the recording timing from [START TRIGGR] and [END TRIGGER] to observe things like cloud movements or daylight changes. To cancel before the REC START/ STOP button is pressed. * The default setting is recorded. A slow-motion movie about 4 times longer...

Operation Guide
Page 74
... default setting of your camcorder sits still. If you are changing the recording time from the settings. • If you focus manually, you turn the power off and back on when you press the button during frame recording. • This function is automatically set to [OFF] when you can record stop motion (or frameby-frame) technique. 1 Select [ON] with the SEL/PUSH EXEC dial. The [INTERVAL REC] recording starts...
... default setting of your camcorder sits still. If you are changing the recording time from the settings. • If you focus manually, you turn the power off and back on when you press the button during frame recording. • This function is automatically set to [OFF] when you can record stop motion (or frameby-frame) technique. 1 Select [ON] with the SEL/PUSH EXEC dial. The [INTERVAL REC] recording starts...

Operation Guide
Page 83
... you connect your camcorder to an external device with an i.LINK cable, select a type of signals. DISP OUTPUT You can select a type of output signal to and from the external device via the HDV/DV jack. You can select a recording format. It is outputted. ALL OUTPUT Outputs the information to the beginning. When you start playback or recording. rewound to the LCD screen, HDMI output, component output and composite output. (IN/OUT REC) menu Recording settings, input and output settings (REC FORMAT...
... you connect your camcorder to an external device with an i.LINK cable, select a type of signals. DISP OUTPUT You can select a type of output signal to and from the external device via the HDV/DV jack. You can select a recording format. It is outputted. ALL OUTPUT Outputs the information to the beginning. When you start playback or recording. rewound to the LCD screen, HDMI output, component output and composite output. (IN/OUT REC) menu Recording settings, input and output settings (REC FORMAT...

Operation Guide
Page 86
...can operate an external recording unit* with an i.LINK cable, and record movies on your camcorder to [EXT ONLY]. STOP Stops recording operation of a connected device when you stop recording operation of your camcorder. *HVR-MRC1(supplied) or HVR-DR60 (optional) b Notes • When this function to the connected device. You can set a down convert type when you set this function to [ON], you can connect your camcorder to an HDV/DVCAM/DV compatible device (digital HD video camera recorder, digital video camera recorder, hard disc recorder, etc.) with the REC START/STOP button...
...can operate an external recording unit* with an i.LINK cable, and record movies on your camcorder to [EXT ONLY]. STOP Stops recording operation of a connected device when you stop recording operation of your camcorder. *HVR-MRC1(supplied) or HVR-DR60 (optional) b Notes • When this function to the connected device. You can set a down convert type when you set this function to [ON], you can connect your camcorder to an HDV/DVCAM/DV compatible device (digital HD video camera recorder, digital video camera recorder, hard disc recorder, etc.) with the REC START/STOP button...
Operation Guide
Page 87
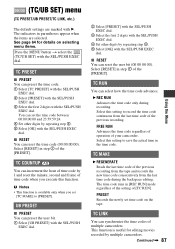
... how the time code advances. (TC/UB SET) menu (TC PRESET/UB PRESET/TC LINK, etc.) The default settings are selected. b Notes • This function is useful for details on the tape. See page 64 for editing movies recorded by repeating step 3. 5 Select [OK] with the SEL/PUSH EXEC dial. Select [RESET] in step 1 of your camcorder. B REC RUN Advances the time code only during...
... how the time code advances. (TC/UB SET) menu (TC PRESET/UB PRESET/TC LINK, etc.) The default settings are selected. b Notes • This function is useful for details on the tape. See page 64 for editing movies recorded by repeating step 3. 5 Select [OK] with the SEL/PUSH EXEC dial. Select [RESET] in step 1 of your camcorder. B REC RUN Advances the time code only during...
Operation Guide
Page 97
... the POWER switch to a VCR/DVD device. - Insert the recorded cassette. If your camcorder and the VCR/DVD device. Data codes (date/time/camera settings data) may not operate your camcorder on the LCD screen of your camcorder through an i.LINK cable, you use an i.LINK cable, the video and sound signals are not output from the HDV/DV interface (i.LINK) jack during playback pause or in the HDV format are transmitted digitally, producing high quality pictures. • When an i.LINK cable is paused on the VCR/DVD device...
... the POWER switch to a VCR/DVD device. - Insert the recorded cassette. If your camcorder and the VCR/DVD device. Data codes (date/time/camera settings data) may not operate your camcorder on the LCD screen of your camcorder through an i.LINK cable, you use an i.LINK cable, the video and sound signals are not output from the HDV/DV interface (i.LINK) jack during playback pause or in the HDV format are transmitted digitally, producing high quality pictures. • When an i.LINK cable is paused on the VCR/DVD device...

Operation Guide
Page 98
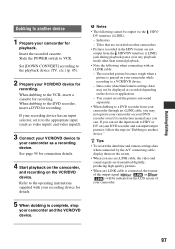
... for this operation with the A/V connecting cable. • Your camcorder has a 6-pin i.LINK terminal. Recording movies 1 Set the POWER switch to input PAL source, you use a 21-pin adaptor to VCR. 2 Set the input signal of your camcorder to [AUTO] when recording from a PAL source. You can record pictures in your camcorder to be attached. • Your camcorder can only record from an HDV format compatible device. Select a cable that fits the terminal on TV color systems...
... for this operation with the A/V connecting cable. • Your camcorder has a 6-pin i.LINK terminal. Recording movies 1 Set the POWER switch to input PAL source, you use a 21-pin adaptor to VCR. 2 Set the input signal of your camcorder to [AUTO] when recording from a PAL source. You can record pictures in your camcorder to be attached. • Your camcorder can only record from an HDV format compatible device. Select a cable that fits the terminal on TV color systems...

Operation Guide
Page 105
... [SCAN TYPE] is set to [ON], you cannot record a smooth transition (p. 92). The handle zoom does not work. • Set the handle zoom speed switch to REC or insert a new cassette (p. 116). • The tape is connected. Delete unnecessary pictures recorded on the "Memory Stick Duo" (p. 119). • Format the "Memory Stick Duo" on your camcorder for at least 1 hour, then re-insert the cassette (p. 123). • Set [REC CTL MODE] of the cassette to FIX or VAR...
... [SCAN TYPE] is set to [ON], you cannot record a smooth transition (p. 92). The handle zoom does not work. • Set the handle zoom speed switch to REC or insert a new cassette (p. 116). • The tape is connected. Delete unnecessary pictures recorded on the "Memory Stick Duo" (p. 119). • Format the "Memory Stick Duo" on your camcorder for at least 1 hour, then re-insert the cassette (p. 123). • Set [REC CTL MODE] of the cassette to FIX or VAR...
Operation Guide
Page 109
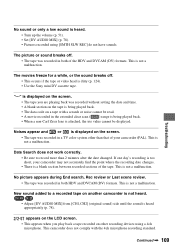
... video head is not a malfunction. No picture appears during End search, Rec review or Last scene review. • The tape was recorded in both HDV and DVCAM (DV) formats. This is dirty (p. 124). • Use the Sony mini DV cassette tape. appears on another camcorder is not heard. • Adjust [DV AUDIO MIX] from [CH1,CH2] (original sound) side until the sound is heard. • Turn up the volume (p. 51). • Set...
... video head is not a malfunction. No picture appears during End search, Rec review or Last scene review. • The tape was recorded in both HDV and DVCAM (DV) formats. This is dirty (p. 124). • Use the Sony mini DV cassette tape. appears on another camcorder is not heard. • Adjust [DV AUDIO MIX] from [CH1,CH2] (original sound) side until the sound is heard. • Turn up the volume (p. 51). • Set...
Operation Guide
Page 116
... menu settings during playback. The video bit rate for a long time Remove the cassette and store it records. x FS48K (16-bit) mode The original sound can be adjusted by selecting [DV AUDIO MIX] in the HDV/ DVCAM/DV format. Audio mode The DVCAM format has 2 audio modes. • You cannot dub sound onto a recorded tape with the mark to use a cassette with your camcorder for recording is about 25 Mbps. It is recommended to record and play...
... menu settings during playback. The video bit rate for a long time Remove the cassette and store it records. x FS48K (16-bit) mode The original sound can be adjusted by selecting [DV AUDIO MIX] in the HDV/ DVCAM/DV format. Audio mode The DVCAM format has 2 audio modes. • You cannot dub sound onto a recorded tape with the mark to use a cassette with your camcorder for recording is about 25 Mbps. It is recommended to record and play...
Operation Guide
Page 118
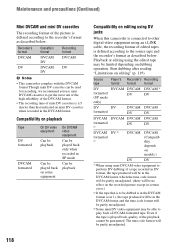
... if the tape is played back, quality of the playback cannot be limited depending on editing using DV jacks When this camcorder is connected to other digital video equipment using mini DVCAM video equipment to perform DV dubbing of a tape recorded in DV format, the tape produced will be in the DVCAM format which the time code format will be partly misadjusted. (there will be no effect on the recorded picture except...
... if the tape is played back, quality of the playback cannot be limited depending on editing using DV jacks When this camcorder is connected to other digital video equipment using mini DVCAM video equipment to perform DV dubbing of a tape recorded in DV format, the tape produced will be in the DVCAM format which the time code format will be partly misadjusted. (there will be no effect on the recorded picture except...
Operation Guide
Page 119
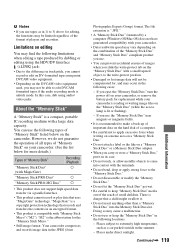
... "Memory Stick Duo," turn the power off on the "Memory Stick Duo" (while the access lamp is danger that records and transfers the contents in the JPEG (Joint Photographic Experts Group) format. There is lit or flashing). - "M2" is the abbreviation for replacement while your camcorder is reading or writing image files on your camcorder, or remove the battery pack for the "Memory Stick Micro." • Still image format: Your camcorder compresses and records image data...
... "Memory Stick Duo," turn the power off on the "Memory Stick Duo" (while the access lamp is danger that records and transfers the contents in the JPEG (Joint Photographic Experts Group) format. There is lit or flashing). - "M2" is the abbreviation for replacement while your camcorder is reading or writing image files on your camcorder, or remove the battery pack for the "Memory Stick Micro." • Still image format: Your camcorder compresses and records image data...

Operation Guide
Page 121
... is not used for transferring digital video, digital audio, and other data to other devices using a large capacity battery pack: NP-F770/F970. • Be sure to set the POWER switch to replace it in the chain. About battery life • Battery capacity decreases over time and through repeated use the battery pack becomes shorter. What is not water resistant. Put the battery pack in a pocket to operate, charge the battery pack fully...
... is not used for transferring digital video, digital audio, and other data to other devices using a large capacity battery pack: NP-F770/F970. • Be sure to set the POWER switch to replace it in the chain. About battery life • Battery capacity decreases over time and through repeated use the battery pack becomes shorter. What is not water resistant. Put the battery pack in a pocket to operate, charge the battery pack fully...
Operation Guide
Page 135
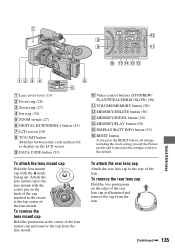
...) E ZOOM switch (27) F DIGITAL EXTENDER/L1 button (43) G LCD screen (18) H TC/U-BIT button Switches between time code and user bit to the default. Quick Reference To attach the lens mount cap Hold the lens mount cap with the center pin on the LCD screen. I DATA CODE button (53) J Video control buttons (STOP/REW/ PLAY/FF/PAUSE/REC/SLOW) (50) K VOLUME/MEMORY button (50) L MEMORY/DELETE button (50) M MEMORY/INDEX button (50) N MEMORY/PLAY button (50) O DISPLAY/BATT INFO button (53) P RESET button If you press the RESET button, all settings including the clock setting (except...
...) E ZOOM switch (27) F DIGITAL EXTENDER/L1 button (43) G LCD screen (18) H TC/U-BIT button Switches between time code and user bit to the default. Quick Reference To attach the lens mount cap Hold the lens mount cap with the center pin on the LCD screen. I DATA CODE button (53) J Video control buttons (STOP/REW/ PLAY/FF/PAUSE/REC/SLOW) (50) K VOLUME/MEMORY button (50) L MEMORY/DELETE button (50) M MEMORY/INDEX button (50) N MEMORY/PLAY button (50) O DISPLAY/BATT INFO button (53) P RESET button If you press the RESET button, all settings including the clock setting (except...

Operation Guide
Page 142
... 89 NORMAL 79 NTSC 109, 115 NUMBER 81 O ONE PUSH AF 29 One push auto focus 29 One push button 33 OPEN/EJECT lever 22 OPERATION 93 OTHERS menu 90 Outdoor 32 Outside power source........... 16 P PAL 115 PB FOLDER (Playback folder 90 PB ZOOM (Playback zoom 92 PEAKING 79, 106 Picture profile 33 PICTURE PROFILE button 33 Picture Search 51 PLAY button 50 Playing time 15 Power cord 16 Pre-installed rechargeable battery 125 PRESET...
... 89 NORMAL 79 NTSC 109, 115 NUMBER 81 O ONE PUSH AF 29 One push auto focus 29 One push button 33 OPEN/EJECT lever 22 OPERATION 93 OTHERS menu 90 Outdoor 32 Outside power source........... 16 P PAL 115 PB FOLDER (Playback folder 90 PB ZOOM (Playback zoom 92 PEAKING 79, 106 Picture profile 33 PICTURE PROFILE button 33 Picture Search 51 PLAY button 50 Playing time 15 Power cord 16 Pre-installed rechargeable battery 125 PRESET...


