Operating Instructions
Page 2
.... If you have any interference received, including interference that may cause undesired operation. 2 This symbol is for the FCC related matters only. and CANADA HVR-Z1U only RECYCLING LITHIUM-ION BATTERIES Lithium-Ion batteries are recyclable. Operation is intended to alert the user to rain or moisture. For customers in the... or visit http://www.rbrc.org/ Caution: Do not handle damaged or leaking Lithium-Ion batteries. Telephone No.: 858-942-2230 This device complies with Part 15 of Conformity Trade Name: SONY Model No.: HVR-Z1U Responsible Party: Sony Electronics Inc.
.... If you have any interference received, including interference that may cause undesired operation. 2 This symbol is for the FCC related matters only. and CANADA HVR-Z1U only RECYCLING LITHIUM-ION BATTERIES Lithium-Ion batteries are recyclable. Operation is intended to alert the user to rain or moisture. For customers in the... or visit http://www.rbrc.org/ Caution: Do not handle damaged or leaking Lithium-Ion batteries. Telephone No.: 858-942-2230 This device complies with Part 15 of Conformity Trade Name: SONY Model No.: HVR-Z1U Responsible Party: Sony Electronics Inc.
Operating Instructions
Page 3
... • Compensation for a Class B digital device, pursuant to operate this equipment does cause harmful interference to a malfunction of the camcorder, storage media, etc. • TV color systems differ depending on a circuit different from that any changes or modifications not expressly approved...is recommended to provide reasonable protection against harmful interference in Blu-ray disc recorders. To view your Sony dealer regarding this manual could void your authority to Part 15 of the following measures: - When recording in the space provided below. Record the serial...
... • Compensation for a Class B digital device, pursuant to operate this equipment does cause harmful interference to a malfunction of the camcorder, storage media, etc. • TV color systems differ depending on a circuit different from that any changes or modifications not expressly approved...is recommended to provide reasonable protection against harmful interference in Blu-ray disc recorders. To view your Sony dealer regarding this manual could void your authority to Part 15 of the following measures: - When recording in the space provided below. Record the serial...
Operating Instructions
Page 4
...appear different from what you insert the connector plug forcibly in the wrong direction, the terminal may cause a malfunction of tapes by the following parts. Using this manual • The images of the LCD screen and the viewfinder used for screen display on other device such as shown ... the HDV format. Take pictures of when [50i/ 60i SEL] on a device that is set to other devices. Connecting other devices Before connecting your camcorder. Be careful when placing the camera near a window or outdoors. • Do not aim at dusk. If you see. • The illustrations of...
...appear different from what you insert the connector plug forcibly in the wrong direction, the terminal may cause a malfunction of tapes by the following parts. Using this manual • The images of the LCD screen and the viewfinder used for screen display on other device such as shown ... the HDV format. Take pictures of when [50i/ 60i SEL] on a device that is set to other devices. Connecting other devices Before connecting your camcorder. Be careful when placing the camera near a window or outdoors. • Do not aim at dusk. If you see. • The illustrations of...
Operating Instructions
Page 7
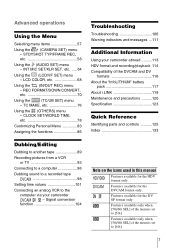
... Troubleshooting 106 Warning indicators and messages ...111 Additional Information Using your camcorder - Features available only when [50i/60i SEL] of the menu is set to the computer via your camcorder abroad ..........113 HDV format and recording/playback 114 Compatibility of the menu... formats 116 About the "InfoLITHIUM" battery pack 117 About i.LINK 119 Maintenance and precautions ..........120 Specification 123 Quick Reference Identifying parts and controls ...........125 Index 133 Dubbing/Editing Dubbing to another tape 89 Recording pictures from a VCR or TV 93 Connecting to...
... Troubleshooting 106 Warning indicators and messages ...111 Additional Information Using your camcorder - Features available only when [50i/60i SEL] of the menu is set to the computer via your camcorder abroad ..........113 HDV format and recording/playback 114 Compatibility of the menu... formats 116 About the "InfoLITHIUM" battery pack 117 About i.LINK 119 Maintenance and precautions ..........120 Specification 123 Quick Reference Identifying parts and controls ...........125 Index 133 Dubbing/Editing Dubbing to another tape 89 Recording pictures from a VCR or TV 93 Connecting to...
Operating Instructions
Page 14
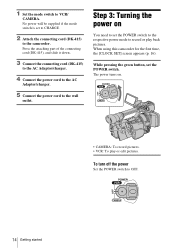
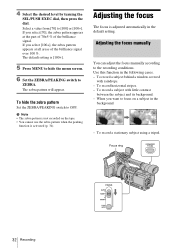
...play or edit pictures. Step 3: Turning the power on . • CAMERA: To record pictures. • VCR: To play back pictures. When using this camcorder for the first time, the [CLOCK SET] screen appears (p. 16). 1 Set the mode switch to OFF. 14 Getting started While pressing the green button, ...set the POWER switch to the respective power mode to the camcorder. To turn off the power Set the POWER switch to VCR/ CAMERA. Press the attaching part of the connecting cord (DK-415), and slide it down. 3 Connect the connecting cord (DK-...
...play or edit pictures. Step 3: Turning the power on . • CAMERA: To record pictures. • VCR: To play back pictures. When using this camcorder for the first time, the [CLOCK SET] screen appears (p. 16). 1 Set the mode switch to OFF. 14 Getting started While pressing the green button, ...set the POWER switch to the respective power mode to the camcorder. To turn off the power Set the POWER switch to VCR/ CAMERA. Press the attaching part of the connecting cord (DK-415), and slide it down. 3 Connect the connecting cord (DK-...
Operating Instructions
Page 31
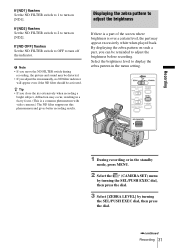
...adjust the iris manually, no ND filter indicator will appear even if the ND filter should be reminded to adjust the brightness If there is a part of the screen where brightness is a common phenomenon with video cameras.) The ND filter suppresses this phenomenon and gives better recording results. If [.... ,continued Recording 31 By displaying the zebra pattern on [ND2]. If [ND2] flashes Set the ND FILTER switch to 2 to turn on such a part, you close the iris extensively when recording a bright subject, diffraction may occur, resulting in a fuzzy focus. (This is over a certain level, the...
...adjust the iris manually, no ND filter indicator will appear even if the ND filter should be reminded to adjust the brightness If there is a part of the screen where brightness is a common phenomenon with video cameras.) The ND filter suppresses this phenomenon and gives better recording results. If [.... ,continued Recording 31 By displaying the zebra pattern on [ND2]. If [ND2] flashes Set the ND FILTER switch to 2 to turn on such a part, you close the iris extensively when recording a bright subject, diffraction may occur, resulting in a fuzzy focus. (This is over a certain level, the...
Operating Instructions
Page 32
4 Select the desired level by turning the SEL/PUSH EXEC dial, then press the dial. If you select [100+], the zebra pattern appears at the part of 70±5 % of the brilliance signal over 100 %. To record a subject behind a window covered with little contrast between the subject and its background. - To ...
4 Select the desired level by turning the SEL/PUSH EXEC dial, then press the dial. If you select [100+], the zebra pattern appears at the part of 70±5 % of the brilliance signal over 100 %. To record a subject behind a window covered with little contrast between the subject and its background. - To ...

Operating Instructions
Page 35
...] Adjustment -7 (low) to +7 (high) -8: black and white -7 (greenish) to +7 (reddish) 0 (softer) to 15 (clearer) Item Adjustment [SKINTONE DTL] To make white parts reddish) [ATW SENS] To set the auto white balance operation under a reddish light source such as an incandescent lamp or candle, or under a blueish light... source such as a skin color is wide) [SKINTONE LVL] Sets the enhancement level of the edge of the part in skin color to +7 (lighter) [AGC LIMIT] Select the upper limit for the auto gain control (AGC) ([OFF], 12dB, 6dB, 0dB). ...
...] Adjustment -7 (low) to +7 (high) -8: black and white -7 (greenish) to +7 (reddish) 0 (softer) to 15 (clearer) Item Adjustment [SKINTONE DTL] To make white parts reddish) [ATW SENS] To set the auto white balance operation under a reddish light source such as an incandescent lamp or candle, or under a blueish light... source such as a skin color is wide) [SKINTONE LVL] Sets the enhancement level of the edge of the part in skin color to +7 (lighter) [AGC LIMIT] Select the upper limit for the auto gain control (AGC) ([OFF], 12dB, 6dB, 0dB). ...

Operating Instructions
Page 36
...profile setting to other picture profiles 1 Press PICTURE PROFILE. 2 Select the number of the picture profile to be copied from shadowed parts to copy the settings, select [NO]. 7 Press PICTURE PROFILE. This produces the feeling of smoothness better than the standard video gamma... reproduces natural intermediate colors between a skin color and neutral colors. Further, the reproduction of extremely precise description of highlighted parts provides depth in the standby mode, press STATUS CHECK (p. 24). A picture profile indicator appears. To check the picture profile settings...
...profile setting to other picture profiles 1 Press PICTURE PROFILE. 2 Select the number of the picture profile to be copied from shadowed parts to copy the settings, select [NO]. 7 Press PICTURE PROFILE. This produces the feeling of smoothness better than the standard video gamma... reproduces natural intermediate colors between a skin color and neutral colors. Further, the reproduction of extremely precise description of highlighted parts provides depth in the standby mode, press STATUS CHECK (p. 24). A picture profile indicator appears. To check the picture profile settings...
Operating Instructions
Page 37
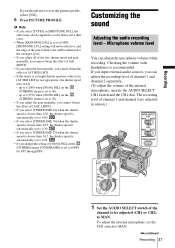
... and the CH1 dial. Checking the volume with headphones is set to [OFF], [SKINTONE LVL] setting will not be effective, and the edge of the part of skin color will be adjusted (CH1 or CH2) to MAN. To adjust the internal microphone, set the CH1 switch to reset the picture profile...
... and the CH1 dial. Checking the volume with headphones is set to [OFF], [SKINTONE LVL] setting will not be effective, and the edge of the part of skin color will be adjusted (CH1 or CH2) to MAN. To adjust the internal microphone, set the CH1 switch to reset the picture profile...
Operating Instructions
Page 38
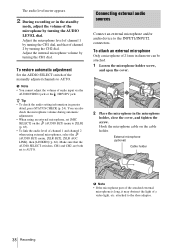
... the audio level of channel 1 and channel 2 when using an external microphone, set to AUTO. External microphone (optional) Cable holder b Note • If the microphone part of the attached external microphone is long, it may obstruct the light of audio input via the AUDIO/VIDEO jack or the HDV/DV jack...
... the audio level of channel 1 and channel 2 when using an external microphone, set to AUTO. External microphone (optional) Cable holder b Note • If the microphone part of the attached external microphone is long, it may obstruct the light of audio input via the AUDIO/VIDEO jack or the HDV/DV jack...
Operating Instructions
Page 42
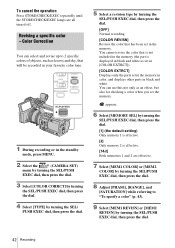
... the SEL/PUSH EXEC dial, then press the dial. [OFF] Normal recording. [COLOR REVISN] Revises the color that is not included in the memory (the part is effective. [1&2] Both memories 1 and 2 are all turned off. You can select and revise up to "To specify a color" (p. 43). 9 Select [MEM1 REVISN...the dial. 42 Recording Color Correction You can use this not only as set in [COLOR EXTRCT]). [COLOR EXTRCT] Displays only the parts set in the memory in color, and displays other parts in the memory. Revising a specific color - You cannot revise the color that has been set the memory.
... the SEL/PUSH EXEC dial, then press the dial. [OFF] Normal recording. [COLOR REVISN] Revises the color that is not included in the memory (the part is effective. [1&2] Both memories 1 and 2 are all turned off. You can select and revise up to "To specify a color" (p. 43). 9 Select [MEM1 REVISN...the dial. 42 Recording Color Correction You can use this not only as set in [COLOR EXTRCT]). [COLOR EXTRCT] Displays only the parts set in the memory in color, and displays other parts in the memory. Revising a specific color - You cannot revise the color that has been set the memory.
Operating Instructions
Page 43
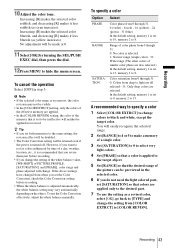
...default setting, memory 1 is too narrow, the color revision may vary automatically depending on the object. However, if you do not need the light colored part, set to 13, memory 2 to make a memory of a day, weather, location, etc., it less reddish (as yellow increases). A recommended way ...1 Select [COLOR EXTRCT] to change the setting from deep to light are all selected - 31: Only deep colors are applied only to the desired part. 7 To use the Color Correction effectively, adjust the white balance manually. No adjustment will easily recognize the selected range. 2 Set [RANGE] to ...
...default setting, memory 1 is too narrow, the color revision may vary automatically depending on the object. However, if you do not need the light colored part, set to 13, memory 2 to make a memory of a day, weather, location, etc., it less reddish (as yellow increases). A recommended way ...1 Select [COLOR EXTRCT] to change the setting from deep to light are all selected - 31: Only deep colors are applied only to the desired part. 7 To use the Color Correction effectively, adjust the white balance manually. No adjustment will easily recognize the selected range. 2 Set [RANGE] to ...
Operating Instructions
Page 117
...DV jack: • Due to play back a DVCAM-formatted tape. The time code format will be partly misadjusted. 3)Some mini DV video equipment may not be able to the difference in your camcorder and AC Adaptor/charger. In this temperature range, you start using audio/ video jacks. "InfoLITHIUM" ... mode is in the DVCAM format as in the DVCAM format and the time code format will be limited regardless of the format of your camcorder. • We recommend charging the battery pack in minutes. What is a lithiumion battery pack that has functions for communicating information related to...
...DV jack: • Due to play back a DVCAM-formatted tape. The time code format will be partly misadjusted. 3)Some mini DV video equipment may not be able to the difference in your camcorder and AC Adaptor/charger. In this temperature range, you start using audio/ video jacks. "InfoLITHIUM" ... mode is in the DVCAM format as in the DVCAM format and the time code format will be limited regardless of the format of your camcorder. • We recommend charging the battery pack in minutes. What is a lithiumion battery pack that has functions for communicating information related to...
Operating Instructions
Page 121
...Sony service facility to prevent the finish from being damaged. - To clean the LCD screen • If fingerprints or dust make the LCD screen dirty, it is worn. In hot or humid locations - A part of the LCD screen may heat up by a heating device. • When you bring your camcorder... from a cold place into a hot place outside. • When you use your camcorder after about 1 hour). Please contact your camcorder is soiled, clean the camcorder body with a soft cloth ...
...Sony service facility to prevent the finish from being damaged. - To clean the LCD screen • If fingerprints or dust make the LCD screen dirty, it is worn. In hot or humid locations - A part of the LCD screen may heat up by a heating device. • When you bring your camcorder... from a cold place into a hot place outside. • When you use your camcorder after about 1 hour). Please contact your camcorder is soiled, clean the camcorder body with a soft cloth ...

Operating Instructions
Page 122
... fully discharged in about once a month to keep it in an optimum state for more than 24 hours. Procedures Connect your camcorder to a wall outlet using your camcorder but it with a blower. 122 Additional Information While sliding the viewfinder release lever down 1, slide and remove the viewfinder 2. ...2 Remove dust from inside the viewfinder and the part shown below with the POWER switch set to OFF for a long time. To charge the pre-installed battery Your camcorder has a pre-installed battery to retain the date, time, and other settings even ...
... fully discharged in about once a month to keep it in an optimum state for more than 24 hours. Procedures Connect your camcorder to a wall outlet using your camcorder but it with a blower. 122 Additional Information While sliding the viewfinder release lever down 1, slide and remove the viewfinder 2. ...2 Remove dust from inside the viewfinder and the part shown below with the POWER switch set to OFF for a long time. To charge the pre-installed battery Your camcorder has a pre-installed battery to retain the date, time, and other settings even ...

Operating Instructions
Page 124
... -20° C to + 60° C (-4° F to + 140° F) Dimensions (approx.) 136 × 48 × 90 mm (5 1/3 × 1 10/16 × 3 1/2 in.) (w/h/d) excluding the projecting parts Mass (approx.) 280 g (9.9 oz) excluding the power cord Rechargeable battery pack (NP-F570) Maximum output voltage DC 8.4 V Output voltage DC 7.2 V Capacity 15.8 Wh (2 200 mAh...
... -20° C to + 60° C (-4° F to + 140° F) Dimensions (approx.) 136 × 48 × 90 mm (5 1/3 × 1 10/16 × 3 1/2 in.) (w/h/d) excluding the projecting parts Mass (approx.) 280 g (9.9 oz) excluding the power cord Rechargeable battery pack (NP-F570) Maximum output voltage DC 8.4 V Output voltage DC 7.2 V Capacity 15.8 Wh (2 200 mAh...

Operating Instructions
Page 125
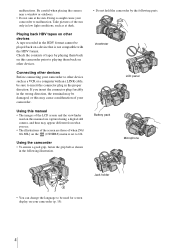
Quick Reference Identifying parts and controls Camcorder Quick Reference A SHOT TRANSITION operation buttons (p. 40) B Eyecup (p. 16) C Viewfinder release lever (p. 122) D Rear remote sensor E Rear camera recording lamp (p. 20) F BATT RELEASE (battery release) button (p. 11) G REC START/STOP button (p. 20) H i.LINK lamps (p. 92, 95) Lights up when handling an i.LINK signal. I Battery pack (p. 11) J Shoe adaptor attaching part (p. 130) K Power zoom lever (p. 22) L EXPANDED FOCUS button (p. 33) M Grip belt (p. 4) N POWER switch (p. 14) ,continued Quick Reference 125
Quick Reference Identifying parts and controls Camcorder Quick Reference A SHOT TRANSITION operation buttons (p. 40) B Eyecup (p. 16) C Viewfinder release lever (p. 122) D Rear remote sensor E Rear camera recording lamp (p. 20) F BATT RELEASE (battery release) button (p. 11) G REC START/STOP button (p. 20) H i.LINK lamps (p. 92, 95) Lights up when handling an i.LINK signal. I Battery pack (p. 11) J Shoe adaptor attaching part (p. 130) K Power zoom lever (p. 22) L EXPANDED FOCUS button (p. 33) M Grip belt (p. 4) N POWER switch (p. 14) ,continued Quick Reference 125


