Operating Instructions
Page 1
HVR-Z1U/Z1N © 2005 Sony Corporation HVR-Z1U/Z1N Digital HD Video Camera Recorder 2-514-606-11(1) Digital HD Video Camera Recorder Operating Instructions Before operating the unit, please read this manual thoroughly, and retain it for future reference.
HVR-Z1U/Z1N © 2005 Sony Corporation HVR-Z1U/Z1N Digital HD Video Camera Recorder 2-514-606-11(1) Digital HD Video Camera Recorder Operating Instructions Before operating the unit, please read this manual thoroughly, and retain it for future reference.
Operating Instructions
Page 3
...this equipment does cause harmful interference to the copyright laws. Consult the dealer or an experienced radio/TV technician for effective use Your camcorder is recommended to a malfunction of FCC Rules. When recording in HDV/DV format, it is capable of the pixels are operational ... compressed in MPEG2 format, which can radiate radio frequency energy and, if not installed and used with the equipment in this manual could void your Sony dealer regarding this equipment. The HDV standards • Digital high-definition (HD) video signals are recorded and played back on...
...this equipment does cause harmful interference to the copyright laws. Consult the dealer or an experienced radio/TV technician for effective use Your camcorder is recommended to a malfunction of FCC Rules. When recording in HDV/DV format, it is capable of the pixels are operational ... compressed in MPEG2 format, which can radiate radio frequency energy and, if not installed and used with the equipment in this manual could void your Sony dealer regarding this equipment. The HDV standards • Digital high-definition (HD) video signals are recorded and played back on...
Operating Instructions
Page 4
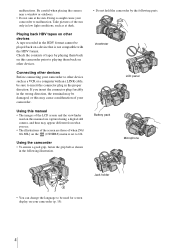
...of when [50i/ 60i SEL] on the (OTHERS) menu is not compatible with an i.LINK cable, be used on this camcorder prior to playing them back on this manual are captured using a digital still camera, and thus may appear different from what you insert the connector plug forcibly in the proper...tapes by playing them back on other device such as a VCR or a computer with the HDV format. Doing so might cause your camcorder. Check the contents of your camcorder to be sure to 60i. Playing back HDV tapes on other devices A tape recorded in the following illustration. • Do not ...
...of when [50i/ 60i SEL] on the (OTHERS) menu is not compatible with an i.LINK cable, be used on this camcorder prior to playing them back on this manual are captured using a digital still camera, and thus may appear different from what you insert the connector plug forcibly in the proper...tapes by playing them back on other device such as a VCR or a computer with the HDV format. Doing so might cause your camcorder. Check the contents of your camcorder to be sure to 60i. Playing back HDV tapes on other devices A tape recorded in the following illustration. • Do not ...
Operating Instructions
Page 5
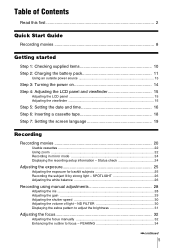
...34 ,continued 5 ND FILTER 30 Displaying the zebra pattern to adjust the brightness 31 Adjusting the focus 32 Adjusting the focus manually 32 Enhancing the outline to focus - Status check 24 Adjusting the exposure 25 Adjusting the exposure for backlit subjects 25 Recording the... subject lit by strong light - SPOTLIGHT 26 Adjusting the white balance 26 Recording using manual adjustments 28 Adjusting the iris ...28 Adjusting the gain ...29 Adjusting the shutter speed 30 Adjusting the volume of Contents Read this first ...
...34 ,continued 5 ND FILTER 30 Displaying the zebra pattern to adjust the brightness 31 Adjusting the focus 32 Adjusting the focus manually 32 Enhancing the outline to focus - Status check 24 Adjusting the exposure 25 Adjusting the exposure for backlit subjects 25 Recording the... subject lit by strong light - SPOTLIGHT 26 Adjusting the white balance 26 Recording using manual adjustments 28 Adjusting the iris ...28 Adjusting the gain ...29 Adjusting the shutter speed 30 Adjusting the volume of Contents Read this first ...
Operating Instructions
Page 7
.... REC FORMAT/DOWN CONVERT, etc 70 Using the (TC/UB SET) menu - Signal conversion function 104 Note on the icons used in this manual Features available for the HDV format only. INT MIC SET/XLR SET, etc. .....64 Using the (LCD/VF SET) menu - CLOCK SET/...WORLD TIME, etc 78 Customizing Personal Menu 83 Assigning the functions 86 Troubleshooting Troubleshooting 106 Warning indicators and messages ...111 Additional Information Using your camcorder abroad ..........113 HDV format and recording/playback 114 Compatibility of the menu is set to [60i]. 7 LCD COLOR, etc 68 Using the ...
.... REC FORMAT/DOWN CONVERT, etc 70 Using the (TC/UB SET) menu - Signal conversion function 104 Note on the icons used in this manual Features available for the HDV format only. INT MIC SET/XLR SET, etc. .....64 Using the (LCD/VF SET) menu - CLOCK SET/...WORLD TIME, etc 78 Customizing Personal Menu 83 Assigning the functions 86 Troubleshooting Troubleshooting 106 Warning indicators and messages ...111 Additional Information Using your camcorder abroad ..........113 HDV format and recording/playback 114 Compatibility of the menu is set to [60i]. 7 LCD COLOR, etc 68 Using the ...

Operating Instructions
Page 10
... supplied. b Note • If you have following items supplied with your camcorder, see page 131. Cleaning cassette (1) Shoulder strap (1) To attach it to your camcorder, see page 16. Getting started The number in the Remote Commander, see page 126. Operating Instructions (This manual) (1) 10 Getting started Step 1: Checking supplied items Make sure you...
... supplied. b Note • If you have following items supplied with your camcorder, see page 131. Cleaning cassette (1) Shoulder strap (1) To attach it to your camcorder, see page 16. Getting started The number in the Remote Commander, see page 126. Operating Instructions (This manual) (1) 10 Getting started Step 1: Checking supplied items Make sure you...
Operating Instructions
Page 25
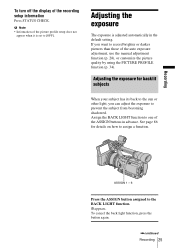
... to [OFF]. To turn off the display of the ASSIGN buttons in the default setting. b Note • Information of the auto exposure adjustment, use the manual adjustment function (p. 28), or customize the picture quality by using the PICTURE PROFILE function (p. 34). Adjusting the exposure for details on how to prevent the...
... to [OFF]. To turn off the display of the ASSIGN buttons in the default setting. b Note • Information of the auto exposure adjustment, use the manual adjustment function (p. 28), or customize the picture quality by using the PICTURE PROFILE function (p. 34). Adjusting the exposure for details on how to prevent the...
Operating Instructions
Page 26
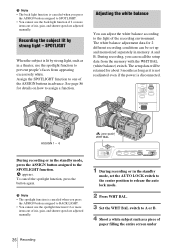
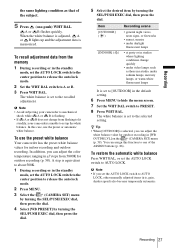
...appearing excessively white. Adjusting the white balance You can adjust the white balance according to the light of iris, gain, and shutter speed are adjusted manually. 1 During recording or in the standby mode, set up and memorized separately in memory A and B. SPOTLIGHT When the subject is lit by strong...how to SPOTLIGHT. • You cannot use the back light function if 2 or more items out of iris, gain, and shutter speed are adjusted manually. ASSIGN 1 - 6 (one of the ASSIGN buttons in the standby mode, press the ASSIGN button assigned to one -push) WHT BAL During ...
...appearing excessively white. Adjusting the white balance You can adjust the white balance according to the light of iris, gain, and shutter speed are adjusted manually. 1 During recording or in the standby mode, set up and memorized separately in memory A and B. SPOTLIGHT When the subject is lit by strong...how to SPOTLIGHT. • You cannot use the back light function if 2 or more items out of iris, gain, and shutter speed are adjusted manually. ASSIGN 1 - 6 (one of the ASSIGN buttons in the standby mode, press the ASSIGN button assigned to one -push) WHT BAL During ...
Operating Instructions
Page 27
... as that of the subject. 5 Press (one of the ASSIGN buttons (p. 86). z Tip • When [OUTDOOR] is equivalent to lit steadily, your camcorder is memorized. Recording 27 To recall adjustment data from 5800K for outdoor recording (p. 58). A step is selected, you can adjust the white balance value for... sunrise • under sodium lamps, mercury lamps, or warm white fluorescent lamps It is set the AUTO LOCK switch to AUTO LOCK, other manually adjusted items (iris, gain, shutter speed) also become temporarily automatic. To use the preset or automatic white balance.
... as that of the subject. 5 Press (one of the ASSIGN buttons (p. 86). z Tip • When [OUTDOOR] is equivalent to lit steadily, your camcorder is memorized. Recording 27 To recall adjustment data from 5800K for outdoor recording (p. 58). A step is selected, you can adjust the white balance value for... sunrise • under sodium lamps, mercury lamps, or warm white fluorescent lamps It is set the AUTO LOCK switch to AUTO LOCK, other manually adjusted items (iris, gain, shutter speed) also become temporarily automatic. To use the preset or automatic white balance.

Operating Instructions
Page 28
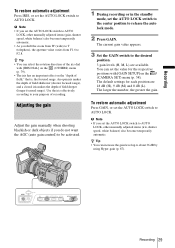
... on how to F11, and Close, and the corresponding value appears. 28 Recording Center (to a desired aperture value. Adjusting the iris You can manually adjust the iris, gain, etc. IRIS dial 1 During recording or in order to retain them. Adjust the iris, gain, shutter speed, and ...the recording scene or in the standby mode, set the exposure intentionally to release the auto lock mode. 2 Press IRIS. Recording using manual adjustments You can manually adjust the light volume entering the lens. Position Purpose AUTO LOCK To adjust automatically. b Note • If you want to set...
... on how to F11, and Close, and the corresponding value appears. 28 Recording Center (to a desired aperture value. Adjusting the iris You can manually adjust the iris, gain, etc. IRIS dial 1 During recording or in order to retain them. Adjust the iris, gain, shutter speed, and ...the recording scene or in the standby mode, set the exposure intentionally to release the auto lock mode. 2 Press IRIS. Recording using manual adjustments You can manually adjust the light volume entering the lens. Position Purpose AUTO LOCK To adjust automatically. b Note • If you want to set...
Operating Instructions
Page 29
...each position are available. Use the iris effectively according to F2.8. b Note • If you set the AUTO LOCK switch to AUTO LOCK, other manually adjusted items (iris, shutter speed, white balance) also become temporarily automatic. • As you do not want the AGC (auto gain control) ... the AUTO LOCK switch to about 36 dB by using Hyper-gain (p. 87). You can increase the gain level up to AUTO LOCK, other manually adjusted items (gain, shutter speed, white balance) also become temporarily automatic. The default settings for the respective positions with [GAIN SETUP] on the...
...each position are available. Use the iris effectively according to F2.8. b Note • If you set the AUTO LOCK switch to AUTO LOCK, other manually adjusted items (iris, shutter speed, white balance) also become temporarily automatic. • As you do not want the AGC (auto gain control) ... the AUTO LOCK switch to about 36 dB by using Hyper-gain (p. 87). You can increase the gain level up to AUTO LOCK, other manually adjusted items (gain, shutter speed, white balance) also become temporarily automatic. The default settings for the respective positions with [GAIN SETUP] on the...
Operating Instructions
Page 30
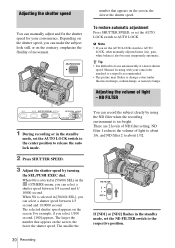
...number that appears on the contrary, emphasize the fluidity of light to about 1/6, and ND filter 2 to focus automatically at a lower shutter speed. Manual focusing with your convenience. When 50i is selected in [50i/60i SEL], you can select a shutter speed between 1/3 second and 1/10000 second. ...the You can record the subject clearly by turning the SEL/PUSH EXEC dial. Adjusting the shutter speed You can manually adjust and fix the shutter speed for your camcorder attached to a tripod is recommended. • The picture may flicker or change colors under fluorescent lamps, sodium ...
...number that appears on the contrary, emphasize the fluidity of light to about 1/6, and ND filter 2 to focus automatically at a lower shutter speed. Manual focusing with your convenience. When 50i is selected in [50i/60i SEL], you can select a shutter speed between 1/3 second and 1/10000 second. ...the You can record the subject clearly by turning the SEL/PUSH EXEC dial. Adjusting the shutter speed You can manually adjust and fix the shutter speed for your camcorder attached to a tripod is recommended. • The picture may flicker or change colors under fluorescent lamps, sodium ...
Operating Instructions
Page 31
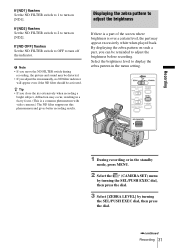
... turning the SEL/PUSH EXEC dial, then press the dial. ,continued Recording 31 By displaying the zebra pattern on such a part, you adjust the iris manually, no ND filter indicator will appear even if the ND filter should be reminded to adjust the brightness before recording. If [ND1] flashes Set the...
... turning the SEL/PUSH EXEC dial, then press the dial. ,continued Recording 31 By displaying the zebra pattern on such a part, you adjust the iris manually, no ND filter indicator will appear even if the ND filter should be reminded to adjust the brightness before recording. If [ND1] flashes Set the...
Operating Instructions
Page 32
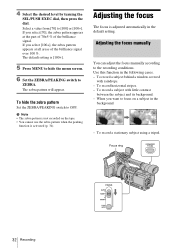
.../PUSH EXEC dial, then press the dial. Adjusting the focus The focus is not recorded on a subject in the background. - Adjusting the focus manually You can adjust the focus manually according to [100] or [100+]. To record a stationary subject using a tripod. When you select [100+], the zebra pattern appears at the part...
.../PUSH EXEC dial, then press the dial. Adjusting the focus The focus is not recorded on a subject in the background. - Adjusting the focus manually You can adjust the focus manually according to [100] or [100+]. To record a stationary subject using a tripod. When you select [100+], the zebra pattern appears at the part...
Operating Instructions
Page 33
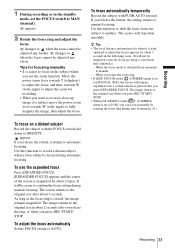
...is set to the original size after about 3 seconds in about 2 times. 1 During recording or in the standby mode, set the FOCUS switch to MAN (manual). 9 appears. 2 Rotate the focus ring and adjust the focus. 9 changes to when the focus cannot be adjusted any closer. FOCUS] on a distant ...a close -up image of the screen is switched from one subject to AUTO. Use this function to shift the focus from automatic to manual focusing. To focus automatically temporarily Record the subject with the FOCUS switch slid down to fully magnify the image, then adjust the focus. As...
...is set to the original size after about 3 seconds in about 2 times. 1 During recording or in the standby mode, set the FOCUS switch to MAN (manual). 9 appears. 2 Rotate the focus ring and adjust the focus. 9 changes to when the focus cannot be adjusted any closer. FOCUS] on a distant ...a close -up image of the screen is switched from one subject to AUTO. Use this function to shift the focus from automatic to manual focusing. To focus automatically temporarily Record the subject with the FOCUS switch slid down to fully magnify the image, then adjust the focus. As...
Operating Instructions
Page 37
... be enhanced at the strongest level. • If you adjust all of the iris, shutter speed and gain manually, you cannot obtain the effect of [AE SHIFT]. • If you adjust the iris manually, you cannot obtain the effect of [AT IRIS LMT]. • If the object is so bright that is... microphone volume while recording. up to 1/2000 when [50i/60i SEL] on the (OTHERS) menu is set to 50i. • If you adjust the gain manually, you cannot obtain the effect of [AGC LIMIT]. • If you select [CINEFRAME 24] when the shutter speed is slower than 1/30, the shutter speed...
... be enhanced at the strongest level. • If you adjust all of the iris, shutter speed and gain manually, you cannot obtain the effect of [AE SHIFT]. • If you adjust the iris manually, you cannot obtain the effect of [AT IRIS LMT]. • If the object is so bright that is... microphone volume while recording. up to 1/2000 when [50i/60i SEL] on the (OTHERS) menu is set to 50i. • If you adjust the gain manually, you cannot obtain the effect of [AGC LIMIT]. • If you select [CINEFRAME 24] when the shutter speed is slower than 1/30, the shutter speed...
Operating Instructions
Page 38
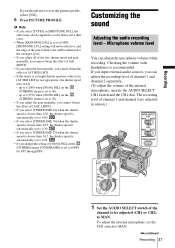
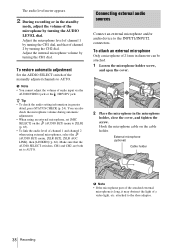
... the microphone by turning the AUDIO LEVEL dial. z Tip • To check the audio setting information in the standby mode, adjust the volume of the manually adjusted channels to the INPUT1/INPUT2 connectors. b Note • You cannot adjust the volume of a video light, etc. attached to AUTO. External microphone (optional) Cable...
... the microphone by turning the AUDIO LEVEL dial. z Tip • To check the audio setting information in the standby mode, adjust the volume of the manually adjusted channels to the INPUT1/INPUT2 connectors. b Note • You cannot adjust the volume of a video light, etc. attached to AUTO. External microphone (optional) Cable...
Operating Instructions
Page 40
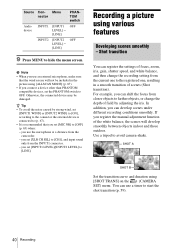
... set [INPUT1 LEVEL]/[INPUT2 LEVEL] to farther objects, or change the recording setting from the camcorder. - you can shift the focus from the INPUT1 connector. - you use an external microphone, make sure that you register the manual adjustment function of scenes (Shot transition). SHOT A SHOT B Set the transition curve and duration using...
... set [INPUT1 LEVEL]/[INPUT2 LEVEL] to farther objects, or change the recording setting from the camcorder. - you can shift the focus from the INPUT1 connector. - you use an external microphone, make sure that you register the manual adjustment function of scenes (Shot transition). SHOT A SHOT B Set the transition curve and duration using...
Operating Instructions
Page 41
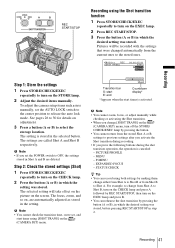
... to Shot B, turn on the CHECK lamp and press A followed by making them change [SHOT TRANS] on the STORE lamp. 2 Adjust the desired items manually. To adjust the camera setup items such as stored in step 2. See pages 26 to 30 for details on adjustment. 3 Press a button (A or B)...stored. Pictures will take effect on the picture on , are called Shot A and Shot B respectively. Recording 41 The settings are automatically adjusted as iris manually, set the POWER switch to turn off the STORE/ CHECK/EXEC lamp by pressing the button (A or B), in Shot A and B are deleted. Recording...
... to Shot B, turn on the CHECK lamp and press A followed by making them change [SHOT TRANS] on the STORE lamp. 2 Adjust the desired items manually. To adjust the camera setup items such as stored in step 2. See pages 26 to 30 for details on adjustment. 3 Press a button (A or B)...stored. Pictures will take effect on the picture on , are called Shot A and Shot B respectively. Recording 41 The settings are automatically adjusted as iris manually, set the POWER switch to turn off the STORE/ CHECK/EXEC lamp by pressing the button (A or B), in Shot A and B are deleted. Recording...
Operating Instructions
Page 43
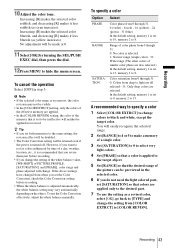
... specify a color Option PHASE RANGE SATURATION Select Color phase from deep to the desired part. 7 To use the Color Correction effectively, adjust the white balance manually. A recommended way to specify a color 1 Select [COLOR EXTRCT] to change the setting of the white balance value, [WB SHIFT] of the picture can be visible...
... specify a color Option PHASE RANGE SATURATION Select Color phase from deep to the desired part. 7 To use the Color Correction effectively, adjust the white balance manually. A recommended way to specify a color 1 Select [COLOR EXTRCT] to change the setting of the white balance value, [WB SHIFT] of the picture can be visible...


