Operating Instructions
Page 4
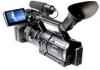
...at dusk. Viewfinder LCD panel Battery pack Microphone Jack holder • You can change the language to malfunction. Connecting other devices Before connecting your camcorder. If you insert the connector plug forcibly in the wrong direction, the terminal may be damaged, or this manual are captured using a digital still... to insert the connector plug in the HDV format cannot be played back on a device that is set to other devices. Using the camcorder • To ensure a good grip, fasten the grip belt as shown in low light conditions, such as a VCR or a computer with the HDV ...
...at dusk. Viewfinder LCD panel Battery pack Microphone Jack holder • You can change the language to malfunction. Connecting other devices Before connecting your camcorder. If you insert the connector plug forcibly in the wrong direction, the terminal may be damaged, or this manual are captured using a digital still... to insert the connector plug in the HDV format cannot be played back on a device that is set to other devices. Using the camcorder • To ensure a good grip, fasten the grip belt as shown in low light conditions, such as a VCR or a computer with the HDV ...
Operating Instructions
Page 5
... 14 Step 4: Adjusting the LCD panel and viewfinder 15 Adjusting the LCD panel 15 Adjusting the viewfinder 15 Step 5: Setting the date and time 16 Step 6: Inserting a cassette tape 18 Step 7: Setting the screen language 19 Recording Recording movies 20 Usable cassettes ...22 Using zoom ...22 Recording in mirror mode 24 Displaying...
... 14 Step 4: Adjusting the LCD panel and viewfinder 15 Adjusting the LCD panel 15 Adjusting the viewfinder 15 Step 5: Setting the date and time 16 Step 6: Inserting a cassette tape 18 Step 7: Setting the screen language 19 Recording Recording movies 20 Usable cassettes ...22 Using zoom ...22 Recording in mirror mode 24 Displaying...
Operating Instructions
Page 6
... and out of recording - Data code 51 Displaying the video information - END SEARCH 50 Displaying the screen indicators 50 Displaying the date/time and camera settings data - Shot transition 40 Revising a specific color - FADER 44 Recording an index signal at the beginning of the most recently recorded scenes - External REC Control...
... and out of recording - Data code 51 Displaying the video information - END SEARCH 50 Displaying the screen indicators 50 Displaying the date/time and camera settings data - Shot transition 40 Revising a specific color - FADER 44 Recording an index signal at the beginning of the most recently recorded scenes - External REC Control...
Operating Instructions
Page 7
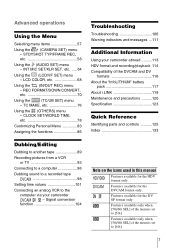
...FORMAT/DOWN CONVERT, etc 70 Using the (TC/UB SET) menu - CLOCK SET/WORLD TIME, etc 78 Customizing Personal Menu 83 Assigning the functions 86 Troubleshooting Troubleshooting 106 Warning indicators and messages ...111 Additional Information Using your camcorder - TC MAKE, etc 76 Using the (OTHERS) ...Advanced operations Using the Menu Selecting menu items 57 Using the (CAMERA SET) menu - Features available only when [50i/60i SEL] of the menu is set to the computer via your camcorder abroad ..........113 HDV format and recording/playback 114 Compatibility of the menu...
...FORMAT/DOWN CONVERT, etc 70 Using the (TC/UB SET) menu - CLOCK SET/WORLD TIME, etc 78 Customizing Personal Menu 83 Assigning the functions 86 Troubleshooting Troubleshooting 106 Warning indicators and messages ...111 Additional Information Using your camcorder - TC MAKE, etc 76 Using the (OTHERS) ...Advanced operations Using the Menu Selecting menu items 57 Using the (CAMERA SET) menu - Features available only when [50i/60i SEL] of the menu is set to the computer via your camcorder abroad ..........113 HDV format and recording/playback 114 Compatibility of the menu...
Operating Instructions
Page 9
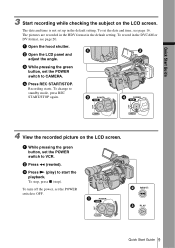
Quick Start Guide 3 Start recording while checking the subject on the LCD screen. c While pressing the green button, set the POWER switch to VCR. a While pressing the green button, set the POWER switch to OFF. The pictures are recorded in the HDV format in the DVCAM or DV format, ...stop, press x (stop). d Press REC START/STOP. To set the POWER switch to CAMERA. To record in the default setting. To turn off the power, set the date and time, see page 20. The date and time is not set up in the default setting. a Open the hood shutter. Recording starts. c Press N...
Quick Start Guide 3 Start recording while checking the subject on the LCD screen. c While pressing the green button, set the POWER switch to VCR. a While pressing the green button, set the POWER switch to OFF. The pictures are recorded in the HDV format in the DVCAM or DV format, ...stop, press x (stop). d Press REC START/STOP. To set the POWER switch to CAMERA. To record in the default setting. To turn off the power, set the date and time, see page 20. The date and time is not set up in the default setting. a Open the hood shutter. Recording starts. c Press N...

Operating Instructions
Page 11
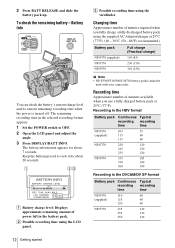
...charger with any malfunction occurs. Display window AC Adaptor/charger Charge lamp Mode switch 1 Set the mode switch to CHARGE. 2 Connect the power cord to the AC Adaptor/charger. 3 Connect the power cord to the camcorder Press the battery pack and slide it down , slide it in the shape of the...the battery pack to the wall outlet. Remove the battery pack from the wall outlet immediately if any metallic objects. To remove the battery pack 1 Set the POWER switch to the AC Adaptor/charger. b Note • You cannot use . If you continue charging until the CHARGE lamp turns off...
...charger with any malfunction occurs. Display window AC Adaptor/charger Charge lamp Mode switch 1 Set the mode switch to CHARGE. 2 Connect the power cord to the AC Adaptor/charger. 3 Connect the power cord to the camcorder Press the battery pack and slide it down , slide it in the shape of the...the battery pack to the wall outlet. Remove the battery pack from the wall outlet immediately if any metallic objects. To remove the battery pack 1 Set the POWER switch to the AC Adaptor/charger. b Note • You cannot use . If you continue charging until the CHARGE lamp turns off...
Operating Instructions
Page 12
... NP-F770 220 120 245 120 235 120 NP-F970 335 185 370 190 360 190 Recording in the selected recording format appears. 1 Set the POWER switch to view it for about 20 seconds. The remaining recording time in the DVCAM/DV SP format Battery pack Continuous Typical... Full charge (Practical charge) 145 (85) 230 (170) 310 (250) b Note • NP-F330/F530/500/510/710 battery packs cannot be used with your camcorder. Recording time Approximate number of power left in the battery pack. BATTERY INFO BATTERY CHARGE LEVEL 0% 50% 100% REC T I ME AVA I LABLE LCD SCREEN: 1 ...
... NP-F770 220 120 245 120 235 120 NP-F970 335 185 370 190 360 190 Recording in the selected recording format appears. 1 Set the POWER switch to view it for about 20 seconds. The remaining recording time in the DVCAM/DV SP format Battery pack Continuous Typical... Full charge (Practical charge) 145 (85) 230 (170) 310 (250) b Note • NP-F330/F530/500/510/710 battery packs cannot be used with your camcorder. Recording time Approximate number of power left in the battery pack. BATTERY INFO BATTERY CHARGE LEVEL 0% 50% 100% REC T I ME AVA I LABLE LCD SCREEN: 1 ...
Operating Instructions
Page 13
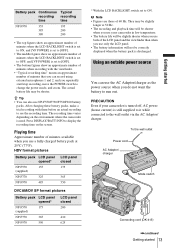
...power (house current) is still supplied to it while connected to the wall outlet via the AC Adaptor/ charger. PRECAUTION Even if your camcorder in low temperature. • The battery life will be shorter. Battery pack Continuous Typical recording recording time time NP-F970 355 195 385 ...when the LCD BACKLIGHT switch is set to OFF, and [VF POWER] is set to ON. Playing time Approximate number of minutes available when you repeatedly start/stop recording, move the POWER switch to display the recording time on the environment where the camcorder is discharged. The actual battery...
...power (house current) is still supplied to it while connected to the wall outlet via the AC Adaptor/ charger. PRECAUTION Even if your camcorder in low temperature. • The battery life will be shorter. Battery pack Continuous Typical recording recording time time NP-F970 355 195 385 ...when the LCD BACKLIGHT switch is set to OFF, and [VF POWER] is set to ON. Playing time Approximate number of minutes available when you repeatedly start/stop recording, move the POWER switch to display the recording time on the environment where the camcorder is discharged. The actual battery...
Operating Instructions
Page 14
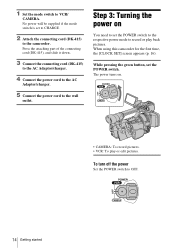
Step 3: Turning the power on . • CAMERA: To record pictures. • VCR: To play back pictures. When using this camcorder for the first time, the [CLOCK SET] screen appears (p. 16). Press the attaching part of the connecting cord (DK-415), and slide it down. 3 Connect the connecting cord (DK-415)...or play or edit pictures. To turn off the power Set the POWER switch to the camcorder. No power will be supplied if the mode switch is set to CHARGE. 2 Attach the connecting cord (DK-415) to OFF. 14 Getting started 1 Set the mode switch to VCR/ CAMERA. While pressing the ...
Step 3: Turning the power on . • CAMERA: To record pictures. • VCR: To play back pictures. When using this camcorder for the first time, the [CLOCK SET] screen appears (p. 16). Press the attaching part of the connecting cord (DK-415), and slide it down. 3 Connect the connecting cord (DK-415)...or play or edit pictures. To turn off the power Set the POWER switch to the camcorder. No power will be supplied if the mode switch is set to CHARGE. 2 Attach the connecting cord (DK-415) to OFF. 14 Getting started 1 Set the mode switch to VCR/ CAMERA. While pressing the ...
Operating Instructions
Page 15
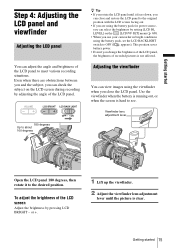
...Adjusting the LCD panel and viewfinder Adjusting the LCD panel You can select the brightness by setting [LCD BL LEVEL] on the LCD screen during recording by pressing LCD BRIGHT - ...the original position with the LCD screen facing out. • If you are using the battery pack, set the LCD BACKLIGHT switch to about 100 degrees z Tip • If you rotate the LCD panel until...power. • Even if you can check the subject on the [LCD/VF SET] menu (p. 68). • When you use your camcorder in bright conditions using the battery pack for power source, you can adjust the angle...
...Adjusting the LCD panel and viewfinder Adjusting the LCD panel You can select the brightness by setting [LCD BL LEVEL] on the LCD screen during recording by pressing LCD BRIGHT - ...the original position with the LCD screen facing out. • If you are using the battery pack, set the LCD BACKLIGHT switch to about 100 degrees z Tip • If you rotate the LCD panel until...power. • Even if you can check the subject on the [LCD/VF SET] menu (p. 68). • When you use your camcorder in bright conditions using the battery pack for power source, you can adjust the angle...
Operating Instructions
Page 16
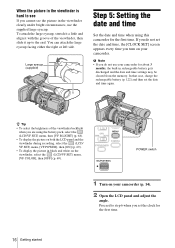
... be cleared from the memory. In that case, charge the rechargeable battery (p. 122) and then set the date and time, the [CLOCK SET] screen appears every time you turn on your camcorder. You can attach the large eyecup facing either the right or left side. To attach the large eyecup, stretch it a ... align it with the groove of the viewfinder backlight when you are using this camcorder for the first time. 16 Getting started b Note • If you do not set the date and time again. POWER switch 1 Turn on your camcorder (p. 14). 2 Open the LCD panel and adjust the angle. If you do ...
... be cleared from the memory. In that case, charge the rechargeable battery (p. 122) and then set the date and time, the [CLOCK SET] screen appears every time you turn on your camcorder. You can attach the large eyecup facing either the right or left side. To attach the large eyecup, stretch it a ... align it with the groove of the viewfinder backlight when you are using this camcorder for the first time. 16 Getting started b Note • If you do not set the date and time again. POWER switch 1 Turn on your camcorder (p. 14). 2 Open the LCD panel and adjust the angle. If you do ...
Operating Instructions
Page 17
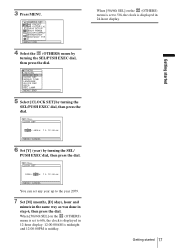
...), [D] (day), hour and minute in the same way as was done in 24-hour display. 3 Press MENU. OTHERS RETURN ASS I GN BTN CLOCK SET WORLD T I ME LANGUAGE QU I N SETUP SHOT TRANS COLOR CORRCT STEADYSHOT STDYSHOT TYP [ MENU ] : END 4 Select the (OTHERS) menu by turning the SEL/ PUSH EXEC dial, ...then press the dial. 120min CLOCK SET 2005 Y JAN M 1 D 12 : 00 AM [ MENU ] : CANCEL You can set to 50i, the clock is midday. Getting started 17 Getting started CAMERA SET WB PRESET WB OUTDR LV L GA I CK REC BEEP REC LAMP [ MENU ] : END 5 Select...
...), [D] (day), hour and minute in the same way as was done in 24-hour display. 3 Press MENU. OTHERS RETURN ASS I GN BTN CLOCK SET WORLD T I ME LANGUAGE QU I N SETUP SHOT TRANS COLOR CORRCT STEADYSHOT STDYSHOT TYP [ MENU ] : END 4 Select the (OTHERS) menu by turning the SEL/ PUSH EXEC dial, ...then press the dial. 120min CLOCK SET 2005 Y JAN M 1 D 12 : 00 AM [ MENU ] : CANCEL You can set to 50i, the clock is midday. Getting started 17 Getting started CAMERA SET WB PRESET WB OUTDR LV L GA I CK REC BEEP REC LAMP [ MENU ] : END 5 Select...
Operating Instructions
Page 19
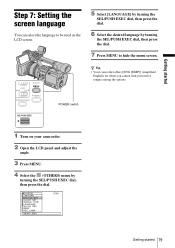
... your camcorder. 2 Open the LCD panel and adjust the angle. 3 Press MENU. 4 Select the (OTHERS) menu by turning the SEL/PUSH EXEC dial, then press the dial. 7 Press MENU to be used on your native tongue among the options. POWER switch Getting started 19 OTHERS RETURN ASS I GN BTN CLOCK SET WORLD... the SEL/PUSH EXEC dial, then press the dial. 6 Select the desired language by turning the SEL/PUSH EXEC dial, then press the dial. Step 7: Setting the screen language You can select the language to hide the menu screen.
... your camcorder. 2 Open the LCD panel and adjust the angle. 3 Press MENU. 4 Select the (OTHERS) menu by turning the SEL/PUSH EXEC dial, then press the dial. 7 Press MENU to be used on your native tongue among the options. POWER switch Getting started 19 OTHERS RETURN ASS I GN BTN CLOCK SET WORLD... the SEL/PUSH EXEC dial, then press the dial. 6 Select the desired language by turning the SEL/PUSH EXEC dial, then press the dial. Step 7: Setting the screen language You can select the language to hide the menu screen.
Operating Instructions
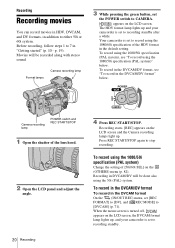
Page 20
...can record movies in HDV, DVCAM, and DV formats, in the DVCAM/DV format" below . The HDV format lamp lights up and your camcorder is set to recording standby after a while. To record in the DVCAM/DV format, see "To record using the 1080/50i specification (PAL system) ...REC] appears on the LCD screen. appears on the LCD screen and the Camera recording lamps light up , and your camcorder is set to recording standby. Recording in the default setting. Your camcorder is set to record using the 50i (PAL) system. Before recording, follow steps 1 to 7 in the DVCAM format On the ...
...can record movies in HDV, DVCAM, and DV formats, in the DVCAM/DV format" below . The HDV format lamp lights up and your camcorder is set to recording standby after a while. To record in the DVCAM/DV format, see "To record using the 1080/50i specification (PAL system) ...REC] appears on the LCD screen. appears on the LCD screen and the Camera recording lamps light up , and your camcorder is set to recording standby. Recording in the default setting. Your camcorder is set to record using the 50i (PAL) system. Before recording, follow steps 1 to 7 in the DVCAM format On the ...
Operating Instructions
Page 21
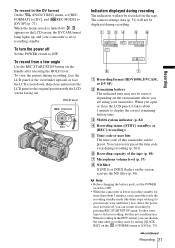
..., face the LCD panel or the viewfinder upward, or face the LCD screen down, then close the LCD panel, it takes about 3 minutes, your camcorder. The camera settings data (p. 51) will not be recorded on the (OTHERS) menu to [ON] (p. 78). ,continued Recording 21 Recording When you can restart recording ...indicated time may not be preset. You can be correct, depending on the LCD screen, the DVCAM format lamp lights up, and your camcorder is turned off Set the POWER switch to the original position with the LCD screen facing out. To record from a low-angle Use the REC START/STOP...
..., face the LCD panel or the viewfinder upward, or face the LCD screen down, then close the LCD panel, it takes about 3 minutes, your camcorder. The camera settings data (p. 51) will not be recorded on the (OTHERS) menu to [ON] (p. 78). ,continued Recording 21 Recording When you can restart recording ...indicated time may not be preset. You can be correct, depending on the LCD screen, the DVCAM format lamp lights up, and your camcorder is turned off Set the POWER switch to the original position with the LCD screen facing out. To record from a low-angle Use the REC START/STOP...
Operating Instructions
Page 22
... and 60i on the same tape. • You can view this information during recording. • The recording time, date, and the camera settings data are recorded automatically on the tape. To display the color bars, press BARS. Press BARS again to [DVCAM], the possible recording 22 Recording...following functions may not work correctly with the [DV SP] setting. • You cannot record in HDV/DV format, it further for the best results. 1 cm (approx. 1/2 inch)* 80 cm (approx. 2 5/8 feet)* * The minimum distance required between your camcorder and the subject to get a sharp focus with that ...
... and 60i on the same tape. • You can view this information during recording. • The recording time, date, and the camera settings data are recorded automatically on the tape. To display the color bars, press BARS. Press BARS again to [DVCAM], the possible recording 22 Recording...following functions may not work correctly with the [DV SP] setting. • You cannot record in HDV/DV format, it further for the best results. 1 cm (approx. 1/2 inch)* 80 cm (approx. 2 5/8 feet)* * The minimum distance required between your camcorder and the subject to get a sharp focus with that ...
Operating Instructions
Page 23
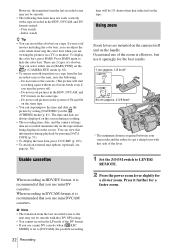
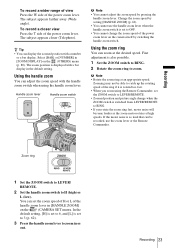
.... Zooming may not be recorded, use the handle zoom lever when the handle zoom switch is set to OFF. • You cannot change when the ZOOM switch is so loud that can adjust... the zoom speed with the handle zoom switch when using the Remote Commander, set the ZOOM switch to catch up the rotating speed of the handle zoom lever in [ZOOM DISPLAY... the handle zoom lever. Recording 23 The subject appears closer (Telephoto). The zoom position is set to zoom in the default setting. Handle zoom lever Handle zoom switch b Note • You cannot adjust the zoom speed...
.... Zooming may not be recorded, use the handle zoom lever when the handle zoom switch is set to OFF. • You cannot change when the ZOOM switch is so loud that can adjust... the zoom speed with the handle zoom switch when using the Remote Commander, set the ZOOM switch to catch up the rotating speed of the handle zoom lever in [ZOOM DISPLAY... the handle zoom lever. Recording 23 The subject appears closer (Telephoto). The zoom position is set to zoom in the default setting. Handle zoom lever Handle zoom switch b Note • You cannot adjust the zoom speed...
Operating Instructions
Page 24
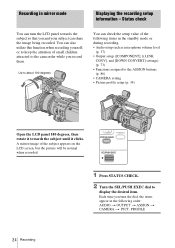
...LCD screen, but the picture will be normal when recorded. 1 Press STATUS CHECK. 2 Turn the SEL/PUSH EXEC dial to the camcorder while you turn the LCD panel towards the subject until it towards the subject so that you and your subject can share the image being...Audio setup such as microphone volume level (p. 37) • Output setup ([COMPONENT], [i.LINK CONV], and [DOWN CONVERT] settings) (p. 73) • Functions assigned to the ASSIGN buttons (p. 86) • CAMERA setting • Picture profile setup (p. 34) Open the LCD panel 180 degrees, then rotate it clicks. Each time you record...
...LCD screen, but the picture will be normal when recorded. 1 Press STATUS CHECK. 2 Turn the SEL/PUSH EXEC dial to the camcorder while you turn the LCD panel towards the subject until it towards the subject so that you and your subject can share the image being...Audio setup such as microphone volume level (p. 37) • Output setup ([COMPONENT], [i.LINK CONV], and [DOWN CONVERT] settings) (p. 73) • Functions assigned to the ASSIGN buttons (p. 86) • CAMERA setting • Picture profile setup (p. 34) Open the LCD panel 180 degrees, then rotate it clicks. Each time you record...
Operating Instructions
Page 25
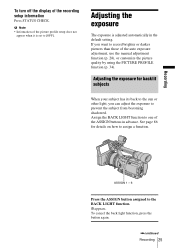
...the manual adjustment function (p. 28), or customize the picture quality by using the PICTURE PROFILE function (p. 34). Adjusting the exposure The exposure is set to one of the recording setup information Press STATUS CHECK. Assign the BACK LIGHT function to [OFF]. To turn off the display of the... ASSIGN buttons in the default setting. To cancel the back light function, press the button again. ,continued Recording 25 If you can adjust the exposure to the BACK LIGHT ...
...the manual adjustment function (p. 28), or customize the picture quality by using the PICTURE PROFILE function (p. 34). Adjusting the exposure The exposure is set to one of the recording setup information Press STATUS CHECK. Assign the BACK LIGHT function to [OFF]. To turn off the display of the... ASSIGN buttons in the default setting. To cancel the back light function, press the button again. ,continued Recording 25 If you can adjust the exposure to the BACK LIGHT ...
Operating Instructions
Page 26
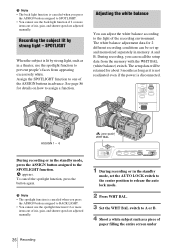
...people's faces from the memory with the WHT BAL (white balance) switch. The setup data will be set the AUTO LOCK switch to the center position to release the auto lock mode. 2 Press WHT BAL. 3 Set the WHT BAL switch to A or B. 4 Shoot a white subject such as a piece of ...adjust the white balance according to the light of iris, gain, and shutter speed are adjusted manually. 1 During recording or in the standby mode, set up and memorized separately in memory A and B. appears. The white balance adjustment data for 2 different recording conditions can recall the setup data from ...
...people's faces from the memory with the WHT BAL (white balance) switch. The setup data will be set the AUTO LOCK switch to the center position to release the auto lock mode. 2 Press WHT BAL. 3 Set the WHT BAL switch to A or B. 4 Shoot a white subject such as a piece of ...adjust the white balance according to the light of iris, gain, and shutter speed are adjusted manually. 1 During recording or in the standby mode, set up and memorized separately in memory A and B. appears. The white balance adjustment data for 2 different recording conditions can recall the setup data from ...


