
Operating Instructions
Page 10
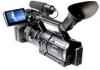
... Adaptor/charger (1) Large eyecup (1) To attach it to your camcorder, see page 131. Lens hood (1) This is attached to your camcorder, see page 126. Getting started The number in the Remote Commander, see page 130. Cleaning cassette (1) Shoulder strap (1) To attach it to your camcorder. Operating... an optical filter (optional) or so, remove the lens hood. b Note • If you have following items supplied with your camcorder, see page 16. Wireless Remote Commander (1) Power cord (1) A/V connecting cable (1) Component video cable (1) Connecting cord (DK-415) (1) ...
... Adaptor/charger (1) Large eyecup (1) To attach it to your camcorder, see page 131. Lens hood (1) This is attached to your camcorder, see page 126. Getting started The number in the Remote Commander, see page 130. Cleaning cassette (1) Shoulder strap (1) To attach it to your camcorder. Operating... an optical filter (optional) or so, remove the lens hood. b Note • If you have following items supplied with your camcorder, see page 16. Wireless Remote Commander (1) Power cord (1) A/V connecting cable (1) Component video cable (1) Connecting cord (DK-415) (1) ...

Operating Instructions
Page 11
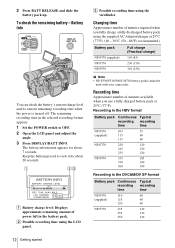
... lights up in the direction of the arrow. Display window AC Adaptor/charger Charge lamp Mode switch 1 Set the mode switch to CHARGE. 2 Connect the power cord to the AC Adaptor/charger. 3 Connect the power cord to the camcorder Press the battery pack and slide it in the shape of the AC... Adaptor/ charger with any malfunction occurs. To attach the battery pack to the wall outlet. Remove the...
... lights up in the direction of the arrow. Display window AC Adaptor/charger Charge lamp Mode switch 1 Set the mode switch to CHARGE. 2 Connect the power cord to the AC Adaptor/charger. 3 Connect the power cord to the camcorder Press the battery pack and slide it in the shape of the AC... Adaptor/ charger with any malfunction occurs. To attach the battery pack to the wall outlet. Remove the...
Operating Instructions
Page 12
...charge) 145 (85) 230 (170) 310 (250) b Note • NP-F330/F530/500/510/710 battery packs cannot be used with your camcorder. 2 Press BATT RELEASE and slide the battery pack up. To check the remaining battery - BATTERY INFO BATTERY CHARGE LEVEL 0% 50% 100% REC...Battery charge level: Displays approximate remaining amount of minutes available when you fully charge a fully discharged battery pack using the supplied AC Adaptor/charger at 25°C (77°F). Recording time Approximate number of power left in the battery pack. The remaining recording time in the DVCAM...
...charge) 145 (85) 230 (170) 310 (250) b Note • NP-F330/F530/500/510/710 battery packs cannot be used with your camcorder. 2 Press BATT RELEASE and slide the battery pack up. To check the remaining battery - BATTERY INFO BATTERY CHARGE LEVEL 0% 50% 100% REC...Battery charge level: Displays approximate remaining amount of minutes available when you fully charge a fully discharged battery pack using the supplied AC Adaptor/charger at 25°C (77°F). Recording time Approximate number of power left in the battery pack. The remaining recording time in the DVCAM...
Operating Instructions
Page 13
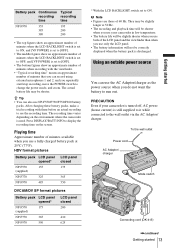
...Playing time Approximate number of minutes that you can use NP-F550/F730/F750/F960 battery packs. To the wall outlet Power cord AC Adaptor/ charger Mode switch Connecting cord (DK-415) ,continued Getting started 13 Getting started Press DISPLAY/BATT INFO to change the power mode, and zoom. After...minutes when the LCD BACKLIGHT switch is set to OFF, and [VF POWER] is set to the wall outlet via the AC Adaptor/ charger. PRECAUTION Even if your camcorder in low temperature. • The battery life will be slightly shorter when you use only the LCD panel. • The battery ...
...Playing time Approximate number of minutes that you can use NP-F550/F730/F750/F960 battery packs. To the wall outlet Power cord AC Adaptor/ charger Mode switch Connecting cord (DK-415) ,continued Getting started 13 Getting started Press DISPLAY/BATT INFO to change the power mode, and zoom. After...minutes when the LCD BACKLIGHT switch is set to OFF, and [VF POWER] is set to the wall outlet via the AC Adaptor/ charger. PRECAUTION Even if your camcorder in low temperature. • The battery life will be slightly shorter when you use only the LCD panel. • The battery ...
Operating Instructions
Page 14
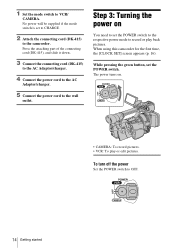
... part of the connecting cord (DK-415), and slide it down. 3 Connect the connecting cord (DK-415) to the AC Adaptor/charger. 4 Connect the power cord to the AC Adaptor/charger. 5 Connect the power cord to OFF. 14 Getting started The power turns on You need to set the POWER switch to.... 2 Attach the connecting cord (DK-415) to VCR/ CAMERA. To turn off the power Set the POWER switch to the wall outlet. When using this camcorder for the first time, the [CLOCK SET] screen appears (p. 16). Step 3: Turning the power on . • CAMERA: To record pictures. • VCR: To play back...
... part of the connecting cord (DK-415), and slide it down. 3 Connect the connecting cord (DK-415) to the AC Adaptor/charger. 4 Connect the power cord to the AC Adaptor/charger. 5 Connect the power cord to OFF. 14 Getting started The power turns on You need to set the POWER switch to.... 2 Attach the connecting cord (DK-415) to VCR/ CAMERA. To turn off the power Set the POWER switch to the wall outlet. When using this camcorder for the first time, the [CLOCK SET] screen appears (p. 16). Step 3: Turning the power on . • CAMERA: To record pictures. • VCR: To play back...
Operating Instructions
Page 52
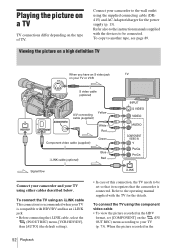
...type of this connection, the TV needs to be connected. When the picture recorded in the HDV format, set so that it recognizes that the camcorder is compatible with HDV/DV and has an i.LINK jack. • Before connecting the i.LINK cable, select the (IN/OUT REC) menu, ...LINK cable (optional) Blue Red Signal flow Connect your camcorder and your TV (p. 73). To connect the TV using an i.LINK cable This connection is recommended when your camcorder to your TV using the supplied connecting cable (DK415) and AC Adaptor/charger for the details. Connect your TV is connected. Refer...
...type of this connection, the TV needs to be connected. When the picture recorded in the HDV format, set so that it recognizes that the camcorder is compatible with HDV/DV and has an i.LINK jack. • Before connecting the i.LINK cable, select the (IN/OUT REC) menu, ...LINK cable (optional) Blue Red Signal flow Connect your camcorder and your TV (p. 73). To connect the TV using an i.LINK cable This connection is recommended when your camcorder to your TV using the supplied connecting cable (DK415) and AC Adaptor/charger for the details. Connect your TV is connected. Refer...

Operating Instructions
Page 105
... or its on-line help for details. • You cannot import pictures that have been recorded using the supplied connecting cable (DK415) and AC Adaptor/charger for the power supply. 3 Press MENU. 4 Select the (IN/OUT REC) menu by turning the SEL/PUSH EXEC dial, then press the dial.... computer, and stop playback on the analog device. 2 Set the POWER switch to your camcorder. b Note • Your camcorder may not be able to output the signal to a computer via your camcorder to the wall outlet using a copyright protection signal to the computer correctly depending on the computer...
... or its on-line help for details. • You cannot import pictures that have been recorded using the supplied connecting cable (DK415) and AC Adaptor/charger for the power supply. 3 Press MENU. 4 Select the (IN/OUT REC) menu by turning the SEL/PUSH EXEC dial, then press the dial.... computer, and stop playback on the analog device. 2 Set the POWER switch to your camcorder. b Note • Your camcorder may not be able to output the signal to a computer via your camcorder to the wall outlet using a copyright protection signal to the computer correctly depending on the computer...
Operating Instructions
Page 106
...battery pack to [ON] (p. 81). cPlug the AC Adaptor /charger to CHARGE. A clattering noise is heard when the camcorder is activated. cInsert batteries into any obstructions between the Remote Commander and the remote sensor. The camcorder gets warm. • This is because some lens functions on for...power is set to the camcorder. cRemove any problem using a sharp-pointed object. If the functions still do not work, press the RESET button using your Sony dealer. The supplied Remote Commander does not function. cDisconnect the AC Adaptor/charger from the wall outlet ...
...battery pack to [ON] (p. 81). cPlug the AC Adaptor /charger to CHARGE. A clattering noise is heard when the camcorder is activated. cInsert batteries into any obstructions between the Remote Commander and the remote sensor. The camcorder gets warm. • This is because some lens functions on for...power is set to the camcorder. cRemove any problem using a sharp-pointed object. If the functions still do not work, press the RESET button using your Sony dealer. The supplied Remote Commander does not function. cDisconnect the AC Adaptor/charger from the wall outlet ...
Operating Instructions
Page 107
cFully charge the battery again. The power turns off the power, and disconnect the AC Adaptor/charger from the compartment. A problem occurs when the camcorder is connected to operate. • A problem has occurred in the remaining battery time indicator, or the battery pack has not been charged enough. The Cassette ...
cFully charge the battery again. The power turns off the power, and disconnect the AC Adaptor/charger from the compartment. A problem occurs when the camcorder is connected to operate. • A problem has occurred in the remaining battery time indicator, or the battery pack has not been charged enough. The Cassette ...
Operating Instructions
Page 113
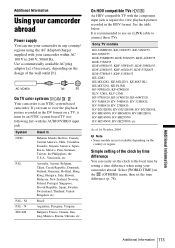
...the Philippines, the U.S.A., Venezuela, etc. Additional Information Additional Information 113 If you want to view playback pictures recorded in the HDV format. Sony TV models KD-34XBR960, KD-36XS955, KD-34XS955, KD-30XS955 KDE-55XBR950, KDE-50XS955, KDE-42XS955, KDE-37XS955 KDF-60WE655, KDF... on the (OTHERS) menu, then set the clock to the local time by setting a time difference when using the AC Adaptor/charger supplied with your camcorder within AC 100 V to connect these TVs. Brazil Argentina, Paraguay, Uruguay Bulgaria, France, Guiana, Iran, Iraq, Monaco, Russia,...
...the Philippines, the U.S.A., Venezuela, etc. Additional Information Additional Information 113 If you want to view playback pictures recorded in the HDV format. Sony TV models KD-34XBR960, KD-36XS955, KD-34XS955, KD-30XS955 KDE-55XBR950, KDE-50XS955, KDE-42XS955, KDE-37XS955 KDF-60WE655, KDF... on the (OTHERS) menu, then set the clock to the local time by setting a time difference when using the AC Adaptor/charger supplied with your camcorder within AC 100 V to connect these TVs. Brazil Argentina, Paraguay, Uruguay Bulgaria, France, Guiana, Iran, Iraq, Monaco, Russia,...
Operating Instructions
Page 117
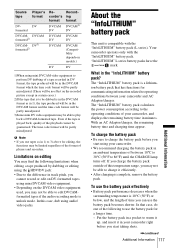
.... • Depending on models.) DV 1)When using the HDV/DV jack: • Due to charge it in your camcorder and AC Adaptor/charger. In this temperature range, you may be limited regardless of the format of the following limitations when editing a tape produced ...InfoLITHIUM" L series battery packs have the mark. The "InfoLITHIUM" battery pack calculates the power consumption according to the operating conditions of your camcorder. • We recommend charging the battery pack in an ambient temperature of time you start using audio/ video jacks. The "InfoLITHIUM" battery...
.... • Depending on models.) DV 1)When using the HDV/DV jack: • Due to charge it in your camcorder and AC Adaptor/charger. In this temperature range, you may be limited regardless of the format of the following limitations when editing a tape produced ...InfoLITHIUM" L series battery packs have the mark. The "InfoLITHIUM" battery pack calculates the power consumption according to the operating conditions of your camcorder. • We recommend charging the battery pack in an ambient temperature of time you start using audio/ video jacks. The "InfoLITHIUM" battery...
Operating Instructions
Page 120
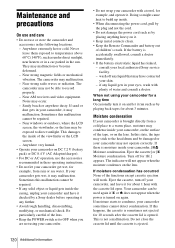
...ejection will not appear when the moisture condenses on DC 7.2 V (battery pack) or DC 8.4 V (AC Adaptor/charger). • For DC or AC operation, use or store the camcorder and accessories in your eyes, wash with plenty of the viewfinder or the LCD screen. - Near strong radio waves or... the power is not a malfunction. wash off for 1H.] appears. If there is opened. If moisture starts to condense, your local authorized Sony service facility. - If your camcorder gets wet, it . • Keep metal contacts clean. • Keep the Remote Commander and battery out of the lens. •...
...ejection will not appear when the moisture condenses on DC 7.2 V (battery pack) or DC 8.4 V (AC Adaptor/charger). • For DC or AC operation, use or store the camcorder and accessories in your eyes, wash with plenty of the viewfinder or the LCD screen. - Near strong radio waves or... the power is not a malfunction. wash off for 1H.] appears. If there is opened. If moisture starts to condense, your local authorized Sony service facility. - If your camcorder gets wet, it . • Keep metal contacts clean. • Keep the Remote Commander and battery out of the lens. •...

Operating Instructions
Page 122
...The battery will be affected if you are using the supplied AC Adaptor/charger, and leave it in an optimum state for more than 24 hours. It is recommended you operate your camcorder about 3 months if you do not use your camcorder at all. Removing dust from inside the viewfinder 1 Remove the viewfinder.... the viewfinder and the part shown below with the POWER switch set to OFF for a long time. To charge the pre-installed battery Your camcorder has a pre-installed battery to retain the date, time, and other settings even when the POWER switch is always charged while you do not...
...The battery will be affected if you are using the supplied AC Adaptor/charger, and leave it in an optimum state for more than 24 hours. It is recommended you operate your camcorder about 3 months if you do not use your camcorder at all. Removing dust from inside the viewfinder 1 Remove the viewfinder.... the viewfinder and the part shown below with the POWER switch set to OFF for a long time. To charge the pre-installed battery Your camcorder has a pre-installed battery to retain the date, time, and other settings even when the POWER switch is always charged while you do not...

Operating Instructions
Page 124
...: HDV recording 8.5 W at 60 Hz operation* DVCAM (DV) recording 8.1 W at 60 Hz operation* * Power consumption at 50 Hz operation will be slightly lower. AC Adaptor/charger AC-VQ850 Power requirements AC 100 - 240 V, 50/60 Hz, 12/24 V DC (only for negative grounded cars) Current consumption 0.35 - 0.18 A Power consumption 25...
...: HDV recording 8.5 W at 60 Hz operation* DVCAM (DV) recording 8.1 W at 60 Hz operation* * Power consumption at 50 Hz operation will be slightly lower. AC Adaptor/charger AC-VQ850 Power requirements AC 100 - 240 V, 50/60 Hz, 12/24 V DC (only for negative grounded cars) Current consumption 0.35 - 0.18 A Power consumption 25...
Operating Instructions
Page 133
... 68 LCD screen 3 ,continued Quick Reference 133 Quick Reference Index Numerics 50i/60i SEL 82 A A/V connecting cable .....53, 54, 91, 94, 98, 104 AC Adaptor/charger...........13 AE RESPONSE 61 AE SHIFT 35 AF ASSIST 61 AGC LIMIT 35 ALLSCAN MODE 88 Aperture 28 ASSIGN BTN 87 AT IRIS LMT 35...
... 68 LCD screen 3 ,continued Quick Reference 133 Quick Reference Index Numerics 50i/60i SEL 82 A A/V connecting cable .....53, 54, 91, 94, 98, 104 AC Adaptor/charger...........13 AE RESPONSE 61 AE SHIFT 35 AF ASSIST 61 AGC LIMIT 35 ALLSCAN MODE 88 Aperture 28 ASSIGN BTN 87 AT IRIS LMT 35...


